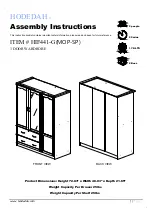


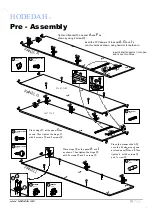


HODEDAH
®
www.Hodedah.com
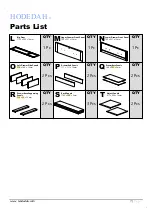
L
QTY
1 Pc
M
QTY
N
QTY
1 Pc
O
QTY
P
QTY
Q
QTY
R
QTY
S
QTY
T
QTY
2 Pcs
3 Pcs
2 Pcs
Parts List
Back Panels
1743 x 338 x 3mm
Drawer End Panels
717 x 111 x 15mm
Upper Drawer Front Panel
792 x 251 x 15mm
Drawer Base Supporting
Panels
338 x 5 6 x 15 mm
Big Door
1722 x 395 x 18mm
Adjust Panels
377 x 394 x 15mm
Drawer Base Panels
746 x 342 x 3mm
Lower Drawer Front Panel
792 x 251 x 15mm
1 Pc
2 Pcs
2 Pcs
2 Pcs
Left Drawer Side Panels
338 x 140 x 15mm


