background image

HODEDAH 

®

www.Hodedah.com

A

QTY

1 Pc

B

QTY

B1

QTY

QTY

E

QTY

F

QTY

G

QTY

QTY

I

QTY

Parts List

J

QTY

Stand Panel

1712 x 494 x 15mm

Back Strengthening Panel

570  x 76 x 15mm

Kick Panels

860 x 89 x 15mm

Top Panel

902 x 527 x 30mm

Partition Panel

570 x 493 x 15mm

Left Side Panel

1816 x 495 x 15mm

Right Side Panel

1816 x 495 x 15mm

Partition Panel

275 x 394 x 15mm

Bottom Panel

860 x 494 x 15mm

QTY

QTY

Left Door

1207 x 293 x 15mm

D

H

K

Mid Door

1207 x 293 x 15mm

1 Pc

1 Pc

1 Pc

1 Pc

1 Pc

1 Pc

1 Pc

2 Pcs

Kick Panels

432 x 76 x 15mm

C

1 Pc

1 Pc

1 Pc

Содержание HID8020-G(MOP-SP)

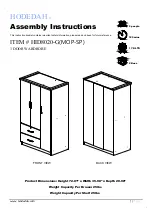
Страница 1: ...ase read and keep for future reference HODEDAH ITEM HID8020 G MOP SP 3 DOOR WARDROBE 2 people 120 mins 1 YR LTD 2 Boxs FRONT VIEW BACK VIEW www Hodedah com 1 Page Product Dimensions Height 72 01 x Wid...

Страница 2: ...ollowing original bill of sale date of purchase where the product was purchased and images if applicable Components replaced warranted through the remainder of the original warranty only The defective...

Страница 3: ...furniture it will strip and damage parts Your package should include the following hardware and parts Parts are labeled or stamped on the raw edge Please inspect contents to ensure you have received...

Страница 4: ...8 Pcs Shelf Support 14 QTY 15 QTY 16 QTY V Bracket 18 Pcs Screw M 10 X 1 2 MM 2 Pcs 17 QTY 20 QTY 21 QTY 2 Pcs Screw M6 x 40mm 22 Pcs Screw M3 5 x 14mm 56 Pcs For 19 Drawer Slides Screw M4 x 32mm 20 P...

Страница 5: ...ow the package please use the Check Box to identify the parts and hardware to ensure that you have everything you need 2 Check and measure the bolts before applying them to parts 3 Do not completely f...

Страница 6: ...Kick Panels 860 x 89 x 15mm Top Panel 902 x 527 x 30mm Partition Panel 570 x 493 x 15mm Left Side Panel 1816 x 495 x 15mm Right Side Panel 1816 x 495 x 15mm Partition Panel 275 x 394 x 15mm Bottom Pan...

Страница 7: ...x 253 x 15mm Drawer End Panels 513 x 138x 15mm Back Panels 1739 x 295 x 3mm Right Door 1722 x 293 x 15mm Left Drawer Side Panels 338 x 140 x 15mm Lower Drawer Front Panel 590 x 253 x 15mm P L 1 Pc 1 P...

Страница 8: ...HODEDAH www Hodedah com 8 Page The Breakdown x2...

Страница 9: ...mm 8 Pcs 17 Place the drawer slide A onto the 2 holes area shown at side panel A and G Then fasten it with 2 screws and 1 screw Insert the PVC dowels to panels A I and G s non thru holes using hammer...

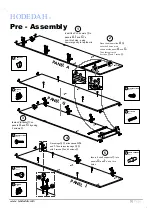
Страница 10: ...Hodedah com Pre Assembly 10 Page PANEL B PANEL E PANEL D PANEL H PANEL C PANEL B PANEL B1 Insert PVC dowels to panels B B1 C D E H Q R and U s non thru holes using hammer to gently tap them in 3 Pvc D...

Страница 11: ...x 14mm 18 Pcs Insert 6 Hinges and 3 hinges into door panels J K and L s non thru hole then fasten screws through hinges and s thru hole Fasten 2 screws from inner side of panels J K and L into the han...

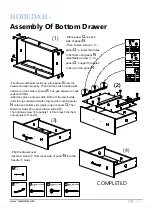
Страница 12: ...with bottom side up place panel S onto the drawer and align properly Then nail the nails provided with hammer on the border of panel S The gap between 2 nails is about 100mm After that place a drawer...

Страница 13: ...l R Flip drawer with bottom side up place panel S onto the drawer and align properly Then nail the nails provided with hammer on the border of panel S The gap between 2 nails is about 100mm After that...

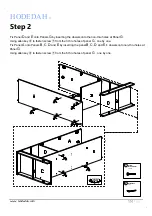
Страница 14: ...onto the respective non thru holes at Panel B Next fix Panel B1 and 2 Panels B onto panel C by inserting the dowels onto the non thru holes at Panel C Use allen key to fasten 2 screws from the thru ho...

Страница 15: ...y inserting the dowels onto the non thru holes at Panel G Using allen key to fasten screw from the 3 thru holes of panel G one by one Fix Panel A onto Panels B C D and E by inserting the panel B C D a...

Страница 16: ...o Panel G by inserting the Left dowels onto the non thru holes at Panel G Using allen key to fasten screw from the 2 thru holes of panel G Fix Panel I onto Panels B C and H by inserting the panel B C...

Страница 17: ...4 Pcs 14 Fix panel F onto panels A G and I and align properly by inserting the 6 dowels of panels A G and I onto the non thru holes of panel F Pushing and light tapping of panel F to have panel F pane...

Страница 18: ...ce iron tube onto both panels A and G s V bracket Put adjusting panels P onto shelf supports Take drawers drawers M and N and slide them the white rollers at drawer slide at both side of drawers are t...

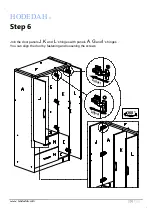
Страница 19: ...HODEDAH www Hodedah com Step 6 19 Page Adjust Adjust 360 Join the door panels J K and L s hinges with panels A G and I s hinges You can align the door by fastening and loosening the screws...

Страница 20: ...H profile by slotting one side each of panel O into the track of H profile Then align them properly for nailing Then use hammer to nail the nails one by one and at center of 4 side edges Gap between 2...

Страница 21: ...ot have to be centered Place the other mounting bracket a on the wall stud 2 inches below the mounting bracket secured to the back of your unit Attach to the wall stud using c through the smaller hole...

Страница 22: ...HODEDAH www Hodedah com Job Complete In the interest of our environment please dispose of all packaging thoughtfully 22 Page Enjoy Thank you for purchasing from Hodedah...

Отзывы: