

WWW.HOBBYEAGLE.COM 3
A3 Mini User Manual V1.0
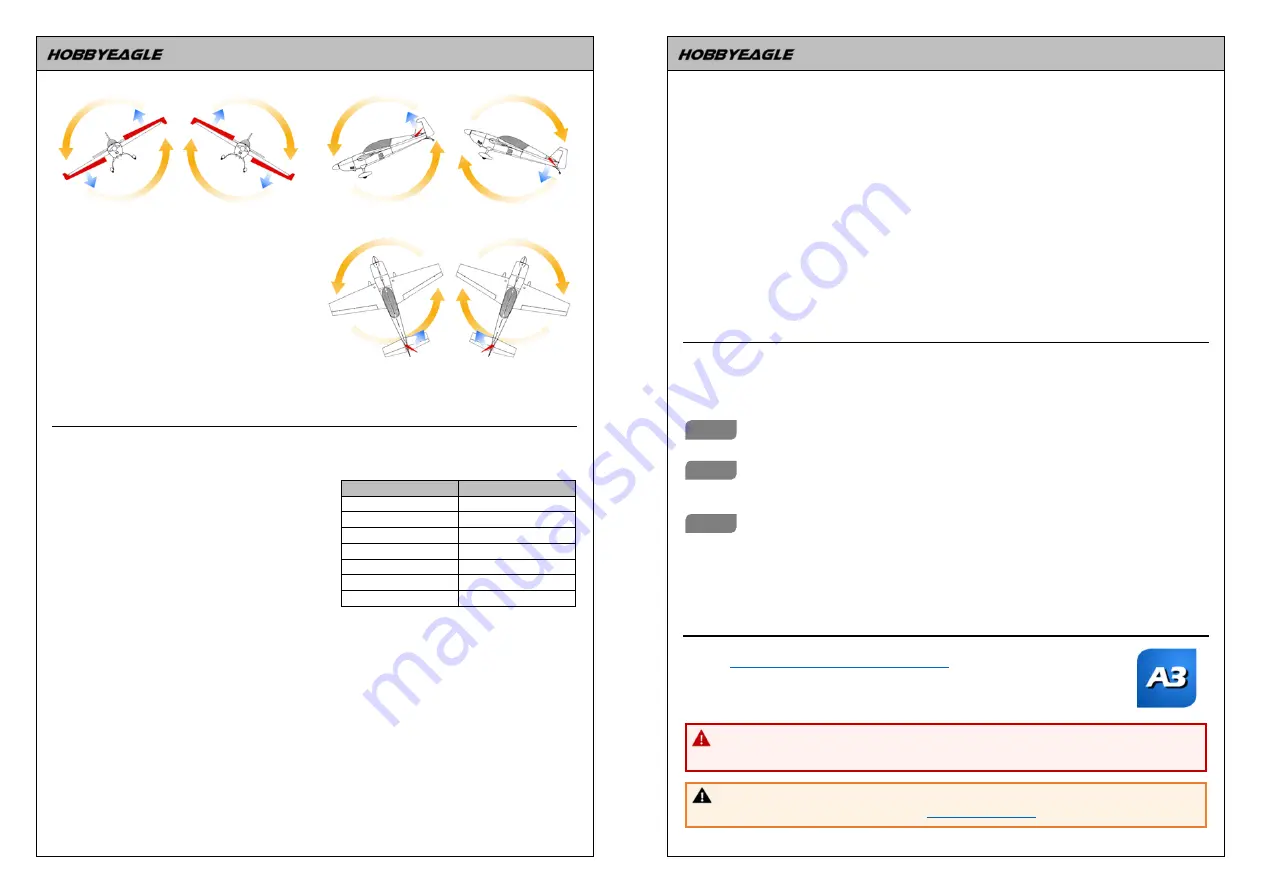
①
Check the gyro direction for Aileron
②
Check the gyro direction for Elevator
③
Check the gyro direction for Rudder
Fast Revers ing Gy ro Direction
A3 Mini also provides you a quick approach to
reverse the gyro direction without connecting it to a
PC or a programming card. For example, to reverse
the gyro direction of Aileron, press and hold the
button while moving and holding the Aileron stick
right or left for about 2 seconds, release both the
button and stick when the LED blinks White once,
then the gyro direction of Aileron will be reversed
and saved. Similarly, move the Elevator stick up or
down for Elevator channel and move the Rudder stick right or left for Rudder channel while long pressing
the button until the LED blinks White.
Flight Modes
A3 Mini provides 6 flight modes which can be switched by a 3-position switch of the transmitter during
flight. The factory default mode allocation of the switch is
NORMAL - LEVEL - ANGLE
. The color of the
LED shows the current flight mode of the gyro while in use.
1. Gy ro Off Mode
When operating in
GYRO OFF
mode the gyro will be
deactivated completely, and the airplane will be
completely under the control of your transmitter as it
was before installing the gyro. This mode is usually
used for testing purpose only.
2. NO RMAL MODE
The
NORMAL
mode, also known as the ‘
Rate mode
’, is
the most basic function of the gyro. It works based on
the rotation rate control of each axis of the airplane. When operating in this mode, the gyro will only correct
currently occurring rotational movements, a momentary reaction will be applied to the servos when the
airplane rotating on corresponding axis, after rotation the servos will move back to their neutral position as
soon as the airplane standing still immediately. The
NORMAL
mode can be used with nearly any size and
type of airplanes. It can effectively improve the stability and precision of the airplane and reduce the stall
point specially.
3. LOCK MO DE
The
LOCK
mode is also known as the ‘
Attitude Lock mode
’, ‘
3D mode
’ or ‘
AVCS mode
’. Different from
NORMAL
mode, the gyro will perform a permanent correction for rotational movements on each axis
constantly. That is when you release the sticks the airplane will stop and lock its current position
immediately. This mode is well suited for practicing basic 3D maneuvers such as hovering or knife edge.
Since it can help you to lock the attitude of the airplane, it is also helpful for landing.
4. ANG LE MODE
The
ANGLE
mode, also known as the ‘
Trainer mode
’ or ‘
Attitude mode
’, will limit the maximum angle of
the airplane on both roll and pitch axes. Roll and loop are not allowed in this mode, the airplane will be
LED Color
Flight Mode
Solid Red
GYRO OFF Mode
Solid Blue
NORMAL Mode
Blue, Flashing
LOCK Mode
Solid Violet
ANGLE Mode
Violet, Flashing
LEVEL Mode
Violet, Fast Flashing
HOVER Mode
Red, Slow Flashing
RX signal lost
WWW.HOBBYEAGLE.COM 4
A3 Mini User Manual V1.0
stabilized all the time, independent of any stick input. This prevents the airplane from being tilted into a
larger angle that may cause a danger. As soon as the sticks are released, the airplane will be brought back
to horizontal position automatically. You can use this mode as emergency rescue, or in other applications,
e.g., to have a training for new beginners or to use for FPV. You can change the maximum allowed angle
to meet your need via the PC config software or the programming card.
5. LEV EL MO DE
The
LEVEL
mode is also known as the ‘
Auto-Level mode
’, ‘
Auto-Balance mode
’ or ‘
Horizon mode
’. When
operating in this mode, the airplane will be brought to horizontal position automatically when releasing the
sticks. Different from the
ANGLE
mode, there is no maximum angle limitation in this mode and the airplane
will be stabilized only when there is no specific control input from aileron and elevator sticks. This mode
can be used if the pilot becomes disoriented and would like to save the airplane from crashing.
6. HOVER MO DE
The
HOVER
mode, also known as the ‘
Auto-Hover mode
’, provides the same functionality as the
LEVEL
mode. The only difference is that when you release the sticks, the airplane will be brought to vertical
position (nose up) and keeps hovering. This mode is designed to help you to learn hovering maneuver
and reduce the probability of crashing.
How to Perform Level and Hover Calibration
When flying in
ANGLE
mode or
LEVEL
mode, A3 Mini needs to know the angle of the airplane in both roll
and pitch directions, this is achieved by calculating the attitude of its own. A small angle deviation caused
by installation can lead to an unexpected behavior when flying in
ANGLE
mode or
LEVEL
mode. For this
reason, a level calibration is recommended to offset the error caused by installation and to establish a
proper level reference of your airplane after installing the gyro.
Before calibrating, the airplane should be placed on the horizontal ground and make the wing parallel to the
ground. Make the airplane slightly nose-up because a certain elevation angle is usually required to maintain
level flight for most airplanes.
To start calibration, click the “Level Calibration” button on the Sensor tab of the config utility, or press and
hold the button for about 2 seconds, release it when the LED lights solid White. The whole calibration
process will take you several seconds and the LED will blink Blue rapidly during calibrating. Do not move
the airplane and keep its attitude until the calibration is done.
After a successful calibration, the result will be saved and displayed on the screen, you can adjust them
manually in the future. If you get a rapid Red blinking during calibration, this means the result exceeds the
maximum permissible value (i.e. ±25deg), in this case, you have to re-install the gyro to reduce the deviation
caused by installation.
As a same reason, a hover calibration is recommended to perform after installation if you want to fly with
HOVER
mode. The procedure is quite similar to that of level calibration. The only difference is that the
airplane should be lifted vertically to the ground while calibrating instead of putting it on the ground.
THE PC Config Utility
Please download the
HobbyEagle A3 Configurator
and the
USB driver installer
from our
website:
http://www.hobbyeagle.com/a3-configurator/
.
1. The software supports Windows XP, Windows 7, Windows 8 and Windows 10 (32 or 64 bit).
2. If the installation fails, please download and install
Microsoft .NET Framework 4
first.
3. Install the USB driver before connecting the gyro to the PC.
NOTES
Use only the USB adapter and the black data cable included with this set to connect the
gyro to the PC or programming card.
NOTES
We are continuously adding features and improvements to our products. To keep up to
date with your gyro, please check our website
www.hobbyeagle.com
for the latest update firmware.
Step 1
Step 2
Step 3


