background image

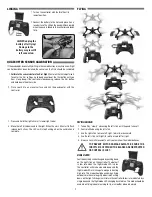
LINKING

 1.  Turn on the controller with the throttle at its 

lowest position.

 2.  Connect the battery to the Vista and place it on a 

level surface. The LED on the quad will flash rapidly 
when the quad is linked to the controller and ready 
to fly.

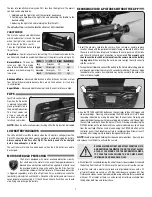
QUADCOPTER SENSOR CALIBRATION

If the quadcopter is constantly drifting in the same direction or any time a new fl ight 
control board has been installed, the sensors on the Vista should be calibrated.

 1.  

Calibrate the sensors before the fi rst fl ight.

 Center all the trim adjustments. 

To center the trim settings, hold down one side of the trim button until you 

hear a long beep. If the controller stops beeping, release the trim button 
and hold down the other side.

  2.   Place your Vista on a level surface and link the quadcopter with the 

controller.

  3.   Press and hold the right stick in its lower right corner.

  4.   Move the left stick down and to the right. When the arm LEDs start to fl ash, 

release both sticks. The LEDs will stop fl ashing when the calibration is 
complete.

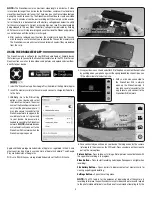
FLYING

FLYING BASICS

  1.    Take off by “slowly” advancing the left stick until the quad takes off.

  2.   Control altitude using the left stick. 

  3.    Use the right stick to move left, right, forward, or backward. 

  4.   Use the left stick (left/right) to rotate or spin left or right. 

  5.    Always use small movements until you learn how the model behaves.

TO PREVENT MOTOR DAMAGE ALWAYS BE SURE THE 
THROTTLE IS OFF WHEN THE BLADES ARE OBSTRUCTED 

OR CONTROL IS LOST.

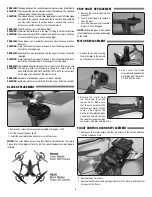
DUAL RATES

Control sensitivity can be changed by pushing down 
on the right stick on the controller. The default 
is low rate when the flight mode LED is blue. 

The controller will make a double beep and the 

flight mode LED will change to orange indicating 
high rate. This mode should be used when flying 
outdoors or when more agility is desired. Pushing 
down on the right stick again will return the controller to low rate indicated by a 
single beep and the flight mode LED changing back to blue. This mode should be 
used when flying indoors, learning to fly, or smoother video is desired. 

2

ALWAYS

 unplug the 

battery after flying!

Damage to the 

battery may result if 

left connected.

Содержание VISTA FPV

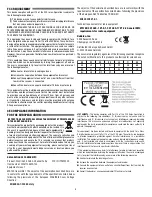
Страница 1: ... the USB port to power down while the charger is connected to the battery ALWAYS unplug the charger from the USB port and the battery when charging is complete NEVER charge a puffed or damaged battery INSTALL BATTERIES IN THE CONTROLLER Remove the screw and slide the cover down to insert the included 4 AAA batteries INSTALL THE CAMERA 1 Carefully slide the camera onto the camera mount until you fe...

Страница 2: ...op flashing when the calibration is complete FLYING FLYING BASICS 1 Take off by slowly advancing the left stick until the quad takes off 2 Control altitude using the left stick 3 Use the right stick to move left right forward or backward 4 Use the left stick left right to rotate or spin left or right 5 Always use small movements until you learn how the model behaves TO PREVENT MOTOR DAMAGE ALWAYS ...

Страница 3: ... reconnecting it If the LEDs continue to flash then you should stop flying and recharge the battery Easy Steady blue ON Normal Steady orange ON Expert Flashing orange OFF Advanced Flashing blue OFF Mode LED Stab Low High High Low Sensitivity RECORDING VIDEO PICTURES WITHOUT THE APP 1 Insert the memory card into the camera If you remove or need to replace insert as shown with the gold contact point...

Страница 4: ...ual name of the DroneView network will vary from the photo shown here It may take several seconds for the DroneView network to appear in the available network list in proximity to your device No password is needed to connect to the DroneView network NOTE Android devices will automatically connect to the DroneView WiFi network when the DroneView app is opened Apple and the Apple logo are trademarks...

Страница 5: ...ideos and pictures 180 This feature is needed when the DroneView camera is used independently of the Vista with a Power Battery Module TACZ1002 and is mounted on top of a surface rather than underneath like on the Vista The Date Code will display the current date on the FPV feed when the Date Code is turned ON The date will also be seen in video recordings and pictures in the same format as seen o...

Страница 6: ...oper installation of the memory card PROBLEM Horizontal scrolling lines appear in video or pictures SOLUTION Avoid aiming the camera directly into the sun or reflected sunlight BLADE REPLACEMENT 1 Remove the screw that secures the rotor blade to the gear shaft 2 Pull the prop off the gear shaft 3 Install the new rotor blade and secure it with the screw NOTE The rotor blades have arrows that indica...

Страница 7: ...ttery This product contains a LiPo battery that must be recycled or disposed of properly Do not leave the charger unattended while charging Disconnect the battery and unplug the charger immediately if either becomes hot However it is normal for the charger to get warm Disconnect the battery from the charger and carefully move the battery to a fireproof location if the battery begins to swell or sm...

Страница 8: ...Switch F will make the Vista flip as described in the flipping section of this manual Switch E turns the stabilization on and off Position 0 and 1 are ON and position 2 is OFF Tactic TTX850 NOTE The Tactic TTX 850 transmitter is not capable of activating the DroneView camera You will need to use the DroneView app to start and stop the camera CH5 is used to control the 3 position dual rate switch w...

Страница 9: ... is recycled in a manner that protects human health and the environment For more information about where you can drop off your waste equipment for recycling please contact your local city office your household waste disposal service or location where you purchased the product DECLARATION OF CONFORMITY Product Dromida 2 4GHz 4 Channel Tx Rx FCC ID IYFMR100 Item number DIDJ1105 MR100 Equipment class...

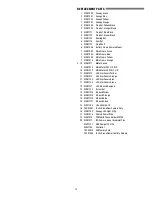
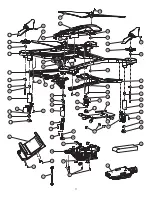
Страница 10: ...9 DIDE1218 Main Motor CW L F R R 10 DIDE1219 Main Motor CCW R F L R 11 DIDE1212 LED Arm Covers Yellow 11 DIDE1213 LED Arm Covers Orange 11 DIDE1183 LED Arm Covers Blue 11 DIDE1184 LED Arm Covers Green 12 DIDE1187 LED E Board Dampers 13 DIDE1188 Screw Set 14 DIDM1214 E board Yellow 14 DIDM1215 E Board Orange 14 DIDM1110 E Board Blue 14 DIDM1111 E Board Green 15 DIDP1105 LiPo 850mAh 1S 16 TACZ1001 T...

Страница 11: ...3 04 01 13 01 02 13 04 03 04 03 05 09 08 16 08 19 13 13 13 13 03 11 03 10 05 10 08 19 08 15 09 13 12 14 13 16 02 02 13 07 11 03 05 08 19 13 11 11 03 09 05 09 13 13 13 13 13 19 08 20 06 13 13 13 17 20 08 08 18 10 10 ...

Страница 12: ...dromida com 2015 Dromida a Hobbico company DIDE04xx v1 2 TO PREVENT MOTOR DAMAGE ALWAYS BE SURE THE THROTTLE IS OFF WHEN THE BLADES ARE OBSTRUCTED OR CONTROL IS LOST ...

Отзывы: