Hobbico TZNA1100 Скачать руководство пользователя страница 7

7


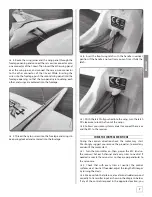
4. Route the wing joiner and the wing panel through the 

fuselage opening and connect the servo wire connector onto 
one connector of the Y-Lead. Then, insert the other wing panel 
over the wing joiner, and connect the servo wire connector 
to the other connector of the Y-Lead. While inserting the 
wires into the fuselage, push the second wing panel into the 
fuselage opening, so that the two panels are touching each 
other, and wings are centered into the fuselage.


5. Thread the nylon screw into the fuselage and wings to 

keep wings locked and centered into the fuselage. 


6. Insert the front wing latch with the handle in vertical 

position. If the handle is not vertical, you can't insert fully the 
latch. 


7. With the latch fully pushed into the wing, turn the latch 

90° clockwise to lock the front of the wings. 


8. Follows your radio system manual to connect the servos 

and the ESC to the receiver. 

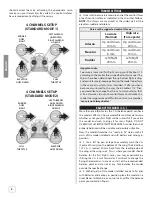
CHECK THE CONTROL DIRECTIONS

During the controls direction check, the motor may start. 
We strongly suggest you remove the propeller, to avoid any 
accident if the motor start. 


1. Turn the transmitter on, then, power the ESC (and so, 

the receiver). Set each channel and every trims to neutral. If 
needed, re-locate the servo arms so they are perpendicular to 
the servo case. 


2. Check that with every trims at neutral, the control 

surfaces are at neutral. If needed, adjust the length of linkages 
by turning the clevis.


3. Make certain that ailerons, elevator and rudder respond 

correctly to transmitter input as shown in the diagrams below. 
If any of the controls respond in the opposite direction, you 

ENGLISH

Содержание TZNA1100

Страница 1: ...ruction manual with the model 78275 EN Distributed by www hobbico de TZNA1100 E XCALIBUR 110 Rx R Technical datas E Xcalibur 110 Rx R Wingspan 1100 mm Length 777 mm Weight 470 g environ Radio 4 channe...

Страница 2: ...odel to a third party include this manual with the model Take care that you are familiar with your transmitter and all electronic components used in your plane Take care to ensure the safe operation u...

Страница 3: ...ght tested 2 I will not fly my model aircraft higher than approximately 400 feet within 3 miles of an airport without notifying the airport operator I will give right of way and avoid flying in the pr...

Страница 4: ...SYSTEM BATTERY AND CHARGER To control the E Xcalibur 110 you will require a minimum 4 channel transmitter and the matching receiver For best performance a computer transmitter is recommended such as o...

Страница 5: ...ll Product Support Service Department Revell GmbH Henschelstr 20 30 32257 Bunde Germany Tel 01805 110111 only for Germany 14 Cent Min when called from landline Mobile max 42 Cent Min Email Hobbico Ser...

Страница 6: ...servo arm WING INSTALL 1 Route the Y Lead through the wing opening of the fuselage and the fuselage canal so it goes to the front area to be connected to the receiver 2 Remove the protections of the...

Страница 7: ...he latch 7 With the latch fully pushed into the wing turn the latch 90 clockwise to lock the front of the wings 8 Follows your radio system manual to connect the servos and the ESC to the receiver CHE...

Страница 8: ...0 flies you would like to change the throws to suit your taste that is fine However too much control throw could make the model too responsive and difficult to control so remember more is not always b...

Страница 9: ...NEVER place on combustible materials or leave unattended during charge or discharge ALWAYS KEEP OUT OF REACH OF CHILDREN NEVER leave the LiPo battery unattended while charging If the battery becomes m...

Страница 10: ...so before your first flight FLYING THE E XCALIBUR 110 GENERAL The E Xcalibur 110 is a great flying model that flies smoothly and predictably However it is not a model for beginners it have a wide spe...

Страница 11: ...leg at an 20 30 m altitude With motor shutted down and retracted set landing gear down Allow the nose of the model to pitch downward slightly to gradually bleed off altitude Continue to lose altitude...

Страница 12: ...Distributed by www hobbico de...

Отзывы: