
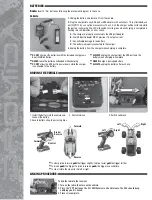


BATTERIES
Radio:
Insert 4 “AA” batteries following the placement diagram in the case.
Vehicle
1.
Unplug the battery and remove it from the vehicle.
2.
Plug the charger into any USB port or USB adapter with an output ≥ 1A (not included, use
part DIDP1125 as an optional accessory). The LED on the charger will be solid red while
the battery is charging. The LED will switch to solid green when charging is completed. A
fl ashing red LED indicates an error, check:
A.
The charger is properly connected to the USB port/adapter.
B.
Your USB port/adapter MUST provide ≥ 1A output current.
C.
Any noticable damage to the battery.
D.
The battery is properly connected to the charger.
3.
Unplug the battery from the charger when charging is complete.
•
DO NOT
charge LiPo batteries with the included charger, only
6-cell NiMH batteries.
•
NEVER
leave the battery unattended while charging.
•
DO NOT
allow the USB port to power down while the charger
is connected to the battery.
•
ALWAYS
unplug the charger from the USB port and the
battery when charging is complete.
•
NEVER
charge a damaged battery.
•
ALWAYS
unplug the battery after each use.
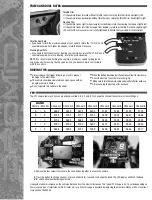
DRIVING THE VEHICLE
1. Install the battery into the vehicle and
connect the battery.
2. Secure battery strap to post using clips.
3. Switch radio on.
4. Switch vehicle on.
Forward
Left
Left
Left
Right
Right
Forward
Neutral
Brake/
Reverse
Reverse
•
To slowly drive forward,
pull
the trigger slightly. To drive faster
pull
the trigger further
•
To brake,
push
the trigger. To drive in reverse
push
the trigger a second time.
•
To steer rotate the wheel to the left or right.
LINKING PROCEDURE
To link the radio to the receiver:
1. Turn on the radio, then turn on the vehicle.
2. Press the “SW” button on the 2n1 ESC/Receiver unit and release. The ESC should beep,
notifying you it is linked.
3. Process is complete.
SW Button
n


