


❏
6. Install the battery. Connect the battery to the plug
in the fuselage. Tuck in the wires so the hatch can close.
❏
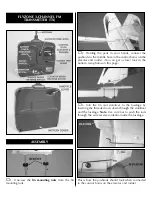
7. With the transmitter turned on, the trims centered
and the battery plugged in, view the elevator from the
rear. If necessary, bend the “Z” portion of the elevator
pushrod to get the elevator centered.
❏
8. Center the rudder the same way.
Note:
The
procedure of centering the rudder and elevator must be
done with the radio system on and the trims centered.
❏
Use a fine-point felt-tip pen to write your name,
telephone number and address directly on the model, or
write it on a piece of masking tape and apply it to
the model.
❏
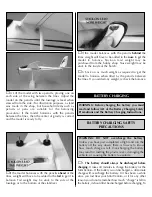
1. Use a straightedge and a fine-point felt-tip pen to
mark two lines on the bottom of the wing 1" [25mm]
and 1-1/4" [32mm] from the leading edge indicating the
balance range.
❏
2. Install the battery (it is not necessary to hook it up).
❏
3. Mount the wing to the fuselage with two
rubber bands.
BALANCE YOUR MODEL
IDENTIFY YOUR MODEL
PREFLIGHT
7


