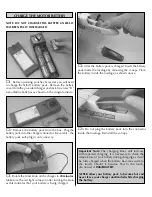
Hobbico FlyZone Sky Scream Скачать руководство пользователя страница 3

3

AIRFRAME PARTS AND HARDWARE

1

2

3

4

5

6

7
8

9

11

12

10

UNPACKING THE BOX

Check the parts against the list below. If any
parts are damaged or missing, give us a call
at: 

(217) 398-8970.

Part Name

Qty.

1. Transmitter Antenna.............1

2. Transmitter...........................1

3. Fuselage ..............................1

4. Charger................................1

5. Wing ...................................1

6. Horizontal Stabilizer............1

7. Landing Gear.......................1

8. NiMH Battery ......................1

9. Fin .......................................1

10. Screwdriver .........................1

11. Propellers ............................4

12. Wrench ...............................1
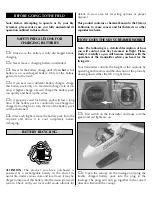
ITEMS NOT SHOWN

Part Name

Qty.

Spare Wing..........................1

Spare Tail Set .......................1

Instruction Manual ..............1

Instruction Video .................1

Содержание FlyZone Sky Scream

Страница 1: ...In no case shall Hobbico s liability exceed the original cost of the purchased model Further Hobbico reserves the right to change or modify this warranty without notice In that Hobbico has no control...

Страница 2: ...ny modifications you will void your warranty 2 Test the operation of the model before each flight to insure that all equipment is operating properly and that the model remains structurally sound 3 Fly...

Страница 3: ...missing give us a call at 217 398 8970 Part Name Qty 1 Transmitter Antenna 1 2 Transmitter 1 3 Fuselage 1 4 Charger 1 5 Wing 1 6 Horizontal Stabilizer 1 7 Landing Gear 1 8 NiMH Battery 1 9 Fin 1 10 S...

Страница 4: ...fully place the threaded shafts through the holes in the horizontal stabilizer as shown in the photo above Note Make sure the fin is placed through the horizontal stabilizer with the decals up as show...

Страница 5: ...e the landing gear wire into the the landing gear slot as shown above Install the landing gear plate over the landing gear 4 Secure the assembly with the small Phillips screw 1 Remove the two wing mou...

Страница 6: ...itter case as shown above Tighten it down clockwise until it has a snug fit Do not overtighten the antenna 2 The transmitter that controls your airplane requires eight alkaline AA batteries To install...

Страница 7: ...the knob as this indicates that your battery is being charged 4 After the battery pack is charged Insert the battery pack inside the fuselage by removing the canopy Place the battery inside the fusela...

Страница 8: ...y At the end of its useful life under various state and local laws it may be illegal to dispose of this battery into the municipal waste system Check with your local solid waste officials for details...

Страница 9: ...ght 6 Moving the right stick to the left will cause the left motor to slow down This will cause the plane to turn to the left 7 Releasing the left stick your airplane will slowly descend for landing F...

Страница 10: ...plane into the wind It should glide straight ahead and settle gently to the ground See the diagram below If your plane dives A or stalls B follow the steps included below until you have a correct path...

Страница 11: ...ottle stick forward so that both motors are running Have your assistant launch the plane into the wind 4 Allow the airplane to climb at a 20 angle for a few seconds before turning it This will allow t...

Страница 12: ...der replacement parts for your SKY SCREAMER use the order numbers in the list below Replacement parts are available only as listed Replacement parts are not available from Product Support but can be p...

Отзывы: