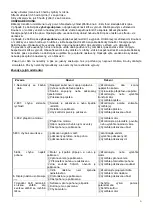
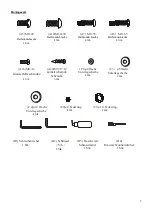
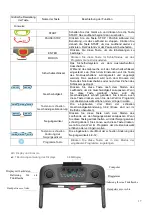
HMS ABI17-19-027 Скачать руководство пользователя страница 53

11 


Liste der Teile 
 

Nr. 

Beschreibung 

Stk. 

Nr. 

Beschreibung 

Stk. 

Nr. 

Beschreibung 

Stk. 

Hauptrahmen 

37 

Umspanner

wahlweise


A13 

Schraube

Φ8

 X

 40 

Rahmen für die 
Neigungsfunktion 

38 

Controller 

A14 

Schraube

Φ10

 X

 30 

Basis-Rahmen 

39 

Abdeckung links 1 

A15 

SchraubeΦ10

 X

 45 

Konsolenmast 
links 

40 

Abdeckung links 2 

A16 

Schraube mit 
Kreuzkopf 

M4 X12 

Konsolenmast 
rechts 

41 

Abdeckung rechts 1 

A17 

Schraube M6 X25 

Konsole 

42 

Abdeckung rechts 2 

A18 

Schraube mit 
Kreuzkopf 

M6 X30 

Handlauf 

43 

Hydraulischer 
Zylinder 

A19 

Schraube mit 
Kreuzkopf 

M3 X8 

Vordere Rolle 

44 

Seitlicher 
Stoßdämpfer 

A20 

Selbstsichernde 
Schraube ST4 X16


Hintere Rolle 

45 

Stoßdämpfer aus 
Gummi 

A21 

Selbstsichernde 
Schraube ST4.2 X12 

23 

10  Antriebsriemen 

8V 

46 

Abdeckung des 
linken 
Konsolenmasts 

A22 

Selbstsichernde 
Schraube ST4 .2X16 

11 

Platte des 
Laufbands 

47 

Abdeckung des 
rechten 
Konsolenmasts 

A23 

Selbstsichernde 
Schraube ST4.2 X35 

12  Kissen bei der 

Platte des 
Laufbands 

48 

Halterung für ein 
Tablet 

A24 

Selbstsichernde 
Schraube ST2.9 X12 

14 

13  Rolle 

49 

Fußkappe links 

A25 

Selbstsichernde 
Schraube ST4X10 

46 

14  Laufbandgurt 

50 

Fußkappe rechts 

A26 

Kreuzschlitzschraube 
mit der 
Unterlegscheibe 

M3 

X6 

10 

15  Verstellbare 

Fußstütze 

51 

Scheibe aus Gummi 


16  Seitenschiene 

links 

52 

Hülse 

B0 

Sechskantmutter M8 

17  Seitenschiene 

rechts 

53 

Hülse 2 

B1 

Nylonmutter M6 

14 

18  Stecker 

54 

Sensor, quadratisch 

B2 

Nylonmutter M8 

10 

19  Bolzen 

55 

Kabel A 

B3 

Nylonmutter M10 

20  Stoßdämpfer 

56 

Kabel B 


21  Endkappe 

J60X30  

57 

Kühlungsplatte 
(wahlweise)


C1 

Flache 
Unterlegscheibe Φ4 

14 

22  Abdeckung des 

Motors 

58 

Filter (wahlweise) 

C2 

Flache 
Unterlegscheibe Φ6 

12 

23  Untere 

Abdeckung des 
Motors 

59 

Induktor 
(wahlweise) 

C3 

Flache 
Unterlegscheibe Φ8 

19 

24  Endkappe links 


C4 

Flache 
Unterlegscheibe Φ10 

25  Endkappe rechts 

A1 

Sechskantschraube 
M5X35 

C5 

Große und flache 
Unterlegscheibe Φ4 

26  Motor 

A2 

Sechskantschraube 

C6 

Große und flache 

Содержание ABI17-19-027

Страница 1: ...BIE NIA ELEKTRYCZNA MOTORIZED TREADMILL ELEKTRICK B ECK P S ELEKTRISCHES LAUFBAND BE3601 i INSTRUKCJA U YTKOWANIA MANUAL INSTRUCTION N VOD K OBSLUZE BEDIENUNGSANLEITUNG...

Страница 2: ...ularnie sprawdzane pod wzgl dem zu ycia i uszkodze tylko wtedy b dzie ono spe nia o warunki bezpiecze stwa Szczeg ln uwag nale y zwr ci na uchwyty piankowe za lepki na nogi i tapicerk kt re ulegaj naj...

Страница 3: ...WTYCZK Z GNIAZDKA ZESTAW MONTA OWY A5 ruba M8 20 A10 ruba M10 20 A7 ruba M8 55 A8 ruba M8 65 8 szt 4 szt 4 szt 4 szt A16 M4 12 ruba z bem krzy owym 4 szt A24 ST2 9 12 ruba samoblokuj ca 6 szt C1 4 p...

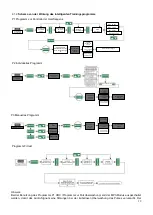
Страница 4: ...3 Schemat szczeg owy...

Страница 5: ...22 ruba samoblokuj ca ST4 2X16 7 11 P yta bie na 1 47 Os ona prawego wspornika 1 A23 ruba samoblokuj ca ST4 2 X35 2 12 Poduszka p yty bie nej 6 48 Uchwyt na tablet 1 A24 ruba samoblokuj ca ST2 9 X12 1...

Страница 6: ...ad 2 A7 P okr g a ruba M8X55 4 C11 Podk dka spr ynuj ca 10 4 32 End cap link block L 1 A8 P okr g a ruba M8X65 4 C12 Podk adka nylonowa 10 4 33 End cap link block R 1 A9 P okr g a ruba M8X50 2 D1 rubo...

Страница 7: ...jednej p askiej podk adki 8 C3 jak pokazano na rysunku 2 3 Monta wspornika kierownicy i panelu steruj cego 3 1 Przeci gnij przew d sygna owy 56 przez wspornik kierownicy a nast pnie po cz wspornik kie...

Страница 8: ...k t nachylenia do zera oraz wy czy zasilanie 1 Sk adanie Unie koniec ramy g wnej i z w g r a do momentu kiedy poprzeczka cz ca wskoczy w cylinder zobacz ilustracja A 1 2 Przenoszenie Unie por cze tak...

Страница 9: ...anie Ponownie w klucz bezpiecze stwa aby przycisk zatrzymania awaryjnego by podniesiony i zresetuj a nast pnie mo esz ponownie uruchomi bie ni jak na poni szym rysunku Z bie ni mo na korzysta po dokon...

Страница 10: ...szybkie przej cie 3 6 9 Dane dotycz ce biegu Time Czas Incline K t nachylenia Speed Pr dko Pace Kroki Distance Dystans Calorie Kalorie Poziom pulsu HRC Monitor poziomu pulsu Puls HRC bezprzewodowy czu...

Страница 11: ...nale y w o y klucz bezpiecze stwa po w o eniu klucza bezpiecze stwa przycisk zatrzymania awaryjnego automatycznie zresetuje si i pojawi Bie nia zostanie zatrzymana po naci ni ciu przycisku zatrzymania...

Страница 12: ...trening 4 1 3 Obs uga programu wicze The treadmill apply four types of configurable heart rate control programs each with a different level of intensity users can choose the appropriate level of inte...

Страница 13: ...su Program ustawiony Program manualny Program Fit test Wskaz wka Podczas korzystania z programu P1 HRC program kontroli pulsu nale y zatrzyma tryb MP3 aby sygna audio nie zak ca bezprzewodowego sygna...

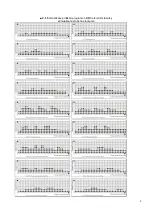
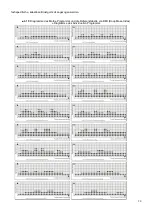
Страница 14: ...13 4 1 5 Wykresy programu Matrix oraz tabela referencyjna wska nika masy cia a Wykresy programu indywidualnego...

Страница 15: ...e upewnij si e urz dzenie jest w czone znajd jego odpowiedni nazw BE3601 i i po cz si Uwaga na jednym smartfonie lub tablecie mo na wybra tylko jedn funkcj Bluetooth Konserwacja mo liwe usterki i ich...

Страница 16: ...Kontrola poprawno ci pod czenia transformatora lub jego wymiana Wymiana bezpiecznika 2 E01 B d czujnika pr dko ci Niew a ciwy monta czujnika lub jego uszkodzenie Uszkodzony optoizolator Uszkodzony st...

Страница 17: ...ni Poprawnie wykonana rozgrzewka zredukuje ryzyko kontuzji Wskazane jest rozci gni cie cia a jak pokazano na rysunkach poni ej Ka da z nast puj cych czynno ci powinna by wykonywana przez co najmniej...

Страница 18: ...u ycie takich element w jak linki paski elementy gumowe peda y uchwyty z g bki k ka o yska itp 6 Gwarancja traci wa no w przypadku Up ywu terminu wa no ci samodzielnych napraw nieprzestrzegania zasad...

Страница 19: ...ds are securely tightened 9 Always use the equipment as indicated If you find any defective components whilst assembling or checking the equipment or if you hear any unusual noise coming from the equi...

Страница 20: ...s 4 pcs 4 pcs A16 M4 12 cross head screw 4pcs A24 ST2 9 12 cross head tapping screw 6pcs C1 4flat washer 4pcs C3 8 flat washer 2pcs C4 10 flat washer 4pcs C9 4 spring washer 4pcs C1 10 spring washer 4...

Страница 21: ...20 Exploded view drawing...

Страница 22: ...r 1 A26 Cross bolt with washer M3 X6 10 15 Adjustable foot pad 2 51 Rubber pad 2 16 Left side rail 1 52 Spacer bush 2 B0 Hex nut M8 1 17 Right side rail 1 53 Spacer bush 2 2 B1 Nylon lock nut M6 14 18...

Страница 23: ...pright tube and fix it 2 2Install the Right upright tube 5 to the Base frame 3 by using two sets Half round bolt M8 55 A7 and Half round bolt M8 65 A8 on the side 2 3In the rear use one piece of Half...

Страница 24: ...g moving and unfolding instruction Warning The incline must be return to zero and the power should be cut off before folding 1 Folding The treadmill is foldaway Lift the end of the main frame and upwa...

Страница 25: ...ut safety key when the treadmill is running it will stop immediately Reinsert the safety key so that the emergency stop button is up and reset then you can restart the treadmill As the below figure Th...

Страница 26: ...e put on the holder 1 Function Display screen LED Shortcut Keys Incline direct keys 4 8 12 Speed direct keys3 6 9 Running data Time Incline Speed Pace Distance Calorie Heart rate HRC Heart rate monito...

Страница 27: ...ll you need to insert the safety key after inserting the safety key the emergency stop button will automatically reset and pop up Treadmill will be stopped when press the emergency stop button or pull...

Страница 28: ...ters At the same time you can select speed or incline key to adjust speed or incline class as you like press Pause Stop key to pause or stop running 4 1 3 Exercise program operation instruction The tr...

Страница 29: ...rate control program Preset program Manal program Fit test Program Warm Tip When using the P1 HRC program please stop MP3 mode to prevent the audio signal from interfering with the wireless heart rate...

Страница 30: ...29 4 1 5 Program Matrix graphics and body mass index reference table Custom program graphics...

Страница 31: ...surface of the treadmill should be kept clean pull out the power wire before cleaning You can clean the running belt and the surface of the treadmill with a soft and wet cloth Do not use strong solve...

Страница 32: ...f motor overcurrent The motor current is excessive The resistance of roller is too high The part of driver is broken Replace the motor Strengthen the lubricate or replace Replcace the driver 4 E03 fau...

Страница 33: ...se at least about 30 seconds 2 Position Step on the running belt you may put your hands on the handle bar Keep your back straight during exercises You may walk or run look at the pictures Even though...

Страница 34: ...pouze tehdy budou spln ny bezpe nostn podm nky Zvl tn pozornost je pot eba v novat potahu a p novk m kter podl haj opot eben nejrychleji Po kozen sti je pot eba co nejrychleji opravit nebo vym nit do...

Страница 35: ...55 4 ks A8 roub M8 65 4 ks A16 roub M4 12 4 ks A24 roub ST2 9 12 6 ks C1 podlo ka 4 4 ks C3 podlo ka 8 2 ks C4 podlo ka 10 4 ks C9 p u inov podlo ka 4 4 ks C1 10 pru inov podlo ka 4 ks D1 imbus roubov...

Страница 36: ...35 Detailn sch ma...

Страница 37: ...en 1 A24 roub ST2 9 X12 14 13 Transportn kole ko 4 49 Lev z slepka 1 A25 roub ST4X10 46 14 Kurtna 1 50 Prav z slepka 1 A26 roub M3 X6 10 15 Staviteln no ka 2 51 Gumov podlo ka 2 16 Lev bo nice 1 52 V...

Страница 38: ...i Postup mont e UPOZORN N p ed dokon en m mont e trena r nep ipojujte do z suvky 230V Pozn mka 1 P ed dokon en m mont e nedotahujte rouby dot hn te je a na z v r 2 Trena r je zabalen do 2 bal k hlavn...

Страница 39: ...ov ch podlo ek 10 C11 a podlo ek 10 C4 Obr 4 4 Mont dr ku mobiln ho za zen 4 1 Vyklopte kloub dr ku 48 a pomoc 4 roub A16 pru inov ch podlo ek 4 C9 a podlo ek 4 C1 jej p ipevn te ke konzoli 6 Obr 5 5...

Страница 40: ...r A 1 2 P esouv n Trena r uchopte za zadn st zaji t n ho r mu a zatla te tak aby se p edn st z kladn ho r mu zvedla od zem a trena r p evezte na po adovan m sto 3 Spou t n Nadzvedn te r m tak aby poji...

Страница 41: ...tla tka nouzov ho zastaven nebo vyta en m bezpe nostn ho kl e kdy je b eck p s spu t n b eck p s okam it zastav Znovu vlo te bezpe nostn kl aby bylo tla tko nouzov ho zastaven naho e a resetov no pak...

Страница 42: ...ispleje LED Rychl kl ves y Skokov zm na n klonu 4 8 12 Skokov zm na rychlosti 6 9 Zobrazovan daje as N klon Rychlost Vzd lenost Kalorie Tep HRC Sn man tepov frekvence Elektrody na madlech hrudn p s vo...

Страница 43: ...zov tla tko bezpe nostn kl Bezpe nostn prvek kter zastav p s v p pad upadnut V p pad nouze stiskn te tla tko a trena r se zastav Pro obnovu tla tka zasu te kl na doraz Tla tka nastaven rychlosti Tla t...

Страница 44: ...ete m nit rychlost a n klon b eck plochy stiskn te kl vesu START STOP pro pozastaven a ukon en tr ninku 4 1 3 Popis vestav n ch program Trena r je vybaven ty mi typy nastaviteln ch program zen ch pom...

Страница 45: ...nu ln program Program Test fyzick kondice Pozn mka P i pou v n programu P1 HRC zastavte p ehr v n hudby aby p enos zvukov ho sign lu neru il sign l bezdr tov ho p enosu tepov frekvence pot eba pou t b...

Страница 46: ...4 4 1 5 Vizualizace pr b h program a BMI referen n tabulky Vizualizace pr b h program...

Страница 47: ...t lze zvolit pouze jednu funkci Bluetooth dr ba a odstar ov n z vad UPOZORN N Ujist te se pros m e b eck trena r je vypnut ze s t vyta en z str ka nap jec ho kabelu ze z suvky p ed i t n m nebo dr bou...

Страница 48: ...ni extr mn vypnut Z vady a jejich odstran n Z vada D vod e en 1 Nezobrazuj se dn data Nap jec kabel nen zapojen spr vn Vyhozena p ep ov pojistka patn zapojen nebo po kozen transform tor Po kozen pojis...

Страница 49: ...l Spr vn proveden rozcvi ka sn riziko razu Doporu ujeme cviky viz obr zek n e Ka d z t chto cvik by m l b t prov d n min po dobu 30 sekund Neprotahujte se p li jakmile uc t te bolest protahov n ukon e...

Страница 50: ...sgr nden sollte der Abstand zu anderen Gegenst nden mindestens 0 6 m betragen 8 Es sollten entsprechende Sportkleidung und schuhe verwendet werden Zu lockere Kleidungsst cke sollten vermieden werden 9...

Страница 51: ...k A16 M4 12 Kreuzschlitzschraube 4 Stk A24 ST2 9 12 selbstsichernde Schraube 6 Stk C1 4 flache Unterlegscheibe 4 Stk C3 8 flache Unterlegscheibe 2 Stk C4 10 flache Unterlegscheibe 4 Stk C9 4 Federring...

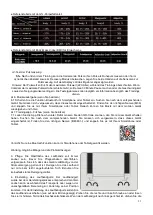
Страница 52: ...10 Detaillierte Zeichnung...

Страница 53: ...rechten Konsolenmasts 1 A23 Selbstsichernde Schraube ST4 2 X35 2 12 Kissen bei der Platte des Laufbands 6 48 Halterung f r ein Tablet 1 A24 Selbstsichernde Schraube ST2 9 X12 14 13 Rolle 4 49 Fu kapp...

Страница 54: ...rodukten Montageanleitung VORSICHT Schlie en Sie die Stromversorgung vor der Montage nicht an Hinweise 1 Ziehen Sie die Schrauben vor dem Beenden der Montage des ganzen Laufbands nicht fest an 2 Das S...

Страница 55: ...ie den Griff mit der drehbaren Basis Befestigen Sie alles mittels 4 Sets mit Kreuzschlitzschrauben A16 mittels eines Federrings 4 C9 und einer flachen Unterlegscheibe 4 C1 wie auf der Abbildung Nr 5 5...

Страница 56: ...runde Rohr eingerastet sind siehe Abbildung A 1 2 Transport Heben Sie das Ende des Hauptrahmens so an dass der Rahmen nicht den Boden ber hrt Schieben Sie danach das zusammengeklappte Laufband 3 Aufk...

Страница 57: ...igen Anhalten des Ger ts Stecken Sie den Sicherheitsschl ssel wieder ein so dass die Taste des Not Ausschaltens angehoben und zur ckgesetzt werden kann Man darf das Laufband nur dann benutzen wenn all...

Страница 58: ...der Geschwindigkeit 3 6 9 Laufdat en Zeit Neigungswinkel Geschwindigkeit Schritte Distanz Kalorienverbrauch Herzfrequenz HRC Messung der Herzfreque nz Handpulsmessung HRC drahtlose Pulsmessung wahlwe...

Страница 59: ...zt und angezeigt werden Das Laufband wird nach dem Dr cken der Taste des Not Ausschaltens oder nach dem Ziehen des Schl ssels gestoppt Geschwindigkeit Dr cken Sie diese Taste nach dem Starten des Lauf...

Страница 60: ...ienung des Trainingsprogramms Dieses Laufband verf gt ber 4 konfigurierbare Programme zur Kontrolle der Herzfrequenz jedes mit einem anderen Niveau der Intensit t Der Benutzer kann das Niveau der Trai...

Страница 61: ...it HRC NO1 NO4 NO1 65 103 NO2 75 119 NO3 90 143 NO4 PUL65 110 Halten Sie beide Handpulssensoren oder ziehen Sie den Brustgurt an Das Laufband beginnt zu arbeiten Die Taste PAUSE STOP dr cken Die Taste...

Страница 62: ...20 fachspezifische kabellose Brustgurt soll angezogen werden 4 1 5 Diagramme des Matrix Programms und die Referenztabelle von BMI Body Mass Index Diagramme des individuellen Programms...

Страница 63: ...h ren 7 Trainingsapp Fitshow wenn Sie besitzen 7 1 Laden Sie die App Fitshow herunter Daf r m ssen Sie den QR Code scannen den Sie mit dem Ger t erhalten haben Suchen Sie nach dem entsprechenden Ger...

Страница 64: ...m Anschlie en des Netzkabels Das Netzkabel ist nicht richtig angeschlossen Der berlastungsschutz ist ausgeschaltet Der Umspanner ist nicht richtig eingesteckt oder besch digt Die Sicherung ist durchge...

Страница 65: ...muss es von einem hierf r ausgebildeten Fachmann gewartet oder ausgetauscht werden 7 Problem mit dem Laufbandgurt Ein falsch berechnetes Drehmoment Der Laufbandgurt ist zu locker Fehler im Motor Eins...

Страница 66: ......

Отзывы: