Instruction Manual
© Gebr. Holthoff, www.hmf-shop.de, info@
hmf-shop.de
4
English
Instruction Manual
Art.-No.: 49122
EN
Safe with fingerprint lock
Important notes about operation / exclusion of liability
please read carefully this manual before activating the lock. We assume no liability, neither for malfunctions caused
by faulty changing, use of force or improper handling, nor in case of property or pecuniary damages due to inap-
propriate locking of the safe.
▲
!
Keep the emergency keys in a safe place, do not put them into the safe !
1.
Commissioning / emergency opening
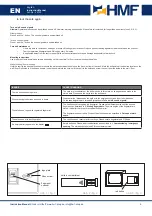
For the first opening, unscrew the allen head screws on the logo plate with the Allen wrench supplied to release
the cylinder lock (see fig. 1). Then insert the included emergency key into the lock and open the safe.
Open the battery case (see fig. 2) in the interior of the vault and insert four AA batteries into the battery
compartment (observe polarity).
2.
Reset safe to factory default settings
Press and hold the red button (see fig. 3) on the inside of the safe door for 10 seconds. “INIT” flashes on the
LCD display followed by “OK”. The safe is now reset to factory default settings. All data is deleted and you can
store new fingerprints or PIN codes as soon as the red LED lights up.
Note:
If the vault has been reset to factory defaults, it can be opened with any fingerprint or the factory code
1234. Please enter a new code immediately.
3.
Storing fingerprints
3.1
To register new fingerprints, press briefly the red button on the inside of the safe. As soon as the red LED
lights up, press your finger onto the fingerprint scanner. The LCD display shows “OK”, the data count
indicator displays “ID--01”.
3.2
If the display shows “Err”, the fingerprint has not been saved. Please repeat the step 3.1.
3.3
Please repeat step 3.1 with the same finger. Therefore please press your finger several times on the
lock at different angles. (
Note:
The multiple scanning of your fingerprint at different angles ensures that
your fingerprint is detected even if the finger is not quite straight on the scanner.)
3.4
To register a different fingerprint, repeat step 3.1.
4.
Storing the personal code
Note:
For the first opening, please use the factory default code 1234. Register a new PIN code using 4 - 8
digits. If you want to change already registeres PIN codes, follow the same steps beginning with your
registered PIN. Afterwards please test both PIN codes. Only the registered PIN code should open the safe.
4.1
Please enter the PIN code (factory default code 1234 or already registered code) and hold down the
*-button until “(_)” is diplayed on the LCD screen.
4.2
Now enter the new PIN code and press the *-button. The display shows “(_)”. Now enter the new PIN
code again and confirm with *-button. The screen displays “OK” after successful storage.
Now please try to open the safe with the old and new code. The vault can no longer be opened with the
factory or the old code.
5.
Open the vault with fingerprint
5.1
Unlock:
Press the #-button. As soon as the red LED lights up, press your registered finger onto the
scanner. The display shows “Id - - 01” and the safe is unlocked.
5.2
Lock:
Press the *-button or #-button. The safe is locked now.
6.
Open the vault with your personal code
6.1
Unlock:
Enter your registered PIN code and confirm with the *-button. The safe is unlocked now.
6.2
Lock:
Press the *-button or #-button. The safe is locked now.
7.
Open the vault with emergency key
Unscrew the Allen head screws on the logo plate with the supplied Allen wrench to release the cylinder lock.
Insert the key into the lock and rotate to the right (clockwise) to unlock the safe and back to the starting position


