background image


Service Manual 


Effectivity: HKS700E after S/N 100600 

- 16 - 


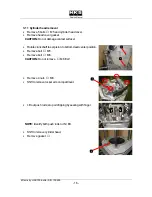
3.11  Cylinder head removal 

• 

Remove 5 bolts 

  M5 and cylinder head cover.


• 

Remove head cover gasket.


CAUTION: 

Do not damage contact surface! 


• 

Rotate crankshaft to set piston to bottom dead center position.


• 

Remove bolt 

 M5.


• 

Remove bolt 

 M6.


CAUTION: 

Do not remove 

 M6 first! 


• 

Remove 4 nuts 

 M8.


• 

Shift to remove rocker arm compartment.


• 

Lift out push rods; stop oil dripping by sealing with finger.


NOTE: 

Identify both push rods to IN / EX.


• 

Shift to remove cylinder head.


• 

Remove gasket 

.


EX IN


Содержание 700E

Страница 1: ...700E Service Manual 2006 June Ver 2 02 HKS CO LTD 7181 KITAYAMAFUJINOMIYA SHIZUOKA JAPAN 418 0192 TEL 81 0 544 54 1781 FAX 81 0 544 54 1410 hks_aviation hks power co jp http www hks power co jp hks_aviation ...

Страница 2: ...3 4 Spark plug removal 3 5 Gearbox removal and disassembly 3 5 1 Atype ratio 2 58 3 5 2 B type ratio 3 47 3 6 Front cover removal 3 6 1 Drive gear removal 3 7 Rear cover removal and disassembly 3 7 1 Oil pump disassembly 3 8 Stator removal 3 9 Starter idler gear and Driven gear removal 3 10 Flywheel removal 3 11 Cylinder head removal 3 11 1 Cylinder head disassembly 3 12 Cylinder and Piston disass...

Страница 3: ...g 4 4 Cylinder reassembly 4 4 1 Hydraulic lifter 4 5 Cylinder heads reassembly 4 5 1 Push rod 4 5 2 Rocker arm compartment 4 6 Cylinder head cover reassembly 4 7 Flywheel reassembly 4 8 Driven gear and Starter idler gear reassembly 4 9 Rear cover reassembly 4 9 1 Stator 4 9 2 Oil pump 4 9 3 Pressure regulator 4 9 4 Oil filter 4 10 Front cover reassembly 4 10 1 Atype ratio2 58 4 10 2 B type ratio3 ...

Страница 4: ...embly 4 13 Spark plug reassembly 4 14 Intake manifolds reassembly 4 15 Carburetors reassembly 4 15 1 Upper type 4 15 2 Horizon type 5 Table for torque values 6 Selection of metal bearing 6 1 Connecting rod bearing 6 2 Crankshaft bearing 7 Grading of cylinder and piston 8 Wear limits ...

Страница 5: ...e this engine over densely populated areas Do not operate this engine over terrain where a safe power off landing cannot be performed The operating and maintenance instructions supplied with this engine must be followed at all times Flying any aircraft involves the risk of injury or death building and maintaining your own aircraft requires great personal responsibility ...

Страница 6: ...Service Manual Effectivity HKS700E after S N 100600 5 1 Introduction ...

Страница 7: ...6 2 General information 2 1 Special tools In addition to this service manual please refer to the following 1 HKS 700E Installation instruction Manual 2 HKS 700E Operations Manual 3 HKS 700E Parts List ST 01 ST 02 ST 03 ST 05 ST 06 ST 04 ST 07 ST 08 ST 09 ...

Страница 8: ...rs removal NOTE Identify both carburetors to RH LH cylinders 3 1 1 Upper type Remove 2 nuts M6 3 1 2 Horizon type Remove tension spring Loosen clamp screw and remove carburetor by turning action 3 2 Intake manifolds removal Remove 2 bolts M8 and intake manifold Remove intake gasket ...

Страница 9: ...Service Manual Effectivity HKS700E after S N 100600 8 3 3 Electric starter removal Remove 2 bolts M6 Shift to remove electric starter 3 4 Spark plug removal Remove 4 spark plugs ...

Страница 10: ...after S N 100600 9 3 5 Gearbox removal and disassembly 3 5 1 Atype ratio2 58 Remove 8 bolts M6 3 5 2 B type ratio3 47 Remove 10 bolts M6 Shift to remove gearbox Remove circlip Set ST 07 as shown Compress gear and remove half rings ST 07 ...

Страница 11: ...TEP 2 Insert one ST 08 STEP 3 Decompress ST 07 Inner race will move to upward by spring washers If three ST 08s are inserted go to STEP 4 else go to STEP 1 STEP 4 Remove ST 08s and ST 07 Remove Inner race Remove retainer Remove gear hub dog and spring washer Remove spacer Press PTO shaft to remove from gearbox STEP 4 STEP 1 STEP 2 STEP 3 3 ST 08s Yes No Press Release ST 08 ...

Страница 12: ...ectivity HKS700E after S N 100600 11 3 6 Front cover removal 3 6 1 Drive gear removal Block crankshaft with ST 02 Remove nut M25 and washer Shift to remove drive gear Remove 12 bolts M6 Shift to remove front cover ST 02 ...

Страница 13: ...move oil filter with oil filter wrench Remove 10 bolts M6 Shift to remove rear cover NOTE Do not lose the thrust washer 3 7 1 Oil pump disassembly Remove bolt Remove spring and valve Remove 5 bolts M6 Remove oil pump cover Remove inner rotor 25mm Remove woodruff key Shift to remove pump body 25mm ...

Страница 14: ...Service Manual Effectivity HKS700E after S N 100600 13 Remove inner rotor 15mm Remove woodruff key Shift to remove pump body 15mm Shift to remove inner feed rotorAssy ...

Страница 15: ...Service Manual Effectivity HKS700E after S N 100600 14 3 8 Stator removal Block crankshaft with ST 02 Remove bolts M10 Remove stator with tightening ST 03 M16 x P1 5 Remove woodruff key ST 02 ST 03 ...

Страница 16: ...100600 15 3 9 Starter idler gear and Driven gear removal Remove idler gear idler shaft and 2 thrust washers Remove driven gear by turning clockwise left 3 10 Flywheel removal Block crankshaft same as 1 8 Remove 6 bolts M8 Shift to remove flywheel ...

Страница 17: ... Do not damage contact surface Rotate crankshaft to set piston to bottom dead center position Remove bolt M5 Remove bolt M6 CAUTION Do not remove M6 first Remove 4 nuts M8 Shift to remove rocker arm compartment Lift out push rods stop oil dripping by sealing with finger NOTE Identify both push rods to IN EX Shift to remove cylinder head Remove gasket EX IN ...

Страница 18: ...jet pipe Compress valve spring with valve spring mounting device and clamp or similar tool Remove valve cotters and release valve spring Remove valve spring retainer valve springs and valve NOTE To prevent damage to valve guide trim out burrs which may be present on valve stems prior to the removal of valves Remove valve spring seat ...

Страница 19: ...hift to remove cylinder Support piston by hand to avoid damaging piston and piston rings Remove gasket Remove piston pin circlip using the specially shaped screwdriver Pull out to remove piston pin Remove piston CAUTION Make sure to install rings in initial position Remove piston rings using the piston ring pliers Pull to remove hydraulic lifters from crankcase Soak the hydraulic lifters in cup of...

Страница 20: ...HKS700E after S N 100600 19 3 13 Crankcase disassembly Remove 2 bolt M6 Remove 8 bolts M6 Remove 2 bolts M8 Remove 4 bolts M10 Set crankcase on ST 01 Attach ST 04 at mounting boss Split crankcase with tightening bolt ST 01 ST 04 ...

Страница 21: ...Service Manual Effectivity HKS700E after S N 100600 20 Remove oil strainer Remove camshaft Remove crankshaft Remove 4 thrust bearing Remove 4 main bearing ...

Страница 22: ...Service Manual Effectivity HKS700E after S N 100600 21 3 14 Crankshaft disassembly Remove 4 connecting rod bolts Remove connecting rod cap end Remove connecting rod bearing ...

Страница 23: ... motor oil to metal surface NOTE Confirm the turn stop of bearing entered the ditch Assemble connecting rod Apply motor oil to bolt and thread Tighten connecting rod cap end evenly with 2 connecting rod bolts Tightening torque is 3 8 kgfm Swing connecting rod to check for ease movement CHANGE PARTS AT OVERHAUL Connecting rod bearing See para 6 1 ...

Страница 24: ...metal bearing into both crankcases Place thrust bearing to crankcase with applying grease to back side of thrust bearing NOTE There are two kinds of bearings Bearing with a lug is attached to a RH side crankcase Flat side of bearing is assembled to the crankcase side CHANGE PARTS AT OVERHAUL Crankshaft bearing and thrust bearing See para 6 2 4 2 2 Crankshaft Apply motor oil to bearing surface Plac...

Страница 25: ...pply motor oil to camshaft journal and all teeth of drive and driven gear Place camshaft to RH crankcase while uniting punch marks 4 2 4 Oil strainer Fit new O ring to oil strainer with applying motor oil Place oil strainer to RH crankcase and tighten bolt M6 20 temporary ...

Страница 26: ...bolts M10 with applying motor oil Attach LH crankcase on RH crankcase with 2 bolts M10 both upper side 2 bolts M10 with O ring both lower side and 2 bolts M8 applying motor oil to thread Tighten 4 bolts M10 both side evenly to 4 8 kgfm Tighten 2 bolts M8 evenly to 2 4 kgfm Tighten 7 bolts M6 25 and 1 bolt M6 45 evenly to 1 2 kgfm with LOCTITE 243 and washers Attach drain bolt with motor oil and ne...

Страница 27: ...Service Manual Effectivity HKS700E after S N 100600 26 Wipe off the protruding LOCTITE Fix oil strainer with 2 bolts M6 20 with applying LOCTITE 243 Tighten to 1 2 kgfm ...

Страница 28: ... towards piston crown Insert new piston pin circlip in groove of front marked triangular sign side Apply motor oil over the whole of the piston pin the bore in connecting rod and the bore in piston Insert piston pin Insert new piston pin circlip in another groove CHANGE PARTS AT OVERHAUL Piston piston pin piston rings and piston pin circlip See para 7 FRONT MARK ...

Страница 29: ...ying motor oil and Clean and remove oil from contact surface of crankcase and cylinder Place new gasket to crankcase Place pipe knock pin φ6 Lubricate piston and cylinder with motor oil Compress rings with piston ring spanner and mount cylinder with care CAUTION Use piston ring spanner to avoid ring breakage Top Ring Second Ring Oil Ring upper side Oil Ring expander Oil Ring lower side ...

Страница 30: ...k towards upper side CHANGE PARTS AT OVERHAUL IN and EX valve Compress valve springs with valve spring mounting tool Insert valve cotters and release springs NOTE Check correct positioning of valve cotters Push piston of banjo bolt to check for ease movement Attach oil jet pipe to cylinder head with banjo bolt applying motor oil to thread Tighten to 2 4 kgfm Insert bolt M5 10 with LOCTITE 243 and ...

Страница 31: ...d remove oil from contact surface of cylinder and cylinder head Place new gasket to cylinder Place 2 pipe knock pins φ10 Place cylinder head 4 5 1 Push rod Place push rod on hydraulic lifter NOTE Coloring side is turned to cylinder head side Check proper position of push rod ...

Страница 32: ...ith 4 nuts M8 and 4 washers applying motor oil to thread Tighten evenly to 2 0 kgfm Tighten more 90 deg NOTE Pay attention the direction of nut and washer CHANGE PARTS AT OVERHAUL M8 nut Tighten bolt M6 20 to 1 0 kgfm and bolt M5 20 to 0 6 kgfm with LOCTITE 243 and washers NOTE The valve must move freely when turning the crankshaft Repeat same procedure from 2 3 on the opposite side Sharp side dow...

Страница 33: ...cylinder head cover Place new gasket to cylinder head Attach cylinder head cover to cylinder head with 5 bolts M5 25 with LOCTITE 243 and washers Tighten evenly to 0 8 kgfm 4 7 Flywheel reassembly Block crankshaft same as 1 8 Attach flywheel to crankshaft with 6 bolts M8 13 with LOCTITE 243 Tighten evenly to 2 4 kgfm CHANGE PARTS AT OVERHAUL M8 13 bolt ...

Страница 34: ...The driven gear must engaged on crankshaft when turning clockwise right looking from rear side and turn freely when turning counter clockwise left Attach idler gear idler shaft and 2 thrust washers applying motor oil 4 9 Rear cover reassembly 4 9 1 Stator Attach woodruff key in crankshaft Check for tight fit and degrease tapers of crankshaft and stator hub Fit stator hub and washer Apply LOCTITE 2...

Страница 35: ...mp Attach inner feed rotor Assy and outer rotor in rear cover Fit 4 new O rings Attach 2 knock pins Attach pump body 15mm Attach woodruff key Attach inner rotor 15mm Attach outer rotor 15mm Fit 2 new O rings Attach 2 knock pins Attach pump body 25mm Attach woodruff key ...

Страница 36: ... bolt M6 60 4 bolts M6 110 and washers evenly to 1 2 kgfm applying LOCTITE243 NOTE The oil pump must rotate freely when turning by hand 4 9 3 Pressure regulator Insert valve and spring applying motor oil Attach bolt with new copper washer Tighten to 2 5 kgfm Clean and remove oil from contact surface of crankcase and rear cover Apply LOCTITE 5699 on red circle area ...

Страница 37: ...aft into a position to align with groove of camshaft Place rear cover on crankcase Tighten rear cover with 10 bolts M6 20 and washers evenly to 1 2 kgfm applying LOCTITE 243 4 9 4 Oil filter Lubricate the rubber seal of oil filter Screw new oil filter by hand until it stops at the oil filter housing Tighten by an extra 3 4 turn ...

Страница 38: ...t Place front cover on crankcase 4 10 1 Atype ratio2 58 Tighten front cover with 12 bolts M6 30 and washers evenly to 1 2 kgfm applying LOCTITE 243 4 10 2 B type ratio3 47 Tighten front cover with 2 bolts M6 45 8 bolts M6 35 2 bolts M6 30 and washers evenly to 1 2 kgfm applying LOCTITE 243 Attach drive gear and washer to crankshaft Tighten nut M25 to 10 0 kgfm applying LOCTITE 243 CHANGE PARTS AT ...

Страница 39: ...shaft with rounded side towards oil seal Heat up gearbox in oven to approx 120 Press in ball bearing and fit circlip in the groove Apply grease to sealing lips Press PTO shaft from outside into gearbox Attach spacer Attach 12 spring washers on the shaft as illustrated Attach hub dog Attach gear so the knuckle joint is engaged to new face of hub dog ...

Страница 40: ...ivity HKS700E after S N 100600 39 ST 09 Attach retainer Compress gear using ST 07 and attach half rings with the flat side out Set inner race with ST 09 Press ST 07 to insert inner race Fit circlip in the groove ST 07 Press ...

Страница 41: ...r Place 2 pipe knock pins φ6 Apply motor oil to roller bearing and gear tooth Place gearbox on front cover 4 11 1 Atype ratio2 58 Tighten gearbox with 4 bolts M6 25 4 bolts M6 45 and washers evenly to 1 2 kgfm applying LOCTITE 243 4 11 2 B type ratio3 47 Tighten gearbox with 4 bolts M6 25 6 bolts M6 45 and washers evenly to 1 2 kgfm applying LOCTITE 243 ...

Страница 42: ... 1 2 kgfm applying LOCTITE 243 4 13 Spark plug reassembly Insert spark plug with LOCTITEANTISEIZE and tighten to 2 3 kgfm CHANGE PARTS AT OVERHAUL Spark plug Replace every 200Hr 4 14 Intake manifolds reassembly Clean and remove oil from contact surface of cylinder head and intake manifold Place new gasket The seal spreading side is assembled to manifold side Tighten intake manifold with 2 bolts M8...

Страница 43: ...S700E after S N 100600 42 4 15 Carburetors reassembly Attach carburetor by turning action and tighten clamp screw CHANGE PARTS AT OVERHAUL Insulator rubber 4 15 1 Upper type Tighten 2 nuts M6 4 15 2 Horizon type Hook tension spring ...

Страница 44: ...nkcase M8 2 0 Rocker arm component nut M8 2 0 90 deg Engine oil Cylinder head Cylinder M5 0 6 Cylinder head cover M5 0 8 Front cover M6 1 2 Gear box M6 1 2 Starter motor M6 1 2 Stator hub M10 5 0 Oil strainer M6 1 2 LOCTITE 243 Adapter M14 rear cover M14 3 0 Drain bolt M10 1 2 Union rear cover M18 3 0 Engine oil Rear cover M6 1 2 LOCTITE 243 Regulator bolt M18 2 5 Engine oil Oil pump M6 1 2 LOCTIT...

Страница 45: ...cting rod bearing No on P1 P2 O D of pin mm Wear limit mm No on con rod I D of journal mm 1 φ40 994 φ41 000 1 φ44 000 φ44 008 N1 2 φ40 988 φ40 993 40 960 N2 2 φ44 009 φ44 016 N1 N2 Color of bearing 2 BROWN 3 BLACK 4 BLUE New mm Wear limit mm Axial clearance 0 100 0 250 0 350 Rear PIN Front PIN Color mark ...

Страница 46: ...4 993 44 960 N1 N2 Color of bearing 2 BROWN 3 BLACK 4 BLUE New mm Wear limit mm Axial clearance 0 200 0 390 0 490 7 Grading of cylinder and piston Grading letter A B C is marked as illustrated Use same grading of cylinder or piston when replacing Grading Cylinder Bore mm Piston O D mm A φ84 985 φ84 994 φ84 970 φ84 979 B φ84 995 φ85 005 φ84 980 φ84 990 C φ85 006 φ85 015 φ84 991 φ85 000 Rear Journal...

Страница 47: ...ring Ring groove clearance 0 050 0 085 Ring end gap 0 100 0 200 Second ring Ring groove clearance 0 025 0 060 Ring end gap 0 150 0 250 Cylinder head Wear on valve seat Valve guide bore 6 000 6 009 IN 5 970 5 985 Valve stem EX 5 960 5 975 IN 0 015 0 039 0 080 Stem clearance EX 0 025 0 049 0 090 Sealing face width IN valve 2 40 Sealing face width EX valve 2 40 Out of true on valve head Valve spring ...

Страница 48: ...D 21 387 21 404 21 350 S N100895 0 036 0 073 0 085 Radial clearance S N100896 0 010 0 047 0 070 Propeller gearbox Prop flange axial out of true 0 060 Wear depth of dogs 0 20 Disk spring free length 4 05 4 65 3 80 Camshaft Camshaft journal 25 959 25 972 25 930 Axial clearance 0 100 0 250 0 30 Radial clearance 0 028 0 053 0 085 IN 33 205 33 000 Height of cam shaft lobe EX 33 205 33 000 See FIG 1 Oil...

Страница 49: ...Service Manual Effectivity HKS700E after S N 100600 48 ...

Отзывы: