background image

ITALIANO 

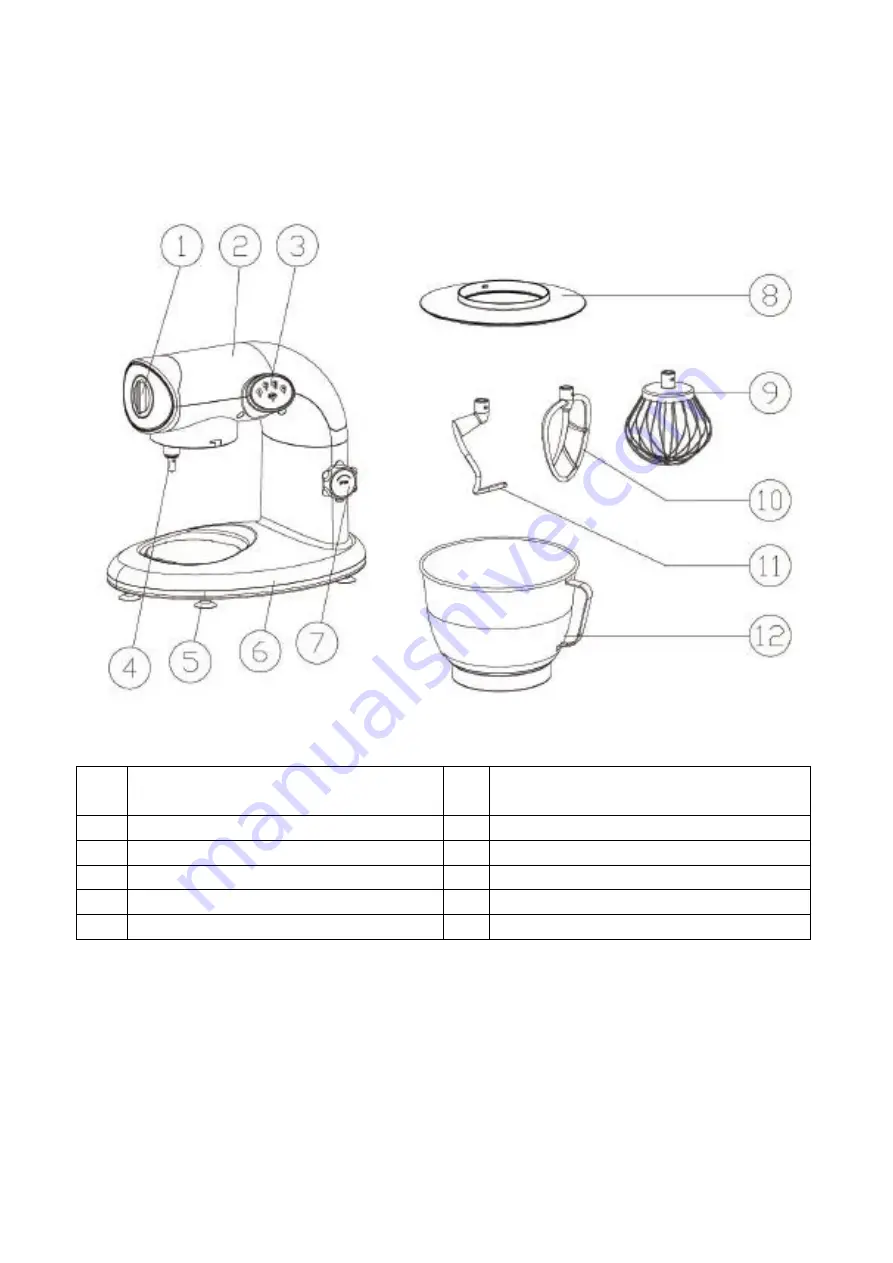
Mascherino di uscita 

Leva bloccaggio e sbloccaggio 

del braccio 

Braccio 

Coperchio antischizzo 

Pannello di controllo 

Frusta 

Asse rotante 

10 

Sbattitore 

Piedi antiscivolo 

11 

Frusta per impasto 

Base 

12 

Contenitore da 5 litri 

Содержание Top Chef TOPC416

Страница 1: ...sanleitung Robot Mixer Multifunktions Handboek Robot Keukenmachine Multifunctioneel Manual de Utilizaci6n Robot Batidora Multifunci6n Manuale d uso Robot lmpastatrice Multifunzione TOPC416 Top Chef is a trademark of Bravo Media LLC Bravo Media LLC 2017 Adapté du format Top Chef distribué par NBC Universal ...

Страница 2: ...11 Beater 5 Rubber feet 12 Kneading hook 6 Body 13 Bowl 7 Knob Important safety precaution When using electrical appliance basic precautions should always be followed including the following Read all instructions To protect against risk of electrical shock do not put the appliance unit cord or plug in water or other liquid ...

Страница 3: ...cord to hang over edge of table or counter Keep hands and utensils away from moving blades or discs while processing food to reduce risk of severe injury to person or damage to the food mixer To reduce the risk of injury never place cutting blades or discs on base Turn off the machine before replace attachment Use the product and assembly the accessory as mentioned on user manual only Switch off t...

Страница 4: ...re Button Speed Time Kneading Hook 1 2 33rpm 50rpm 1 5min at button 1 and 8 min at button 2 Balloon Whisk 4 151rpm 10min Beater 1 2 3 33rpm 50rpm 88rpm 5min Operating positions Warning Operate the appliance only when the accessory tool is attached according to this table and is in the operating position Position 1 ...

Страница 5: ...perating keep fingers clear of the mixing bowl Do not change tools until the appliance is at a standstill and have been unplugged When switch off the drive continues running briefly How to use Stirrer Eggbeater Kneading hook 1 Align the arrow on front protection cover to the one on arm and then revolve it into arm counter clockwise ...

Страница 6: ...2 Revolve the knob clockwise meanwhile set the arm to the position as picture shown 3 Assembling the bowl filled with powder into base flute clockwise 4 Assembly bowl cover into arm counter clockwise ...

Страница 7: ...lockwise As picture shown 6 Press arm down to position as picture shown Power on Set switch to the appropriate speed 7 After food is ready set the control panel to OFF then unplug Turn the knob clockwise and set arm up to position as picture shown 8 Remove beater balloon whisk kneading hook counter clockwise ...

Страница 8: ...s on progress 2 Do not operate the appliance for more than 10mins consecutively when the dough hook flat beater and whisk are working Running the appliance continuously for too long without a break may reduce the life span of the appliance After having used the appliance for 10 minutes take a break and wait at least 40 45 minutes before using it again 3 If at any time the mixer head is raised duri...

Страница 9: ...storage Capability of bowl 1 5kg flour and 0 75Kg water When stirring flour power gets to 1000W KB1 min ENVIRONMENT CAUTION Do not dispose of this product as it has with other household products There is a separation of this waste product into communities you will need to inform your local authorities about the places where you can return this product In fact electrical and electronic products con...

Страница 10: ...he de sortie 2 Bras 3 Panneau de commande 4 Axe rotatif 5 Pieds antidérapants 6 Corps 7 8 9 10 11 12 10 11 i r 12 Manette de dé blocage du bras Couvercle anti projection Fouet Mélangeur Crochet à pétrin Bol 5 litres ...

Страница 11: ...raves aux personnes ou des dommages au mélangeur des aliments Les lames sont affilées Manipulez les avec soin Pour réduire les risques de blessures ne mettez jamais les lames de coupe ou des disques sur la base Ne mettez jamais des aliments à la main utilisez toujours le pousseur d aliments Eteignez la machine avant de remplacer les accessoires Utilisez le produit et montez les accessoires comme i...

Страница 12: ......

Страница 13: ......

Страница 14: ......

Страница 15: ......

Страница 16: ...deva SAS H Koenig Europe 8 rue Marc Seguin 77290 Mitry Mory France www hkoenig com sav hkoenig com contact hkoenig com Tél 33 1 64 67 00 01 Accessoires non compatibles avec un nettoyage au lave vaiselle ...

Страница 17: ...H 1 Ausgabecache 7 Kegel griff des Greif armes 2 Greifarm 8 Anti Projektion Deckel 3 Bedienungspaneel 9 Schneebesen 4 Rotationsachse 10 Mischer 5 Rutsch feste Füße 11 Hackmaschine 6 Körper 12 5 Liter Schüssel ...

Страница 18: ...de weit weg von den Klingen und Platten bei der Behandlung von Nahrungsmittel und ernste Risiken wie Verletzungen von Personen oder Schäden an der Küchenmaschine zu reduzieren Handhaben Sie die Klingen sorgfältig Sie sind sehr scharf Um Verletzungsgefahren zu reduzieren stellen Sie die Klingen der Schüssel oder der Platten nie auf die Basis Entnehmen Sie die Nahrungsmittel nie mit der Hand benutze...

Страница 19: ...ale Schnellheit Knopf 4 Maximale Schnellheit Einstellung der Schnellheit Accessoires Bild Schnellheit Dauer Hackmaschine 1 2 1 min 30 Sekunden Schnellheit 1 und 6 8 Minimum Schnellheit 2 Schneebesen 3 4 10 min Mischer 1 2 3 10 min Normale Funktion um Teig zu kneten 1 Schnellheit 1 2 Schnellheit 2 ...

Страница 20: ...le angebracht wurde benutzen Sie nur die Betriebsanleitung Verletzungsgefahr bei der Änderung der Werkzeuge Stecken Sie die Finger nie in die Schüssel wenn das Gerät eingeschaltet ist ACHTUNG Wechseln Sie das Zubehör nur wenn das Gerät ausgeschaltet ist Wenn das Gerät ausgeschaltet wird lauft der Motor noch für einen kurzen Zeitraum Regieren Sie das Knethaken den Mischer und den Schneebesen wie ge...

Страница 21: ...igersinn drehen Geben Sie Ihre Zutaten in die Schüssel Kapazität der Schüssel 1 kg von Mehl 750 ml Wasser Platzieren Sie den Deckel der Schüssel auf dem Arm und befestigen Sie Diesen indem Sie in den Uhrzeigersinn drehen Drehen sie den Mischer den Schneebesen oder de Hakmaschine auf der Rotationsachse fest indem Sie im Uhrzeigersinn drehen Drücken Sie den Arm in die untere Position so wie im Bild ...

Страница 22: ...Mischer Schneebesen oder die Hakmaschine gegen den Uhrzeigersinn zurück Ziehen Sie den Deckel der Schüssel zurück Ziehen Sie die Schüssel mit der Vorbereitung gegen den Uhrzeigersinn zurück Drücken sie den Arm in die unterste Position so wie im Bild angegeben Reinigung und Unterhalt Schalten Sie das Gerät immer aus bevor Sie es reinigen Ausgabecache Körper des Roboters ...

Страница 23: ...krowellen entfernt UMWELT ACHTUNG Dieses produkt muss nicht mit dem haushaltsmüll entsorgt werden Eine selektive sammlung für diese art von produkten wird von gemeinden eingerichtet sie können kontakt mit der gemeinde aufnehmen um sich über die orte zu informieren Diese Produkte können schadliche stoffe erhalten die schädliche auswirkung auf die umwelt oder menschliche gesundheit haben und müssen ...

Страница 24: ......

Страница 25: ...N E D E R L A N D S ...

Страница 26: ......

Страница 27: ......

Страница 28: ...Adeva SAS H Koenig Europe 8 rue Marc Seguin 77290 Mitry Mory France www hkoenig com sav hkoenig com contact hkoenig com Tél 33 1 64 67 00 01 Toebehoren niet compatibel met afwassen ...

Страница 29: ...E S P A N O L ...

Страница 30: ......

Страница 31: ......

Страница 32: ...Adeva SAS H Koenig Europe 8 rue Marc Seguin 77290 Mitry Mory France www hkoenig com sav hkoenig com contact hkoenig com Tél 33 1 64 67 00 01 Accesorios no compatibles con lavavajillas ...

Страница 33: ...di uscita 7 Leva bloccaggio e sbloccaggio del braccio 2 Braccio 8 Coperchio antischizzo 3 Pannello di controllo 9 Frusta 4 Asse rotante 10 Sbattitore 5 Piedi antiscivolo 11 Frusta per impasto 6 Base 12 Contenitore da 5 litri ...

Страница 34: ...i gravi a persone o al robot durante la preparazione tenere le mani e gli utensili lontano dalle lame e dai dischi Le lame sono molto affilate quindi è opportuno maneggiarle con cura Per evitare rischi non disporre mai le lame o i dischi sulla base Non inserire mai gli alimenti con le mani servirsi sempre del pestello Spegnere la macchina prima di cambiare gli accessori Utilizzare l apparecchio e ...

Страница 35: ...a veloce Regolare la velocità Accessorio Figura Velocità Tempo Frusta per impasto 1 2 1m 30sec a velocità 1 6 8min a velocità 2 Frusta 3 4 10 min Sbattitore 1 2 3 10 min Operazione normale per impastare la pasta 1 Velocità 1 2 Velocità 2 Dopo 1 minuto e mezzo a velocità 1 il robot passerà automaticamente a velocità 2 durante il processo di impastamento ...

Страница 36: ...2 Scegliere tra la frusta per l impasto lo sbattitore o la frusta multiuso Rischio di lesioni durante la rotazione degli utensili Quando l apparecchio è in funzione tenere le dita lontano dal recipiente ATTENZIONE cambiare gli accessori solo dopo aver spento l apparecchio e staccato la spina Quando l apparecchio è messo sotto tensione il motore continua a funzionare per un breve intervallo ...

Страница 37: ...o Mettere gli ingredienti scelti Capacità del recipiente 1 5 kg di farina e 750 ml d acqua Posizionare il coperchio del recipiente sul braccio e fissarlo ruotandolo in senso orale Installare a scelta lo sbattitore la frusta o la frusta per impastare sull asse rotante e ruotarla in senso orale come indicato in figura Spingere il braccio verso il basso nella posizione indicata in figura Collegare la...

Страница 38: ...so orario e alzare il braccio come indicato in figura Togliere la frusta per impasto lo sbattitore o la frusta multiuso in senso antiorario Togliere il coperchio dal recipiente Togliere il contenitore con il preparato dalla base in senso antiorario Spingere il braccio verso il basso nella posizione riportata in figura ...

Страница 39: ... apparecchio tra i rifiuti domestici Per questo tipo di prodotti è fornito dai comuni un sistema di raccolta e ritiro in zona ed è quindi un dovere informarsi per conoscere il giusto smistamento del rifiuto Infatti i prodotti elettrici ed elettronici possono contenere sostanze pericolose che hanno effetti dannosi sull ambiente o sulla nostra salute e quindi devono essere ricicl ati Il simbolo al l...

Отзывы: