


--- 32 ---
10. REPAIR GUIDE
WARNING: Without fail, remove the battery from the main body before starting repair or maintenance
work. Because the tool is cordless, if the battery is left in and the switch is activated
inadvertently, the motor will start rotating unexpectedly, which could cause serious injury.
10-1. Precautions in Disassembly and Reassembly
The [bold] and <bold> numbers correspond to the item numbers in the Parts List and the exploded assembly
diagram. ( [ ]: WH 12DM2, < >: WR 12DM2 )
10-1-1. Disassembly
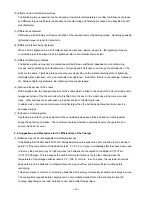
(1) Removal of Guide Sleeve (B) [4] (Model WH 12DM2 only)
Remove the Retaining Ring [1], Washer (D) [2], Guide Spring (A) [3] and Guide Sleeve (B) [4] in order by
following the procedure shown in Figs. 1-1 to 1-4. Be sure not to lose the two Steel Balls D3.5 [9] in Anvil (F)
[10].
Hold the body and adjust the gap of the retaining
ring to the groove of anvil (F), then insert a small
flat-blade screwdriver into the groove at an angle.
Press down washer (D) with the small flat-blade
screwdriver.
Fig. 1-2
Fig. 1-1
1
2
Small flat-blade screwdriver
Anvil (F) [10]
Retaining Ring [1]
Washer (D) [2]
Gap of retaining ring
Guide Sleeve (B) [4]
Slide the small flat-blade screwdriver under one side
of the gap of the retaining ring.
Slowly raise the retaining ring using the end face of
guide sleeve (B) as a fulcrum.
Fig. 1-4
Fig. 1-3
3
4
Then slowly raise the other side of the retainer ring with the small flat-blade screwdriver until it is free. Avoid
quickly raising the retainer ring or it may fly out forcefully.
Содержание WH 12DM2
Страница 49: ... 4 ITEM NO CODE NO DESCRIPTION REMARKS NO USED 8 03 WH 12DM2 Printed in Japan 030820N ...
Страница 54: ......


