background image

18

Displays the standby
shortcut icon.

Selects an item.

Displays outgoing records.

Scrolls forward one menu
screen.

Selects an item.

Displays the main menu.

Applies an item.

Displays the EZ apps
menu.

Displays the address book.

Creates a new address
book (hold down for about
one second).

E-mail

C-mail (hold down for
about one second).

Dials/answers a phone call.

Displays the Pair function.

Memo

Toggles Easy Voice Memo
on and off (hold down for
about one second).

Deletes a character.

Returns to the previous
menu screen.

Toggles power on and off.

Hangs up.

Terminates a function.

Returns to the standby
screen.

Displays the EZ menu.

%

L

N

C

&

R

F

0

9*#

l

d

r

c

Displays the calendar.

Selects an item.

u

Inputs phone number.

Inputs text character.

Toggles Manner Mode on and off
(hold down for about one second).

(

 Standby light illuminates when held down for

more than one second.

 Photo light illuminates when shooting a photo.

)

Operation Basics

 Key functions

 Side key functions

If you lose track of where you are or if you make a mistake
Press 

C

 to scroll back to the previous screen.

Press 

F

 to return to the standby screen.

When 

 is in the lower right corner of the photo or movie screen, pressing

0

 will display key help.

Holding down 

c

 for about one second toggles side key’s disabling feature

on and off while the cellphone is folded. To cancel the side key’s disabling
feature, follow the above procedure with the phone unfolded.

Displays incoming records.

Returns to the previous
menu screen.

Selects an item.

b

Shutter release

Photo function (hold down
for about one second).

Содержание w42h

Страница 1: ...anual Sales KDDI Corporation Okinawa Cellular Telephone Company Manufactured by Hitachi Ltd For inquiries call au Customer Service Center General Information From regular phones toll free toll free From au cellphones 157area code not required 0077 7 111 Pressing zero will connect you to an operator after calling 157 on your au cellphone フリーコール EZ FM PC site viewer Phone Call Address Book Pair Func...

Страница 2: ...u online manual using EZweb EZweb Access EZトップメニュー EZ Top Menu 料金 申込 インフォ Charges Applications and Info auオンラインマニュアル au Online Manual For information about basic operation W42H Basic Manual Equivalent to this English PDF manual For detailed information about each function W42H Instruction Manual English version not available W42H by HITACHI 取扱説明書 目次 カメラ データフォルダ EZweb EZナビ au Music EZ FM 赤外線通信 機能設定...

Страница 3: ...aring a pacemaker Turn off your cellphone when you are in a crowded area Follow the rules of hospitals and other medical facilities concerning the use or possession of cellphones Cellphone Etiquette Some locations do not allow the use of cellphones Using a cellphone while driving is both dangerous and prohibited by Japanese law Using a cellphone inside of an aircraft is prohibited by law Be sure t...

Страница 4: ...ember s cards point cards and so on 78 Page PC document viewer Display Word files Excel files or PDF files and so on EZweb Download Chaku Uta wallpaper and other data Page 66 Mail Send mail messages to other cellphones or to PCs 45 Page Camera 59 Shoot photos and record movies and send them by e mail Page Hello Messenger Enjoy meeting with the members using our original cartoon like characters Pag...

Страница 5: ... 14 Keep an eye on the battery level You cannot talk on the phone if it is unable to receive a signal The phone may not function properly if battery power is low indicates the current battery level Signal strength is low in some areas even if they are within the service area iindicates the current signal strength Page 14 Page 14 Easy Voice Memo If you cannot answer a call Easy Voice Memo plays an ...

Страница 6: ...effective November 1 2004 Reading mail or looking at the display Holding a cellphone in your hand to talk Drive Mode I m driving right now In Drive Mode the phone will play the message ただいま車を運転 しています I am driving right now and then ask the caller to leave a message using Easy Voice Memo While the standby screen is displayed press and then press 1 ON Next press 2 Drive Mode to enter Drive Mode Turn...

Страница 7: ...u call back to a service that automatically bills you very high charges The icon at the head of an incoming record indicates that the call rang for only four seconds or less This indicates a possible one ring call Page 52 Page 27 You can set up mail filters to block specific mail or mail identified as 未承諾広告 unsolicited advertisement which often includes spam Your cellphone has the following filter...

Страница 8: ...d information R Top Menu 災害用伝言板 Disaster Message Board Disaster Message Board information can be accessed by inputting the phone number of an individual over EZweb or the Internet Disaster Message Board information can be accessed from another type of cellphone except for TU KA PHS or PC at http dengon ezweb ne jp Disaster Message Board The Disaster Message Board lets you use EZweb to register inf...

Страница 9: ...録可能です 確認 削除 お知らせメール設定 サービス概要 ご利用地域情報 お問合せ English 災害用伝言板 伝言板トップ サービス提供中 C KDDI TU KA Group Registration contents are retained for up to 72 hours You can register up to 10 entries per phone number Registering a new entry while there are already 10 registered entries automatically overwrites the oldest entry You can view a Disaster Message Board demonstration at R Top Menu 料金 申込 インフォ 災害用伝言板 デモ版 Char...

Страница 10: ...ng Records Incoming Records 27 One ring Calls 27 Changing the Ring Tone 28 Adjusting the Ring Tone Volume 30 Adjusting the Earpiece Volume during a Call 31 Turning On Manner Mode 31 Turning On Easy Voice Memo 32 Playing an Easy Voice Memo 33 Inputting Characters 34 Inputting an E mail Address 35 Inputting Pictographs and Useful Sentences 36 Address Book Registering an Address Book 38 Editing an Ad...

Страница 11: ...curity Navi Features 76 EZ FeliCa 78 Communicating with Reader Writer 79 Setting FeliCa Lock 80 Using FeliCa supported EZ apps 81 EZ FM Before using EZ FM 82 Listening to the EZ FM 83 PC site viewer Features 85 PC site viewer Mastering Operation Basics 86 Using Standby Assignment 87 Smart Mode Entering Smart Mode 89 Exiting Smart Mode 90 Using the Smart Mode Main Menu 91 Adding Data to the Address...

Страница 12: ...利用の準備 au ICカー ド 基本操作 ペア機能 microSDTM メモリカー ド メール Hello Messenger 便利な機能 PCサイトビューアー PCドキュメントビューアー スマートモード ティーンズモード EZアプリ BREW auのネッ トワーク サービス 付録 索引 クイックガイ ド EZ FeliCa Ready Before using the W42H check the contents of the package comes with your W42H You should also familiarize yourself with basic operations like how to charge the battery how to turn the power on etc The microSDTM memory card is not i...

Страница 13: ...or Photo light Standby light Incoming Charge indicator LED Camera start indicator Custom bangle Speaker Battery pack cover Strap eyelet Memo Clear key EZ AF lock key Center key Address book key Power End key Number keys Microphone Built in antenna Application key Mail key Answer Pair key Cursor key External connection jack Flat type earphone microphone jack Charging terminals Infrared port Light k...

Страница 14: ...ged when you purchase it Be sure to charge the battery pack before using the W42H for the first time Charging takes about 150 minutes You should recharge the battery pack whenever the battery level icon shows or You must purchase a common AC adaptor 01 option for charging Note that the configuration of the AC adaptor may be different from that shown in the illustration above Pull out the connector...

Страница 15: ...orrectly before you connect Trying to force a connection may damage the connectors Fold out the power plug of the common AC adaptor 01 option and then plug it into a 100V AC power outlet Insert the W42H into the desktop holder This will make the W42H charge LED indicator light red and the battery level icon to change according to the following pattern When charging is completed the battery level i...

Страница 16: ...en 103 Page Lock No 1234 Teens Lock No 1234 Caller ID On Incoming Display On Profile Blank Font Size Add Book Char Middle Input Middle Mail Char Middle EZweb Char Small Data Folder Char Middle Text Memo Char Middle icon Signal Strength Strong Medium Out of Range Weak Very Weak icon Battery Level High Low Fully Discharged Extension Mode Medium Fully Charged Using Extension Mode Using the Extension ...

Страница 17: ...igit number you entered on your subscription contract Premium EZ Password Usage Examples Initial Values For entering and canceling subscriptions for EZweb fee based content paid for using まとめてau支払い combined au payment service For purchasing products from EZweb sites that use まとめてau支払い combined au payment service 4 to 8 digit number you registered for your first まとめてau支払い combined au payment servic...

Страница 18: ...16 Selecting English as the Display Language While the standby screen is displayed press c Use a to select 機能設定 SETTINGS and then press c OK Press 3 画面表示 照明 ScreenSetup DisplayLighting ...

Страница 19: ...elects English as the display language Even if English is selected as the display language schedule and other dates are displayed in the format year month day Folder names inside of the Data Folder are also displayed in year month day format ...

Страница 20: ... item u Inputs phone number Inputs text character Toggles Manner Mode on and off hold down for about one second Standby light illuminates when held down for more than one second Photo light illuminates when shooting a photo Operation Basics Key functions Side key functions If you lose track of where you are or if you make a mistake Press C to scroll back to the previous screen Press F to return to...

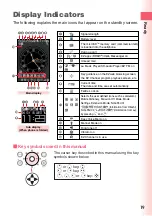
Страница 21: ...in use 9 Selects the user defined icons such as calculator Mobile Dictionary Emission Off Mode Mode Settings Extension Mode Note Pad 01 日立製作所からのご案内 information from Hitachi Note Pad 02 auからのご案内 information from au by pressing d and s au Music Player SD Audio Player EZ FM on Key guidance on the EZweb browsing screen the EZ Channel program playback screen etc Display Indicators The following explain...

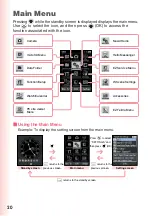
Страница 22: ... screen Press a to select SETTINGS and then press c OK c F returns to the standby screen C returns to the previous screen C returns to the previous screen Main Menu Pressing c while the standby screen is displayed displays the main menu Use a to select the icon and then press c OK to access the function associated with the icon Using the Main Menu Example To display the setting screen from the mai...

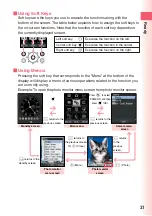
Страница 23: ...use to execute the functions along with the bottom of the screen The table below explains how to assign the soft keys to the on screen functions Note that the function of each soft key depends on the currently displayed screen Left soft key Center soft key c Right soft key Executes the function on the left Executes the function in the center Executes the function on the right Using Menus Pressing ...

Страница 24: ...be when you purchased your phone contact your nearest au shop or the au Customer Service Center You will be assigned an e mail address automatically when you perform the EZweb initialization procedure While the standby screen is displayed press L Press c OK Wait until the phone connects to the server for initialization After your automatically assigned e mail address appears press c OK Pressing R ...

Страница 25: ...l Address While the standby screen is displayed press c Use a to select SETTINGS and then press c OK Press 0 Profile Your current phone number and e mail address appear You can also look up your phone number and e mail address by pressing c and then 0 while the standby screen is displayed ...

Страница 26: ...irmation screen appears press 1 Yes Press 1 E メールアドレ スの変更 Change E mail Address その他の設定 1 Eメールアドレスの変更 2 自動転送先 3 メールフィルター 4 Eメールヘッダ情報表示 通信 料有料 5 その他の設定の確認 ー ー ー ー ー ー ー a uのメルマガサービス設定 メルマガの登録 変更 解 除 お客様の暗証番号を入力 してください 下記の対 象サービスで同日内に連続 3 回間違えると 翌日まで ご利用できなくなります のでご注意ください 対象サービス 送信 リセット ezweb ne jp E mail address Part you can change Domain name ...

Страница 27: ...u want and then press c OK To input an e mail address Inputting an E mail Address page 35 Use j to select 送信 Send and then press c Select The e mail address confirmation screen appears Press j to select OK and then press c Select The message 正常に変更されました Update is complete appears to indicate that your e mail address has been changed Your PIN is the 4 digit number you entered on your subscription co...

Страница 28: ...ll Making a Call Answering a Call Press N to answer an incoming call After you finish a call press F to hang up Display for Incoming Calls A message like this appears when the phone number of the caller is not provided for some reason ID Unsent The caller s phone refused to send its phone number Pay Phone The call is from a pay phone Not Support The call is from a phone that does not support calle...

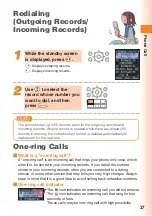
Страница 29: ...tgoing Records Incoming Records One ring Calls What is a one ring call A one ring call is an incoming call that rings your phone only once which aims it to be stored in your incoming records If you redial the number shown in your incoming records often you are connected to a dating service or some other service that may bills you very high charges Always keep in mind that it is a good idea to avoi...

Страница 30: ...28 While the standby screen is displayed press c Use a to select SETTINGS and then press c OK Press 2 Sound Vib LED Press 1 Incoming Call Changing the Ring Tone ...

Страница 31: ...ownload a Chaku Uta from the Internet and use it for your ring tone Downloading Chaku Uta page 70 Press 2 Melody Press 1 Fixed Sound To hear the currently selected ring tone press Check Use j to select the ring tone you want and then press c OK The ring tone is set ...

Страница 32: ...just the ring tone volume perform steps 1 through 3 under Changing the Ring Tone page 28 and then continue with the following steps Beep Beep beep beep Beep beep Step up Ring tone volume gradually increases Step down Ring tone volume gradually decreases Mute Ring tone does not sound To display the Step up and Step down settings select volume level 5 and then press u To display the Mute setting sel...

Страница 33: ...nner Mode While Manner Mode is set to on the phone alerts you to incoming calls by vibrating While the standby screen is displayed hold down for about one second This turns on Manner Mode the icon appears on the display while Manner Mode is turned on Turning on Manner Mode also turns on Easy Voice Memo which is indicated by on the display While Manner Mode is set to on the phone vibrates without s...

Страница 34: ...mo is recorded when there are already four memos in memory the oldest unprotected memo that has already been played back is deleted automatically to make room for the new one Protected Easy Voice Memos are not deleted To turn off Easy Voice Memo hold down C for about one second again Turning On Easy Voice Memo Using the Voice Mail The Voice Mail can be used to answer the phone and take messages wh...

Страница 35: ...ect the record with the icon and then press c Disp The incoming record detail screen appears Use j to select EasyVoiceMemo and then press c Play The easy voice memo plays back To delete an Easy Voice Memo press C42 while the standby screen is displayed Select the Easy Voice Memo you want to delete press Menu and then 1 Delete Next press 1 Delete One and then press 1 Yes Playing an Easy Voice Memo ...

Страница 36: ...ding single byte English lower case letters hyphens periods and underbars _ A period or a zero 0 cannot be used as the first character Characters and symbols that are shaded in the above table cannot be used at the left of in the address format ezweb ne jp You can input a period or at symbol by pressing 1 d e f Key 1 2 3 4 5 6 7 8 9 0 N Number of Presses 1 2 3 4 5 6 7 8 9 1 a b c A B C 2 d e f D E...

Страница 37: ... 1 through 6 under Registering an Address Book page 38 and then perform the following steps Input mark To input m Press 6 once To input a Press 2 once To input r Press 7 three times To input k Press 5 twice Press Menu Press 1 Emoticon Useful Sentence and then 2 Useful Sentence Use j to select ezweb ne jp and then press c OK mark ezweb ne jp is inputted You could also input ezweb ne jp by pressing ...

Страница 38: ...reating a new e mail message Press Char and then 6 Pictograph You can also select a pictograph by pressing Use a to select the pictograph you want and then press c Select Use L and R to scroll through the various categories of pictographs To input consecutive pictographs press Serial Press Menu 2 Emoticon Useful Sentence and then 2 Useful Sentence ...

Страница 39: ...hows the input screens for symbols double byte and emoticons Symbol Double byte Input In step 1 of the above procedure press Char and then 5 to display the FullSym double byte symbol menu Emoticon Input In step 3 of the above procedure press 1 Emoticon in place of 2 Useful Sentence to display the emoticon menu You can also display the emoticon menu by pressing in place of Menu in step 3 ...

Страница 40: ...ond Select Name and then press c Edit Enter the name and then press c OK The Reading is generated automatically when you enter a name To input text Inputting Characters page 34 Use j to select Phone Number1 and then press c Edit Registering an Address Book Address Book ...

Страница 41: ...jump to step 8 Enter the e mail address and then press c OK To input an e mail address Inputting an E mail Address page 35 Press Reg The Address Book can contain up to 700 records Address Book Records are numbered from 000 through 699 A new record is automatically assigned to the lowest available unused record number An Address Book Record can also contain a keyword website URL street address birt...

Страница 42: ... press use a to select the record you want to edit and then press Menu Press 3 Modify and then 1 Overwrite Use j to select 0900006XXXX and then press c Edit Make the changes you want press c OK and then Reg To delete characters press C Address Birthday Group Editing an Address Book Record ...

Страница 43: ...ber you want to save and then press Menu r Displays outgoing records l Displays incoming records Press 4 Reg Add Book Press 1 Reg New To enter the name use the procedure starting from step 2 under Registering an Address Book page 38 Adding Outgoing or Incoming Record Data to the Address Book ...

Страница 44: ...creen is displayed press and then use a to select the record whose phone number you want to dial Press c Disp The details screen of the record appears Use j to select the phone number and then press N Dialing from the Address Book ...

Страница 45: ...s not registered the confirmation screen appears Press c OK Use s to select the 1 through 5 tab where you want to register the Pair partner Use j to select Register Check and then press c OK Press 1 Register Use a to select the address book record for the person you want to register as a Pair partner and then press c Select When there is more than one phone number e mail address registered in the ...

Страница 46: ...eating and Sending E mail Messages page 47 Creating and Sending C mail Messages page 53 After selecting Hello Messenger pressing c OK will display the screen for inviting a Pair partner to a Hello Messenger meeting Next continue from step 4 of the procedure under Invite the Members to the Meeting page 57 In order to register a person as a Pair partner that person s name phone number and other info...

Страница 47: ...an initialization procedure before you can use e mail If you have not performed initialization yet refer to Initializing E mail and EZweb page 22 E mail makes you possible to exchange mails with a PC and with another cellphone that supports e mail function You can send mail messages that contain up to 5 000 double byte characters 10 000 single byte characters and you can attach photos and movies t...

Страница 48: ...ges that contain up to 50 double byte characters 100 single byte characters with another au cellphone that supports C mails About C mail safe block function C mail safe block function blocks C mails that contain accessing URLs http https or phone numbers in its body text C mail safe block function is set to on by default If you want to receive C mails that contain accessing URLs or phone numbers i...

Страница 49: ...ail will be sent You can send an e mail up to five addressees at a time Press 1 Address Book use a to select an addressee and then press c Select You can select an addressee from sending records receiving records or My Address or you can enter an address Use j to select the e mail address you want to enter and then press c OK Creating and Sending E mail Messages ...

Страница 50: ... OK Press Send or N フォトメール便送信 Photo Mail マ イ絵文字送信 My Pictograph お手軽 絵文字送信 Easy Pictograph are the auto address converter a part of the e mail address will be converted automatically To use お手軽絵文字送信 Easy Pictograph free or マイ絵文字送信 My Pictograph paid services you need to subscribe to the EZweb contents 絵文字 め る Pictographs Mail Press 1 Send The message Sent appears on the display after the e mail mes...

Страница 51: ... Mail and then press c OK Press c OK Indicates an unread message Indicates an already read message Use j to select the unread e mail you want to view and then press c Disp The received e mail message appears If all of the message cannot be displayed press d to scroll Use L and R to scroll between messages Press C to return to the e mail message list ...

Страница 52: ... and then press c Play Depending on the size of the photo or movie file the file may not appear within the mail in step 2 of the above procedure If this happens select the file name and press c Rcv c Play The sending and receiving operations may take longer when a mail message has data attached Certain signal conditions may also cause e mail sending and receiving to take longer than normal ...

Страница 53: ... e mail is quoted For the remainder of this procedure Perform the procedure starting from step 7 under Creating and Sending E mail Messages page 47 Replying to a Received E mail Message To reply to an e mail message perform steps 1 through 3 under Reading Received E mail Messages page 49 and then perform the following steps ...

Страница 54: ...ct 送信 and then press c Select Next follow the instructions that appear on the display カンタン設定 Simple Settings You can prevent spam by changing your e mail address See Changing Your E mail Address page 24 for information about how to change your e mail address サポート設定 Supportive settings フィルターレベル 高 Filter level Strict フィルターレベル 中 Filter level Medium フィルターレベル 低 Filter level Normal You can choose filter...

Страница 55: ...s 1 Create New Select and then press c Edit Press 1 Address Book use a to select an addressee and then press c Select You can also select a phone number from sending records or receiving records or you can enter an address Use j to select the phone number you want to enter and then press c OK Creating and Sending C mail Messages ...

Страница 56: ...sending records Reading Received C mail Messages When you receive a C mail The message C Mail and appear on the standby screen Select C Mail and then press c OK Indicates an unread message Use j to select the unread C mail you want to view and then press c Disp The received C mail message appears Use L and R to scroll between messages Press C to return to the C mail message list Received C mail ic...

Страница 57: ... send text sound and photo in real time to all the chatters using au cellphone supporting this service All chatters are represented by cartoon style characters they selected The host can invite up to 4 people from the address book entries Due to the conditions like frequent use location or signal conditions the time you can use for meeting may become shorter than usual Two to five people can use t...

Страница 58: ...ect your own cartoon style character then press c 設定 Setting Character list From these 12 original characters you can select the one as your own character Hello Messenger menu Yamashita Kohei mountain mountain Item スタート Start コメントログ Comment log ヒント Hint オプション Option Outline Select the members to invite to the meeting Displays Comment log meeting records Displays operations basics Makes various set...

Страница 59: ...es perform steps 1 through 2 under Dialing from the Address Book page 42 Press c 選択 Select The member list appears Your name is shown on the top of the list or 私 Me is shown when your name is not registered in the profile Your name or 私 Me cannot be changed or deleted 私 Me is shown on the list when your name is not registered in the profile To add members select the blank column and press c 選択 Sel...

Страница 60: ...ne sounds and you can start meeting without any operation When you get an invitation message to join The message inviting you to join the meeting appears on the display Use j to select 参加 Join and then press c OK On the incoming screen you can see the host s name total number of the members and the time of acceptance With Manner Mode set no ring tone sounds from speaker or Casio flat type stereo e...

Страница 61: ...ur address book Send images by e mail Within 500KB you can send a photo or a movie shot or recorded with Mail Mode as an e mail attachment Certain signal conditions may cause e mail send and receive to take longer than normal Your W42H comes with a built in 2 1 megapixel 2 07 million effective pixel camera to shoot photos and record movies You can attach the photos and movies that you shot recorde...

Страница 62: ...us function You can shot photos with the subject properly focused simply by pressing the shutter key Tips for Avoiding Hand Movement Remain steady by keeping your arms lightly against your sides and standing with your feet about shoulder width apart Having your arms away from your side or extended in front of you can cause blurred images When you press the shutter button remain still until your sh...

Страница 63: ...t the phone emits the shutter sound even if it is in Manner Mode You can also press b in place of c Check the subject through the monitor screen within the area indicated as and release the shutter Press c Save The display shows the message Saved to data folder Phone and then returns to the photo monitor screen Photos you shot are saved to the Photo Folder which is in the Data Folder Shooting a Ph...

Страница 64: ...gnal the start of recording even if it is in Manner Mode You can also press b in place of c To stop recording press c End Even if you do not press c End recording will stop automatically after about 15 seconds The phone emits a shutter sound when recording stops Press c Save The display shows the message Saved to data folder Phone and then returns to the movie monitor screen Movies you recorded ar...

Страница 65: ...een press 0 to display key help Press 0 again to exit key help The initial movie mode setting when you purchase your W42H is Mail Mode High Quality L 176 144 The maximum recording time in Mail Mode is 15 seconds Meanings of the Movie Titles in the Movie Folder which is in the Data Folder Example of a Movie Title 060816 1123 0001 S_ is added to the beginning of the movie title when the movie size i...

Страница 66: ...otos and movies in the Photo Folder or Movie Folder Use j to select the dated by recording date folder and then press c Detail A list of all movies that were recorded on that day are displayed Use a to select the photo or movie you want to play and then press c Disp Play The photo or movie displays plays To pause movie playback press c Playback will stop automatically when the movie ends Viewing P...

Страница 67: ...ail automatically converts images so as you can view them properly on a non au cellphone In order to use Photo Mail you need to change the receiver s e mail address to a special Photo Mail address When you send an e mail using the auto address converter the e mail address will be converted automatically as shown below To use the auto address converter press 2 フォ ト メール便送信 Send Photo Mail on the e m...

Страница 68: ... did not subscribe when you purchased your phone contact your nearest au shop or the au Customer Service Center In addition to an EZweb subscription you also need to perform an initialization procedure before you can use EZweb If you have not performed initialization yet refer to Initializing E mail and EZweb page 22 EZweb allows you to access to Chaku Uta the latest news and other web based conte...

Страница 69: ...g Auctions Provides information about shopping malls where you can purchase goods with your cellphone and the information about the net auction where you can sell or buy easily 7 ライフ Daily life Provides useful information for daily life 8 キーワードで探す Search by keyword Searches for a site by keyword 2 最新情報 Latest Information Introduces the list of new special features or contents started at EZweb 3 トッ...

Страница 70: ...able to bookmark some sites Press Reg Use j to select a folder and then press c OK The message Registered appears when completed Bookmarking Sites You Frequently Access You can have up to 100 sites bookmarked in the Favorite Site list 無料メルマカ つぶメル 旅行券5万円分 特集 今週のヒキタ シ ーーーーーーーーーーーーーーーーーーーーーー ーーーーーーーーーーーーーーーーーーーーーー ...

Страница 71: ... here While the standby screen is displayed press R Press 2 Favorite Site Use j to select a site or folder and then press c OK If you selected a folder use j to select a site and then press c OK Viewing a Bookmarked Site ...

Страница 72: ...u 支払 い combined au payment service payment Input the required password according to the instructions that appear on the display The first time you use a site register the password you want to use To download information follow the instructions that appear on the display Downloaded data is stored in the Data Folder Downloading Chaku Uta To download a Chaku Uta perform step 1 under Displaying the EZ...

Страница 73: ...s c OK Use j to select Jump to EZ Music and then press c OK This operation connects the phone to EZ Music For the operations after connecting follow the instructions displayed on the screen Downloading Chaku Uta Full You can also download Chaku Uta Full by selecting 着うたフル Chaku Uta Full performing step 2 under Downloading Chaku Uta page 70 ...

Страница 74: ...払 説明 6 累計ポイン ト照会 説明 料金照会 While the standby screen is displayed press c11 When the EZweb connection confirmation screen appears press 1 Yes Use j to select the item you want to check and then press c Select Checking Charges You can check call and transmission charges ...

Страница 75: ...matically download the programs the ones you selected and preregistered to your W42H Every updated program will be delivered to your W42H since late at night to early morning 2 00 a m 8 00 a m Displaying EZ Channel Menu EZweb subscription required You need to perform an initialization procedure before you can use EZ Channel If you have not performed initialization yet refer to Initializing E mail ...

Страница 76: ...er seat Navi This is a service that a person in an automobile s passenger seat of an automobile can use to check the route to a destination using voice and map images This application is not included when you first purchase the phone After accessing Passenger seat Navi you need to download the application to use it Press 2 EZnavi PressR and then press4 EZ Service Menu EZ navi menu Standby screen E...

Страница 77: ...A menu of useful options you can use while you are out The star symbol shows that you can use your voice to enter search terms This is called Voice input function 乗換検索 Transfer Search ナビ Navigation 現在地 Current Location 道路情報 Traffic Information 設定登録 Setups and Registrations オススメ New The latest news and featured information おためしナビ Navi Demo provides the demonstration of voice navigation or Voice inp...

Страница 78: ...is although her child does not make any operation This service is recommended to little children who are not accustomed to cellphone operations Notice The monthly fee is charged separately Did you finish school C o m in g h o m e Where is my boy Park Park Park Security Navi Features Position Search Features When your child does not come home early and you are worried if your child may be lost you ...

Страница 79: ... both of the cell phones Before you can use Security Navi you need to agree to be bound by the terms of the user agreement that appears the first time you start it up and you must register a password Agreement to be bound by the user agreement is required in order to use Security Navi The wrong location may be displayed in areas where GPS reception is poor underground inside of a building or in ar...

Страница 80: ...a caused by theft loss or malfunction of your W42H cellphone Your security codes and passwords needs to be highly confidential and protected Contact the service company for further details about FeliCa supported EZ apps Even when your cellphone supports EZ FeliCa service itself some of the services can be unavailable For details contact your nearest au shop or the au Customer Service Center Some o...

Страница 81: ...iter Hold the FeliCa mark of W42H over reader writer You can use EZ FeliCa without starting FeliCa supported EZ apps EZ FeliCa is available even when the power is turned off However when the battery level is very low you may not be able to use EZ FeliCa Be careful not to bump the FeliCa mark against reader writer when holding it ...

Страница 82: ...tial setup beforehand Even if you set Auto Lock the FeliCa Lock will not be set If the battery discharges while the FeliCa Lock is on you will be unable to release the FeliCa Lock Be careful of the battery level When your battery is discharged recharge the battery then release the FeliCa Lock to use EZ FeliCa Releasing FeliCa Lock temporarily quick release When the FeliCa Lock is on hold down r fo...

Страница 83: ...t the time of purchasing Starting FeliCa supported EZ apps While the standby screen is displayed press c Use a to select EZ FeliCa and then press c OK EZ FeliCa menu appears Press 1 アプリ一覧 EZ apps List The list of the FeliCa supported EZ apps saved in W42H is displayed Select the EZ apps you want to start EZ FeliCa menu ...

Страница 84: ...reception condition is not good you may not be able to listen to the EZ FM In such case try the measures below The cable of Casio flat type stereo earphones 03 works as an antenna Connect Casio flat type stereo earphones 03 to W42H extend the cable as long as possible and try to find the best direction for listening to the EZ FM Radio wave comes from outside so try to listen to the EZ FM as close ...

Страница 85: ...ess C You can switch between Frequency area and Radio station Song title area EZ FM screen Continued on the next page Listening to the EZ FM When you use EZ FM for the first time area selection screen appears Select an area where you use the EZ FM No packet communication fees are charged for listening EZ FM However you will be charged for using Display the song title service provided by EZ FM apps...

Страница 86: ...st and the broadcasting station of the currently air played tune Press c 曲名表示 Display the Song Title on the EZ FM screen The name of the tune the artist etc will be scroll displayed This information may not be displayed depending on the program Switching the speakers Press 44 on the EZ FM screen and then press 1 スピーカー イヤホン 切替 Speaker Earphone You can set to イヤホン Earphone or スピーカー Speaker Suspendin...

Страница 87: ...een is displayed and you can view the site with a operations Display a portion of a WEB site page and you can automatically update it at specified intervals If you press 接続 Connect while 待受指定 Standby Assignment is displayed you can display from the top of the page with a full screen and operate the PC site viewer in the same way as the usual browsing Displaying as Standby screen Select a portion o...

Страница 88: ...own at maximum PC site viewer Mastering Operation Basics While the standby screen is displayed press c Use a to select PC SITE VIEWER press c OK and then press OK Warning message on packet communication appears Press 1 トップページ Top Page The initial setting is Duogate http duogate jp The contents displayed on the right is an example and it may differ from the contents that actually appear on the disp...

Страница 89: ...by Assignment is displayed To use 待受指定 Standby Assignment perform steps 1 through 4 under Mastering Operation Basics page 86 and then perform the following steps Display your favorite page and then press メニュー Menu Press 5 待受指定 Standby Assignment Press オプション Option and then press 1 新規作成 Create New Press c OK twice If you press a you can shrink the area displayed by 待受指定 Standby Assignment If you pr...

Страница 90: ...ion for PC site viewer We recommend that you subscribe to Packet Communication Discount Service as the communication fee may be quite high by performing a large size communication such as viewing homepages that include large images Also be careful that packet communication fee will be charged for each updating if you set automatic update by 待受指定 Standby Assignment Checking your packet communicatio...

Страница 91: ...ntering Smart Mode While the standby screen is displayed press c use a to select SETTINGS and then press c OK Press 5 User Support 3 OperationSupport and then 3 Mode Setup Press 2 Smart Mode Smart Mode The lock number is required when changing from Teens Mode to Smart Mode When you enter Smart Mode settings configured in Usual Mode are automatically changed to those configured in Smart Mode ...

Страница 92: ...90 Exiting Smart Mode While the standby screen is displayed press c Use j to select SETTINGS and then press c Select Press 9 SmartModeOFF Press 1 Yes This returns to Usual Mode ...

Страница 93: ...ering data in the address book For composing and reading E mail and C mail messages and for changing E mail addresses For selecting the photo or movie recording and the correction method For using EZ services For using au Music Player and EZ FM For viewing and deleting data in the Data Folder or microSDTM memory card For using the calendar calculator and other tools For changing the incoming tone ...

Страница 94: ...g of the name you inputted press c OK and then press 3 Input by Myself You can also select data in incoming records or outgoing records To go without saving the telephone number press 4 Not Input and perform step 5 Enter the phone number and then press c OK When entering the number of a standard phone be sure to start with the area code Adding Data to the Address Book in Smart Mode ...

Страница 95: ...ing an E mail Address page 35 Press 2 Not Register The confirmation screen appears Press c OK Press c Reg In Smart Mode you can only input Name Reading Phone Number1 E Mail Add1 and Image data into an address book record You can press 1 Register in step 7 to select a photo in the Data Folder and assign it to the address book record Pressing Reedit in step 8 and then pressing 1 Change returns to st...

Страница 96: ...n press c E Mail This will display the e mail composition screen 1 Call Dials the number of the selected record 2 Send Mail Selects to compose an e mail message and send it to the address of the selected record To create an e mail message Perform the procedure starting from step 3 under Creating and Sending E mail Messages in Smart Mode page 95 4 Delete Data Deletes the selected address book recor...

Страница 97: ... select an addresses from sending receiving records or you can manually enter an address When you have already registered two or more e mail addresses in the address book in Usual Mode Teens Mode Setting to Smart Mode displays only the e mail address you usually use Press c Fix enter the subject and then press c OK To input text Inputting Characters page 34 Press c Fix Creating and Sending E mail ...

Страница 98: ... Smart Mode an e mail message can have only one attachment After checking the content of the e mail press c Send フォトメール便送信 Photo Mail マイ 絵文字送信 My Pictograph お手軽絵文 字送信 Easy Pictograph are the auto address converter a part of the e mail address will be converted automatically To use お手軽絵文字送信 Easy Pictograph free or マイ絵文字送信 My Pictograph paid services you need to subscribe to the EZweb contents 絵文字 め...

Страница 99: ...e will emit a shutter sound You can also press b in place of c Press Save Shooting a Photo in Smart Mode Pressing c Menu in step 4 and then pressing 2 Send Mail will display a screen for composing an e mail message with attached photo To create an e mail message Perform the procedure starting from step 2 under Creating and Sending E mail Messages in Smart Mode page 95 Photo 1 Photo 2 Wallpaper 240...

Страница 100: ...ess 1 Data Folder Use j to select Photo Folder and then press c Select Selecting All Data displays a list of all photos in the Photo Folder Use j to select the dated by shooting date folder and then press c Select A list of all photos that were shot on that day are displayed Viewing Photos in Smart Mode ...

Страница 101: ...s data 3 Attach E Mail Displays a screen for composing an e mail message with an attachment To create an e mail message Perform the procedure starting from step 2 under Creating and Sending E mail Messages in Smart Mode page 95 4 MoveTo microSD Moves the data to microSDTM memory card 5 Send via Ir Sends your data via infrared ...

Страница 102: ...book When the sender is not either of the above Receipt is allowed Receipt is allowed However the phone numbers e mail addresses or URLs contained in the body of the mail message can not be used E mail Only the sender s name and subject are received Body text and attached data are not received C mail Not received To someone who is a Pair partner To someone who is not a Pair partner No restriction ...

Страница 103: ...ed press c use a to select SETTINGS and then press c OK Press 5 User Support and then 3 OperationSupport Press 3 Mode Setup and then 3 Teens Mode Enter the lock number and then press c OK The lock number is required when changing from Teens Mode to Usual Mode or Smart Mode ...

Страница 104: ...essc OK Next input the phone number you want to preset and then press c Reg With Hot Buzzer holding down 0 for about one second will sound a loud volume buzzer To turn on Hot Buzzer While the standby screen is displayed press c5352 input the lock number and then press c OK To stop the Hot Buzzer To stop the Hot Buzzer after it starts to sound input the lock number and then press c OK You cannot tu...

Страница 105: ...s Book Schedule and so on when necessary In this case you can only use the functions which needs no radio wave To turn on Extension Mode While the standby screen is displayed press c5341 The Hot Buzzer sounds from the speaker of W42H even when you have Casio flat type stereo earphones 03 flat type switched earphone microphone option flat type stereo earphone microphone option attached to your W42H...

Страница 106: ...h data in full screen enlarged or reduced landscape or portrait switch or fitting Barcode Reader Maker You can use the camera to read QR codes and barcodes Also you can create your own barcodes directly from your address book entries Infrared communication You can exchange the data saved in your address book Schedule or Data Folder between au cellphones supporting infrared communication EZ apps BR...

Страница 107: ...e second to turn off Easy Voice Memo Hold down for about one second to turn off Drive Mode During a call press u to increase earpiece volume Page P 12 P 14 P 14 P 26 P 14 P 26 P 14 P 14 P 14 P 12 P 32 P 4 P 31 What to check Is the battery pack installed correctly Is the battery pack charged Are you holding down F for at least 1 5 seconds Is Out of Range on the display Are you including the area co...

Страница 108: ...d phone number to your W42H within the specified period of time While the standby screen is displayed press c414 input the lock number and then press c OK Press 6 Caller ID List Use j to select a registration number press Edit input the phone number and then press c Reg Press C twice and advance to the next step You can also press Menu before inputting a phone number and select the number from the...

Страница 109: ...Auto Lock turns active and you hear an announcement letting you know Auto Lock and FeliCa Lock has been set After Remote Auto Lock turns active your W42H is automatically turned off and turned on again Press 1 ON OFF Setup and then press 1 ON Press 2 Specified Time input the period you want to specify and then press c OK You can set the time period the time intervals from the first call to the las...

Страница 110: ...ice Memo Delete 33 Playback 33 Turning on 32 E mail 45 Create New 47 Creating and sending e mail messages 47 E mail address 22 23 24 E Mail Setup 52 Initial settings 22 Reading an e mail message with an attached photo or movie 50 Reading received e mail messages 49 Replying to a received e mail message 51 Subject 48 To 47 Extension Mode 103 EZ Channel 73 EZ FeliCa 78 Communicating with reader writ...

Страница 111: ...all 26 Dialing a person who called you incoming records 27 Making a call 26 Missed call notification 26 Redialing a person you called outgoing records 27 Photo Photo Folder 64 Reshooting a photo 63 Sending a photo by e mail 65 Shooting a photo 61 Viewing photos 64 Playback Easy Voice Memo 33 Movie 64 Photo 64 R Ready 10 Redial From incoming records 27 From outgoing records 27 Remote Auto Lock 106 ...

Страница 112: ...anual Sales KDDI Corporation Okinawa Cellular Telephone Company Manufactured by Hitachi Ltd For inquiries call au Customer Service Center General Information From regular phones toll free toll free From au cellphones 157area code not required 0077 7 111 Pressing zero will connect you to an operator after calling 157 on your au cellphone フリーコール EZ FM PC site viewer Phone Call Address Book Pair Func...

Отзывы: