background image

After Sales Support

Telephone:


1300 886 649

Email: 


[email protected]

13

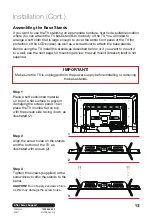
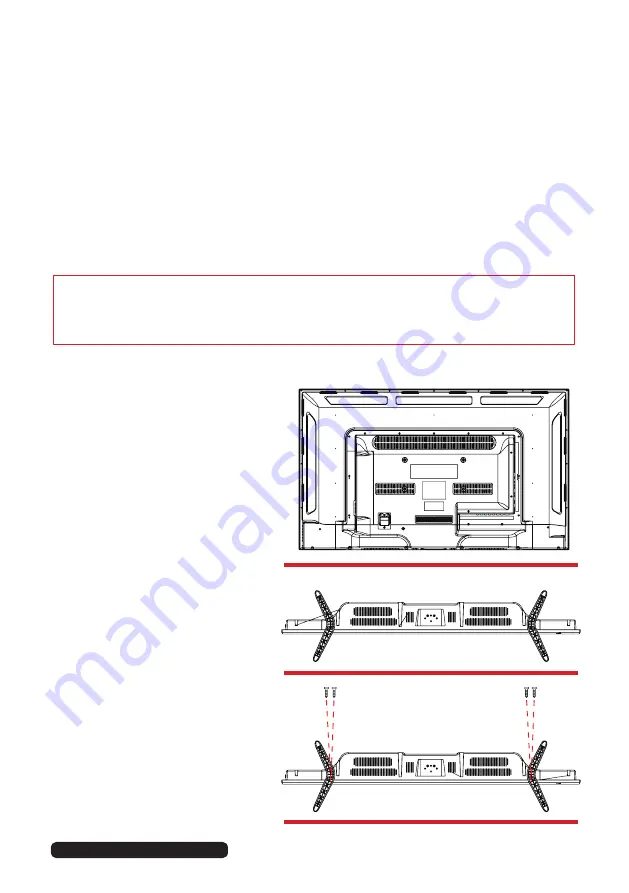
Step 1
Place a soft cushioned material 
on top of a flat surface to prevent 
damaging the screen panel. Then 
place the TV monitor flat on top, 
with the screen side facing down, as 
illustrated (2).

Step 2
Align the screw holes on the stands 
and the bottom of the TV, as 
illustrated with arrows (2). 

Step 3
Tighten the screws (supplied) with a 
screwdriver to affix the stands to the 
panel.

CAUTION! Do not apply excessive force 
as this may damage the screw holes.

Installation (Cont.)

Assembling the Base Stands 

If you want to use the TV standing on appropriate furniture, first find a suitable location 
where you can attach the TV base stands to the body of the TV. You will need to 
arrange a soft cloth that is large enough to cover the entire front panel of the TV (for 
protection of the LCD screen), as well as a screwdriver to attach the base stands. 
Before using the TV, install the stands as described below, or if you want to mount it 
to a wall, see the next page for mounting advice; the wall mount (bracket) itself is 

not


supplied.

IMPORTANT!

Make sure the TV is unplugged from the power supply before installing or removing 

the base stands.

3

2

1

Содержание VZC40FHD5300

Страница 1: ...OWNER S GUIDE MODEL VZC40FHD5300 40 Full HD LED LCD TV with Built In DVD Player ...

Страница 2: ...uy a HITACHI product All products brought to you by HITACHI are manufactured to the highest standards of performance and safety and as part of our philosophy of customer service and satisfaction are backed by our comprehensive 2 Year Warranty We hope you will enjoy using your purchase for many years to come ...

Страница 3: ...Welcome 2 Remote Control 4 Safety Instructions 8 Installation 12 Controls and Connections 15 Getting Started 21 Basic Operations 22 TV Guide 24 Recording 25 Menu Settings 28 DVD Mode 40 USB Multimedia Playback 49 Troubleshooting 52 Specifications 54 Other Useful Information 55 ...

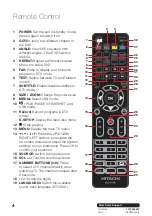
Страница 4: ... MEDIA Select USB mode 10 PLAY PAUSE in TIMESHIFT and USB mode 11 Record Record programs in DTV mode D SETUP Display the main disc menu 12 Stop playing 13 MENU Display the main TV menu 14 Press the UP DOWN RIGHT LEFT buttons to navigate the on screen menus and adjust the system settings to your preference Press OK to confirm your selection 15 SOURCE Switch the input source 16 VOL Turn the volume u...

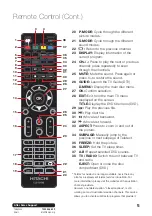
Страница 5: ... Exit from the main TV menu displayed on the screen TITLE Display the DVD title menu DVD 29 Play the previous file 30 Play next file 31 Move fast backward 32 Move fast forward 33 ASPECT Press to zoom in and out of the picture 34 SUBPAGE Manually jump to the previous or next subpage of Teletext 35 FREEZE Hold the picture 36 SLEEP Set the TV sleep timer 37 A B Repeat selected DVD scenes 38 TV RADIO ...

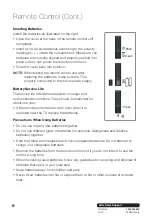
Страница 6: ...sage and environmental conditions They should normally last for about one year If the remote control fails to work even when it is operated near the TV replace the batteries Precautions When Using Batteries Do not use old and new batteries together Do not use different types of batteries for example Manganese and Alkaline batteries together Note that there are chargeable and non chargeable batteri...

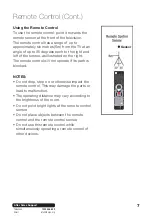
Страница 7: ...left of the sensor as illustrated on the right The remote control will not operate if its path is blocked NOTES Do not drop step on or otherwise impact the remote control This may damage the parts or lead to malfunction The operating distance may vary according to the brightness of the room Do not point bright lights at the remote control sensor Do not place objects between the remote control and ...

Страница 8: ...optical laser beam system in the disc mechanism designed with built in safeguards Do not attempt to disassemble Exposure to this invisible laser light beam may be harmful to the human eye This is a Class 1 laser product Use of controls adjustments or procedures other than those specified herein may result in hazardous laser light beam exposure This TV set with DVD player should not be adjusted or ...

Страница 9: ...nd operable Protect the cord Do not bend twist or kink the power cord excessively Do not allow anything to rest on or roll over the power cord and antenna cable Doing so may cause a fire or an electric shock Do not run the power cord near heat producing appliances such as radiators stoves or irons The excessive heat could melt the insulation and expose live wires resulting in fire or electric shoc...

Страница 10: ...lation Leave at least 10cm clear space around the TV and 30cm from the top of the TV If the temperature inside the unit rises it may result in fire Do not cover the ventilation openings with items such as newspapers tablecloths curtains etc as this could impede ventilation Usage Conditions and Restrictions Adjustments Follow the instructions in this manual when installing and adjusting the TV set ...

Страница 11: ...emoved from the mains outlet You may then wipe the TV with a dry soft cloth Repair If the TV requires repair contact the after sales support line never disassemble or modify the TV or attempt to service it yourself Service Refer all servicing to qualified service personnel Servicing is required when the TV has been damaged in any way such as when the power supply cord or plug is damaged liquid has...

Страница 12: ... you can either use it standing up on the supplied base stands on suitable furniture or mounted to a wall You will find installation instructions for both options on the following pages After having installed the base stands or wall mounted the TV follow the instructions in the Controls and Connections section to ensure that you TV is correctly connected to your TV antenna and related AV equipment...

Страница 13: ...ge the screw holes Installation Cont Assembling the Base Stands If you want to use the TV standing on appropriate furniture first find a suitable location where you can attach the TV base stands to the body of the TV You will need to arrange a soft cloth that is large enough to cover the entire front panel of the TV for protection of the LCD screen as well as a screwdriver to attach the base stand...

Страница 14: ...ing bracket to mount this TV NOTE The screws in the package are for securing the TV stands only If you are wall mounting the TV please consult a qualified installer for further instructions on bracket support and wall support IMPORTANT Make sure the TV is unplugged from the power supply before mounting it to a wall or taking it off the wall mount We recommend you contact a professional for assista...

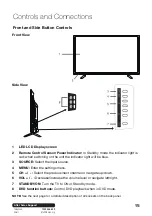
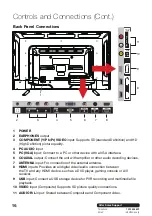
Страница 15: ...ng on the unit the indicator light will be blue 3 SOURCE Select the input source 4 MENU Enter the settings menu 5 CH Select the previous next channel or navigate up down 6 VOL Decrease increase the volume level or navigate left right 7 STANDBY ON Turn the TV to ON or Standby mode 8 DVD function buttons Control DVD playback when in DVD mode NOTE See the next page for a detailed description of all s...

Страница 16: ...other device with a VGA interface 6 COAXIAL output Connect the unit with amplifier or other audio decoding devices 7 ANTENNA input For connection of the external antenna 8 HDMI inputs Provides an all digital video audio connection between the TV and any HDMI device such as a DVD player gaming console or A V receiver 9 USB input Connect a USB storage device for PVR recording and multimedia file pla...

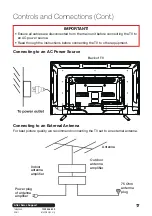
Страница 17: ...ng the TV to an AC power source Read through the instructions before connecting the TV to other equipment Connecting to an AC Power Source Antenna Outdoor antenna amplifier Indoor antenna amplifier Power plug of antenna amplifier 75 Ohm antenna plug Connecting to an External Antenna For best picture quality we recommend connecting the TV set to an external antenna Back of TV ...

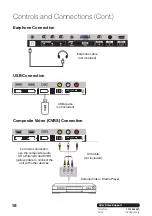
Страница 18: ...n AV Cable not included USB Connection Earphone cable not included USB device not included External Video Media Player For basic connection use the composite Audio L R white red and CVBS yellow cable to connect the unit with other devices 2 0 USB HDMI 3 2 L R VIDEO AUDIO AV IN COMPONENT AV IN 2 0 USB HDMI 3 2 L R VIDEO AUDIO AV IN COMPONENT AV IN ...

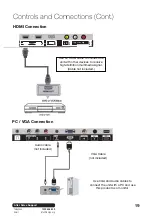
Страница 19: ...onnection Use VGA and Audio cables to connect the unit with a PC and use this product as a monitor Use an HDMI cable to connect the unit with other devices to receive high definition multimedia signal Cable not included VGA Cable not included Audio cable not included 2 0 USB HDMI 3 2 L R VIDEO AUDIO AV IN COMPONENT AV IN ...

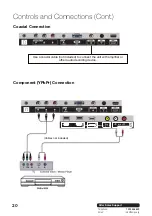
Страница 20: ...po org 20 Controls and Connections Cont Coaxial Connection Component YPbPr Connection Use a coaxial cable not included to connect the unit with amplifier or other audio decoding device 2 0 USB HDMI 3 2 L R VIDEO AUDIO AV IN COMPONENT AV IN Cables not included ...

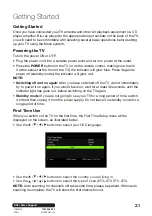
Страница 21: ... will glow red NOTE Switching off and on again After you have switched off the TV do not immediately try to power it on again If you want it back on wait for at least 30 seconds until the indicator light has gone out before switching on the TV again Standby mode If you are not going to use your TV for a long period of time switch it off and then unplug it from the power supply Do not leave it in s...

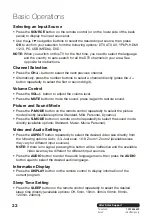
Страница 22: ...sound Picture and Sound Mode Press the P MODE button on the remote control repeatedly to select the picture mode directly available options Standard Mild Personal Dynamic Press the S MODE button on remote control repeatedly to select the sound mode directly available options Standard Music Movie Personal Video and Audio Settings Press the ASPECT button repeatedly to select the desired video size d...

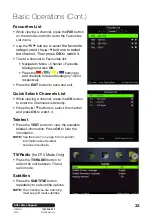
Страница 23: ...ory 1 2 3 4 respectively Press the EXIT button to save and exit Quick Select Channels List While viewing a channel press the OK button to enter the Channels List directly Press the buttons to select the channel and press OK to watch it Teletext Press the TEXT button to view the available teletext information Press OK to hide the information NOTE See the note on page 5 for important information abo...

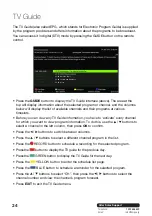
Страница 24: ...e to activate every channel for which you want to view program information To do this use the buttons to select a channel in the left column then press OK to confirm Press the buttons to switch between columns Press the buttons to select a different channel program in the list Press the RECORD button to schedule a recording for the selected program Press the button to display the TV guide for the ...

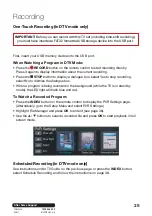
Страница 25: ...he TV is in standby mode the LED light will flash blue and red To Watch a Recorded Program Press the INDEX button on the remote control to display the PVR Settings page Alternatively go to the Setup Menu and select PVR Settings Highlight File Manager and press OK to enter it see page 38 Use the buttons to select a recorded file and press OK to start playback in full screen mode Scheduled Recording...

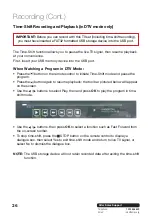
Страница 26: ... DTV Mode Press the button on the remote control to initiate Time Shift mode and pause the program Press the button again to resume playback the tool bar pictured below will appear on the screen Use the buttons to select Play then and press OK to play the program in time shift mode Use the buttons then press OK to select a function such as Fast Forward from the on screen toolbar To stop time shift...

Страница 27: ... your recording Some USB storage devices may not be compatible for smooth operation with this TV For large file sizes and large capacity storage devices the loading speed may be longer The recognition speed of a USB storage device may vary depending on the device When connecting or disconnecting the USB storage device ensure the TV is not in USB mode otherwise the USB device or the files stored in...

Страница 28: ...us Press OK or to enter the submenu page Press the buttons to select the preferred option Press the buttons to adjust the value Press the MENU button to save the current setting and return to the previous menu page Press the EXIT button to exit the menu page Press the SOURCE button on the back panel or on the remote control to display the input source list Press the buttons to select the desired i...

Страница 29: ...Use the buttons to select the desired submenu and with the highlighted menu selected press OK or to enter it Auto Scan Using the buttons select Auto Scan then Country and then the appropriate mode Press the button to start scanning NOTE Auto scanning for channels will take some time please be patient When auto scanning is complete the TV will show the first channel found Press MENU to return to th...

Страница 30: ...Scan then press the button to start manual scanning for analog channels Press MENU to return to the previous menu or EXIT to exit the menu Digital Manual Scan Using the buttons select Digital Manual Scan then press the button to start manual scanning for digital channels Press MENU to return to the previous menu or EXIT to exit the menu ...

Страница 31: ...highlighted channel Press the GREEN button on the remote control to skip the highlighted channel Press the button again to cancel the setting Press the BLUE button on the remote control to move the highlighted channel Then use the buttons to select the preferred position then press the BLUE button again to move the channel Press MENU to return to the previous menu or EXIT to exit the menu Signal I...

Страница 32: ...Saturation Use the buttons to adjust the values Hue Use the buttons to adjust the value only adjustable in NTSC systems Color Temp Use the buttons to select from Standard Cool Warm Aspect Ratio Use the buttons to select the preferred aspect ratio Screen Mode Use the buttons to select the preferred screen mode in HDMI mode only Advanced Settings Use the buttons to enter the advanced settings adjust...

Страница 33: ...uttons to select from Standard Music Personal Movie Treble Bass Balance Use the buttons to adjust the values Sound Delay Use the buttons to sync video and audio Surround Sound Use the buttons to select ON or OFF EQ Setting Use the buttons to enter the EQ setting adjustment menu AVL Use the buttons to select ON or OFF S PDIF Use the buttons to select the SPDIF audio output Audio Description Use the...

Страница 34: ... Channel Locks Use the button to select the channels s you want to lock Parental Rating Use the buttons to set the desired parental rating Available options are No Block Block G and above Block PG and above Block M and above block MA and above block R and above Block All Lock Keypad Use the buttons to select ON or OFF The keys on the lower left side of the TV s back panel will be inactive if you s...

Страница 35: ...f Hotel Mode Max Vol Set the maximum volume level Default Vol Set the default volume level Source Lock Turn on off the lock on available sources Default Source Set the default source Default DTV Program Set the default digital program Default ATV Program Set the default analog program Backup to USB Backup the data to USB memory device Restore from USB Restore data from USB memory device and then y...

Страница 36: ...ou can select the desired primary and secondary subtitle language and turn on off the Hearing Impaired function when this mode is on only adjustable if there is a signal Teletext Press OK or to enter Then you can select the desired digital Teletext language and decoding page language See the note on page 5 for more information about Teletext in Australia Blue Screen Turn ON OFF blue screen Time Se...

Страница 37: ... Use the buttons to adjust it Press OK to confirm the setting press EXIT to cancel it HDMI CEC Control To use the HDMI CEC function make sure the HDMI device amplifier etc is connected correctly Press the SOURCE button on the unit or remote control to select HDMI input source HDMI CEC Control This item is used to turn on off HDMI CEC Consumer Electronic Control ARC This item is used to turn on off...

Страница 38: ...s the GREEN button to delete the highlighted option Press the YELLOW button to delete all Use the buttons to select a schedule Press OK to edit the highlighted Scheduled Recording Frequency Press the buttons to select the desired mode Off Once Daily Weekly Weekday Channel Press the buttons to select the desired channel Start Time Press the buttons to select the desired start date and time of the r...

Страница 39: ...nter Use the buttons to select the preferred item Press OK or to enter the submenu press the buttons to adjust the value Auto Adjust Use this item to adjust the PC screen automatically H Position Use this item to adjust the horizontal position value from 30 to 30 V Position Use this item to adjust the vertical position value from 30 to 30 Phase Use this item to adjust the phase value from 0 to 31 ...

Страница 40: ...starts reading the disc immediately When a menu screen appears on the unit press the buttons or the number buttons to select the chapter track number then press OK to confirm To stop playing and return to the menu screen press the TITLE or D MENU button on the remote control Stopping Play Press the STOP button to stop playback NOTE When the player is stopped it records the point on the DVD where S...

Страница 41: ...wing From Different Angles Some DVDs may contain scenes which have been shot simultaneously from a number of different angles For discs that support multiple angles press the ANGLE button to view the same scene from a different angle Go To Press the GOTO button repeatedly to select the item you want to set and enter a time number chapter number track number etc then press OK Accordingly the disc w...

Страница 42: ...d B starts Press the A B button again to return to normal play Zoom Play This function allows you to zoom into the picture to enlarge it or zoom out Press the ZOOM button when playing the screen shows Use the navigation buttons to scroll across the enlarged picture Changing the Audio Soundtrack Language on DVD VCD discs It is possible to change the audio soundtrack language to a different language...

Страница 43: ...s to select the desired song from the files displayed in this folder then press the or OK button to start playback On the file selection page press the or buttons to turn to the previous or next page Press the REPEAT button on the remote control to change the play mode SINGLE play one file only REPEAT ONE repeat one file REPEAT FOLDER all the files in the folder will be played repeatedly FOLDER al...

Страница 44: ... desired movie file from the files displayed in this folder then press the or OK button to start playback During normal playback press the or button to play the previous or next file Press the REPEAT button on the remote control to change the play mode SINGLE Play one file only REPEAT ONE Repeat one file REPEAT FOLDER All the files in the folder will be played repeatedly FOLDER All the files in th...

Страница 45: ...s the REPEAT button on the remote control to change the play mode SINGLE play one file only REPEAT ONE repeat one file REPEAT FOLDER all the files in the folder will be played repeatedly FOLDER all the files in the folder will be played NOTE The available repeat modes may vary for different discs Skip to the Next Previous Picture Press button to skip to the next picture or button to skip to the pr...

Страница 46: ...cord cleaning sprays benzene thinner or static electricity prevention liquids Be careful not to drop or bend the disc Do not insert more than one disc in the disc compartment Do not try to close the disc cover when the disc is not inserted properly Be sure to store the disc in its exclusive case when not in use DO NOT store discs in humid or dusty areas or where they are exposed to direct sunlight...

Страница 47: ... item then press OK to confirm the setting Press the D SETUP button again to close the setup menu Use the buttons to switch to another main setup item Then press the or OK button to enter the submenu page Press the button to return to the previous menu page General Setup Page TV Display This setting is for selecting the TV output mode Available options Normal PS Pan Scan mode Normal LB Letter Box ...

Страница 48: ...f your disc menu contains multiple menu languages Program Control Use this item to select the desired program rating Password Use this item to change the password Input the password using the number buttons on the remote control The default password is 0000 NOTE If you forget the password please use the master password 4711 Default Use this item to reset to factory settings Audio Setup Page Downmi...

Страница 49: ... to enter USB mode directly Press the buttons to move the cursor Press the EXIT button to return to the previous menu page Photo Press the buttons to select Photo in the main menu then press OK to enter it Photos files can only be played in this menu category Use the buttons to select the desired folder or file then press OK to open the folder or start playing the file Press the BLUE button to ent...

Страница 50: ... to open the folder or start playing the file Press the BLUE button to enter the submenu functions Press the button to return to the previous menu Movie Press the buttons to select Movie in the main menu then press OK to enter it Music files can only be played in this menu category Use the buttons to select the desired folder or file then press OK to open the folder or start playing the file Press...

Страница 51: ...elect Movie in the main menu then press OK to enter it Music files can only be played in this menu category Use the buttons to select the desired folder or file then press OK to open the folder or start playing the file Press the BLUE button to enter the submenu functions Press the EXIT button to return to the previous menu ...

Страница 52: ...s are properly set Ensure the volume is not muted If it is press the MUTE button to restore the sound If earphones are connected unplug them Adjust the volume to a suitable level by pressing the VOL VOL button No operations can be performed with the remote control unit Check the batteries are correctly installed The batteries may be exhausted replace them Make sure to point the remote control at t...

Страница 53: ...Ds with playback control Play does not start even when title is selected Confirm the region code setting is correct Troubleshooting cont Problems Relating to the USB Device My TV does not recognise my USB device or my external hard disk Please refer first to the instructions describing how to use USB devices with this unit If the problem still occurs your device may not be compatible This machine ...

Страница 54: ... JPEG Text TXT Power Source AC 100 240V 50 60Hz Power Consumption 75W USB Output 5V DC 500mA Dimensions mm With Stand 924 x 220 x 604 mm Weight Gross 10 3 kg incl accessories and box Net 7 7 kg TV only Specifications Technical Specifications The region number for the built in DVD player is 4 Region code setting All DVD discs are coded by the sales territory Please note the built in DVD player is s...

Страница 55: ...ren please ensure all packaging materials are out of reach and are safely disposed of Please ensure they are offered for recycling rather than throwing these materials away TV At the end of its working life do not throw this TV out with your household rubbish An environmentally friendly method of disposal will ensure that valuable raw materials can be recycled and used again Electrical and electro...

Страница 56: ......
Отзывы: