background image

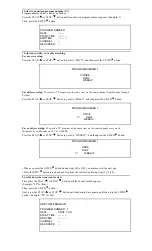
5 Set the start hour 

Press the PLAY/

 or STOP/

 button until the desired hour appears. (Example: 07)  

Then, press the F.FWD/

 button. 


ONE TIME PROGRAM 
 
PROGRAM NUMBER    1 
DATE   

05/04   THUR 

START TIME 

07: --  -- 

END TIME 

-- : --  -- 

CHANNEL  

-- 

REC SPEED 

-- 


6 Set the start minute 

Press the PLAY/

 or STOP/

 button until the desired minute appears. (Example: 30)  

Then, press the F.FWD/

 button. 

Next, press the PLAY/

 or STOP/

 button to point to "AM" or "PM". (Example: PM) Then, press the 

F.FWD/

 button. 


ONE TIME PROGRAM 
 
PROGRAM NUMBER    1 
DATE   

05/04   THU 

START TIME 

07:30  PM 

END TIME 

-- : --  -- 

CHANNEL  

-- 

REC SPEED 

-- 


     AM 


 PM 


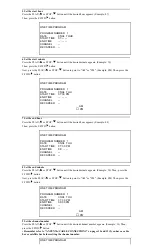
7 Set the end hour 

Press the PLAY/

 or STOP/

 button until the desired hour appears. (Example: 08)  

Then, press the F.FWD/

 button. 


ONE TIME PROGRAM 
 
PROGRAM NUMBER    1 
DATE   

05/04   THU 

START TIME 

07: 30  PM 

END TIME 

08:  --  -- 

CHANNEL  

-- 

REC SPEED 

-- 


8 Set the end minute 

Press the PLAY/

 or STOP/

 button until the desired minute appears. (Example: 30) Then,  press the 

F.FWD/

 button. 

Next, press the PLAY/

 or STOP/

 button to point to "AM" or "PM". (Example: PM) Then, press the 

F.FWD/

 button. 

ONE TIME PROGRAM 
 
PROGRAM NUMBER    1 
DATE   

05/04   THU 

START TIME 

07: 30  PM 

END TIME 

08: 30 PM 

CHANNEL  

-- 

REC SPEED 

-- 


     AM 


 PM 

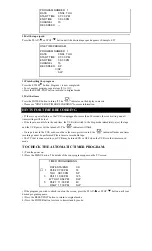
9 Set the channel number 

Press the PLAY/

 or STOP/

 button until the desired channel number appears. (Example: 16) Then, 

press the F.FWD/

 button. 

• Remember refer to "ANTENNA/CABLE CONNECTIONS" on pages 11 and 12 if you have a cable 
box or satellite box before setting the channel number. 

ONE TIME PROGRAM 
 

Содержание VT-MX4530A

Страница 1: ...ect Button Operation n n n n 2 Step Picture Search Operation n n n n Still n n n n Digital Auto Tracking DTR n n n n Auto Repeat n n n n Picture Select n n n n Three different playback tape speeds SP LP SLP n n n n Two different recording tape speeds SP SLP n n n n IRT Instant Recording Timer n n n n 1 Year 7 events including Daily and Weekly Timer Recording n n n n Time Search Quick Find Index Se...

Страница 2: ...ANNELS 24 CHANNEL SET UP AGAIN 25 SELECTING THE LANGUAGE 25 PLAYBACK 26 NORMAL PLAYBACK 26 PICTURE SEARCH 26 STILL PICTURE 26 VERTICAL HOLD CONTROL 26 TRACKING ADJUSTMENT 27 SLOW MOTION 27 COUNTER MEMORY 27 TO EXIT THE COUNTER MEMORY 27 SPECIAL PLAYBACK 28 AUTO REPEAT PLAYBACK 28 TO EXIT THE AUTO REPEAT MODE 28 PICTURE SELECT 28 INDEX SEARCH 29 QUICK FIND 29 TO SKIP TO THE BEGINNING OF NEXT PROGRA...

Страница 3: ...ONVERTER 42 PROGRAMMING THE REMOTE CONTROL OF THE CABLE CONVERTER 42 TO OPERATE THE CABLE BOX ONCE THE REMOTE IS PROGRAMMED FOR IT 42 REMOTE CONTROL OF THE TV 43 PROGRAMMING THE REMOTE CONTROL OF THE TV 43 CONTROLLING THE TV 44 TROUBLESHOOTING GUIDE 44 MAINTENANCE 45 SERVICING 45 CABINET CLEANING 45 HEAD CLEANING 45 TECHNICAL SPECIFICATIONS 45 CABLE CHANNEL DESIGNATIONS 46 ...

Страница 4: ...red The openings should never be blocked by placing the video product on a bed sofa rug or other similar surface This video product should not be placed in a built in installation such as a bookcase or rack unless proper ventilation is provided or the manufacturer s instructions have been adhered to 10 Power Sources This video product should be operated only from the type of power source indicated...

Страница 5: ... may result in damage and will often require extensive work by a qualified technician to restore the video product to its normal operation e If the video product has been dropped or damaged in any way f When the video product exhibits a distinct change in performance this indicates a need for service 20 Replacement Parts When replacement parts are required be sure the service technician has used r...

Страница 6: ...unit when it is moved from a cold place to a warm place or after heating a cold room or under conditions of high humidity Do not use the VCR at least for 2 hours until its inside is dry FCC WARNING This equipment may generate or use radio frequency energy Changes or modifications to this equipment may cause harmful interference unless the modifications are expressly approved in the instruction man...

Страница 7: ...ape you play Auto Repeat Allows you to repeat the playing of a tape indefinitely without pressing the PLAY button Picture Select Allows you to select the picture quality of a tape Three different playback tape speeds SP LP SLP Two different recording tape speeds SP SLP IRT Instant Recording Timer Instant timed recording for 30 to 480 minutes is possible at the push of the REC IRT button 1 Year 7 e...

Страница 8: ... or SLP mode Super Long Play The table below shows the maximum recording playback time using T60 T120 or T160 tapes in each mode Tape Speed Recording Playback Time Type of tape TT16060 T120 T160 SP mode 1 hour 2 hours 2 2 3 hours SLP mode 3 hours 6 hours 8 hours Note You can play back a tape recorded in LP mode Long Play INSERTING A CASSETTE Insert the cassette in the direction as shown Push in ge...

Страница 9: ...s when setting program for example setting clock or timer program Press to select setting modes from the on screen menu only on the remote control 5 F FWD button Press to rapidly advance the tape or view the picture rapidly in forward during playback Forward Search button When setting program for example setting clock or timer program press to determine your selection and proceed to the next step ...

Страница 10: ...l Frame Advance function Press to advance the picture by one frame at a time during the still mode only on the remote control 21 SLOW button Press to start slow motion playback The slow speed can be controlled by pressing the F FWD button faster or the REW button slower only on the remote control 22 MUTE button Press to mute the TV s sound Press it again to resume the sound only on the remote cont...

Страница 11: ...l cable supplied to the UHF VHF antenna jack of your TV Fig 1 Indoor Antenna You can record one channel while viewing another The same goes for Automatic Timer Recording and IRT For details please refer to Recording on page 25 Note The connection of an indoor antenna with a VCR may not always give acceptable TV reception Fig 2 VHF UHF Combination Antenna or Cable from the Cable Company You can rec...

Страница 12: ... one of the connections below Satellite systems Neither one of these connection will work For satellite owner wishing to record one channel and view another please contact the manufacture of the satellite system Fig 5 You can record a scrambled channel while viewing another RECORDING HINTS 1 Be sure to check that the PWR and the VCR indicators are both on 2 Turn on the TV and Cable Box 3 Set the c...

Страница 13: ...Fig 6 This connection is good only if none of your channels are scrambled You can record one channel while viewing another Scrambled channels can not be recorded with this connection ...

Страница 14: ...G TO INPUT JACKS When you copy a video tape or watch a program recorded on an another source use the audio video input jacks on the VCR USING THE REAR JACK Fig 7 USING THE FRONT JACK You can use the audio and video input jacks on the front panel of the VCR instead of using the jacks on the back INPUT SELECT OF FRONT OR REAR To use the audio video input jacks select the LineIn Rear L1 or LineIn Fro...

Страница 15: ...Fig 8 ...

Страница 16: ...play or record a video tape BEFORE programming the tuner you must first turn off the VCR Then press the POWER button again to turn it back on To program the tuner again see CHANNEL SET UP AGAIN on page 19 CHANNEL SET UP Automatic Plug in the VCR power cord Plug the VCR power cord into a standard AC outlet The indicator flashes on the display Whenever the AC plug is connected the VCR search the loc...

Страница 17: ...nnel is transmitting the EDS Extended Data Service signal If the highest channel has EDS signal it takes many times To cancel this search press the RESET EXIT button If you want to use DAYLIGHT SAVINGS TIME feature when current time appears follow DAYLIGHT SAVINGS TIME on page 18 TO SELECT A DESIRED CHANNEL You can select the desired channel by using the CHANNEL CH or button or directly pressing t...

Страница 18: ...ly channel 3 or 4 to be able to set up and automatically correct the clock 1 Select main menu Press the MENU button until the main menu appears If the clock is not set yet CLOCK SET menu appears immediately when you press the MENU button In this case go to step 3 MENU TIMER PROGRAMMING AUTO REPEAT OFF PICTURE SELECT CHANNEL SET UP CLOCK SET LANGUAGE SELECT 2 Select CLOCK SET Press the PLAY or STOP...

Страница 19: ...17 MANUAL CLOCK SETTING We suggest that you use a TV or radio station as your time source In the example below the clock is to be set to DATE 20th March 2000 SETTING TIME 5 40PM Use the remote control for this procedure Be sure to check that the PWR and the VCR indicators are both on Turn on the TV and set the TV to channel 3 or 4 Now set the CH3 CH4 switch on the back of the VCR to match the chan...

Страница 20: ...he PLAY or STOP button to point to MANUAL Then press the F FWD button twice When you press the F FWD button during steps 4 to 8 you may move forward to the next step Press the REW button to go back one step from the current step during steps 5 to 9 CLOCK SET AUTO CLOCK MANUAL ON D S T ON ...

Страница 21: ...the year Press the PLAY or STOP button until the desired year appears Example 2000 Then press the F FWD button CLOCK SET MONTH DAY YEAR 03 20 2000 HOUR MINUTE AM PM 7 Select the hour Press the PLAY or STOP button repeatedly until your desired hour appears Example 05 Then press the F FWD button CLOCK SET MONTH DAY YEAR 03 01 MON 2000 HOUR MINUTE AM PM 05 8 Select the minute Press the PLAY or STOP b...

Страница 22: ...time will change automatically as follows First Sunday of April from 2 00AM to 3 00AM Last Sunday of October from 2 00AM to 1 00AM NOTES When programmed timer recordings start between 2 00AM 2 59AM on the First Sunday of April the VCR will start recording at 3 00AM When programmed timer recordings end between 2 00AM 2 59AM on the First Sunday of April the VCR will stop recording at 3 00AM Use the ...

Страница 23: ...T Daylight Savings Time to ON Press the PLAY or STOP button to point to D S T Then press the F FWD button so that ON appears CLOCK SET AUTO CLOCK ON MANUAL D S T ON 4 To return to TV mode Press the RESET EXIT button ...

Страница 24: ... 3 or 4 Now set the CH3 CH4 switch on the back of the VCR to match the channel selected on the TV 1 Select main menu Press the MENU button until the main menu appears MENU TIMER PROGRAMMING AUTO REPEAT OFF PICTURE SELECT CHANNEL SET UP CLOCK SET LANGUAGE SELECT 2 Select CHANNEL SET UP Press the PLAY or STOP button to point to CHANNEL SET UP Then press the F FWD button 3 Select MANUAL SET UP Press ...

Страница 25: ...ss the MENU button until the main menu appears 2 Press the PLAY or STOP button to point to CHANNEL SET UP Then press the F FWD button 3 Confirm AUTO SET UP is pointed to then press the F FWD button After scanning the tuner stops at the lowest memorized channel The VCR distinguishes between standard TV channels and cable channels CHANNEL SET UP AUTO SET UP MANUAL SET UP SELECTING THE LANGUAGE If yo...

Страница 26: ...TOP button PICTURE SEARCH This feature is very useful in finding or skipping over a particular scene on a tape In this mode the sound will be muted 1 You may view a video tape at a high speed in either a forward or reverse direction by pressing the F FWD or REW button in the SP LP SLP modes 2 Press it again and the VCR will now search in super high speed in the LP SLP modes only 3 Press the PLAY b...

Страница 27: ... to And you can search it easily by rewinding or fast forwarding Use the remote control for the following procedure Be sure to check that the PWR and the VCR indicators are both on Turn on the TV and set the TV to channel 3 or 4 Now set the CH3 CH4 switch on the back of the VCR to match the channel selected on the TV This feature only works with a prerecorded tape 1 Stop tape at your desired point...

Страница 28: ...u turn off the VCR The COUNTER MEMORY button does not function if the Auto Repeat mode is set to ON In this case set the Auto Repeat mode to OFF To stop playback press the STOP button TO EXIT THE AUTO REPEAT MODE Repeat steps 1 to 2 Then press the F FWD button OFF will then appear on the menu Then press the RESET EXIT button to return to TV mode Power failure If there is a power failure for more t...

Страница 29: ...rch Press the REW or F FWD button The VCR begins rewinding or fast forwarding to the beginning of desired program NOTE Every time an index signal is skipped the number in the program indicator decreases by one 4 After Index Search When the preset program is reached the VCR will start playback automatically A video cassette must be inserted in the VCR for this function to work The number of Index S...

Страница 30: ... hours and 50 minutes from the present position in either direction 1 Select TIME SEARCH Press the TIME SEARCH button on the remote control 2 Enter your desired time Press the PLAY or STOP button until your desired time appears 2 50 stands for 2 hours 50 minutes The Time Search mode will be cancelled if the procedures are not activated in 30 seconds TIME SEARCH 2 50 3 Begin Time Search By pressing...

Страница 31: ...roceeding to the next step 2 Select the tape speed Press the TAPE SPEED button on the remote control to select the desired tape speed SP SLP SP 3 Begin recording Press the REC button The REC indicator appears on the display REC SP NOTE If any menu is activated on the TV screen the REC button on the remote control does not function Press the RESET EXIT button to clear the menu Then press the REC bu...

Страница 32: ... button on the VCR Please refer to the connection you are using through pages 10 11 or 12 on ANTENNA CABLE CONNECTIONS before continuing You cannot use the remote control for this function Be sure to check that the PWR and the VCR indicators are both on Turn on the TV and set the TV to channel 3 or 4 Now set the CH3 CH4 switch on the back of the VCR to match the channel selected on the TV Insert a...

Страница 33: ...ng time press the DISPLAY button on the remote control so that IRT appears on the TV screen It will show up momentarily then disappear Recording stops when 0 00 is reached Please note that in the SLP mode maximum recording time assuming the tape is started at the beginning is 8 hours using T 160 or 6 hours using T 120 The TV that is connected to your VCR may be turned on or off during IRT If the t...

Страница 34: ...lock must be set to the correct time and date before setting the timer Insert a cassette tape with its erase prevention tab in place If necessary rewind or fast forward the tape to the point at which you want to begin recording Avoid overlap of programs There is a case that a program will not be performed When programs overlap The program with an earlier start time has priority Once the earlier pr...

Страница 35: ...utton PROGRAM NUMBER 1 ONCE DAILY WEEKLY For weekly recording To record a TV program at the same time on the same channel every week Example every Monday on ch 7 at 5 00PM Press the PLAY or STOP button to point to WEEKLY and then press the F FWD button PROGRAM NUMBER 1 ONCE DAILY WEEKLY When you press the F FWD button during steps 4 to 10 you may move to the next step Press the REW button to go ba...

Страница 36: ...ntil the desired hour appears Example 08 Then press the F FWD button ONE TIME PROGRAM PROGRAM NUMBER 1 DATE 05 04 THU START TIME 07 30 PM END TIME 08 CHANNEL REC SPEED 8 Set the end minute Press the PLAY or STOP button until the desired minute appears Example 30 Then press the F FWD button Next press the PLAY or STOP button to point to AM or PM Example PM Then press the F FWD button ONE TIME PROGR...

Страница 37: ...ettings will be lost If the tape runs out before the end time the VCR will switch to the Stop mode immediately eject the tape and the VCR power will be turned off The indicator will flash If a tape is not in the VCR or does not have the erase protection tab the indicator flashes and timer recording cannot be performed Please insert a recordable tape The TV that is connected to your VCR may be turn...

Страница 38: ...on In this case you can enter the new program Press the F FWD button during program number flashes then continue with the step 3 in the AUTOMATIC TIMER RECORDING section 4 Press the F FWD button ONE TIME PROGRAM PROGRAM NUMBER 1 DATE 05 04 THU START TIME 07 30 PM END TIME 08 30 PM CHANNEL 16 REC SPEED SP To cancel the program press the REW button during the program number flashes To correct the pr...

Страница 39: ...ct the LineIn Rear L1 or LineIn Front L2 position on the editing recording VCR See page 13 under Connecting to input jacks 5 Press the REC button on the editing recording VCR 6 Begin playback of the tape in the source playing VCR For best results during dubbing use the VCR s front panel controls whenever possible The remote control might affect the playback VCR s operation Always use video quality...

Страница 40: ...nt Clock and Channel number press the DISPLAY button on the remote control Each time you press the DISPLAY button TV screen will change as shown below It is normal for the status display STOP PLAY etc and the tape speed display SP LP playback only or SLP to disappear after 5 seconds ...

Страница 41: ... the illustration Indicates the channel number when it is set Indicates the tape speed when it is changed SPECIAL FEATURES REAL TIME TAPE COUNTER This shows the elapsed recording or playback time in hours minutes and seconds The displayed time will not change during blank portions on the tape The indication will appear when the tape is rewound further than 0 00 00 on the tape counter 0 00 12 AUTO ...

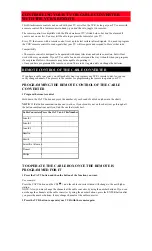
Страница 42: ... have a cable converter you will probably want to program your VCR s remote control so you can easily change channels The process is the same as for programming the remote to operate your TV PROGRAMMING THE REMOTE CONTROL OF THE CABLE CONVERTER 1 Program the remote control Hold down the CATV button and press the number of your brand of cable box shown in the chart NOTE If that button combination d...

Страница 43: ...he remote is set to control the television NOTES If that button combination does not change the TV channel go through the whole list of button combinations one by one until you find one that does change your TV channel Also if your brand of TV is not listed in the chart try all the number buttons One of them may work for you If the TV channel still doesn t change after going through all the button...

Страница 44: ...utlet Make sure the power is turned on Timer recording is not possible Make sure the timer recording is set correctly Make sure the power is off Make sure the VCR clock is set correctly Cannot go into Record mode Make sure the tape has an erase prevention tab If needed cover the hole with plastic tape Playback picture is partially noisy Adjust tracking control for a better picture by using the CHA...

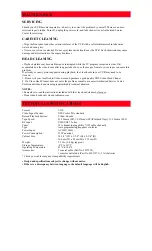
Страница 45: ...S Video Head Cleaner 2 If a Video Head Cleaner does not solve the problem consult our nearest Authorized Service Center Professional video head cleaning requires highly technical attention NOTES Remember to read the instructions included with the video head cleaner before use Clean video heads only when problems occur TECHNICAL SPECIFICATIONS Format VHS Video Signal System NTSC color EIA standard ...

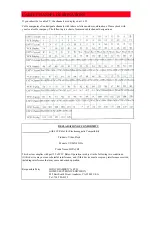
Страница 46: ...ORMITY with FCC Rules for Electromagnetic Compatibility Products Video Deck Models VT MX4530A Trade Name HITACHI This device complies with part 15 of FCC Rules Operation is subject to the following two conditions 1 this device may not cause harmful interference and 2 this device must accept any interference received including interference that may cause undesired operation Responsible Party HITACH...

Отзывы: