background image

DELAYED RECORDING 

- 55 - 

change the minutes.  
 • 

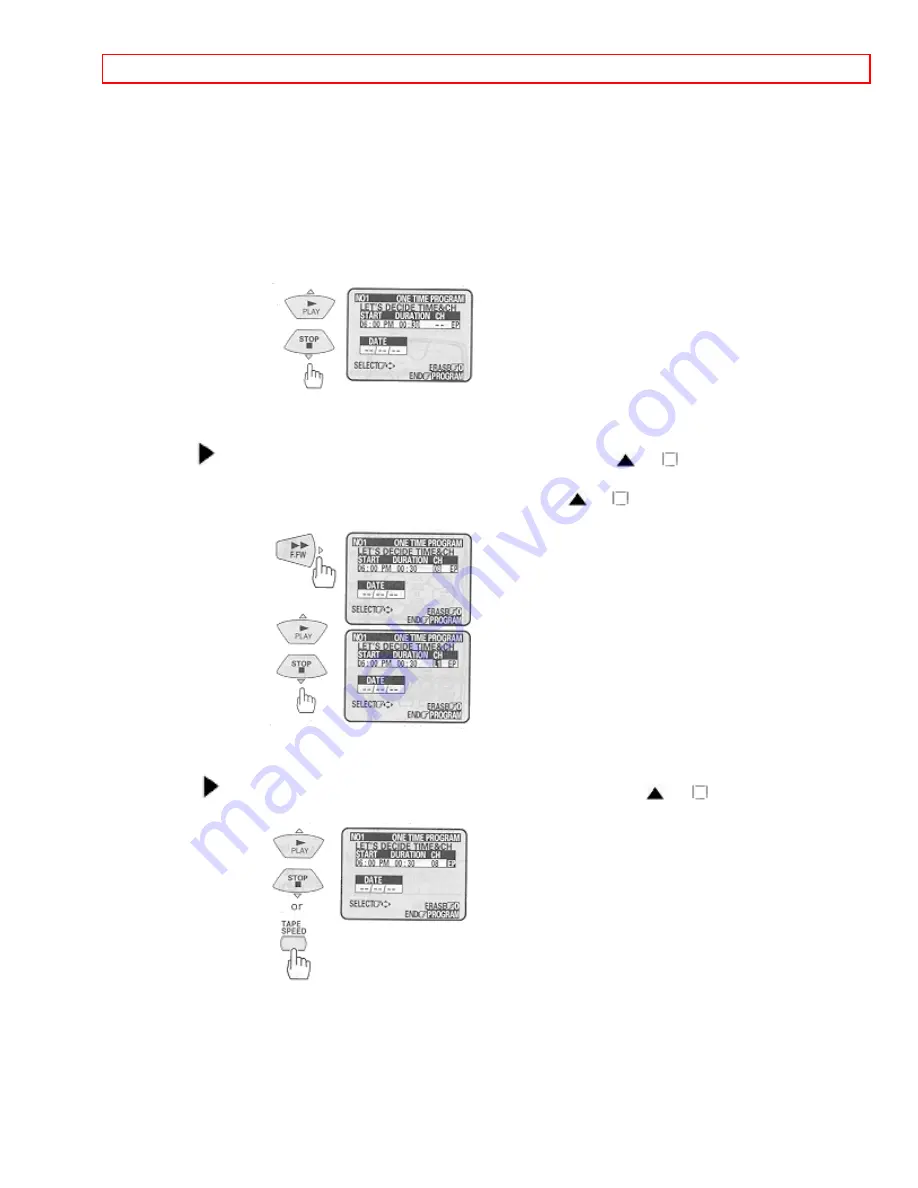
If you have installed a cable box (see page 23), the cable box output channel will appear in the CH 

column. 


9  Press the 

cursor button to select the channel, and then press the 

 or 

 cursor button to change 

the channel.


• 

If you want to record from an external equipment, press the 

 or 

 cursor button to select L1 

                   or L2 instead of the channel number. 


10 Press the 

 cursor button to select the tape speed, and then press the 

 or 

 cursor or TAPE 

SPEED button to change the recording speed to EP. 


Содержание VT-FX6407AS

Страница 1: ...ward Multi channel TV sound MTS 8 program 1 month preset recording Auto tracking system automatically adjusts the tracking so the picture is optimized Frequency synthesized tuner provides easy preset tuning of up to 68 broadcast TV channels and 125 cable channels VHS Hi Fidelity sound in playback On screen programming guide With display VCR Plus can be programmed to record without turning power on...

Страница 2: ...tomatically 19 SETTING THE CLOCK 20 Tips 20 To set the clock 20 PRE TUNING THE VCR TUNER 23 Presetting the received channels without using a cable box Hookups A B C or D 23 To add or erase channels 25 Auto blue setting 27 PLAYBACK 28 To playback a recorded tape 28 Rewinding the tape 29 Rewinding or fast forwarding a tape at high speed 30 To remove noise from the picture 31 SPECIAL PLAYBACK EFFECTS...

Страница 3: ... 59 VCR Plus setup Channel setup 59 Using the VCR Plus system to record a program by using TV screen 61 Using the VCR Plus system to record a program by using VCR s display 64 PROGRAM REVIEW 67 Reviewing what you have programmed 67 USING THE VCR REMOTE TO CONTROL YOUR TV 68 Using the VCR remote to control your Hitachi TV 68 INTEGRATING YOUR STEREO SYSTEM WITH YOUR VCR 69 Hookup 69 To record from s...

Страница 4: ... CATV system installer This reminder is provided to call the CATV system installer s attention to Article 820 40 of the NEC that provides guidelines for proper grounding and in particular specifies that the cable ground shall be connected to the grounding system of the building as close to the point of cable entry as practical IMPORTANT SAFEGUARDS In addition to the careful attention devoted to qu...

Страница 5: ...r ventilation to ensure reliable operation of the video product and to protect it from overheating These openings must not be blocked or covered The openings should never be blocked by placing the video product on a bed sofa rug or other similar surface This video product should never be placed near or over a radiator or heat register This video product should not be placed in a built in installat...

Страница 6: ... or circuits as contact with them might be fatal Installing an outdoor antenna can be hazardous and should be left to a professional antenna installer USE 14 Cleaning Unplug this video product from the wall outlet before cleaning Do not use liquid cleaners or aerosol cleaners Use a damp cloth for cleaning 15 Object and Liquid Entry Never push objects of any kind into this video product through ope...

Страница 7: ...damaged f When the video product exhibits a distinct change in performance this indicates a need for service 19 Replacement Parts When replacement parts are required have the service technician verify that the replacements he uses have the same safety characteristics as the original parts Use of replacements specified by the video product manufacturer can prevent fire electric shock or other hazar...

Страница 8: ...ard S FF high speed fast forward STILL play pause and frame advance REM tape remaining time indicator VCR operate mode Audio indicators REC record flashes during record pause Tape in indicator TV channel or Auxiliary L1 L2 Delayed recording indicator Accessories supplied Check and identify the accessories supplied If any are missing or appear damaged consult your dealer Remote Control Cable for co...

Страница 9: ...hannel up down button VOL button increase or decrease the audio volume Cursor buttons REW button fast rewind or search REC record button GUIDE to recall OSD menu DISPLAY to recall on screen display PROGRAM programming button CLEAR clears time counter 100 ENT button VCR TV mode select button TAPE SPEED button select the recording speed SP or EP VCR TV Device buttons let you set the remote to contro...

Страница 10: ...viewing session F ADV button When you press any of illumination buttons the illumination will turn on The illumination goes off 5 seconds later automatically if you do not press the buttons REMOTE OPERATION Install batteries in the remote control The remote control requires two AA batteries 1 Insert your fingertip into the notch and push the battery compartment lid to remove it Note When replacing...

Страница 11: ...CR 1 Make sure there is no obstacle between the remote control and VCR s infrared receiver Note You cannot operate the VCR if there is an obstacle for example coffee table sofa etc between the VCR and remote control 2 Point the remote control at the VCR s infrared receiver and press the required button on the remote control Note If the remote does not work even at close range try replacing the bat...

Страница 12: ...te without its safety tab is inserted The VCR won t record on a tape without a safety tab and the cassette will be ejected if the REC or REC IRT button is pressed Be sure to check the safety tab before inserting a cassette Insertion Push the video cassette gently into the slot on the front of the VCR The VCR automatically turns on and the Tape In indicator turns on when the cassette is in place Re...

Страница 13: ...V mode select button to turn the VCR indicator on or off TV VCR Select and Watch Channels using TV Select Channel to Watch OFF TV mode Select and Watch Channels using VCR 3 or 4 Select Channel to Watch ON VCR mode Record and Watch the Same Channel 3 or 4 Select Channel to Record ON VCR mode Record One Channel Watch Another Select Channel to Watch Select Channel to Record OFF TV mode Watch Playback...

Страница 14: ...ANNEL RECORD ONE CHANNEL AND WATCH ANOTHER Caution Do not connect to the mains supply socket before connecting all leads ss page 17 PURCHASED SEPARATELY TABLE B FUNCTION CHANNEL SELECTION VCR indicator Press the VCR TV mode select button to turn the VCR indicator on or off TV VCR Select and Watch Channels using TV Select Channel to Watch OFF TV mode Select and Watch Channels using VCR AUX or VIDEO...

Страница 15: ... Watch the Same Channel 3 or 4 Select Channel to Record ON VCR mode Record One Channel Watch Another Select Channel to Watch Select Channel to Record OFF TV mode Watch Playback of a Tape 3 or 4 ON VCR mode Switch the RF Channel When the VCR is on its video signal can come into your TV on either channel 3 or channel 4 You need to select the appropriate channel When the power is turned on press the ...

Страница 16: ... to Watch OFF TV mode Select and Watch Channels using VCR AUX or VIDEO Select Channel to Watch Record and Watch the Same Channel AUX or VIDEO Select Channel to Record Record One Channel Watch Another Select Channel to Watch Select Channel to Record OFF TV mode Watch Playback of a Tape AUX or VIDEO BASIC CABLE HOOKUP WITH CABLE BOX E WITH THIS HOOKUP YOU CAN WATCH AVAILABLE CABLE CHANNELS RECORD AN...

Страница 17: ...r 4 ON VCR mode Switch the RF Channel When the VCR is on its video signal can come into your TV on either channel 3 or channel 4 You need to select the appropriate channel When the power is turned on press the POWER button to turn it off Press the PLAY button on front of the VCR Pressing the CHANNEL button alternates between RFCH 03 channel 3 and RFCH 04 channel 4 in the VCR s display Display the ...

Страница 18: ...Box Output Channel Select Channel to Watch Record and Watch the Same Channel AUX or VIDEO Select Cable Box Output Channel Select Channel to Watch Record One Channel Watch Another Watch Playback of a Tape AUX or VIDEO ADVANCED CABLE HOOKUP WITH CABLE BOX AND SPLITTER G WITH THIS HOOKUP YOU CAN WATCH AVAILABLE CABLE CHANNELS RECORD AND WATCH THE SAME CHANNEL RECORD ONE CHANNEL AND WATCH ANOTHER TO R...

Страница 19: ...put Channel Select Channel to Watch Record and Watch the Same Channel AUX or VIDEO Select Cable Box Output Channel Select Channel to Watch Record One Channel Watch Another Select Channel to Watch Select Cable Box Output Channel Select Channel to Record Watch Playback of a Tape AUX or VIDEO AUTO SET UP Setting the channel automatically 1 Plug in at the power supply outlet after completely connectin...

Страница 20: ...e POWER button inadvertently before connecting all leads follow the steps on page 20 for further tuning function If you press the POWER button during auto install mode the VCR automatically switches to the STOP mode SETTING THE CLOCK Note An antenna or cable must be connected to the VCR before you begin this operation Tips 1 You ll need to set the clock when first hooking up your VCR and any time ...

Страница 21: ...tructions in English French or Spanish When you first set up your VCR it will be set to English Press the cursor button to select LANGUAGE option and then press the cursor button for French or for Spanish 2 Press the cursor button to select the SETUP option and then press the ENTER button 3 Press the cursor button to select the CLOCK and then press the ENTER button 4 Press the or cursor button to ...

Страница 22: ... the minutes and then press or cursor button to change the minutes 6 Press the cursor button to select MONTH and then press the or cursor button to change the month 7 Press the cursor button to select DAY and then press the or cursor button to change the day ...

Страница 23: ...12 hour system You set it for AM or PM You can correct any item entered as you go by pressing cursor button to select and press or cursor to change If you press or cursor button continuously the time or date is kept changing PRE TUNING THE VCR TUNER Note An antenna or cable must be connected to the VCR before you begin this operation Presetting the received channels without using a cable box Hooku...

Страница 24: ...o cable set the TV to AUX or VIDEO 2 Press the GUIDE button The main on screen menu will appear on the TV screen 3 Press the cursor button to select the SETUP option and press the ENTER button 4 Press the cursor button to select the CHANNEL and then press the ENTER button ...

Страница 25: ...adcast TV channels vhf 2 13 uhf 14 69 and cable channels CA TV I 125 In some areas channels cannot be received when CATV1 is selected In this case select CATV2 in the receiving setup When automatic presetting of channels are finished Press the CH channel button or numbered buttons to check the channels you can receive Note If no channels have been set or a clear picture does not appear check the a...

Страница 26: ...will appear on the TV screen 2 Press the cursor button to select the SETUP option and then press the ENTER button 3 Press the cursor button to select the channel and then press the ENTER button 4 Use the cursor buttons to select CH LIST ADD ERASE and then press the ENTER button ...

Страница 27: ...ase 6 Press the STOP button to delete the channel or press the PLAY button to add it 7 Press the GUIDE button to return to regular viewing Auto blue setting 1 Turn on the TV and select the video channel 3 or 4 Or if you are hooked up with an audio video cable set the TV to AUX or VIDEO 2 Press the GUIDE button ...

Страница 28: ...t signal on the VCR or a channel on which broadcasting has finished If the signal is too strong this function may not operate even if you specify ON During playback this function does not operate OFF The AUTO BLUE feature is switched off 5 Press the GUIDE button to end the setting PLAYBACK To playback a recorded tape 1 Turn on the TV and select the video channel 3 or 4 Or if you are hooked up with...

Страница 29: ...he STOP button to end playback Note This VCR can quasi playback the tape that is recorded by S VHS type SQPB stands for S VHS Quasi Playback When VCR playback by SQPB the inversion noise will appears on screen in STILL SLOW and F ADV mode Rewinding the tape When the video cassette reaches the end of the tape the VCR will stop and automatically rewind the tape If you press the POWER button while th...

Страница 30: ...safety tab removed the VCR will stop and automatically rewind the videocassette eject it and turn off the power when it reaches the end of the tape or a blank section of tape which lasts for more than 30 seconds Note This function works only in PLAYBACK mode not in RECORDING mode Rewinding or fast forwarding a tape at high speed This function rewinds or fast forwards T 120 tape for about 83 second...

Страница 31: ...pe To stop the tape earlier press the REW or F FWD button to restore the normal rewind fast forward speed then press the STOP button To remove noise from the picture Auto Tracking Pressing the PLAY button starts the auto tracking feature which automatically adjusts playback to eliminate static lines or picture noise that may appear on the screen Manual Tracking Scratched tapes or poorly recorded t...

Страница 32: ...ject the tape and reinsert it into the VCR SPECIAL PLAYBACK EFFECTS Variable speed playback Still Playback Pause Press the PAUSE button on the remote control to still the tape during play The picture will freeze You may see some minor noise or interference on the screen This is normal To resume play press the PLAY button or PAUSE button again Note The sound is muted and cannot be heard during Spec...

Страница 33: ...during playback and then press the CH or button on the remote control to minimize the noise bars see page 26 If the screen jitters during PAUSE press the CH or button to minimize the jitters Frame Advance 1 Press the PAUSE button to stop the tape during playback 2 Press the F ADV button to view the picture one frame at a time Press the PAUSE button to resume play Slow motion 1 Press the PLAY butto...

Страница 34: ...s function let you search backward and forward through the videotape while viewing it During play Press the REW button to search in reverse Press the F FWD button to search ahead Press the PLAY button to return to normal playback Press REW or F FWD and hold it you can search backward or forward through the tape at a higher speed while viewing it Press PLAY and REW then hold REW for backward search...

Страница 35: ...stereo channels Monaural sound is recorded on the linear track To enjoy Hi Fi sound connect your VCR to a stereo television or amplifier receiver using the audio video jacks see page 52 How to select playback audio 1 Press the GUIDE button 2 Press the cursor button to select the SETUP option and then press the ENTER button 3 Press the cursor button to select AUDIO and then press the ENTER button ...

Страница 36: ...IDE button to end the setting SHUTTLE CONTROL Using the shuttle ring The shuttle feature lets you control all the playback functions PLAY PAUSE SLOW MOTION and SEARCH using one convenient ring How to use the shuttle ring 1 Turn the shuttle ring during playback or still playback pause As you turn the ring you get different playback speeds and forward or reverse morion Try using the shuttle to explo...

Страница 37: ...rding on tape with the following four functions INDEX SEARCH You can locate the beginning of a recorded program using the INDEX feature Each time you press the REC button to start recording the VCR will record an INDEX mark at the start of recording The INDEX feature uses this signal recorded on tapes VISS signal to locate the beginning of a program you want to view BLANK SEARCH You can locate the...

Страница 38: ...fore an index mark is reached press the STOP button Note If there are no index marks on the tape the VCR will just rewind to the beginning or fast forward to the end Locating the beginning of a blank section BLANK SEARCH This function searches for a non recorded section of remaining tape or unused tape and stops the tape when it locates such a section NOTES BLANK SEARCH cannot be operated with a c...

Страница 39: ...he screen and VCR display during BLANK SEARCH When a blank is detected the tape will automatically rewind to the beginning of the blank Notes When a cassette without a safety tab is inserted TAb will flash in the VCR display for several seconds and the cassette will be ejected automatically Tape bar will not appear correctly if tapes which have scratches or are slack are being used When the beginn...

Страница 40: ... to visual search so that you can search for a scene you want to view while scanning pictures Hold down the VIEW SKIP BLANK button during rewind The tape will be visually scanned in the reverse direction while the button is held Hold down the VIEW SKIP BLANK button during fast forward The tape will be visually scanned in the forward direction while the button is held When the button is released th...

Страница 41: ...ANK button The tape will search ahead for about a minute and then resume play VIEWING THE ON SCREEN DISPLAY Switching between the clock time counter and time of remaining tape Press DISPLAY while the on screen display is displayed The on screen display switches in the order below together with the VCR s display ...

Страница 42: ...ter the tape is inserted will appear 2 minutes after playback or recording is started the tape remaining time is displayed Press the CLEAR button repeatedly to switch the type of tape is used The correct remaining time will appear AUTO T 120 or shorter tape T 160 T 140 or T 160 tape T 180 T 180 tape T 210 T 210 tape Notes The tape remaining time is not displayed correctly for a tape without any re...

Страница 43: ... programming and you can return to that point automatically 1 Press the DISPLAY button two or three times The counter will appear in the VCR s display 2 Begin recording or playing back a tape 3 At the point that you want to go back to press the CLEAR button This resets the counter to 0 00 00 4 Press the STOP button when you are done recording or playing back the tape ...

Страница 44: ...ning Most television programs and films are copyrighted This means that someone has legal rights governing the reproduction and distribution of this material In certain circumstances copyright law may apply to private in home taping of copyrighted materials In most cases it is okay to record for personal use as long as you do not sell the material You must act responsibly in this area check into t...

Страница 45: ...ct SP standard play for the best picture quality or EP extended play for the longest recording time on a single tape 4 Press the CH button or the number buttons to select the channel you want to record Example Select channel 8 100 ENT and and for the channel 124 ...

Страница 46: ...e warning screen will appear on the TV screen for several seconds and the cassette will be ejected automatically Press the PAUSE button to set the VCR to the recording pause mode Press the button again to re start recording If you stay in PAUSE mode for more than 5 minutes the VCR automatically switches to STOP mode to protect the tape If you press the REC button and the cassette has not been inse...

Страница 47: ...rols or the VCR remote if it s programmed to control your TV see page 48 Notes You can check on the recording by pressing VCR TV again This will switch you back to viewing through the VCR and you ll see the program you are recording If you re hooked up with an audio video cable Switch the TV from AUX or VIDEO mode back to the TV mode then select the channels you want to watch as described in Step ...

Страница 48: ...u press the REC button while recording During playback the Index Search feature will let you move through a tape that has several recordings on it by searching for the INDEX mark See Page 28 Locating the beginning of a recorded program INDEX SEARCH To record a Second Audio Program SAP Some stations transmit a Second Audio Program such as in a second language If a station broadcasts in SAP the SA i...

Страница 49: ...ption 1 Press the GUIDE button 2 Press the cursor button to select the SETUP option and then press the ENTER button 3 Press the cursor button to select AUDIO and then press the ENTER button 4 Press the and cursor button to set the STEREO MONO option to STEREO ...

Страница 50: ... stereo signal is weak and the sound is too noisy Note When you select MONO sound is recorded as mono even when a channel broadcasts in stereo INSTANT RECORDING TIMER Using the Instant Recording Timer IRT The Instant Recording Timer REC IRT button on the VCR will let you make a simplified timer recording without having to use the programming timer In order to set the IRT properly the clock must be...

Страница 51: ...g while in the IRT mode 1 Press the STOP button This can be done wither on the VCR or with the remote control DELAYED RECORDING Setting the VCR to record later Note The cassette safety tab must be in place in order to record With the delayed recording feature you can set this VCR so that it automatically turns on and records programs whenever you like without your being around You can record a pro...

Страница 52: ...at the clock is set to the correct time Date and day of the program Starting time Ending time Channel to be recorded Blank or erasable videocassette safety tab intact Delayed Recording Steps You set up the delayed recording using the on screen Easy Guide System 1 Insert blank or erasable tape The power comes on automatically and the tape indicator lights on the display If a cassette without its sa...

Страница 53: ... for about five seconds The screen above will not appear at this time Types of Delayed Recordings ONE TIME Records one show at a particular date and time DAILY Records a show at the same time every day of the week Monday through Friday WEEKLY Records a show at the same day and time every week 4 Press the ENTER button to bring up the screen for One Time Recording EXAMPLE Set the VCR to record one t...

Страница 54: ... the hour 6 Press the cursor button to select the minutes and then press the or cursor button to change the minutes of the start time 7 Press the cursor button to select the recording time and then press the or cursor button to change the hour 8 Press the cursor button to select the minutes and then press the or cursor button to ...

Страница 55: ... cursor button to select the channel and then press the or cursor button to change the channel If you want to record from an external equipment press the or cursor button to select L1 or L2 instead of the channel number 10 Press the cursor button to select the tape speed and then press the or cursor or TAPE SPEED button to change the recording speed to EP ...

Страница 56: ...lect the recording date and then press the or cursor button to change the date 12 Press the PROGRAM button to set the program in memory Note If program is overlap the VCR gives you an error message that disappears from the screen in about 5 seconds ...

Страница 57: ...e with safety tab intact The VCR will automatically give a warning display on the screen 5 minutes before timer recording is to start When you have set up all the timed recordings you want Don t forget to load a videocassette with the safety tab still attached to record on If you have installed a cable box see page 23 turn on the cable box and select the channel you want to record on the cable box...

Страница 58: ...ready stored in your VCR s memory This is called channel setup and you do it using the on screen Easy Guide System and the following step by step instructions Then you will be ready to begin VCR Plus recording also using the on screen Easy Guide System VCR Plus and PlusCode R are trademarks of Gemstar Development Corporation Channel setup Before you begin 1 Look for a listing like this one in your...

Страница 59: ...all your channels through a cable box Hookups E F or G please refer to page 23 cable box setup in First Time Setup section The following operation is not necessary VCR Plus setup Channel setup The following shows the procedure you should perform when you are receiving the Cable News Network channel 42 with the VCR Plus system on channel 38 Example VCR Plus Channel Number Channel Number You Receive...

Страница 60: ...e box the following operation is not necessary 5 Press the cursor button to select NO and then press the ENTER button A small arrow points to a blank in the CHANNEL column Note If your broadcast channel number is the same as the VCR Plus Channel in your TV listing do not enter any number 6 Press the CH button to move up and down through the channel list until you reach VCR Plus CH42 7 Press the nu...

Страница 61: ...r all channels that need to be assigned 9 Press the GUIDE button to end the setup procedure You are ready to begin delayed recording with the VCR plus system Using the VCR Plus system to record a program by using TV screen 1 Insert a blank or erasable tape The power comes on automatically and the tape indicator lights on the display When a cassette without its safety tab is inserted playback start...

Страница 62: ...umber buttons to enter the PlusCode number of the program you want to record Note This number can be up to eight digits If you enter a wrong digit press the CLEAR button and enter the correct one 4 Press the ENTER button to store the PlusCode number in the VCR s memory Types of Delayed Recordings ONE TIME Records one show at a particular date and time DAILY Records a show at the same time every da...

Страница 63: ...s the cursor button to select tape speed and then press the or cursor button or TAPE SPEED to choose recording speed SP standard play or EP extended play The screen will display all the details of the program you chose Check the CH number to make sure it is the right one If not you need to check your VCR Plus channel setup again If you have installed a cable box see page 23 the cable box output wi...

Страница 64: ...want Don t forget to load a videocassette With the safety tab still attached to record on If you have installed a cable box see page 23 turn on the cable box and select the channel you want to record on the cable box before recording starts Important Your timed recording settings take effect when you turn off the power on the VCR Caution of VCR Plus Recording After entering a PlusCode number check...

Страница 65: ...rted playback starts automatically and VCR Plus recording won t operate 2 Press the POWER button to turn off the VCR 3 Press the PROGRAM button The clock display switches to the indication shown on the right If eight programs have already been stored in memory FULL will flash in the VCR s display for about five seconds 4 Press the number buttons to enter the PlusCode number of the program you want...

Страница 66: ...R This tells you that the VCR will automatically record at the times and dates you have programmed Note If a cassette has not been inserted or a cassette without safety tab has been inserted the delayed recording indicator will flash to warn you The cassette without safety tab will be ejected automatically Be sure to insert a cassette with safety tab intact When you have set up all the timed recor...

Страница 67: ...ou can look back over any of the recordings you have preset and if you need to clear out any of the programs Normal programs will clear automatically once recording is complete but daily and weekly setting must be cleared out manually 1 Press the GUIDE button The main on screen menu will appear on the TV screen 2 Press the ENTER button to select the PROGRAM MENU 3 Press the cursor button for the P...

Страница 68: ...programs you have preset The screen will display the next program if there are more or it will switch back to the main menu 5 Press the GUIDE button to end USING THE VCR REMOTE TO CONTROL YOUR TV Using the VCR remote to control your Hitachi TV 1 Turn on the TV 2 Press the TV buttons on remote control ...

Страница 69: ...me of Hitachi TV does not work with this remote INTEGRATING YOUR STEREO SYSTEM WITH YOUR VCR Hookup When your VCR is connected to a stereo system you can Make high quality audio only recordings for up to 6 hours on a T 120 video cassette tape Receive quality stereo sound from your VCR through your stereo system Use the VCR as an extra audio tape deck for dubbing PURCHASED SEPARATELY To record from...

Страница 70: ...o vs mono sound Select VCR recording speed SP or EP as shown on page 33 of RECORDING OPERATIONS section Basic recording steps 1 Press the AVX button on remote control so that L line on the TV display 2 Turn on the stereo and start the selection you wish to record 3 Press the REC IRT button on VCR or REC button on the remote control to start recording 4 Press the STOP button to stop recording COPYI...

Страница 71: ...nto the AUDIO IN L input on the back of the VCR It is not necessary to connect the S VIDEO jack To copy from a camcorder BEFORE YOU BEGIN Connect the camcorder s AV output cable to the audio video jacks on the back of your VCR 1 Press the AVX button twice on remote control to display L line on the TV display 2 Press the REC then PAUSE buttons on the VCR remote control The VCR will go into Record P...

Страница 72: ...the part of the Camcorder tape you wish to copy press the PAUSE button again to release pause and start copying the camcorder tape Press the STOP button to finish recording COPYING FROM ONE VCR TO ANOTHER VCR DUBBING Hookup If you have two VCRs you may use one VCR to record a tape that is being played back in the other VCR To copy from one VCR to another VCR ...

Страница 73: ... 2 Press the REC then PAUSE buttons on VCR 1 The VCR will go into Record Pause 3 Press the PLAY button on VCR 2 You will see the taped program being played on the TV 4 When you see the part of the program you wish to record press the PAUSE button on VCR 1 again to release pause and start recording Press the STOP button to finish recording ...

Страница 74: ...rogramming Safety tab has been removed from cassette Snowy picture in playback Snow or picture noise is normal during search still and slow Playback Head cleaning may be required Tape is worn or of inferior quality adjust tracking controls Snowy picture in normal TV viewing Check antenna or cable connections Clock shows on the TV display Power has been interrupted reset the clock Reset the clock E...

Страница 75: ...een stored Cancel unnecessary program and transfer the new program flashes uninterruptedly When you turn power off after programming the timer or transfer the programming with the power off A cassette has not been inserted or a cassette without safety tab has been inserted A cassette without safety tab will be ejected automatically Insert a cassette with safety tab intact Display for about 5 sec f...

Страница 76: ...umption 16W nominal 2 0W Standby mode Cabinet Size 14 15 16 W x 3 11 16 H x 10 14 16 D 38 0 cm W x 9 3 cm H x 27 6 cm D Weight 7 7 lbs 3 5 kg Storage Temperature 4 F to 131 F Operating Temperature 41 F to 104 F Accessories 1 coaxial cable Part No EW10251 1 remote control unit Part No HL11134 2 AA batteries Check your cable company s compatibility requirements For information about how to obtain th...

Страница 77: ...TECHNICAL SPECIFICATIONS 77 MONTREAL 514 956 9882 ...

Отзывы: