background image

Advanced Techniques 


41

Advanced 

Techniques 


The Hitachi VM-H835LA offers a diverse group of features that add interest and 
excitement to your video. Adding fades to smooth transitions creates video with a 
professional look. 
As you learn and practice with these features think of situations that they might fit in and 
add a special touch. 

Changing the Angle of the LCD Monitor when Recording  


You can change the angle of the LCD monitor so that the picture on the LCD screen 
can be monitored from different positions. 
See "LCD Monitor" (p. 19) for the range in which you can change the angle of the LCD 
monitor. 

Note: You need the remote control to operate the camcorder. 

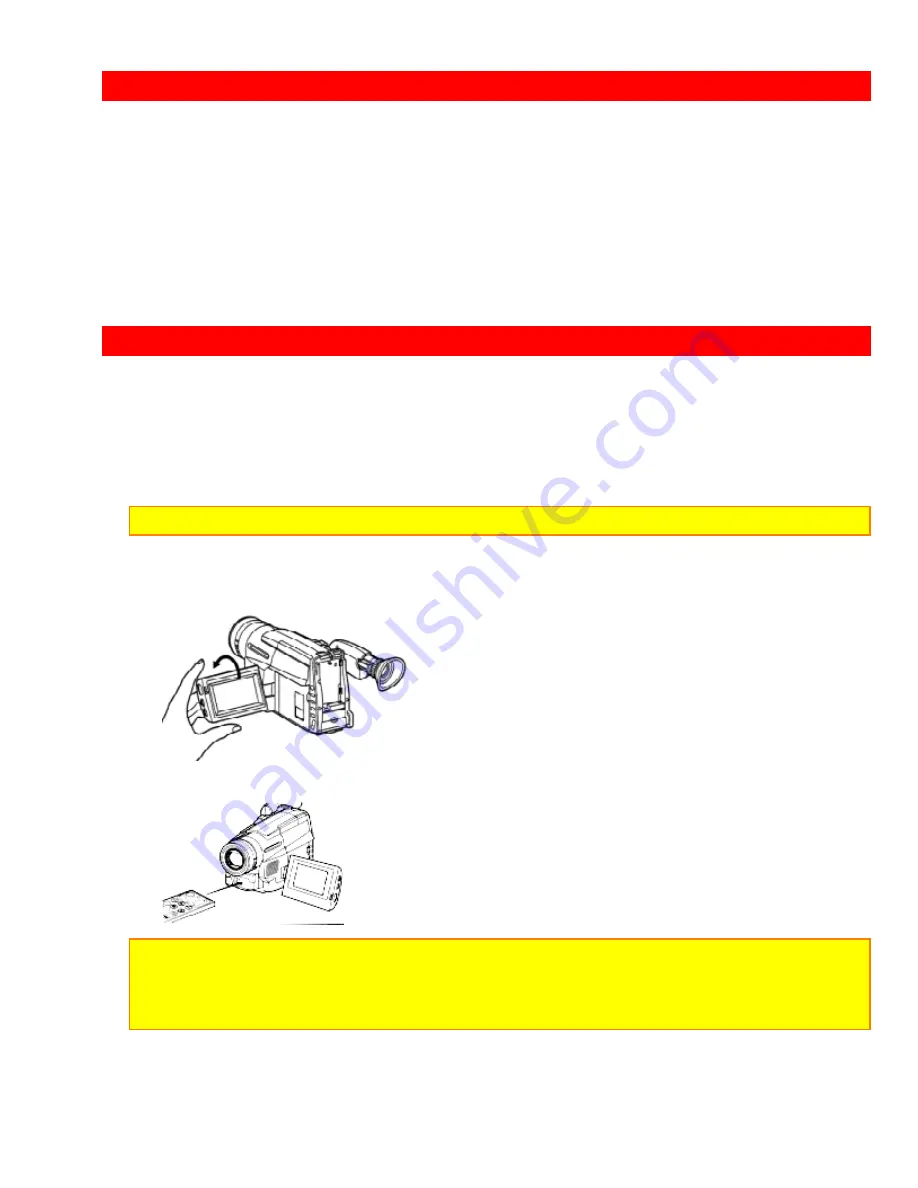
Recording an Image of Yourself while Monitoring the LCD Screen 
1. Open the LCD monitor ("Opening the LCD Monitor", p19). 
2. Turn the LCD monitor so the monitor screen faces the same direction as the lens. 


Press the START/STOP button on the remote control, and the camcorder will begin 
recording. 


Note: When you record an image of yourself, the image displayed on the LCD monitor is 
reverse to that seen in a  mirror. 
Note: Tilt the LCD monitor in the direction of the camera lens so that it faces up slightly, 
and the screen may be viewed easily. 

Содержание VM-H835LA

Страница 1: ...s Blvd Norcross GA 30093 Mississauga Ontario L5N 2L8 Tel 770 279 5600 CANADA Tel 905 821 4545 HITACHI SALES CORPORATION OF HAWAII INC 3219 Koapaka Street Honolulu Hawaii 96819 Tel 808 836 3621 Thank you for buying a Hitachi product Please take time to become familiar with the manual and how it is set up Keep it handy for future reference QR17262 Hitachi Ltd 1997 Printed in Japan KN S N ...

Страница 2: ... the Battery Pack 20 Checking the Battery s Charge 20 Using Alternative Power Sources 21 Using the AC Adapter Charger 21 Using a Car Battery 22 Inserting and Removing Cassettes 22 Inserting a Cassette 22 Removing a Cassette 23 Protecting Recorded Material 23 LCD Monitor 23 Opening the LCD Monitor 24 Adjusting the Brightness of the LCD Screen 24 Range in which the LCD Monitor can be moved 24 Adjust...

Страница 3: ... 44 Negative Positive Recording 45 X130 Digital Zoom Recording 45 Half Mirror Recording 45 Mosaic Recording 46 Using Fade 46 Fading In 47 Fading Out 48 Using the Electronic Image Stabilizer 48 Using Quick Edit 49 Using the Display Button 49 Date Search 50 Using Memory 51 Using the Wireless Remote Control 51 Attaching the Optional Wide or Tele Converter Lens 52 Creating and Recording A Title 52 Cre...

Страница 4: ...r in the United States 70 By Phone 70 By Mail 70 FOR AUTHORIZED HITACHI SERVICE FACILITY IN CANADA 70 U S A only 70 Important Safety Information For Your Safety The CAM OFF VIDEO switch turns the camcorder on and off leaving the date time feature unaffected If the unit is to be left unattended for a long period of time turn the camcorder off and close the lens door WARNING TO PREVENT FIRE OR SHOCK...

Страница 5: ...including interference that may cause undesired operation Note This equipment has been tested and found to comply with the limits for a Class B digital device pursuant of Part 15 of the FCC Rules These limits are designed to provide reasonable protection against harmful interference in a residential installation This equipment generates uses and can radiate radio frequency energy and if not instal...

Страница 6: ...wfinder or LCD monitor Remove the cassette and set the CAM OFF VIDEO switch to OFF then wait for about one hour IMPORTANT SAFEGUARDS In addition to the careful attention devoted to quality standards in the manufacture of your video product safety is a major factor in the design of every instrument But safety is your responsibility too This page lists important information that will help to assure ...

Страница 7: ...ates damage or deteriorated insulation 7 Power Cord Protection Power supply cords should be routed so that they are not likely to be walked on or pinched by items placed upon or against them paying particular attention to cords at plugs convenience receptacles and the point where they exit from the appliance 8 Ventilation Slots and openings in the cabinet are provided for ventilation to ensure rel...

Страница 8: ...the lead in wire to an antenna discharge unit size of grounding conductors location of antenna discharge unit connection to grounding electrodes and requirements for the grounding electrode See example below EXAMPLE OF ANTENNA GROUNDING 13 Power Lines An outside antenna system should not be located in the vicinity of overhead power lines or other electric light or power circuits or where it can fa...

Страница 9: ...ange in performance this indicates a need for service 19 Replacement Parts When replacement parts are required have the service technician verify that the replacements he uses have the same safety characteristics as the original parts Use of replacements specified by the video product manufacturer can prevent fire electric shock or other hazards 20 Safety Check Upon completion of any service or re...

Страница 10: ...therwise damaged in any way take it to a qualified serviceman 12 Do not disassemble charger take it to a qualified serviceman when service or repair is required Incorrect reassembly may result in a risk of electric shock or fire 13 To reduce risk of electric shock unplug charger from outlet before attempting any maintenance or cleaning Before You Begin Any problems that occur as a result of any of...

Страница 11: ...LA We hope you will take the time to learn about these functions since they have been designed for you You can use the video camcorder without reading this section A General Maintenance section to help keep your purchase in good repair We want this manual to be as helpful as possible so it includes two easy ways to find the information you need A quick index for the information you use most often ...

Страница 12: ...der None of these processes are complex Set aside some time relax and familiarize yourself with this quality instrument Enjoy getting to know all about your Hitachi 8mm camcorder The more comfortable and familiar you are with the machine and its features the more you can make it do for you Let s get started It is crucial that you read and understand all the safety instructions before you begin If ...

Страница 13: ...cerning the purchase of camcorder accessories please see the optional accessory listing on page 61 Identifying Controls Front Left Side Illustration 1 Lens Door Slide the lens door opener to open and close the lens door To protect the lens keep the lens door closed when not recording 2 Lens F1 4 2 8 4 64mm 16 1 power zoom lens with auto focus and auto iris functions 3 Lens Door Opener Slide the op...

Страница 14: ...he image being recorded 1 5 times 17 EIS Electronic Image Stabilizer Button EIS corrects the slight shaking of an image Using the Electronic Image Stabilizer p39 18 D EFFECT Button Use this button to add special effects to your recording You can select five modes the 16 x 9 mode negative positive mode X130 digital zoom mode half mirror mode and mosaic mode See Digital Effects Recording on page 36 ...

Страница 15: ... Control Use this to zoom automatically Using the Power Zoom p 26 29 PLAY Button Use to playback recorded tapes 30 STOP button Use this button to stop playback fast forward or reverse Also use this button to set date and time 31 Audio Video Input Output Jack Behind the jack cover Use this jack to connect the camcorder to a VCR or television Playing Back Your Recording on Your TV p30 31 Dubbing fro...

Страница 16: ... switches to the next lower channel For these to operate you must have preset your channels Controlling your TV with the Camcorder s Remote Control p50 40 Recorder s Remote Control The shaded buttons on the remote control have the same functions as the corresponding buttons on the camcorder 41 A V DUB Button only on the remote control Use this button to record new audio and video over existing aud...

Страница 17: ...attery with terminal facing up as shown in the figure 4 Replace the battery holder with battery in the remote control making sure that it is fully inserted WARNING KEEP THE BATTERIES AWAY FROM CHILDREN AND PETS IF SWALLOWED CONSULT A PHYSICIAN IMMEDIATELY FOR EMERGENCY TREATMENT Note Replace the battery with 3V micro lithium cells such as Maxell CR2025 or its equivalent Note Dispose of batteries s...

Страница 18: ... charge When the CHARGE lamp goes out the battery has been completely charged After the lamp goes out unplug the AC adapter charger from the AC outlet and remove the battery from the AC adapter charger Note You can use the battery before it is completely charged Note Remove the DC cord from the AC adapter charger before attempting to charge the battery Note If you re attach the fully charged batte...

Страница 19: ... or above 113 F 45 C At extremely low temperatures operation time decreases while at high temperature the battery may be damaged If the POWER lamp begins to flash during charging remove the battery and then reattach it to the AC adapter charger If the POWER lamp continues to flash after several attempts to attach it the battery is unable to take a charge and must be replaced Do not attach a hot ba...

Страница 20: ...the camcorder which occur when you use battery packs other than those specified Note Always attach a battery by the procedure described here Attaching a battery forcibly could damage it Removing the Battery Pack Slide the BATTERY EJECT lever in the direction of the arrow and hold it then slide the battery to the upper side and remove Checking the Battery s Charge A battery charge indicator is loca...

Страница 21: ...ie battery AC adapter charger etc 1 Plug the AC adapter charger power cord into an AC outlet Make sure that the wide blade fits into the wide slot If it doesn t fit try reversing it If you still cannot make fit the blades fully into the outlet either contact an electrician to replace your obsolete outlet or use a polarized cord or outlet accessory 2 Connect one end of the DC cord provided to the D...

Страница 22: ...ar battery cord Note Only use the car battery cord with cars having 12 24 volt negative ground system Inserting and Removing Cassettes A power source must be connected before inserting or removing cassettes Once connected cassettes can be inserted or removed whether the CAM OFF VIDEO switch is on or off Inserting a Cassette 1 Press the OPEN button to open the LCD monitor Opening the LCD Monitor p1...

Страница 23: ...r LCD monitor remove the cassette and check that the tape is not damaged is not slack or no dust adheres to it etc After making sure that there is no abnormality reinsert the cassette If TAPE reappears see Troubleshooting on page 57 Removing a Cassette Press the EJECT switch EJECT will appear on the LCD monitor and the cassette door opens automatically Remove the cassette Protecting Recorded Mater...

Страница 24: ...so that it appears on the LCD monitor or in the viewfinder Adjusting the Brightness of the LCD Screen Note Even when the picture on the LCD monitor is adjusted the recorded video will not change 1 Load the battery Loading Batteries Camcorder Batteries p16 Press the red button on the CAM OFF VIDEO switch as you slide it to CAM or VIDEO 2 Use the bright control on the side of the LCD monitor to adju...

Страница 25: ...lfunction Close the LCD monitor after making sure it its parallel with the camcorder If you were to close the monitor while it faces the same direction as the lens or it is diagonal it could damage the LCD monitor Do not disassemble the LCD monitor as this might cause a malfunction When opening the LCD monitor be careful that no water droplets adhere the monitor screen and that no water or dust en...

Страница 26: ...timum focus adjustment Note Be sure to pull out the eye cup all the way so that you can see the subject in the viewfinder clearly Adjustment the Hand Strap Adjust the hand strap to best fit your hand Note After adjustment close the hand strap s pad securely Lens Door Opener Slide the opener to open and close the lens door Align the mark with OPEN to open ...

Страница 27: ...rough the shoulder straps buckles Note Make sure that the straps are securely fastened before using the shoulder strap to carry the camcorder Using the Linear Time Counter The linear time counter displays the tape run in hours minutes and seconds helping you to keep track of how long you ve been filming or time you have left to film before running out of tape Turn the camcorder on to display the l...

Страница 28: ...ears 10 seconds after the tape starts to run Note When the remaining tape time becomes less than about three minutes TAPE END flashes in the viewfinder or LCD monitor Setting the Date and Time Take the time to set the date and time now The date and time can be recorded on your tapes to act as a handy reference when viewing them later Use the following procedure to set up the display for the curren...

Страница 29: ... should appear in the lower right with the 1 flashing 12 00 AM 1 1 1997 3 Pressing the F FWD button gives you higher numbers while the REW REVIEW button gives you lower numbers Select the right month and press STOP button Use the F FWD REW REVIEW and STOP buttons to select the proper day year hour minute and AM or PM 12 00 AM 11 5 1997 4 After setting the AM PM press the DATE DISP button The displ...

Страница 30: ...ayback on something unimportant such as traffic or a short tour of your backyard Once familiar with how the machine works you can move to the more sophisticated features with less stress Let s get started Making a Basic Recording The Hitachi VM H835LA uses PROGRAM AE auto exposure that automatically selects the optimum shutter speed either 1 60 1 120 1 180 1 250 1 350 1 500 1 750 1 1000 1 1500 1 2...

Страница 31: ...ording several white stripes may appear in the picture but this does not indicate a fault However these stripes are recorded with the picture so it is recommended that you do not close or open the LCD monitor during recording Note TAPE flashes in the viewfinder or LCD monitor when the tab on the side of the cassette is completely visible Note TAPE END flashes in the viewfinder or LCD monitor when ...

Страница 32: ...ocus is engaged Press the FOCUS control buttons simultaneously to return to auto focus The auto focus will not work under the following conditions and you must focus manually Objects outside the center of the viewfinder or LCD monitor Objects at different distances in the center of the viewfinder or LCD monitor Brightly lit objects such as a neon light objects lit by spotlight etc Objects behind w...

Страница 33: ...ocus 1 Press the FOCUS control buttons simultaneously FOCUS displays in the viewfinder or LCD monitor You can adjust the focus manually 2 Use the power zoom T control to zoom up completely to your subject If you don t use the T control to zoom to the picture you want the picture may fall out of focus when actual recording starts 3 Press the Focus control far or near button until the subject is in ...

Страница 34: ...conds and then disappears The zoom position is displayed in 10 steps Using the Digital Zoom The digital zoom increases the magnification of the power zoom by 2 times You must place the subject you wish to magnify at the center of the viewfinder or LCD monitor Slide and hold the power zoom control to the T side until you find the picture you want You control the zoom with the power zoom T and W con...

Страница 35: ...rom the viewfinder or LCD monitor Note This instant zoom has certain limitations and may degradate at extreme magnification and amplify camcorder s movement Using Macro This function allows you to shoot subjects as close as 3 8 inches 1cm Press and hold the power zoom control W The camera focuses on the subject automatically Check your lighting as it tends to be insufficient when filming close up ...

Страница 36: ...of the camcorder when you play back a recording by connecting the camcorder to your TV If the volume of the camcorder is set to maximum the played back picture may be distorted Make sure that the volume is not set to maximum during recording as it could distort the played back picture Note When the LCD monitor is turned on and left as it is the monitor becomes warm but this does not indicate fault...

Страница 37: ...cture will have several noise bars in the viewfinder and on the TV but this does not indicate a fault Note If you are freezing a picture with the LCD monitor closed then you will not be able to view a still picture with less noise when you open the monitor Using Forward and Reverse Search When looking for a particular point in your videotape use the F FWD button and REW REVIEW button to find the s...

Страница 38: ...VIEW button during playback to play the tape backwards at 4 times normal speed Press the PLAY button to resume normal playback Note If you are using forward or reverse search with the LCD monitor closed then you will not ba able to view pictures with less noise when you open the monitor Note Several noise bars will appear on the TV screen during forward or reverse search Playing Back Your Recordin...

Страница 39: ...e Audio Video Input Output jack of the camcorder 3 Insert a previously recorded cassette into the camcorder 4 Turn on your VCR and place it in the camcorder input mode consult your VCR manual for details Operate the television as you normally do to see the signal coming from the VCR 5 Hold down the red button on the CAM OFF VIDEO switch while sliding the switch to VIDEO 6 Press the PLAY button to ...

Страница 40: ...he VHF antenna lead to ANT IN of the RF output adapter If the cable on the VHF antenna lead is flat you need to purchase an antenna adapter 300 ohm to 75 ohm transformer Connect the antenna adapter to the VHF antenna lead and slide the adapter on to the ANT IN terminal 3 Connect the 75 ohm coaxial cable of the RF output adapter to the VHF antenna terminals on the back of the television If the tele...

Страница 41: ...ifferent positions See LCD Monitor p 19 for the range in which you can change the angle of the LCD monitor Note You need the remote control to operate the camcorder Recording an Image of Yourself while Monitoring the LCD Screen 1 Open the LCD monitor Opening the LCD Monitor p19 2 Turn the LCD monitor so the monitor screen faces the same direction as the lens Press the START STOP button on the remo...

Страница 42: ... the beginning of recording for 10 seconds AUTO 11 5 1998 Note The camcorder records the same date when the cassette is replaced you select AUTO and date display again the recording is less than 10 seconds long Note If the date changes while recording continues over 10 seconds the new date is recorded for about 10 seconds the next time you make a recording TITLE and Date Automatic Title and Date R...

Страница 43: ... 5 1998 No Display No Date Recording The camcorder does not record the date Date and Time Date and Time Recording The camcorder records the date and time with the picture all the time 10 20 AM 11 5 1998 3 Press the start stop button Recording will start Note When AUTO and date display is selected the date disappears about 10 seconds after recoding is started Note When TITLE and date display is sel...

Страница 44: ...center of the screen half mirror recording and an image in mosaic mosaic recording Note The half mirror recording and mosaic recording functions cannot be used with digital zoom instant zoom image stabilizer or zoom fade function Each time the D EFFECT button is pressed the recording mode is switched 16x9 NEGPOS ZM 2 16X9 Mode Negative Positive Mode X130 Digital Zoom Mode MOSAIC MIRROR Normal Mode...

Страница 45: ... Press the start stop button to start recording To release the negative mode press the D EFFECT button repeatedly in recording pause until normal mode is restored X130 Digital Zoom Recording 1 Place the camcorder in record pause 2 Repeatedly press the D EFFECT button until ZM 2 appears in the viewfinder or LCD monitor 3 Slide and hold the power zoom control to the T side until you reach your desir...

Страница 46: ...D monitor will be in mosaic 3 Press the start stop button to start recording To release the mosaic mode press the D EFFECT button repeatedly in recording pause until normal mode is restored Note This function cannot be used with digital zoom instant zoom image stabilizer or zoom fade function Using Fade Use the fade feature to add a professional touch to your recordings Use the FADE button to sele...

Страница 47: ...ite screen or fades out while zooming to a white screen appears in the upper left corner of the viewfinder or LCD monitor Black and white fade Fades in from a black and white screen or fades out to a black and white screen B W appears in the upper left corner of the viewfinder or LCD monitor Fading In 1 Use the FADE button to select a fade option before recording 2 Press the Start Stop button to s...

Страница 48: ...record mode again Using the Electronic Image Stabilizer The electronic image stabilizer EIS corrects slight shaking of the image being recorded and is effective in the following situations While you zoom to a distant subject While you approach a small subject While you walk around While you record from inside a moving vehicle 1 Press the EIS button The EIS icon appears in the viewfinder or LCD mon...

Страница 49: ...se the picture would be blurred Using Quick Edit Use quick edit to search for the end of previously recorded material find a particular spot on your tape begin editing or record new material While the camera is in record pause mode hold down the F FWD REW REVIEW or PLAY button and visually search the tape Release the button and the camcorder stops the tape at the exact position you selected Using ...

Страница 50: ...AM OFF VIDEO switch to VIDEO 2 Press the DATE DISP button the DISPLAY button on the remote control to display SEARCH in the viewfinder or LCD monitor 3 Press the REW REVIEW button to search for the start position from which you last made a recording or the F FWD button to recording end position SEARCH will appear while the start position is being searched for SEARCH while the end position is being...

Страница 51: ...remote control at the point to which you wish to return The linear time counter clears to 0 00 00 2 Press the STOP button to stop playback or press the start stop recording and set the CAM OFF VIDEO switch to VIDEO 3 Press the DISPLAY button on the remote control so the linear time counter with memory is displayed as shown in the figure 4 Press the REW REVIEW button and the tape stops at approxima...

Страница 52: ...en you use the camcorder s wireless remote control Attaching the Optional Wide or Tele Converter Lens Screw the lens into the threads on the camcorder lens assembly Creating and Recording A Title Create titles easily and personalize your recordings while keeping a permanent visual record of what is contained on a tape The camcorder can store a title in its memory A title stored in memory can be di...

Страница 53: ...der is removed Creating a Title 1 Connect the camcorder to a power source 2 Hold down the red button on the CAM OFF VIDEO switch and slide it to either CAM or VIDEO 3 Press the TITLE ON OFF button on the remote control and a flashing cursor appears in the viewfinder or LCD monitor 4 Use the STOP button to place the cursor where you wish to begin your title 5 Use the F FWD and REW buttons to select...

Страница 54: ...trol 2 Use the STOP button to select the character to be corrected 3 Use the F FWD and REW buttons to correct the character 4 Press the TITLE ON OFF button on the remote control to store the corrected title in memory Recording Title on a Tape in the Camcorder 1 Hold down the red button on the CAM OFF VIDEO switch while sliding the switch to CAM 2 Locate the point of the tape where you wish to reco...

Страница 55: ...red button on the CAM OFF VIDEO switch while sliding the switch to VIDEO Press PLAY on the camcorder 3 Press the TITLE ON OFF button on the remote control at the point on the tape where you wish to record the title 4 Press the TITLE ON OFF button on the remote control again to stop recording the title Note Recording the title during tape transfer will erase a portion of your recorded material Dubb...

Страница 56: ...s optional accessory Simple programmable edit allows you to program your camcorder to select the scenes you want to copy from a pre recorded tape Use the edit remote control optional to easily copy scenes from a recorded tape in the camcorder playback machine onto a blank tape in a table top VCR which handles infrared remote signals recording machine Note Only the VM RM20EDA edit remote control op...

Страница 57: ...t the infrared receiver on the VCR and press the VCR SET button and hold it If the remote control code has been set the VCR channel is counted up automatically Note Your VCR should have an infrared remote control Note If the channel on the VCR does not change with the above operation you need to switch the remote control code of your VCR Refer to the VCR s instruction manual If the channel still d...

Страница 58: ...red receiver Especially be careful of this during dubbing Note When the edit remote control is connected to the camcorder the buttons marked in the figure above perform the same operations as those of the other remote control provided Operation You can select up to four different scenes or segments to be copied at one time Note If sunlight or strong artificial light strikes the camcorder s infrare...

Страница 59: ...s the IN button OUT flashes in the program display PROG 1 0 15 13 IN 0 15 13 OUT 7 Press the button to search for the end of the segment you want to copy Press and then to set the camcorder to the play pause mode Use the FORWARD or REVERSE button as required to fine adjust the tape position 8 Press the OUT button to store the counter reading at the end of the scene PROG 2 0 20 15 IN OUT 9 Continue...

Страница 60: ...grammable Simple Edit Press the PROGRAM button to remove the program display from the viewfinder or the LCD monitor Then press the stop button on the recording VCR to set it to the stop mode Note If the CAM OFF VIDEO switch of the camcorder is set to OFF or CAM when the recording VCR is in the record pause mode the VCR enters the record mode Controlling Your TV with the Camcorder s Remote Control ...

Страница 61: ...tions one by one until you find one that does change your TV channel Also if your brand of TV is not listed in the chart try all the buttons One of them may work for you If the TV channel still doesn t change after going through all the button combinations listed it is likely that you will not be able to program this remote control for your TV TV Brands Press CH and This Button Hitachi AVX Zenith ...

Страница 62: ...ct your camcorder to the television following Connecting to a Television with Audio In and Video In Jacks on page 31 2 Turn on your television and place it in the camcorder input mode consult your television manual for details 3 Hold down the red button on the CAM OFF VIDEO switch while sliding the switch to VIDEO 4 Insert a previously recorded tape in the camcorder 5 Use the wireless remote contr...

Страница 63: ...as AUDIO OUT and VIDEO OUT jacks you can record television programs with your camcorder Recording Television Programs Illustration 1 Connect the optional AV input cable to the VIDEO OUT and AUDIO OUT jacks of your television or VCR 2 Connect the free plug to the AV IN OUT jack of your camcorder 3 Connect the camcorder to a power source 4 Insert a cassette in the camcorder 5 Hold down the red butto...

Страница 64: ... head cleaning tape to clean the heads If after cleaning the heads the picture does not clear up consult your nearest dealer or VCR service center for professional head cleaning Cleaning the Lens and Picture Tube of the Electronic Viewfinder The lens of the electronic viewfinder can be user cleaned if dust dirt or other foreign matter adheres to it 1 Pull out the eye cup to the position where a ma...

Страница 65: ... unless the camcorder is used either heavily or seldom Defective parts are covered by the warranty Normal maintenance is the responsibility of the owner Consult your dealer or local VCR service center for recommendations regarding normal maintenance based on your use patterns location and the age of the camcorder Troubleshooting Quality is very important at Hitachi We inspect and check every camco...

Страница 66: ...ating a title RECORDING TV PROGRAMS OFF THE AIR Symptom Check Point Correction The camcorder cannot be set to the recording mode even when the Start Stop button on the camcorder is pressed Check the record protect tab on the cassette See page 18 for details Set the CAM OFF VIDEO switch to CAM Connect the camcorder and TV or VCR PLAYBACK OF PRE RECORDED CASSETTE Symptom Check Point Correction The P...

Страница 67: ... display in the viewfinder or LCD monitor will be reset Then set the information again TAPE DISPLAY Symptom Check Point Correction TAPE appears in the viewfinder or LCD monitor Have you moved the camcorder or cassette from a cold place to a warm place so that its temperature changed abruptly If the temperature has changed remove the cassette and set the CAM OFF VIDEO switch to OFF then wait for ab...

Страница 68: ... a week 24 hours a day 800 HITACHI 1 800 448 2244 Hitachi Home Electronics America Inc Hitachi has made every effort to assure you hours of trouble free operation from your unit However should you require service a network of Hitachi Authorized Service Facilities has been established in all 50 states and Puerto Rico Each facility will provide you with convenient and expedient assistance Our servic...

Страница 69: ...sories PARTS NO APPEARANC E PURPOSE PARTS NO APPEARANC E PURPOSE P6 120SRG CB29US Soft carrying case for camera and accessories SVA50 Stationary shooting unit for mounting camcorder VM MM30 Monopod brace to steady camcorder VM RF86A R To connect your camcorder to a television with RF antenna connector VM CC80A Dc power source for camcorder using cigarette lighter socket VM BPL13 Rechargeable Li io...

Страница 70: ...o the following address with your credit card information money order or check in U S currency and payable to HiTRON Inc HiTRON is a subsidiary of Hitachi Home Electronics America Inc HiTRON Inc 675 Old Peachtree RD Suwanee GA 30174 Please allow two to three weeks for delivery If there is a current back order status on the model s you ordered we will notify you Thank you for allowing us Hitachi an...

Страница 71: ... VM CL12TW 139 95 FILTER KIT VM FL60K 99 95 FILTER KIT VM FL46K 39 95 MOVIE MOUNT VM MM30 49 95 RF OUTPUT ADAPTER VM RF86A R 49 95 CASSETTE TAPE P6 120SRG 9 95 EDIT REMOTE CONTROL VM RM20EDA 49 95 Prices are subject to change without notice Total Merchandise 10 00 Minimum Order _______________________ State Sales Tax Only for Georgia 5 or California 7 75 _______________________ Shipping Handling a...

Отзывы: