background image

Getting Started 


20

Note:

 Replace the batteries with 3V micro lithium cells such as Maxwell CR2025 or its 

equivalent. 

Note:

 Dispose of battery safely in accordance with local laws. Do not dispose of in fire. 

Note:

 Do not short circuit the batteries. 

Note:

 Do not take apart the batteries. 

Note:

 Do not hold the batteries with the metallic tweezers. 

Note:

 Do not re-charge the batteries. 

Note:

 Keep the batteries in a dark, cool, dry place. 

Camcorder Batteries 

4

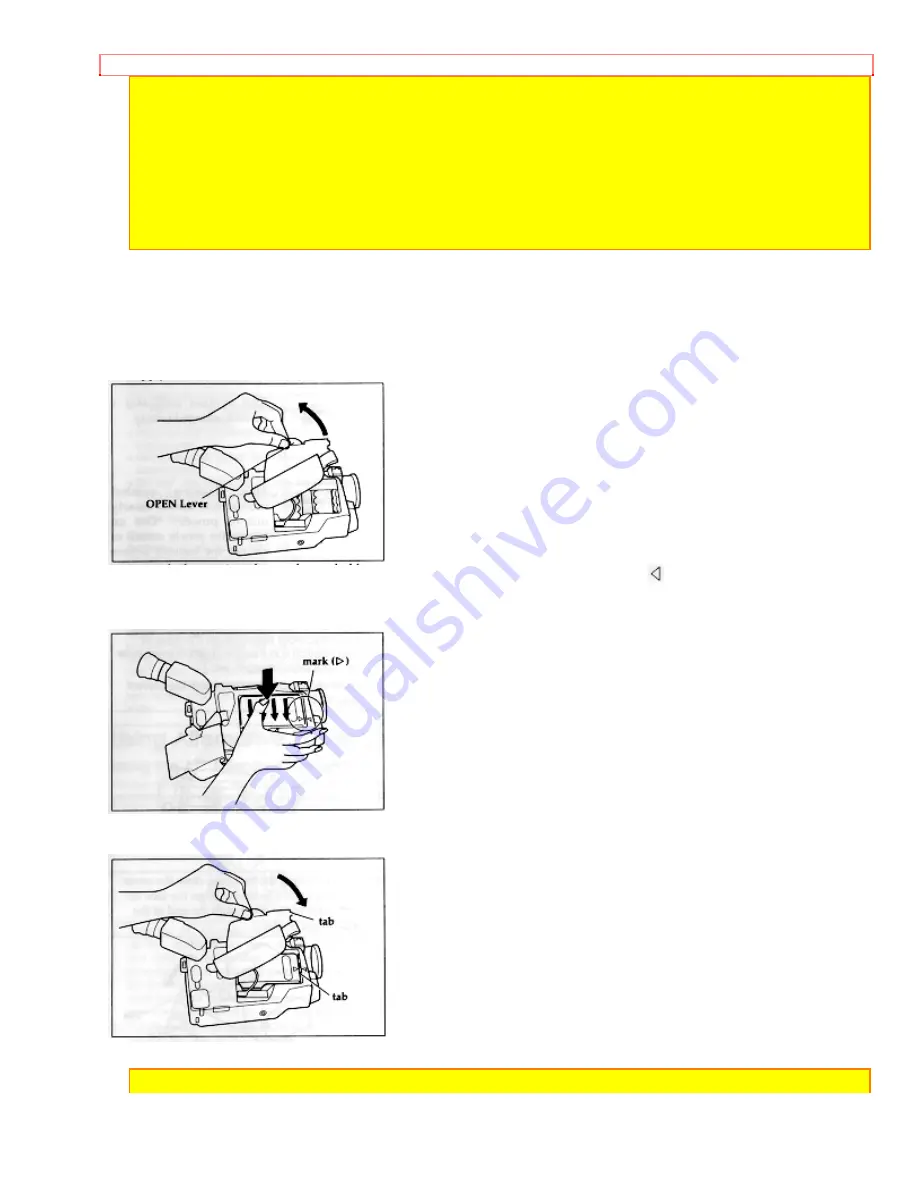
Using Battery Pack 

Before you install the battery for the first time it must be fully charged. Refer to "Charging the 
Battery" for details. 
1. Lift the OPEN lever and pull it up. The power supply attachment cover will open. 


2. Insert the battery into the attachment holder, aligning it with the "( )" mark on the 
camcorder. 
3. Press the center of the battery and hold it, then slide it in the direction of the arrow. 


4. After installing the battery, close the cover. Hold the OPEN lever and align the tabs on both 
sides of the cover with the end of the attachment holder. 


Note:

 If the OPEN lever is flat, the cover will not close. 

Содержание VM-E310A

Страница 1: ...Tel 404 279 5600 Tel 514 697 9150 HITACHI SALES CORPORATION OF HAWAII INC 3219 Koapaka Street Honolulu Hawaii 96819 Tel 808 836 3621 Thank you for buying a Hitachi product You ve chosen the best 8 mm video camcorder for you and we want to help you make the most of your purchase Please take time to become familiar with the manual and how it is set up Keep it handy for feature reference QR12521 Hita...

Страница 2: ...ng the Battery s Charge 21 Using Alkaline Dry Cell Batteries 22 Using Alternative Power Sources 24 Using the AC Adapter Charger 24 Using a Car Battery 24 Inserting and Removing Cassettes 25 Inserting a Cassette 25 Removing a Cassette 25 Protecting Recorded Material 26 Attaching the Optional DC Camera Light 26 Removing the DC Camera Light 27 Replacing the DC Camera Light Bulb 27 Using Memory The re...

Страница 3: ... 48 Using the Wireless Remote Control The remote control is optional for VM E110A 48 How to attach remote control to the shoulder strap The remote control is optional for VM E110A 49 To remove the remote control 49 Dubbing from the camcorder to a VCR 49 Using Synchro Edit The remote control is optional for VM E110A 50 Using Audio Video Dubbing The remote control is optional for VM E110A 51 Recordi...

Страница 4: ...erefore it should be read carefully to avoid any problems CAUTION TO REDUCE THE RISK OF ELECTRIC SHOCK DO NOT OPEN NO USER SERVICEABLE PARTS INSIDE REFER SERVICING TO QUALIFIED SERVICE PERSONNEL WARNING TO PREVENT FIRE OR ELECTRIC SHOCK MATCH WIDE BLADE OF PLUG TO WIDE SLOT AND FULLY INSERT PLUG WARNING Many television programs and films are copyrighted In certain circumstances copyright law may a...

Страница 5: ...e harmful interference to radio or television reception which can be determined by turning the equipment off and on the user is encouraged to try to correct by one or more of the following measures Reorient or relocate the receiving antenna Increase the separation between the equipment and receiver Connect the equipment into an outlet on a circuit different from that to which the receiver is conne...

Страница 6: ...ill fit into the power outlet only one way This is a safety feature If you are unable to insert the plug fully into the outlet try reversing the plug If the plug should still fail to fit contact your electrician to replace your obsolete outlet To prevent electric shock do not use this polarized plug with an extension cord receptacle or other outlet unless the blades can be fully inserted without b...

Страница 7: ...cause hazards Caution Maintain electrical safety Power line operated equipment or accessories connected to this unit should bear the UL listing mark or CSA certification mark on the accessory itself and should not have been modified so as to defeat the safety features This will help avoid any potential hazard from electric shock or fire If in doubt contact qualified service personnel 10 Water and ...

Страница 8: ...o such power lines or circuits When installing an outside antenna system extreme care should be taken to keep from touching or approaching such power lines or circuits as contact with them might be fatal Installing an outdoor antenna can be hazardous and should be left to a professional antenna installer USE 14 Cleaning Unplug this video product from the wall outlet before cleaning Do not use liqu...

Страница 9: ...oduct has been dropped or the cabinet has been damaged f When the video product exhibits a distinct change in performance this indicates a need for service 19 Replacement Parts When replacement parts are required have the service technician verify that the replacements he uses have the same safety characteristics as the original parts Use of replacements specified by the video product manufacturer...

Страница 10: ... cord should not be used unless absolutely necessary Use of improper extension cord could result in a risk of fire and electric shock If extension cord must be used make sure A The pins on plug of extension cord are the same number size and shape as those of plug on charger B That extension cord is properly wired and in good electrical condition and C That wire size should be met below Minimum AWG...

Страница 11: ...intenance section to help keep your purchase in good repair We want this manual to be as helpful as possible so it includes two easy ways to find the information you need A quick index for the information you use most often this page A detailed table of contents directing you to specific information quickly page 10 Get to know your video camcorder by using this manual and get to know Hitachi We ap...

Страница 12: ... leave the viewfinder lens facing sunlight for a prolonged period or the phosphorescent surface of the cathode ray tube or the liquid crystal display LCD panel may be damaged Features Easy to use 24x zoom ratio Instant zoom Recorded date search Automatic title recording Difference between Models VM E110A E310A This instruction manual shows the illustrations for the VM E310A Components and Accessor...

Страница 13: ...Before You Begin 13 4 Batteries for date title and remote control 5 Shoulder strap 6 DC cord 7 Remote control 8 Remote control holder ...

Страница 14: ...age 55 2 ACTUAL LIST STARTS ON PAGE 51 MOISTURE Avoid operating your camcorder immediately after moving it from a cold place to a warm humid place Give the camcorder 2 to 3 hours to stabilize in the ambient conditions of the surroundings before inserting a cassette When moved from a cold place to a warm humid place moisture may condense on the head drum inside the machine This moisture could cause...

Страница 15: ...g the Battery 3 The first step is to set the battery to charge It takes approximately an hour VM BP82 and VM BP82G enough time to familiarize yourself with some of the basic features of the camcorder Once charged the battery will give you approximately 60 70 minutes of operating time depending on the use of Zoom and start stop Charge the battery at a temperature range of 50 F 10 C 86 F 30 C to pre...

Страница 16: ...the battery until the low charge light flashes Using a battery for a short time and then recharging it may shorten the operation time It is recommended to refresh a battery before recharging it when it has not been used for long time otherwise its operation time becomes short Press the refresh button After refreshing is complete the REFRESH light turns off and the CHARGE light turns on and chargin...

Страница 17: ...CAL SHOCK ATTENTION The product that you have purchased contains a rechargeable battery The battery is recyclable At the end of its useful life under various state and local laws it may be illegal to dispose of this battery into the municipal waste stream Check with your local solid waste officials for details in your area for recycling options or proper disposal Adjusting the Electronic Viewfinde...

Страница 18: ...finder turn this control for your optimum focus adjustment Attaching the Optional Wide or Tele Converter Lens 1 To remove the lens hood turn it counterclockwise 2 Remove both caps of the converter lens 3 Screw the lens into the threads on the camcorder lens assembly ...

Страница 19: ... Battery The remote control and the battery are optional for VM E110A 1 Push the tab to the left of the remote control and hold it then remove the battery holder 2 Insert the battery with the terminal facing up as shown in the figure above 3 Replace the battery holder with battery in the remote control making sure that it is full inserted WARNING KEEP THE BATTERIES AWAY FROM CHILDREN AND PETS IF S...

Страница 20: ...amcorder Batteries 4 Using Battery Pack Before you install the battery for the first time it must be fully charged Refer to Charging the Battery for details 1 Lift the OPEN lever and pull it up The power supply attachment cover will open 2 Insert the battery into the attachment holder aligning it with the mark on the camcorder 3 Press the center of the battery and hold it then slide it in the dire...

Страница 21: ...emoving the Battery Pack 1 Lift the OPEN lever and pull it up The power supply attachment cover will open 2 Push the side of the battery in the direction of the arrow A click will be heard and the battery is released 3 Remove the battery and close the cover Checking the Battery s Charge A battery charge indicator is located on the upper right corner of the viewfinder One of three symbols displays ...

Страница 22: ...lder The continuous operation time of the camcorder depends on the type of alkaline batteries used Please ensure that CAM OFF VIDEO switch is in the OFF position whenever attaching or detaching any power supply i e Battery AC adapter charger etc 1 Lift the OPEN lever and pull it up The power supply attachment cover will open 2 Lift the battery holder plates at the center of the attachment holder 3...

Страница 23: ...upply voltage will be very short and the camcorder will turn off soon Note When the batteries are used to power the camcorder in a cold place it may not operate normally the operation time may become extremely short or the camcorder may not be turned on It is recommended that you use a battery pack to power the camcorder in a cord place At 10 C the chemical reaction decreases the capacity of batte...

Страница 24: ...charger Note The AC adapter charger can be used around the world An AC plug adapter is required in some foreign countries If you need one purchase it at your Hitachi distributor Note The battery level indicator sometimes displays partial charge symbol when using the AC adaptor charger Ignore this indicator when using the AC adaptor charger Using a Car Battery The camcorder can be powered with a ca...

Страница 25: ...faces away from the body of the camcorder and the sprockets toward the body of the camcorder 3 Push the cassette holder which is embossed PUSH LOCK on the left hand side until it clicks into place The camcorder automatically closes Caution Be sure that you push the cassette holder embossed PUSH LOCK to close the holder Otherwise the holder will not click into place and the tape may be slack which ...

Страница 26: ...TERMINAL WHEN THE CAMCORDER IS TURNED ON TO AVOID ELECTRIC SHOCK 1 Slide the CAM OFF VIDEO switch to OFF 2 Connect a fully charged batteries or the AC adapter charger Loading Batteries Camcorder Batteries p15 Using Alternative Power Sources p17 3 Slide the DC camera light onto the DC camera light shoe with the camera light lens facing the same direction as the camcorder s lens 4 Hold down the red ...

Страница 27: ...e light to release the tab from the hook and then move the light in the direction of the arrow as shown in the figure Replacing the DC Camera Light Bulb 1 Turn the front of the case counter clockwise and remove it 2 Remove the bulb by pulling it out through the opened case 3 Install the new bulb by aligning the notch in the rim of the bulb s base with the mark outside the socket Avoid touching the...

Страница 28: ...Getting Started 28 Note Only replace the camera light bulb with VM CP4L optional to reduce the risk of fire ...

Страница 29: ...l at the point to which you wish to return The linear time counter clears to 0 00 00M 3 Press the STOP button to stop playback or press the start stop recording and set the CAM OFF VIDEO switch to VIDEO 4 Press the REW button and the tape stops at approximately where you reset the linear time counter This feature works in F F as well Setting the Date and Time Take the time to set the date and time...

Страница 30: ...finder The date and time should appear in the lower right with the 1 flashing 3 Pressing the F F button gives you higher numbers while the REW button gives you lower numbers Select the right month and press STOP button Use the F F REW and STOP buttons to select the proper day year hour minute and AM or PM 4 After setting the AM PM press the DATE TITLE button The display changes and the internal cl...

Страница 31: ...inues over 10 seconds the date is recorded for 10 seconds when recording is restarted after the camcorder has been set to the standby once Press the DATE TITLE button until AUTO and the date appear at the lower right of the viewfinder before you begin to record The date will be recorded whenever it appears in the viewfinder Automatic Title Recording This function automatically records the created ...

Страница 32: ...mcorder on to display the linear time counter The linear time counter keeps track from when you load a cassette into the camcorder and clears to 0 00 00 when the cassette is ejected Using the Display Button The remote control is optional for VM E110A Pressing the DISPLAY button on the remote control allows you to switch the displays in the viewfinder When the camcorder is turned on the linear time...

Страница 33: ...d position is located the camcorder enters the stop mode and SEARCH disappears from the viewfinder Note If you have ejected the cassette this function will not operate with that cassette When a cassette is inserted and the recording is started the position is identified as the recording start position on that day Note If the date title battery is not inserted the date search function does not oper...

Страница 34: ...ing Started Identifying Controls Left side Front Back Controls Illustration 8 1 Lens F1 6 4 48mm 12 1 power zoom lens with auto focus and auto iris functions 2 Viewfinder BRIGHT COLOR and TINT controls Refer to page 9 3 Cassette Holder Close Button CAUTION Be sure to press this button to close the cassette holder Otherwise the tape may become slack and may be damaged 4 Cassette Holder A power sour...

Страница 35: ...utton Use this button to stop playback fast forward or reverse Also use this button to set date and time Right side Viewfinder Battery cover Illustration 12 Marking QUICK EDIT Hold down the REW F F or PLAY button in the record pause mode the camcorder enters the rewind fast forward or play mode Using Quick Edit p38 13 REW BUTTON Use this button to fast rewind tapes or for visual search During visu...

Страница 36: ... DC IN Jack Behind the jack cover When using the AC adapter charger connect one end of the DC cord provided to this jack and the other end to the DC OUTPUT jack of the AC adapter charger When using the car battery cord optional connect this jack and the DC OUTPUT jack of the car battery cord 25 Start Stop Button When the CAM OFF VIDEO switch is in CAM press this button to start recording When pres...

Страница 37: ...function for dubbing Using Synchro Edit P43 32 TITLE ON OFF Button only on the remote control Use this button to create and record titles for your tapes Creating and Recording a Title p 39 33 COUNTER RESET Button only on the remote control Use this button to reset the linear time counter to 0 00 00 34 DISPLAY Button only on the remote control Use this button to select the viewfinder and TV display...

Страница 38: ...E310A uses PROGRAM AE auto exposure that automatically selects the optimum shutter speed either 1 60 1 120 1 180 1 250 1 350 1 500 1 750 1 1000 1 1500 1 2000 or 1 4000 of a second The iris adjusts automatically in response to shutter speed 1 Connect the camcorder to a power source Loading Batteries Camcorder Batteries p 15 Using Alternative Power Sources p17 2 Insert an 8mm cassette Inserting and ...

Страница 39: ...mally do to see the signal coming from the VCR 5 Hold down the red button on the CAM OFF VIDEO switch while sliding the switch to VIDEO 6 Press the PLAY button to begin playback 7 Press the STOP button when finished Connecting to a Television with Audio In and Video In Jacks 11 1 Connect the audio video cable provided to the AUDIO IN and VIDEO IN jacks of your television 2 Connect the other ends o...

Страница 40: ...hile sliding the switch to VIDEO 9 Press the PLAY button to begin playback 10 Press the STOP button when finished Simple Playback Using the Electronic Viewfinder 1 Insert the cassette Inserting and Removing Cassettes p 18 2 Hold down the red button on the CAM OFF VIDEO switch while sliding the switch to VIDEO 3 Press the PLAY button and enjoy your video 4 Press the STOP button when finished Using ...

Страница 41: ...layback to play the tape backwards at approximately 7 times normal speed Press PLAY button to return to normal playback Note When you engage FF button or REG button the picture will have some interference or noise This is normal during search mode ...

Страница 42: ... the power zoom T control brings the subject closer narrowing the picture If ZOOM appears at the left of the viewfinder the digital zoom function shown below has been engaged When the power zoom switch is operated the zoom position is displayed in the viewfinder for about 5 seconds and then disappears The zoom position is displayed in 10 steps Using the Digital Zoom The digital zoom increases the ...

Страница 43: ...he INST ZOOM button I ZOOM appears at the left of the viewfinder and the picture is magnified 1 5 times momentarily Note To return to the original zoom position press the INST ZOOM button so that I ZOOM disappears from the viewfinder Note This instant zoom has certain limitations and may degradate at extreme magnification and amplify camcorder s movement Using Auto Focus 13 The camcorder focuses t...

Страница 44: ...t objects lit by spotlight etc Objects behind water dappled or dusty glass Objects with little difference in light reflection such as a white wall Rapidly moving objects Dark objects Note With the T zoom control you can use the auto focus with subjects that are 3 3 feet away from the lens and further away to infinity With the W zoom control you can use the auto focus with subjects 0 4 inches away ...

Страница 45: ...focus press FOCUS control AUTO MAN buttons and the FOCUS disappears from the viewfinder Using Instant Review Use this feature to view the last few seconds of the tape you shot 1 Set the camcorder to record pause mode and tap the REW button The last few seconds of tape play back in reverse and then in normal playback mode 2 The camera plays back to the spot where you paused and returns to record pa...

Страница 46: ... on a tape The camcorder can store a title in its memory A title stored in memory can be displayed and recorded at any time A title contains two lines of up to 16 characters per line The camcorder contains 47 different characters for creating a title When creating a title use the TITLE ON OFF button on the remote control When creating a title in the CAM mode the DATE TITLE button of the camcorder ...

Страница 47: ...e you ve selected a character press the STOP button to set it 7 Complete the title by repeating steps 5 and 6 8 When you complete your title press the TITLE ON OFF button on the remote control to store the title in memory and remove the title graphics from the viewfinder Note As long as the correct current time can be displayed the title is held in memory Correcting Errors 1 Press the TITLE ON OFF...

Страница 48: ...le to the AV IN OUT jack to record video and audio from the television or VCR Recording a Created Title while Transferring a Tape 1 Connect the camcorder to the VCR p30 2 Turn on the VCR and set it to record Hold down the red button on the CAM OFF VIDEO switch while sliding the switch to VIDEO Press PLAY on the camcorder 3 Press the TITLE ON OFF button on the remote control at the point on the tap...

Страница 49: ...E110A It is recommended that you fit the remote control into the holder and attach the holder to the shoulder strap so as not to lose the remote control and for convenience when shooting outdoors 1 Attach the holder to the shoulder strap 2 Attach the remote control to the holder Fit the remote control into the holder as shown in the figure below and push until a click is heard To remove the remote...

Страница 50: ... it has only one AUDIO IN jack Turn on your VCR and place it in the camcorder input mode consult your VCR manual for details 3 Insert the recorded tape in the camcorder and a blank tape into the VCR 4 Play the tape in the camcorder until you find the place you want to record Press the Start Stop button 5 Press the RECORD button on the VCR It automatically sets to pause If the VCR begins to record ...

Страница 51: ...VIDEO switch while sliding the switch to VIDEO 4 Insert a previously recorded tape in the camcorder 5 Use the wireless remote control and press the PLAY button Use the PLAY F FWD and REW buttons to find the place where you want to stop dubbing Press the PAUSE START STOP button 6 Display the linear timer counter with memory Using Memory p20 Press the COUNTER RESET button to set the linear time coun...

Страница 52: ...M OFF VIDEO switch while sliding the switch to CAM 6 Turn your television or VCR on and tune it to the channel you wish to record from 7 Press the Start Stop button to start recording the program that is on the screen of the television 8 Press the Start Stop button again to stop recording Note If the tape is played back while the AV input cable is left connected to the camcorder noise may appear i...

Страница 53: ...gn matter adheres to it Cleaning the Lens Illustration 1 Rotate and remove eye cup 2 Clean the picture tube face and lens To prevent scratching use a soft non abrasive cloth swab or lens cleaning paper 3 Align the reference mark and rotate the eye cup in the direction of arrow Periodic Maintenance A precision electromechanical device the Hitachi VM E110A E310A requires maintenance after a period o...

Страница 54: ...Check Point Correction Picture does not appear in the viewfinder Remove the lens cap Slide the power switch to CAMERA Disconnect the AV input cable from the camera recorder The camera recorder cannot go into the recording mode even when the start stop button is pressed Check the record protect tab on the cassette Make sure that the FOCUS M does not appear in the viewfinder If it is displayed press...

Страница 55: ...ified to work properly with camera recorder Tape is damaged try another cassette Color of your TV screen is too bright too faint or change TV set has VIR circuit Turn off during playback Specifications General Specifications Power requirements 6V DC Power consumption VM E110A 4 7W when recording VM E310A 5 3W when recording Dimensions 3 11 16 W x 4 12 16 H x 8 5 16 D 94mm x 120mm x 211mm Weight VM...

Страница 56: ...rk of Hitachi Authorized Service Facilities has been established in all 50 states and Puerto Rico Each facility will provide you with convenient and expedient assistance Our service Hotline operator will direct you to the Hitachi Authorized Service Facility nearest you Just present proof of purchase and or delivery receipts to the Hitachi Authorized Service Facility and service will be rendered in...

Страница 57: ...imagination leads Available Accessories To Order in the United States By Phone To place an order by phone have your VISA MASTERCARD or AMERICAN EXPRESS card ready and call Hitachi s toll free number anytime 24 hours a day 7 days a week 1 800 HITACHI By Mail Complete the order form on page 55 Detach it and send it to the following address with your credit card information money order or check in U ...

Страница 58: ...e Hitachi will repair or replace defective parts at no charge to the original owner Parts used for replacement are warranted for the remainder of the original Limited Warranty period For 90 days from the date of original purchase Hitachi will provide labor for the repair or replacement of defective parts without charge subject to the following conditions 1 Owner must provide verification of the da...

Страница 59: ...HITACHI WARRANTY CARD USA Front 59 HITACHI SALES CORPORATION OF HAWAII 3219 Koapaka St Honolulu HI 96819 Tel 808 836 3621 ...

Страница 60: ...OEVER EXCEPT AND TO THE EXTENT PROVIDED IN THIS LIMITED WARRANTY HITACHI MAKES NO EXPRESS WARRANTY REGARDING THIS HITACHI PRODUCT FURTHER ALL IMPLIED WARRANTIES RELATING TO ANY PORTION OF THIS PRODUCT INCLUDING ANY WARRANTY OF MERCHANTABILITY OR FITNESS FOR A PARTICULAR PURPOSE ARE LIMITED TO 90 DAYS FOR LABOR AND TWO YEARS FOR PARTS THE DURATION OF THE APPLICABLE EXPRESS WARRANTY CONTAINED ABOVE ...

Страница 61: ...IMPORTANT NOTICE This warranty will not apply to products purchased outside of Canada OR sold by any organization other than HITACHI HSC CANADA INC PROTECTION PLAN CONDITIONS A This contract is exclusively for products manufactured and sold by Hitachi HSC Canada Inc hereinafter called Hitachi purchased in Canada from a dealer duly accredited by Hitachi The program is available only for products co...

Страница 62: ...ice All video products must be brought to the Service Center for repairs 8 Original installation and any subsequent reinstallation or any transformation of the product 9 The replacement of the video camera pick up element if the pick up element has been over exposed to an intense source of light 10 Cleaning the video heads F All repair costs must be claimed from Hitachi at all times through an aut...

Страница 63: ...achi or a Hitachi Authorized Service Center must be shipped on a PREPAID BASIS To avoid any damage to the returned goods please ensure that proper packaging procedures are followed A short written description of the problem along with proof of warranty should accompany the product returned for repair Only products under warranty will be returned on a no charge basis to the customer The customer is...

Страница 64: ...t if the pickup element has been OVER EXPOSED to an intense source of light 14 Products sold in Canada by any organization other than HITACHI HSC CANADA INC IMPORTANT This warranty is in lieu of all other warranties guarantees or agreements whether express or implied and no person dealer or company is authorized to change modify or extend its terms in any manner whatsoever HITACHI WARRANTY REGISTR...

Страница 65: ...ec H9R1B1 CANADA Tel 404 279 5600 Tel 514 697 9150 HITACHI SALES CORPORATION OF HAWAII INC 3219 Koapaka Street Honolulu Hawaii 96819 Tel 808 836 3621 Thank you for buying a Hitachi product You ve chosen the best 8 mm video camcorder for you and we want to help you make the most of your purchase Please take time to become familiar with the manual and how it is set up Keep it handy for feature refer...

Страница 66: ...HITACHI CANADA WARRANTY CARD Back 66 ...

Отзывы: