background image

MAKING A SAMPLE CAMERA RECORDING 

- 22 - 

MAKING A SAMPLE CAMERA RECORDING 

1. Connect the power source. (See pages 10 and 11.) 
2. Insert the cassette.  (See page 13.) 
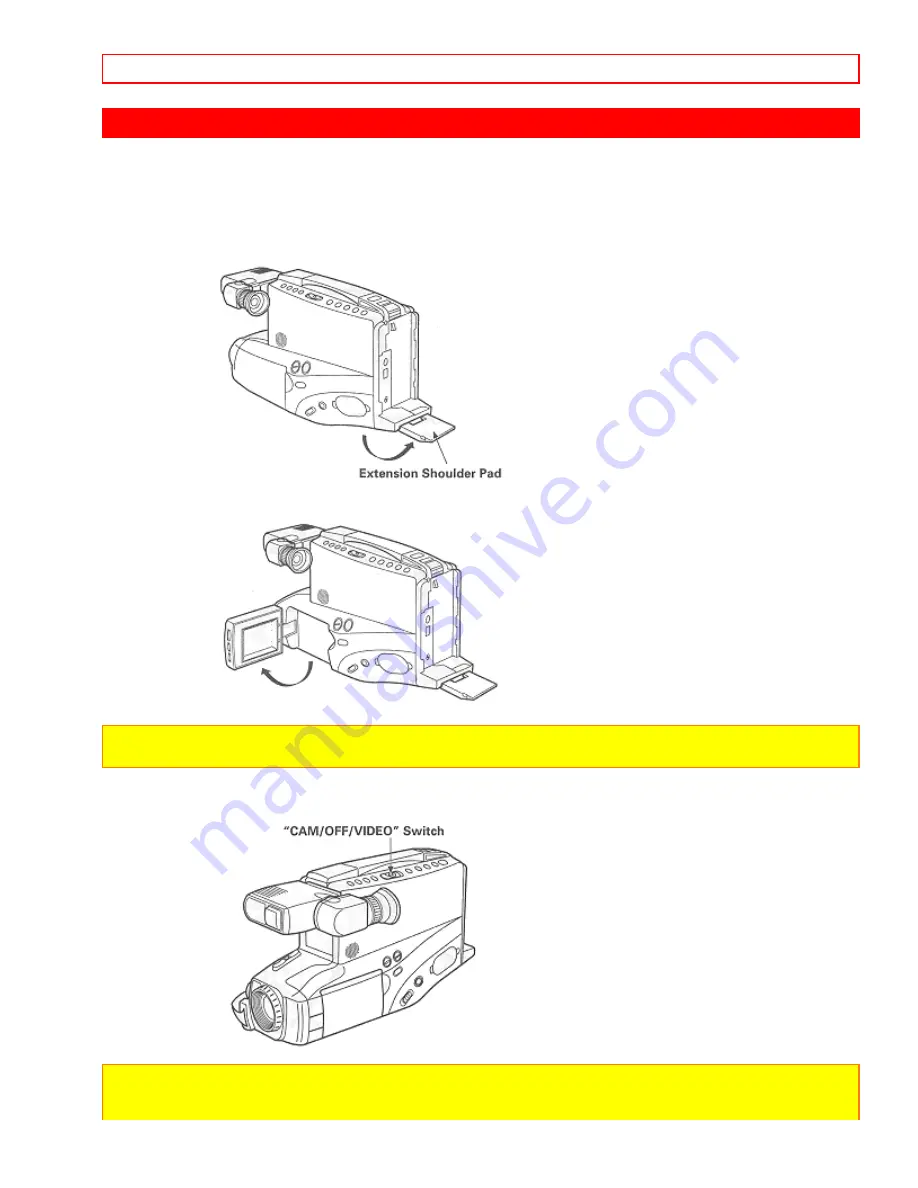
3. Unfold the extension shoulder pad.  When recording while viewing the LCD monitor, fit the extension shoulder 
pad on your shoulder; the LCD screen will be easy to see. 


4. Open the LCD monitor if you want to view the picture being recorded on the LCD monitor.  If you want to view 
the picture in the viewfinder, leave the monitor close. 


NOTE: 

Opening or closing the LCD monitor switches the picture to appear on the LCD monitor or in the 

viewfinder. 

5. Press and hold the small button on 

"CAM/ OFF/VIDEO"

, and then slide it to the 

"CAM" 

position. The 

camcorder will enter record/pause mode automatically. 


NOTES: 

• If the erase prevention tab on the cassette is removed, the 

"TAPE" 

indication in the viewfinder or on the LCD 

monitor flashes for several seconds and the camcorder will not enter record/pause mode. 

Содержание VM-7500LA - Camcorder

Страница 1: ...NC 6740 Campobello Road 1855 Donroch Court Mississauga Ontario L5N 2L8 San Diego California 92173 CANADA Tel 770 279 5600 Tel 905 821 4545 Thank you for choosing the video camcorder For maximum pleasure and convenience please read these simple instructions before operating your camcorder QR31031 Hitachi Ltd 1998 Printed in Japan KY TF N ...

Страница 2: ...ROGRAM AE Auto Exposure 34 POWER ZOOM 34 DIGITAL ZOOM 35 MACRO 35 INSTANT ZOOM 36 DIGITAL EFFECTS RECORDING 36 FADE IN FADE OUT 39 STABLE PIX Electronic Image Stabilizer FUNCTION Only for VIVI 8500LA 40 INDEX SIGNAL RECORDING 41 QUICK EDIT Edit Search 42 TITLE RECORDING 42 AUDIO DUBBING only for VM 8500LA 45 AUDIO AND VIDEO DUBBING only for VM 8500LA 46 RECORDING TV PROGRAMS only for VM 8500LA 47 ...

Страница 3: ...erates uses and can radiate radio frequency energy and if not installed and used in accordance with the instructions may cause harmful interference to radio communications However there is no guarantee that interference will not occur in a particular installation If this equipment does cause harmful interference to radio or television reception which can be determined by turning the equipment off ...

Страница 4: ...isplay LCD panel is made by highly precise technology More than 99 99 of its picture elements pixels are effective but some less than 0 01 may not appear as coloured bright dots This does not indicate a fault as the LCD panel stretches the limits of current technology FEATURES 3 inch LCD with speaker Active screen function Color electronic viewfinder EVF only for VM 8500LA Stable pix Electronic Im...

Страница 5: ... following components and accessories besides the camcorder unit itself before disposing of the packing material 1 Lead acid rechargeable battery 2 AC adaptor charger 3 Shoulder strap 4 DC cord IMPORTANT SAFEGUARDS In addition to the careful attention devoted to quality standards in the manufacture of your video product safety is a major factor in the design of every instrument But safety is your ...

Страница 6: ...ords at plugs convenience receptacles and the point where they exit from the appliance 8 Ventilation Slots and openings in the cabinet are provided for ventilation to ensure reliable operation of the video product and to protect it from overheating These openings must not be blocked or covered The openings should never be blocked by placing the video product on a bed sofa rug or other similar surf...

Страница 7: ...ous and should be left to a professional antenna installer USE 14 Cleaning Unplug this video product from the wall outlet before cleaning Do not use liquid cleaners or aerosol cleaners Use a damp cloth for cleaning 15 Object and Liquid Entry Never push objects of any kind into this video product through openings as they may touch dangerous voltage points or short out parts that could result in a f...

Страница 8: ...harger 2 battery and 3 product using battery 3 Also read all instructions on pages 4 and 5 4 Caution To reduce the risk of injury charge only rechargeable battery VM BP64 BP65 BP66 BP67 Other types of batteries may burst causing personal injury and damage 5 Do not expose charger to rain or snow 6 Use of an attachment not recommended or sold by the battery charger manufacturer may result in a risk ...

Страница 9: ...ion shown in the figure when carrying the camcorder or storing it in the carrying case Turn the viewfinder to the position shown below when shooting pictures 1 Turn the viewfinder 2 Turn the eyepiece You can adjust the position and angle of the viewfinder so you can see through it easily CAUTIONS Do not force the viewfinder to rotate completely around This will damage the viewfinder and or camcord...

Страница 10: ...wfinder without eyeglasses on adjust the diopter control for optimum focus adjustment LCD MONITOR When using the LCD monitor during recording and playback you can adjust the brightness of its screen and the angle of the monitor Opening the LCD monitor 1 Press the OPEN button to open the LCD monitor ...

Страница 11: ...can be moved If the LCD monitor is turned 90 so that it faces the same direction as the lens when the camera signal is being recorded during recording recording pause instant review editing A V dubbing or A V dubbing pause the image on the monitor screen will become a mirror image and the viewfinder will turn on The on screen display on the LCD monitor will also be as if reflected on a mirror If t...

Страница 12: ...ge the LCD monitor Do not disassemble the LCD monitor as this might cause a malfunction When opening the LCD monitor be careful that no water droplets adhere to the monitor screen and that no water or dust enters the camcorder through the gap as it could cause a malfunction ACTIVE SCREEN This camcorder automatically brightens the backlight of the LCD monitor when you are recording a bright subject...

Страница 13: ...order the battery level indicator may display This indicator is used for battery operation and has no meaning when using the AC adaptor charger to power the camcorder WHEN USING WITH THE CAR BATTERY By using optional car battery cord Hitachi VM CC70A 1 Connect the small plug of the car battery cord to the DC IN 9 6V jack of the camcorder 2 Connect the other end of the car battery cord to the car s...

Страница 14: ... the viewfinder When the battery is fully charged is displayed After several minutes the symbol will change to When the battery is very near empty the symbol will change to and start blinking You should find an alternative power source or recharge the battery before continuing to use your camcorder NOTE When a battery pack is used to power the camcorder flashes even if DISPLAY is not pressed to wa...

Страница 15: ...me The battery should be charged at a temperature of 50 degrees F 86 degrees F 10 degrees C 30 degrees C to prevent damage Do not operate the battery at temperatures below 14 degrees F 10 degrees C or above 95 degrees F 35 degrees C The battery may be damaged if operated at temperatures above 122 degrees F 50oC Operation time will decrease at extremely low temperatures After repeated chargings and...

Страница 16: ...so the transparent window is toward you and the arrow toward the cassette holder Slide the cassette into cassette holder as far as it will go NOTE Push in the center of the cassette all the way until it is latched by the cassette holder 4 Press the cassette holder The holder will latch in the operating position Removing a cassette Press STOP EJECT The cassette door will open automatically Remove t...

Страница 17: ... the volume when viewing a played back picture on the LCD monitor See PLAYBACK on page 22 LCD Monitor You can view the pictures as they are being recorded and play them back immediately after recording on the 3 inch LCD screen INST ZOOM Instant Zoom Button Use this button to magnify the image being recorded 1 5 times DIGITAL EFFECT Button Use this button to add special effects to your recording Yo...

Страница 18: ...cks For VM 7500LA Connect the audio video cable not supplied to these jacks and to the audio and video inputs of your TV monitor receiver You can also connect the RF converter unit optional to these jacks and your TV receiver For VM 8500LA These can be used as input or output jacks depending on the position of AV OUT IN When using these jacks as outputs connect the audio video cable not supplied t...

Страница 19: ...making buttons when TITLE is pressed See TITLE RECORDING on page 35 These buttons may be also used to set the date and time during pause stand by mode See DATE TIME SETTING on page 24 REW REVIEW Button Press this button during stop or fast forward mode and fast rewinding starts appears in the viewfinder or on the LCD monitor Press the button during playback of tape and the tape is played back in t...

Страница 20: ...ted ZM 2 appears when the x240 digital zoom mode is selected MIRROR appears when the half mirror recording mode is selected MOSAIC appears when the mosaic recording mode is selected 5 ZOOM appears when the digital zoom is engaged I ZOOM appears in the instant zoom mode 6 Displays the zoom position for several seconds when the power zoom switch is operated 7 Indicates the operating modes REC appear...

Страница 21: ...ng a tape recorded on another VCR Adjust for best picture Ejecting the cassette returns the tracking to the normal position Lens Cap Tab Place the lens cap on this tab when you are ready to record a scene The tab also prevents the lens cap from swinging around on its cord Hand Strap Adjust to best fit to your hand For VM 7500LA Diopter Control To use the electronic viewfinder turn this control for...

Страница 22: ...re being recorded on the LCD monitor If you want to view the picture in the viewfinder leave the monitor close NOTE Opening or closing the LCD monitor switches the picture to appear on the LCD monitor or in the viewfinder 5 Press and hold the small button on CAM OFF VIDEO and then slide it to the CAM position The camcorder will enter record pause mode automatically NOTES If the erase prevention ta...

Страница 23: ... is about five minutes recording time left on the cassette If the record pause mode continues for more than 5 minutes the camcorder s power is automatically turned off To turn on again press REC PAUSE The camcorder enters record pause stand by mode 8 After recording slide CAM OFF VIDEO to OFF position to turn off the camcorder 9 Press STOP EJECT to remove the cassette 10 Always remove the power so...

Страница 24: ...YBACK You can view recorded pictures on the three inch LCD monitor immediately after recording If you connect the camcorder to your TV you can seethe picture played back on your TV Refer to VIEWING THE PICTURE PLAYED BACK ON YOUR TV on page 40 1 Open the LCD monitor and then adjust the angle of the monitor See Opening the LCD monitor on page 9 2 Press and hold the small button on CAM OFF VIDEO and...

Страница 25: ... the LCD monitor is turned on and off automatically when the LCD monitor is opened and closed It is recommended that you close the LCD monitor to save battery power when playing back a picture on a TV or recording a TV program without viewing it Only the playback sound is heard The sound being recorded is not heard To play back tape with the viewfinder Close the LCD monitor then press PLAY to play...

Страница 26: ...following procedure to set up this display for the current date and time The time backup battery is rechargeable Charge the backup battery every two months Set CAM OFF VIDEO to OFF position and connect a charged battery or AC adaptor charger to the camcorder for 24 hours Make sure that the current time is displayed correctly before you start recording NOTES The backup battery should be charged eve...

Страница 27: ...onth Hold button down to advance rapidly If you go past the month you want to set press REW REVIEW When the correct month appears press STOP EJECT 12 00 AM 11 1 1999 4 Press F FWD to select correct date Hold button down to advance rapidly If you go past the date you want to set press REW REVIEW When the correct date appears press STOP EJECT 12 00 AM 11 5 1999 5 Press F FWD or REW REVIEW to select ...

Страница 28: ...date time information after starting the date time 1 Press and hold DATE TIME and then press STOP EJECT The month starts flashing 2 Correct the incorrect digit by using F FWD REW REVIEW and STOP EJECT To correct date time information during programming Press STOP EJECT repeatedly until the digit that is incorrect flashes Correct the incorrect digit by using F FWD REW REVIEW and STOP EJECT DATE REC...

Страница 29: ...rding is less than 10 seconds long If the date changes while recording continues over 10 seconds the new date is recorded for about 10 seconds the next time you make a recording TITLE and date Automatic title and date recording This option records the date and created title see TITLE RECORDING on page 28 automatically once a day at the beginning of recording for 10 seconds HAPPY BIRTHDAY TITLE 11 ...

Страница 30: ...5 1999 3 Press REC PAUSE Recording will start NOTES When AUTO and date display is selected the date disappears about 10 seconds after recording is started When TITLE and date display is selected the title and date disappear about 10 seconds after recording is started AUTO FOCUS The camcorder focuses the subject in the center of the viewfinder automatically The subject at the center of the viewfind...

Страница 31: ...urface to infinity The auto focus will not work under the following conditions 1 Objects not in the center of the viewfinder 2 Objects at far and near positions at the same time 3 Objects lit by a spotlight or neon signs etc 4 Objects behind glass with water droplets or dust on it 5 Objects with almost no difference in brightness such as a white wall 6 Objects moving rapidly 7 Dark objects ...

Страница 32: ...Y is pressed so the display appears in the viewfinder or on the LCD monitor the same display appears on the screen of the connected TV monitor receiver TAPE COUNTER When DISPLAY is pressed so the display appears in the viewfinder or on the LCD monitor and recording or playback is performed the counter indicates the amount of tape transported as a 4 digit number ...

Страница 33: ...to the same point several times in a row 1 Press DISPLAY The tape counter and memory indicator M appear 2 Start playing or recording a tape 3 At the point you want playback to start press RESET button to reset the counter to 0000M 4 Continue to play or record 5 Press STOP EJECT button to stop playback or press REC PAUSE button to stop recording and place CAM OFF VIDEO in VIDEO position 6 Press REW...

Страница 34: ...comes less than about five minutes TAPE END flashes in the viewfinder With some tapes TAPE END may appear slightly earlier but you can continue recording PROGRAM AE Auto Exposure Program AE automatically selects the shutter speed 1 60 1 100 1 120 1 180 1 250 1 350 1 500 l 750 1 1000 1 1500 1 2000 or 1 4000 second that is optimum for the brightness of the subject The iris is also adjusted automatic...

Страница 35: ...er zoom T control until you find the picture you want You control the zoom with the power zoom T and W controls When DISPLAY is pressed and the display appears in the viewfinder ZOOM is displayed to signal to you that the camcorder is in the digital zoom area NOTE When the digital zoom is used the more the image is magnified the rougher the picture becomes Also even a slight shaking of the camcord...

Страница 36: ...fy the subject 1 5 times regardless of zooming engaged by the power zoom T and W controls Press INST ZOOM and the picture is magnified 1 5 times When DISPLAY is pressed and the display appears in the viewfinder or on the LCD monitor I ZOOM is displayed to signal to you that the camcorder is in the instant zoom mode NOTES To return to the original zoom position press INST ZOOM so that I ZOOM disapp...

Страница 37: ...symmetric image obtained by placing a mirror at the center of the screen half mirror recording and an image in mosaic mosaic recording NOTE The half mirror recording and mosaic recording functions cannot be used with digital zoom instant zoom stable pix or zoom fade function Each time DIGITAL EFFECT is pressed the recording mode is switched 16x9 16x9 Mode NEGPOS Negative Positive Mode Normal Mode ...

Страница 38: ... the LCD monitor will become negative ZM 2 x240 Digital Zoom Mode Press and hold the power zoom T control until you reach your desired magnification This function can magnify an image up to 240 times when instant zoom is used at the same time MIRROR Half image Mode The image in the viewfinder or on the LCD monitor will change to a symmetric image on the left and right obtained by placing a mirror ...

Страница 39: ...set the fade function White fade Fades in from a white screen or fades out to a white screen When DISPLAY is pressed and the display appears in the viewfinder or on the LCD monitor appears in the upper left corner of the viewfinder or LCD monitor Black wipe fade The picture opens gradually from the center of a black screen or closes into the center to a black screen When DISPLAY is pressed and the...

Страница 40: ...ewfinder or LCD monitor Fading In 1 Use DIGITAL FADE to select a fade option before recording 2 Press REC PAUSE to start recording fade begins automatically Fading Out 1 While recording with the camcorder use DIGITAL FADE to select a fade option 2 Press REC PAUSE to stop recording the fade begins automatically and REC flashes until the fade ends NOTE When fading out be sure to wait until the PAUSE...

Страница 41: ... When the STABLE PIX function is engaged the picture becomes rough When the STABLE PIX function is engaged the angle of view at the wide angle end becomes narrower It is recommended that you do not use the STABLE PIX function when using a tripod The sensor would detect vibrations from the tripod in which case the picture would be blurred INDEX SIGNAL RECORDING Indexing your tapes while recording m...

Страница 42: ...ick edit is used while the camcorder is in the record pause stand by mode By holding down F FWD REW REVIEW or PLAY you can visually search or play your tape Releasing the buttons F FWD REW REVIEW or PLAY immediately stops the tape at that position TITLE RECORDING You can easily create and record personalized titles on your videos with the camcorder s built in titler Once a title is stored it can b...

Страница 43: ...ace you want to begin your title 4 Select the first character for your title by pressing or repeatedly until the desired character appears L NOTE A title contains two lines of up to 16 characters per line A chart showing the characters contained in the titler is located on page 36 5 After you have selected the first character press SHIFT to move the flashing cursor to the place you want the next c...

Страница 44: ...itle 3 Set CAM OFF VIDEO to CAM 4 Press TITLE to display the title graphics 5 Press REC PAUSE to start the title recording 6 Press TITLE to remove the title graphics from the viewfinder The camcorder will now record as normal NOTES If you are planning to video tape an event you must prepare your titles in advance then by pressing TITLE superimpose the title over the scene as it s being recorded Yo...

Страница 45: ...on a previously recorded tape without erasing the original video picture When you audio dub a tape the previous audio is erased and replaced with new sound NOTES Sound from the built in microphone and the AUDIO jack can be dubbed When dubbing audio from the built in microphone set AV OUT IN to OUT and do not connect the AUDIO jack When dubbing from the AUDIO jack set AV IN OUT to IN 1 Insert a rec...

Страница 46: ...inder or on the LCD monitor the tape stops automatically at the reading of 0000M and audio dubbing stops AUDIO AND VIDEO DUBBING only for VM 8500LA The audio and video dubbing feature lets you record new audio sound and video pictures simultaneously on a previously recorded tape When you audio and video dub a tape the previous audio and video are erased and replaced with the new sound and pictures...

Страница 47: ...he exact position 6 Press RESET to set the tape counter reading to 0000M 7 Press REW REVIEW to rewind the tape to the approximate position from which you want to start dubbing 8 Press PLAY and when the exact position to start dubbing is reached press REC PAUSE 9 Press DUBBING AUDIO VIDEO and PLAY simultaneously twice A V DUB II is displayed in the viewfinder or on the LCD monitor and at the same t...

Страница 48: ... to the camcorder 4 Set AV OUT IN to IN position 5 Press and hold the small button on CAM OFF VIDEO and then slide it to CAM position 6 Turn on your TV or VCR and tune it to the channel you wish to record 7 Press REC PAUSE to start recording You are now recording the TV program 8 Press REC PAUSE to stop recording 9 After recording place CAM OFF VIDEO in OFF and then press STOP EJECT to remove the ...

Страница 49: ... cable to AUDIO IN and VIDEO IN of your TV 2 Connect the other end of the audio video cable to AUDIO and VIDEO of your camcorder 3 Turn on TV and select video input 4 Press STOP EJECT button on the camcorder and then insert the cassette 5 Place CAM OFF VIDEO in VIDEO position 6 Press PLAY 7 After playing press STOP EJECT Tracking adjustment When playing prerecorded tapes or tapes recorded by the r...

Страница 50: ...axial cable with antenna adaptor to OUT TO TV on the RF converter unit 4 Connect the other end to the VHF antenna terminal on the TV as illustrated 5 Connect the connector cable from RF converter unit to RF DC OUT AUDIO and VIDEO jacks on the camcorder 6 Turn on the TV and set to channel 3 unless channel 3 is one of the TV stations in your area If channel 3 is used in your area set your TV to chan...

Страница 51: ...ctor of the VCR to VCR mode the picture being dubbed by VCR can be monitored FLYING ERASE HEAD only for VM 8500LA A rotating erase head which eliminates glitches and rainbow noise that occurs at the joints between recorded segments DEMONSTRATION MODE This camcorder is equipped with a demonstration mode If you leave the powered camcorder for 10 minutes without a cassette inserted when the date has ...

Страница 52: ... unless a cassette is loaded CAUTION Do not hold the unit by the built in camera light when carrying as this could cause a malfunction 3 After use set LIGHT to OFF or set CAM OFF VIDEO of the camcorder to OFF position CAUTION During operation and or after use of the camera light the front surface and lamp of the camera light will be very hot To avoid burns or hair damage do not touch them with you...

Страница 53: ...s replaced or when the front case of the camera light is removed make sure the front case is attached to the camera light properly Consult your nearest service center to replace the lamp ATTACHING THE OPTIONAL TELE OR WIDE CONVERTER LENS 1 Remove the lens hood Turn the lens hood counterclockwise as shown in the figure Or attach the lens cap over the lens hood then turn them counterclockwise to rem...

Страница 54: ...ality control and inspection systems However should problems develop check the following points and take necessary corrective measures INSERTING OR REMOVING THE CASSETTE Symptom Check Point Correction Cassette holder cannot be opened when you press STOP EJECT Connect the power source Cassette cannot be inserted into cassette compartment Load cassette in direction indicated by arrow on cassette Cas...

Страница 55: ...IS ACCEPTED Symptom Check Point Correction Power is not turned on and no button operations are accepted Remove the power source and after about one minute push the reset switch gently using a toothpick etc until you feel a click Since this erases the date time and other customer preferred features reset them again Behind the jack cover PLAYBACK OF PRERECORDED CASSETTE Symptom Check Point Correctio...

Страница 56: ... following procedure For VM 7500LA 1 Push the tab and hold it then open the cover 2 Clean the picture tube face and lens To prevent scratching use a soft non abrasive cloth swab or lens cleaning paper 3 Close the cover For VM 8500LA 1 Rotate and remove eye cup 2 Clean the picture tube face and lens To prevent scratching use a soft non abrasive cloth swab or lens cleaning paper ...

Страница 57: ...t dealer or VCR service center before using a head cleaning tape PERIODIC MAINTENANCE This video camcorder is a precision electromechanical device which will require periodic maintenance after a period of normal use We expect that no maintenance other than head cleaning will be required during the warranty period by most users unless the video camcorder is heavily used or seldom used Normal mainte...

Страница 58: ...kup device 1 4 C C D Lens diameter 46 mm For U S A only HITACHI Service Hotline To locate an authorized HITACHI service facility in the continental U S A DIAL TOLL FREE 7 days a week 24 hours a day 800 HITACHI 1 800 448 2244 Hitachi Home Electronics America Inc Hitachi has made every effort to assure you hours of trouble free operation from your unit However should you require service a network of...

Страница 59: ...ur imagination leads Available Accessories Click here for Chart of Available Accessories To place an order for any of these items call our toll free number or use the ordering form on page 49 1 800 995 4500 HOW TO ORDER USA only In Canada Please use Canadian order form in French version of this manual Pages 38 and 39 BY PHONE To place an order by phone have your VISA MASTER CARD or DISCOVER card r...

Отзывы: