9
English
3. Bending by eye measurement.
Since the unit uses a variable-speed switch, you can
bend the rebar to your desired angle by eye
measurement in addition to the dial setting.
(1) Set the setting dial to a larger angle than you desire.
(2) Pull the switch trigger lightly and bend the rebar
slowly.
(3) When the rebar is bent to the desired angle, stop
pulling the switch. If the bar is still small of the
desired angle, pull the switch again.
(4) Remove the rebar after bending has been finished.
Then, pull the switch once more and return the
bending roller to the home position. (Continue pulling
the switch until the bending roller begins reverse
rotation.)
4. Removing rebar during bending operation
When bending out at a low speed in “bending by eye
measurement”, the rebar can sometimes get caught
in the bending roller due to its own flexure.
If this occurs, you can return the bending roller to the
home position by pulling the switch again after setting
the setting dial to the “return” position. This is the
same method used to remove the rebar when it gets
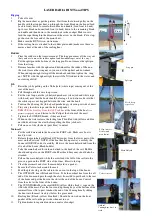
caught during cutting operation. (
Fig. 11
).
5. Use of bending angle measuring plate.
In the unit, the cam cover itself is strucured as an
angle measuring plate that lets you measure the
angle of the rebar after bending. Take advantage of
this convenience. When viewed from the top as shown
in
Fig. 12
, the point where the marked line and the
rebar meet shows the bending angle. (Remember: A
different line must be used depending on the bar
diameter.)
6. Using hole to fix unit in place.
A hole is provided at the center of the unit to fix and
stabilize it. This hole comes in quite handy when
used in the following manner. (
Fig. 13
.)
䡬
For bending operation when the unit is fixed to a
work bench.
This hole will prove very convenient when the unit is
bolted to a suitable work bench. (Bolt size M10, less
than W3/8.)
MAINTENANCE AND INSPECTION
WARNING!
To prevent accidents, always be sure to turn the switch
OFF and unplug the power cord from the receptacle.
1. Inspecting the mounting screws:
Regularly inspect all mounting screws and ensure
that they are properly tightened. Should any of the
screws be loose, retighten them immediately. Failure
to do so could result in serious hazard.
2. Maintenance of the motor
The motor unit winding is the very “heart” of the
power tool. Exercise due care to ensure the winding
does not become damaged and/or wet with oil or
water.
3. Inspecting the carbon brushes (Fig. 14)
The motor employs carbon brushes which are
consumable parts. Since an excessively worn carbon
brush can result in motor trouble, replace the carbon
brushes with new ones which have the same carbon
brush No. shown in the figure when they become
worn to or near the “wear limit”. In addition, always
keep carbon brushes clean and ensure that they slide
freely within the brush holders.
4. Replacing carbon brushes. (Fig. 13, Fig. 14)
Loosen the set screws and remove the tail cover.
Remove the brush caps and carbon brushes. After
replacing the carbon brushes, do not forget to tighten
the brush caps securely and to mount the tail cover
with set screws.
NOTE
Due to HITACHI’s continuing program of research and
development, the specifications herein are subject to
change without prior notice.
IMPORTANT
Correct connection of the plug
The wires of the main lead are coloured in accordance
with the following code:
Blue: -Neutral
Brown: -Live
As the colours of the wires in the main lead of this tool
may not correspond with the coloured markings
identifying the terminals in your plug proceed as follows:
The wire coloured blue must be connected to the terminal
marked with the letter N or coloured black. The wire
coloured brown must be connected to the terminal
marked with the letter L or coloured red. Neither core
must be connected to the earth terminal.
NOTE
This requirement is provided according to BRITISH
STANDARD 2769: 1984.
Therefore, the letter code and colour code may not
be applicable to other markets except The United
Kingdom.
Information concerning airborne noise and vibration
The measured values were determined according to
EN610029.
The typical A-weighted sound pressure level: 72 dB (A).
Wear ear protection.
The typical weighted root mean square acceleration
value does not exceed 2.5 m/s
2


