background image

18

ON-SCREEN DISPLAY MENU

Ǐ

AUDIO MENU

ǐ

Audio menu 

Audio

 menu allows you to control various sounds, such as treble, bass and balance etc. including the settings 

of surround effect, prefect volume etc. Please follow the steps below. 

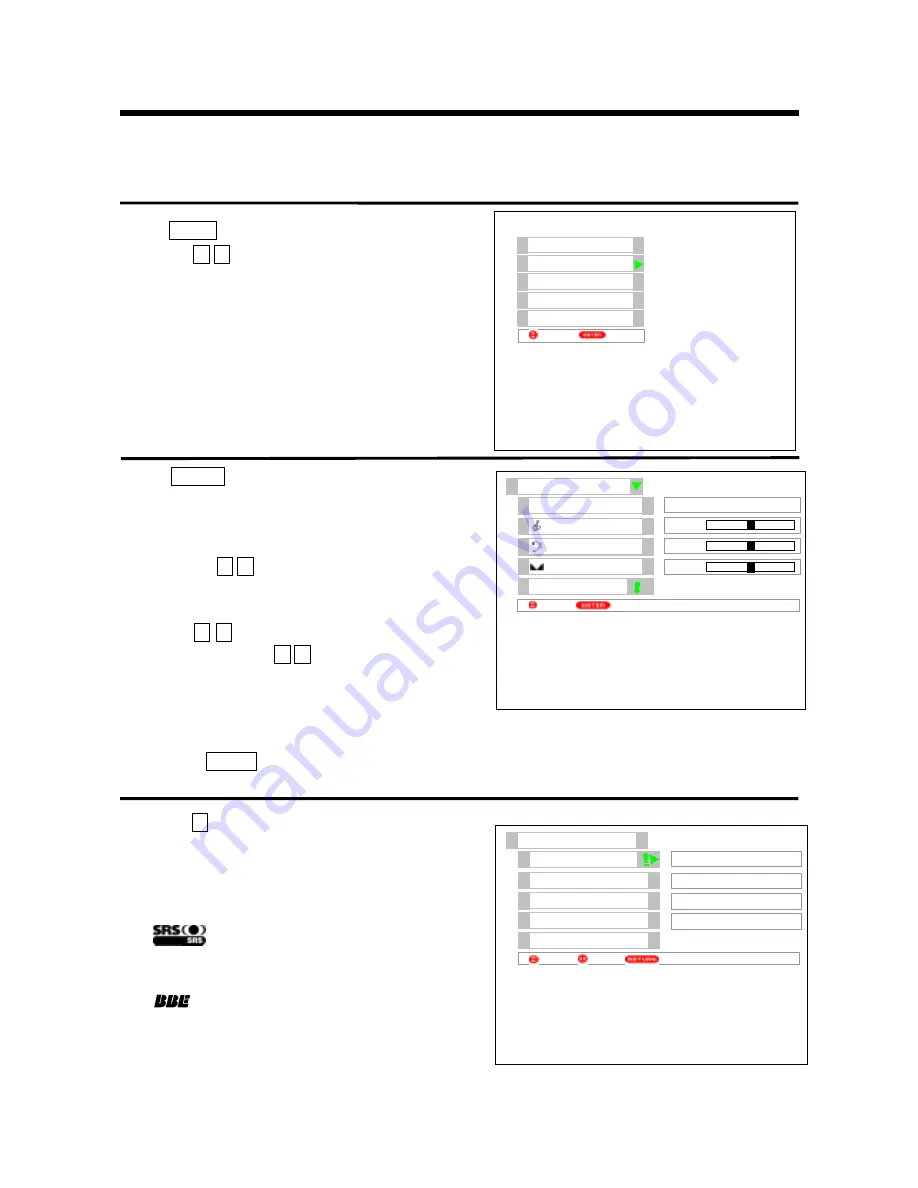
1

Press 

MENU 

button to display menu. 

Press the 

Ÿ ź

 cursor buttons to select 

Audio

 option as 

shown on right.

2

Press 

ENTER 

button to display the first page in 

Audio

  menu as shown on right. 

The first page provides you with four different audio 

modes (

Theater

,

Music

,

Narration

 and 

Favorite

). You 

can press the 

Ż Ź

 cursor buttons to select. We suggest 

that you try every item to obtain the desired sound effect. 

If you want to obtain your favorite sound effect, you can 

press the 

Ÿ ź

cursor buttons to select the adjustment 

item and then press the 

Ż Ź

 cursor buttons to adjust. 

During the process of adjustment, the indicator will 

move left or right, allowing you to know the state of   

adjustment directly. 

NOTE: Press 

AUDIO

 button on the remote control unit, you can switch among the above four audio modes 

easily. 

3

 Press the 

ź

 cursor button until the second page in 

Audio

menu appears as shown on right. These settings allow 

you to enhance or improve sound effect. 

Notes: 

˄

1

˅

     is a trademark of 

SRS Labs, Inc. 

SRS 

technology is incorporated under license from

SRS Labs, Inc.

˄

2

˅

˖

Licensed by 

BBE Sound, Inc.

under

USP4638258

 and 

4482866. BBE

 and 

BBE

symbol are registered trademarks of 

BBE Sound, Inc.

3LFWXUH

$XGLR

7LPHU

)XQFWLRQ

6HWXS

6HW

6HOHFW


$XGLR

%DODQFH

$XGLR0RGH

5HVHW


6HOHFW

5HWXUQ

7UHEOH

%DVV

)DYRULWH


$XGLR

656

5HVHW

2II

6HOHFW

5HWXUQ

%%(

3HUIHFW9ROXPH

/RXGQHVV

2Q

6HW

2II

2II

Содержание Ultravision C50-LD7000

Страница 1: ...I LCD Rear Projection Color TV products It will take you to the high quality audio video world z Before operating the TV please read this instruction manual carefully and keep the manual for future reference C50 LD7000 C60 LD7000 LCD Rear Projection Color TV ...

Страница 2: ...nstructions for the on screen display menu 13 Selecting the on screen display language 14 Easy preset 15 ON SCREEN DISPLAY MENU 16 Picture menu 16 Audio menu 18 Timer menu 19 Function menu 20 Setup menu 22 MULTI PICTURE FUNCTION 32 Split mode 32 P in P mode 33 TV SCAN FUNCTION 35 3 picture mode 35 12 picture mode 36 TELETEXT 37 OTHER FUNCTIONS 38 CONNECTION WITH OTHER EQUIPMENT 44 ADDENDA 47 A gui...

Страница 3: ...Don t place any objects on the cord or allow it to overpass Also not trample on the cord as this may cause damage If the cord or plug is damaged please cut power supply immediately and then contact a service technician for inspection Don t overload wall outlets and extension cords as this can result in fire or electric shock Don t place the TV into a closet or bookshelf where the ventilation is po...

Страница 4: ...in in contact with the cabinet or screen of the TV for a long time the TV surface may get damaged or a stain may result Don t insert any objects or pour water inside the TV from ventilation holes or other slots Be especially careful that children don t insert objects in the TV such as coins nails clips toys etc If these objects drop inside the TV turn off the TV and remove the power plug from the ...

Страница 5: ...e plug from the wall outlet and disconnect the aerial cable audio video cable etc Two people are at least required to move the TV due to the heavy TV Don t pass by any barrier forcibly as it may mark floor surfaces if moved improperly To prevent the TV being bumped or the screen damaged be careful when moving Cleaning Before cleaning the TV remove the power plug from the wall outlet Don t use solv...

Страница 6: ...is moved from a cool place to a warm place condensation may occur on the screen or lenses resulting in picture fading or color distortion In such case please wait a while and the condensation will evaporate meanwhile the sound and picture will be restored to normal Important precautions A small number of missing discolored or lit all the time or pixels is characteristic of the LCD technology due t...

Страница 7: ...e screen To use full of this character please test various locations in the room to find the best spot for viewing The following gives some suggestions The best picture and audio performance are obtained directly in front of the TV and about 2 5 to 4 5 metres from the screen Picture brightness decreases as the viewer moves to left or right Note This is not an integrated digital TV To watch digital...

Страница 8: ...physical shocks ĸ Keep the remote control unit dry Wetting it may cause the unit to malfunction Ĺ Replace the batteries with new ones when operation range of the unit shortened Precautions when connecting the antenna ķ If you use an outdoor antenna instead of CATV system be sure the antenna shouldn t be located in the vicinity of overhead power lines or other electrical circuit ĸ If you use an out...

Страница 9: ...menu mode TV VIDEO selector PHOTO MC adapter slot Front Panel Input Jacks For AV5 Input VOLUME buttons The buttons serve as cursor buttons when in menu mode PHOTO MC exit button MENU RETURN button PHOTO MC status indicator 3 272 0 79 9 2 0 18 5 7851 92 92 85625 5 0212 9 2 6 9 2 8 2 1387 3 272 0 ...

Страница 10: ...P C AUDIO R MONO L C P R R PB Y VIDEO Y B Monitor output terminals Audio Video input Component input terminals 1 2 Audio Video input terminals 3 4 Antenna terminal Variable audio output terminals Notes 1 Please read explanations of photo MC memory card function on page 42 43 carefully before using this function 2 See addenda on page 48 49 for details of the photo MC and adapter compatible with you...

Страница 11: ... Menu button Audio mode button P in P position button TV video selector button Program selector buttons P SIZE button Mute button Return button Freeze button DVD buttons Program up button Program down button Multi picture button Picture mode button TV scan button Stereo Mono Bilingual I II button Recall button A B button Swap button 79 6 1 9 9 9 9 9 527 7 6 6 2 79 3 272 0 Video direct selector but...

Страница 12: ...new command You can turn on the set using the button on the remote control unit in standby mode The picture will appear after the power indicator quick blinking the lamp is preheating The picture will become normal in 50 seconds You can also press the program CH buttons on the front panel to turn on the set Note If you are not going to use the set for a long time turn off the power on off switch a...

Страница 13: ...ark Ź 3 You can interrupt your menu operating and exit menu display mode by pressing MENU button at any moment In the process of menu display the set will exit menu display mode if any new menu is not operated for a while Menu display Menu symbols Description 1 This symbol is displayed at the bottom of the menu indicating that you can select the adjustment item on the menu by pressing the Ÿ or ź c...

Страница 14: ... right The Setup option is displayed in green 3 Press ENTER button to enter the Setup menu Press the Ÿ ź cursor buttons to select the Language option shown on right then press the Ż Ź cursor buttons to select the desired language Ё Chinese or ENGLISH Menu language will immediately change according to your choice 4 Press RETURN button to return to the last stage of menu or press MENU button to quit...

Страница 15: ...re The character Searching will appear at the bottom of menu indicating that the TV is searching and storing all signals available in the area or CATV You can interrupt it by pressing the ENTER button in the process of searching The set ll exit menu display mode automatically after searching is finished Note 1 If you want to arrange the program obtained by Easy Preset please refer to the Tuning se...

Страница 16: ... select We suggest that you try every item to obtain the desired picture effect Press the Ÿ ź cursor buttons to select the adjustment item to set the picture effect you desired and then press the Ż Ź cursor buttons to adjust Notes For AV1 AV5 input different picture modes can be set individually 3 Press the ź cursor button till the second page in Picture menu appears as shown on right These settin...

Страница 17: ...de HD or progressive signals input Film Mode will not adjust While the Film Mode is on a special built in correcting circuit in the TV will improve the video performance when viewing film based sources Noise Reduction Noise Reduction can be determined freely according to the signal condition and the picture noise Contrast Mode Selecting among the three modes of normal auto and dynamic to obtain th...

Страница 18: ...ress the Ÿ ź cursor buttons to select the adjustment item and then press the Ż Ź cursor buttons to adjust During the process of adjustment the indicator will move left or right allowing you to know the state of adjustment directly NOTE Press AUDIO button on the remote control unit you can switch among the above four audio modes easily 3 Press the ź cursor button until the second page in Audio menu...

Страница 19: ...ease turn off the TV by pressing button on the remote control unit until to allow the TV entering countdown mode The power indicator on the front of the TV blinks two minutes later it is entering the circle mode of quick blinkingĺdarkĺquick blinking This is normal The power is turned on automatically when the set time has elapsed Notes 1 If turning off the set by using Power on off switch the On T...

Страница 20: ... shown on right Press the Ż Ź cursor buttons to set TV Picture Size option as Expanded 4 3 or 16 9 three mode Note When use the function refer to page 40 about explanation of ASPECT MODE Note 1 If choose Multi Picture or TV Scan option in Function menu refer to page 32 36 2 If choose Freeze option in Function menu refer to page 32 36 3LFWXUH XGLR 7LPHU XQFWLRQ 6HWXS 6HOHFW 6HW XQFWLRQ 0XOWL 3LFWXU...

Страница 21: ... the actual interval may be longer than setup 2 While using this function please refer to PHOTO MC function on page 42 43 5 ǏBackgroundǐ As indicated before page 20 enter menu and then Function to select Background option as shown on right Press the Ż Ź cursor buttons to set Background to Gray or Black This function allows you to set two sides background color of 4 3 aspect mode as shown below the...

Страница 22: ...he Ÿ ź cursor buttons to select Setup option as shown on right 2 Press the ENTER button to enter the Setup menu Press the ź cursor button to select Preset option as shown on right 3 Press the ENTER button to display Preset menu Press the ź cursor button to select Tuning option as shown on right 3UHVHW 7XQLQJ LQH 7XQLQJ 3URJ FKDQJH QWHQQD WW XWR 0XWH 6HOHFW 6HW 5HWXUQ 2II 2Q 6HWXS 3UHVHW DV 3UHVHW ...

Страница 23: ...Also you can receive AV program using a particular Program Number Select Search option and press the TV VIDEO button on the remote control unit to select AV1 AV2 etc If you don t want to preset AV program please press the ENTER button to quit the AV program setting 6 Press the Ÿ ź cursor buttons to enter Skip option as shown on right The Skip option allows you to skip those programs you don t like...

Страница 24: ... Auto when receiving signal without color burst 9 Program Name option in the Tuning menu is used to give each program a name easy to recognize Press the Ÿ ź cursor buttons to select the Program Name option then press the Ź cursor button to select the letter to be changed from the left to right When the letter is selected press the Ÿ ź cursor buttons to select the desired letter When you select a p...

Страница 25: ...g all frequencies and store all stations to the program numbers starting from the Program Number selected In the process of searching you can press the ENTER button to quit When completing searching the TV will quit the menu automatically AV Preset Press the TV VIDEO button to switch the picture to the AV mode Then select the Preset menu follow the steps before to display the menu on right Press t...

Страница 26: ...enu highlight Preset option as shown on right 2 Press the Ÿ ź cursor buttons to select Fine Tuning option as shown on right 3 The Fine Tuning adjustment band is shown on the screen as shown on right by pressing the ENTER button Then press the Ż Ź cursor buttons to fine tune until the desired picture is available 3UHVHW 7XQLQJ LQH 7XQLQJ 3URJUDP FKDQJH QWHQQD WW XWR 0XWH 6HOHFW 5HWXUQ 2II 2Q 3UHVHW...

Страница 27: ... exchanged left side of arrow shows green press the Ÿ ź cursor buttons to select the program No 001 shown on right 3 Press the ENTER button to highlight the other Prog No right side of arrow shows green and press the Ÿ ź cursor buttons to select the program No desired to be exchanged No 199 shown on right Then press the ENTER button to carry out the exchange 3UHVHW 7XQLQJ LQH 7XQLQJ 3URJ FKDQJH QW...

Страница 28: ...Off for turning on or canceling Antenna Att function ǏPreset Auto Muteǐ If Auto Mute is On the noise from TV will be controlled when no signal transmission is received from the antenna terminals Please perform as follows As indicated before 22 page enter menu Setup menu then Preset menu to select Auto Mute option as shown on right Press the Ż Ź cursor buttons to set Auto Mute to On or Off for turn...

Страница 29: ...e of AV1 or AV5 in a state of the set power on When there is an output from the signal source the set will switch to AV1 or AV5 from the RF or other AV receiving mode automatically 2 If the set is in standby mode turn on the power connected the signal source of AV1 or AV5 when there is an output from the signal source the set will turn on and switch to AV1 or AV5 automatically The set will turn to...

Страница 30: ...is Off Use Picture Moving function to avoid the remain picture on the screen In moving picture it s very difficult to be noticed by eyes due to small range ǏScreen Wipeǐ If remain picture occurs use Screen Wipe White Field Signal function for at least 10 minutes to refresh any remain picture that may have occurred Follow the steps above after displaying the Screen Saver menu press the Ÿ ź cursor b...

Страница 31: ...Please refer to some related items on page 45 46 2 To prevent the damage to the speaker and distorted sound please set the volume control of the stereo system lower and adjust the sound using the remote control unit of the set Follow the steps on page 22 to enter menu and then Setup menu to select Speaker option as shown above Press the Ż Ź cursor buttons to set Speaker option to On or Off for tur...

Страница 32: ...for the selected picture However the program No selected in one picture can not be the same as that in the other one Otherwise the Not Available symbol will appear Notes When the RECALL button is pressed A and B pictures will display their respective programs No instantly and the red trumpet symbol will appear on top of the selected picture momentarily Ɣ While in Split mode press the SWAP button t...

Страница 33: ...t signal the display is in P out P mode as shown below Notes When entering this mode press the SWAP button to switch between the two pictures namely the exchange of program sources of A B pictures 2 While the main picture is receiving HD signal of 1125i format the sub picture receiving RF or video or 525i component or 625i component signal the display is in P in P mode as shown below Note When ent...

Страница 34: ...button is pressed A and B pictures will display their respective programs No instantly and the red trumpet symbol will appear on top of the selected picture momentarily Ɣ Press the POSITION button to move B picture to each corner on the screen in sequence as shown above Don t fix the B picture on a particular corner of the screen for a long time Ɣ In P in P mode press the MULTI PIC or RETURN butto...

Страница 35: ... this mode press the program up down buttons or program number buttons to select A picture As to B group B1 B2 B3 picture press the ŸP źP buttons to select any one of the pictures among B1 B2 or B3 pictures The color of program No in the highlighted picture will change from white to green At this point press the ENTER button the picture selected in B group will be switched to A picture Ɣ While in ...

Страница 36: ...LE AUDIO OUT terminals Ɣ In this mode press the TV SCAN or RETURN button to quit If you enter the menu by pressing the MENU button it will quit the 12 picture mode Ɣ In this mode the A B SWAP and POSITION buttons are invalid The Strobe function shown as below As indicated before page 20 enter the menu and then Function menu to select the Freeze option Press the Ż Ź cursor buttons to set the Freeze...

Страница 37: ...temporarily while the TV is searching a required text page Press this button again to display the teletext screen MODE This button is used to switch between FASTEXT and LIST mode FASTEXT is to link the four prompt information at the lower part of the screen represented by the four colors which match the color buttons on the remote control TO ADJUST THE TELETEXT CONTRAST While in TELETEXT mode pres...

Страница 38: ...ECALL Ŀ MITSUBISHI ONKYO RECALL INDEX ZENITH RECALL MODE ORITRON RECALL SUB SKYWORTH RECALL REVEAL BBK RECALL TV TEXT SHINCO RECALL CANCEL Note Not all models of the listed brand can be operated using this remote control unit AUDIO button Press AUDIO button to switch the sound mode as shown below Theater ĺ Music ĺ Narration ĺ Favorite Ė Ę PICTURE button Press PICTURE button to switch picture mode ...

Страница 39: ...er CH I II button Mode will exchange among I Main II Sub and FM MONO when bilingual broadcast is being received NICAM I NICAM II NICAM When a stereo broadcast is being received mode will exchange between STEREO and MONO When A2 stereo broadcast is being received mode will exchange between A2 stereo and MONO TV VIDEO Button Press TV VIDEO button to switch the input mode See below AV1 AV4 AV2 4 AV3 ...

Страница 40: ... switch between six different modes including lj16 9NJ lj16 9ZoomNJ lj4 3NJ ljExpandedNJˈlj lj4 3Zoom1NJ and lj4 3Zoom2NJ which may greatly vary the size of picture Ɣ In lj16 9NJ lj16 9ZoomNJ lj4 3NJ ljExpandedNJ lj4 3Zoom1NJ or lj4 3Zoom2NJ mode by pressing P SIZE button the aspect mode will automatically return to the mode that you set in TV Picture Size option after completing the program selection or restarting the TV...

Страница 41: ...om1NJorlj4 3Zoom2NJmode after completing the program selection or restarting the TV ǏWhen HD component signal is inputted ǐ Press the P SIZE button to switch between two different modes including lj16 9NJ lj16 9ZoomNJ The aspect mode will return to the mode of lj16 9NJ after completing the program selection or restarting the TV Please see the following for details on each of two modes Notes 1 In multi pict...

Страница 42: ...e photos stored in the memory card are less than 16 the TV will display the actual number of photos Highlight one of the sixteen photos using the Ÿ ź Ż Ź cursor buttons or number buttons the frame of the highlighted photo is indicated in green Press the Page up down buttons to show another stage of photo display If the photo desired to browse is highlighted press the ENTER button to display the hi...

Страница 43: ...V will automatically reduce the contrast and color setting value of the photo displayed if it is not operated for more than three minutes 5 While in Photo MC mode multi picture TV scan freeze and aspect mode functions are not available 6 The TV can display 500 photos at most 7 Do not turn off the TV when the Photo MC indicator is flickering or else the memory card may be destroyed 8 When the Photo...

Страница 44: ...can t be used at the same time or else the picture may be abnormal Thus before you connect the cable to S VIDEO jack please check that VIDEO jack is not connected As well before you connect the cable to VIDEO jack please check that S VIDEO jack is not connected 2 If you have equipment with S VIDEO output please use S VIDEO cable instead of the standard video cable 3 If you have a mono sound only p...

Страница 45: ... 2 MONO L VIDEO S VIDEO L VIDEO MONO S VIDEO VIDEO L MONO AUDIO C C R P INPUT 1 R PR B P R B C Y AUDIO MONO L VIDEO C PB R B Y OUTPUT VIDEO ANT IN S VIDEO L R R L S VIDEO OUTPUT VIDEO R L OUTPUT Y PB PR R L OUTPUT CB Y CR R or or Laserdisc player VCD player Camcorder etc VCR 1 Stereo system VCR 2 DVD PDVD player HDTV SET TOP BOX etc Outside antenna or CATV coaxial cable RF adapter ...

Страница 46: ...ceive signals However when you use VIDEO terminal instead of Y PB CB PR CR terminals to input video signal only the character AV1 or AV2 will appear at the top right corner of the screen 6 If your device has s video signal output please use s video signal instead of the standard video signal If there are signals input from the same group of S VIDEO and VIDEO terminals on the rear terminal panel th...

Страница 47: ...r brightness color or tint gMay be the misadjustment for contrast brightness color and tint Snowy picture gInterference from motorcycles high tension line electric hair drier personal compute and radio station Ghosts gCheck if the direction height or position of the antenna has changed No color gThe antenna signal is too weak gColor System Sound System is not set properly Remote controller does no...

Страница 48: ...2 SanDisk 64 SDSM 64 SanDisk 64 SM064 231 LEXAR C D J K P 128 SDSM 128 SanDisk A B C D I J K P 128 P SF3128 RF PNY C D J K P SM 128 SND5CT0501 BUFFFALO A B C D I J P 32 HB288032SM1 HITACHI A B C D N O SMMC 64 HB288064SM1 HITACHI 128 MXD128P3 Olympus P xD 256 DPC 256 FUJIFILM P 8 RP SD008B Panasonic A B C D N O 16 SD M16 TOSHIBA C D N 32 RP SD032 Panasonic A B C D N O 64 RP SD064B Panasonic A B D O...

Страница 49: ...lumpus P Media Capacity MB Name Maker Adapter See chart below 16 PCMMC 16MS IODATA A B C D 16 HB288016MM1 HITACHI A B C D O 32 PCMMC 32MS IODATA A B C D N O 32 SDMB 32 472 SanDisk A B D O 32 HB288032MM1 HITACHI A B D O 64 SDMB 64 SanDisk C D N 64 MMC064 231 LEXAR C D N MMC 128 HB28B128MM2 IODATA 4 MSA 4A SONY A B C D L M 32 MSA 32A SONY 64 MSA 64A SONY A B C D L M 64 SDMS 64 SanDisk 64 MS064 281 L...

Страница 50: ...is possible to dispose of used bulbs in the same manner as used glass bottles but in some cases bulbs are sorted separately CAUTIONʽ A TEMP indicator will light when lamp becomes hot Unplug product s power cord from the AC outlet and allow lamp to cool for at least 30 45 minutes If TEMP indicator is still lit please with the service center contact authorization by Hitachi NOTES gContact your Hitac...

Страница 51: ...p on disengages FRONT COVER POWER ON OFF SWITCH NOTE THE LAMP IS VERY HOT AND MAY CAUSE FIRE OR SEVERE BURNS WAIT AT LEAST 30 45 MINUTES TO ALLOW THE LAMP TO COOL BEFORE PROCEEDING WITH LAMP REMOVAL LAMP COMPARTMENT PULL FRONT COVER NOTE The lamp in this product contains Mercury Obey local ordinances when disposing of used lamps In most case it is possible to dispose of used bulbs in the same mann...

Страница 52: ...the front glass of the new lamp or receptacle This may shorten the life of the lamp and reduce the picture quality gPush the lamp unit back to its original position gTighten the screws firmly on the lamp unit If they are loose the TV may not operate correctly SCREW LAMP COVER SCREW DRIVER NOTE DO NOT PUT YOUR HAND IN THE LAMP STORAGE AREA AFTER THE LAMP UNIT IS REMOVED YOU MAY GET BURNED HANDLE RE...

Страница 53: ...left and right side of the front cover until you hear a snap Push the other snap on gently to make a good fit 8 Plug power cord into AC outlet and turn on the main power switch SCREW LAMP COVER SCREW DRIVER NOTE IF POWER IS CONNECTED BEFORE THE LAMP COVER IS INSTALLED THE POWER WILL BE OFF AND THE LAMP INDICATOR WILL FLASH FRONT COVER PUSH POWER ON OFF SWITCH NOTE The lamp in this product contains...

Страница 54: ...on balance type Speaker 6h12cmh2 5cmh2 10cmh2 Sound Output 12Wh2 12Wh2 Comb Filter 3L PAL 3D NTSC Perfect Volume yes yes NICAM A2 yes yes BBE yes yes SRS yes yes Multi Picture yes yes Teletext yes yes S VIDEO INPUT 1 front ˈ2 back 1 front ˈ2 back VIDEO INPUT 1 front ˈ4 back 1 front ˈ4 back Component INPUT Y PB CB PR CR 2 back 2 back AUDIO INPUT 1 front ˈ4 back 1 front ˈ4 back VIDEO OUTPUT MONITOR ...

Страница 55: ...iable for incidental damages such as profit loss or interruption in business modification or erasure of record data etc caused by use or misuse of products Ƶ Hitachi is not liable for any damage caused by neglect of the instructions described in the owner s manual Ƶ Hitachi is not liable for any damage caused by misuse or malfunction through simultaneous use of this product and the connected Equip...

Страница 56: ......

Отзывы: