background image

Configuring the Oracle Linux KVM-based SVP

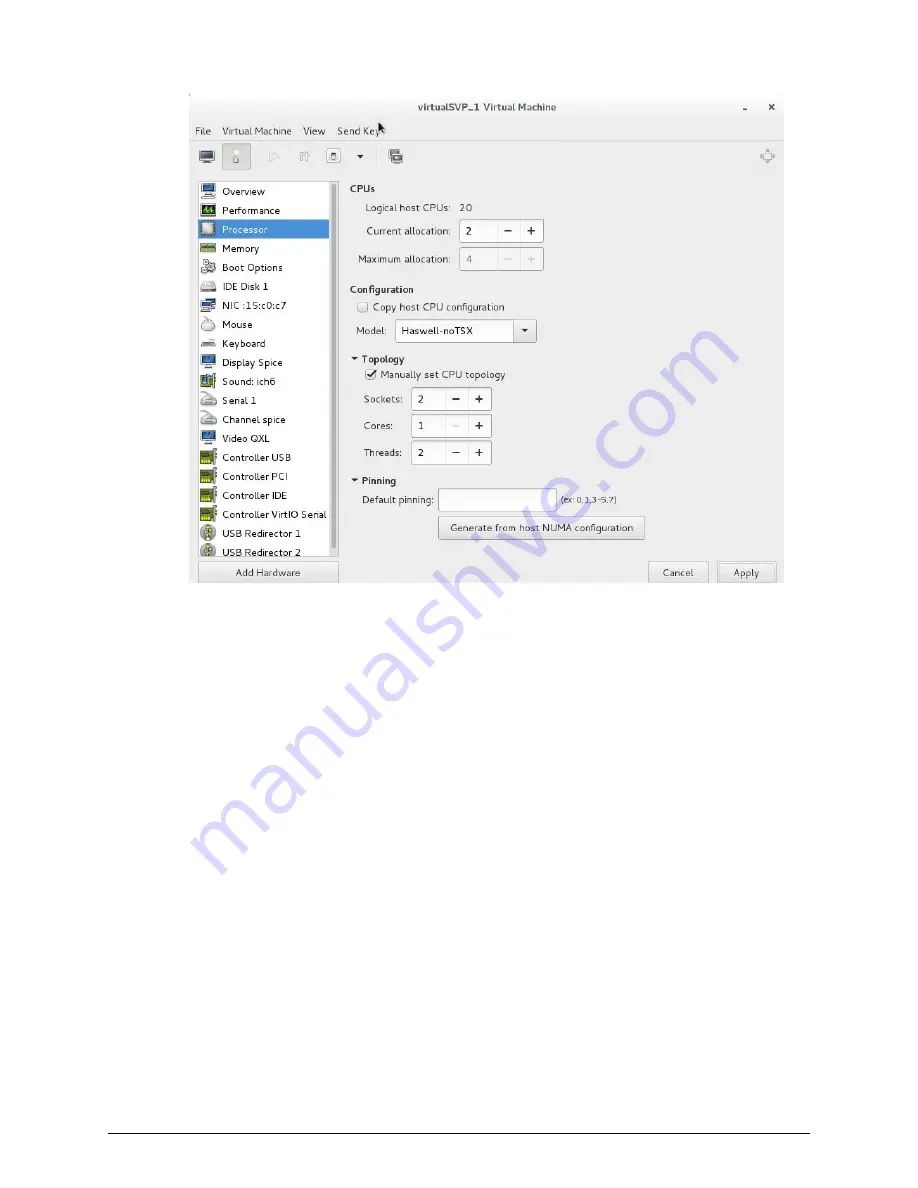
After preparing the environment, activating hyper-threading on both the Oracle Linux

KVM server and VM guest host, and verifying the configuration layout, configure the SVP

in the Oracle Linux KVM environment.

Procedure

1. On the Oracle Linux KVM host, create a VM that is appropriate for the Windows

operating system being used.

2. Verify that the virtual network connection is properly assigned to the appropriate

virtual machine network.

Configuring the Oracle Linux KVM-based SVP

Chapter 6: Installing the SVP software on an Oracle Linux KVM host

Service Processor Technical Reference

103

Содержание SVP F 00 Series

Страница 1: ...or system administrators Hitachi Vantara representatives and authorized service providers who install configure or operate VSP Gx00 models and VSP Fx00 models In addition this guide provides information about setup configuring and maintaining both physical and virtual service processor MK 97HM85045 00 May 2018 ...

Страница 2: ... or otherwise from authorized employees and other individuals and 2 Verifying that your data continues to be held retrieved deleted or otherwise processed in accordance with relevant laws Notice on Export Controls The technical data and technology inherent in this Document may be subject to U S export control laws including the U S Export Administration Act and its associated regulations and may b...

Страница 3: ...purchased the product Recycling A nickel metal hydride battery is used in the Cache Backup Battery A nickel metal hydride battery is a resource that can be recycled When you want to replace the Cache Backup Battery call the service personnel They will dispose of it for you This nickel metal hydride battery which is designated as recycling product by a recycling promotion low must be recycled The m...

Страница 4: ...ndows 10 Enterprise hardware description 22 SVP front panel 22 SVP rear panel 23 Service Processor Windows 10 Enterprise hardware specifications 23 Physical SVP Windows 10 Enterprise electrical specifications 24 Physical SVP Windows 10 Enterprise environmental specifications 25 Chapter 4 Installing the Hitachi Vantara supplied SVP 26 Physical SVP network configuration 26 Physical SVP LAN port assi...

Страница 5: ...anagement settings 56 Configuring Action Center settings 59 Configuring the troubleshooting settings 61 Configuring the Remote Desktop settings 62 Configuring Internet Explorer settings 64 Disabling the auto execute feature 70 Configuring the Registry 72 Enabling ICMP ping reply 76 Changing the computer name 78 Changing the account name 83 Configuring the password setting for Administrator 87 Chan...

Страница 6: ...nging the computer name 146 Changing the account name 151 Configuring the password setting for Administrator 155 Changing the password setting 157 Installing the SVP software 158 Deploying a cloned virtual SVP 165 Detecting SVP failures 166 Chapter 8 Installing the SVP software on a Microsoft Hyper V Server 2012 R2 Virtual Machine 168 Setting up the SVP locale 168 Network connection for Hyper V 16...

Страница 7: ... PC to the default 204 Uploading the certificate to the SVP 205 Uploading the certificate to the web server 206 Returning the web server certificate to the default 206 Resolving security certificate messages 207 Blocking HTTP communications to the SVP 207 Releasing HTTP communications to the SVP 208 Chapter 12 Changing the storage IP address 209 Using the SVP to set the storage system IP address 2...

Страница 8: ...Shutting down the SVP 250 Restarting the SVP 250 Chapter 19 Replacing the Hitachi Vantara supplied SVP 251 Detecting SVP failures 251 Replacing the physical SVP 252 Recovering the operating system 252 Backing up the OS 253 Restoring the OS 253 Configuring the replacement physical SVP 253 Mapping the internal SVP network adapters 253 Renaming the internal SVP network adapters 254 Setting the IP add...

Страница 9: ... software Document conventions This document uses the following typographic conventions Convention Description Bold Indicates text in a window including window titles menus menu options buttons fields and labels Example Click OK Indicates emphasized words in list items Italic Indicates a document title or emphasized words in text Indicates a variable which is a placeholder for actual text provided...

Страница 10: ... either a or b This document uses the following icons to draw attention to information Icon Label Description Note Calls attention to important or additional information Tip Provides helpful information guidelines or suggestions for performing tasks more effectively Caution Warns the user of adverse conditions and or consequences for example disruptive operations data loss or a system crash WARNIN...

Страница 11: ... 1 0005 bytes 1 exabyte EB 1 000 PB or 1 0006 bytes Logical capacity values for example logical device capacity cache memory capacity are calculated based on the following values Logical capacity unit Value 1 block 512 bytes 1 cylinder Mainframe 870 KB Open systems OPEN V 960 KB Others 720 KB 1 KB 1 024 210 bytes 1 MB 1 024 KB or 1 0242 bytes 1 GB 1 024 MB or 1 0243 bytes 1 TB 1 024 GB or 1 0244 b...

Страница 12: ...ntara com en_us contact us html Hitachi Vantara Community is a global online community for Hitachi Vantara customers partners independent software vendors employees and prospects It is the destination to get answers discover insights and make connections Join the conversation today Go to community hitachivantara com register and complete your profile Comments Please send us your comments on this d...

Страница 13: ...at https support hitachivantara com en_us interoperability html Table 1 Service processor with Windows 10 Enterprise Operating system Server virtual machine Minimum SVP version Notes and additional requirements Windows 7 Professional VMware ESXi 6 0 0 88 01 02 x0 00 KVM on Oracle Linux 7 2 3 8 13 98 7 1 el7ue k x86_64 qemu kvm 1 5 3 105 el7 x 86_64 88 01 02 x0 001 Windows 7 Professional Service Pa...

Страница 14: ... Pack 1 VMware ESXi 6 0 U2 83 03 23 x0 00 Cluster is supported Windows Server 2012 Bare metal installation see requirements VMWare ESXi 6 0 U2 83 01 03 x0 00 Windows Server 2012 R2 Bare metal installation see requirements 83 01 03 x0 00 Hyper V Server 2012 R2 83 04 02 x0 00 VMWare ESXi 6 0 U2 Windows 10 Professional Bare metal installation see requirements 83 04 02 x0 00 Windows 10 Enterprise Bare...

Страница 15: ...uirements Corresponding SVP guest OS ESX Server VMware ESXi server 6 0 Two quad core processors Intel Xeon 2 29 GHz One port network interface card NIC 32 GB RAM SVP Guest OS maximum one DKC per SVP guest OS Two virtual CPUs One virtual network adapter 4 GB RAM 120 GB disk space Linux KVM Server Oracle Linux 7 2 Two quad core processors Intel Xeon 2 29 GHz One port NIC 128 GB RAM Same as ESX Serve...

Страница 16: ... can be installed per OS instance However multiple virtual machines that each run their own OS SVP software instance can be installed on a physical server Other software is not supported when run in the same OS instance with the SVP software Chapter 1 SVP overview Service Processor Technical Reference 16 ...

Страница 17: ...ysical SVP along with the physical electrical and environmental specifications SVP front panel The front panel of the physical SVP is equipped with LEDs a reset button and a power button Table 3 SVP Windows 7 front panel Item Description 1 LEDs From left to right the LEDs are BMC Heartbeat LAN card 2 LAN card 1 Hard drive System standby power 2 Reset button 3 Power button Applies power to or remov...

Страница 18: ... and the user LAN port on each storage system controller Note After the Initial Startup Wizard is run the SVP can be used in non bridge mode In this mode the cables can be removed from SVP ports LAN3 and LAN4 and attached to switches For more information contact customer support Service processor Windows 7 hardware specifications The following table lists the hardware specifications for the servic...

Страница 19: ...m 4 pin PWM fans Operating system Windows Embedded Standard 7 Physical SVP Windows 7 electrical specifications The following table lists the electrical specifications for the physical SVP supplied by Hitachi Vantara Item Specification Rated AC voltage 100 240 V 50 60 Hz 4 2 1 8A Power supply 350 W AC power supply with PFC AC voltage 100 240 V 50 60 Hz 4 2 1 8 Amp Power supply safety EMC USA UL lis...

Страница 20: ...S8 4 GB 1600 Mhz DIMM SR x8 with TS Kingston F 4 05 W Total 112 55 W VA is 140 69 with a 0 8 power factor Note The measurements are not kilo values Physical SVP Windows 7 environmental specifications The following table lists the environmental specifications for the physical SVP supplied by Hitachi Vantara Item Specification Operating temperature 41 F 95 F 5 C 35 C Non operating temperature range ...

Страница 21: ...dity range 8 90 non condensing Non operating relative humidity range 5 95 non condensing Physical SVP Windows 7 environmental specifications Chapter 2 Physical SVP Windows 7 hardware description Service Processor Technical Reference 21 ...

Страница 22: ...tara supplied physical SVP along with the physical electrical and environmental specifications SVP front panel The front panel of the physical SVP with Windows 10 Enterprise operating system is equipped with LEDs a reset button and a power button Table 5 SVP Windows 10 Enterprise front panel Item Description 1 LED Left to Right N A LAN card 2 LAN card 1 Hard drive System standby power 2 Reset butt...

Страница 23: ...rotocol STP If your network has BPDU enabled to prevent loops connect the user LAN port on controllers 1 and 2 to an Ethernet switch that is also connected to the LAN1 port on the SVP Note After the Initial Startup Wizard is complete the SVP can be used in non bridge mode In this mode the cables can be removed from SVP ports LAN3 and LAN4 and attached to switches For more information contact custo...

Страница 24: ...is supported in high temperature environments Do not operate in any location with temperatures above 40 C 104 Fahrenheit Physical SVP Windows 10 Enterprise electrical specifications The following table lists the electrical specifications for the physical SVP supplied by Hitachi Vantara Item Specification Rated AC voltage 100 240 V 50 60 Hz 4 2A Power supply 200 W AC power supply AC voltage 100 240...

Страница 25: ... by Hitachi Vantara Item Specification Operating temperature 41 F 104 F 5 C 40 C Non operating temperature range 40 F 158 F 40 C 70 C Operating relative humidity range 8 90 non condensing Non operating relative humidity range 5 95 non condensing Physical SVP Windows 10 Enterprise environmental specifications Chapter 3 Physical SVP Windows 10 Enterprise hardware description Service Processor Techni...

Страница 26: ...or replacing a Hitachi Vantara supplied SVP Physical SVP network configuration In networking terms a network bridge is software or hardware that connects two or more networks so that they can communicate For the physical SVP a network bridge configures the three local area network LAN ports on the SVP using the Bridge Connections setting in the Windows operating system This configuration requires ...

Страница 27: ...ssignment The LAN port assignments on the physical SVP should match the ones in the following figure The IPMI port is an IPMI dedicated port connected to the BMC in the SVP and is invisible from the Windows operating system For security reasons the IPMI port cannot be enabled in BIOS setting and is not supported for the SVP Physical SVP LAN port assignment Chapter 4 Installing the Hitachi Vantara ...

Страница 28: ...es LAN 1 Management User Management LAN N A DHCP 192 168 0 15 24 Part of bridge IST uses LAN1 3 4 or 2 ports for Remote Desktop Protocol RDP LAN 2 Maintenance MPC or User PC 10 0 0 100 2 4 Not a part of bridge IST uses LAN1 3 4 or 2 ports for RDP LAN 3 Management CTL1 DKC CTL1 N A DHCP 192 168 0 15 24 Part of the bridge LAN 4 Management CTL2 DKC CTL2 N A DHCP 192 168 0 15 24 Part of the bridge IPM...

Страница 29: ...e intermix drive tray DB60 have a depth of 34 1 inches 865 mm and 33 9 inches 860 mm respectively If the SVP is rack mounted between a CBL and dense intermix drive tray as shown in the following figure there is not enough space to access the rear I O panel of the SVP To verify that the SVP can be accessed for maintenance Locate the SVP at the top of the rack or above the system If a small form fac...

Страница 30: ...ease in servicing Installing the inner rail extension The physical SVP contains two rack rail assemblies Each assembly consists of an inner fixed chassis rail that secures directly to the SVP chassis and an outer fixed rack rail that secures directly to the rack itself The physical SVP includes chassis ears that you must remove before installing the rails Procedure 1 Remove the chassis ears a Loca...

Страница 31: ...nt the rails so that the front of the rail faces the front of the rack Adjust both the short rail and long rail to the proper distance so that they fit snugly into the rack Then insert two small screws and two large M5 screws into the threaded holes in the slide area on the rails as shown in the following figure to prevent the rails from moving 3 Secure the long outer rail to the vertical rail at ...

Страница 32: ...the rack Procedure 1 Align the SVP enclosure inner rails with the front of the horizontal outer rails on the rack 2 Slide the SVP enclosure inner rails into the outer rails on the rack keeping the pressure even on both sides If necessary press the locking tabs when inserting When the SVP enclosure is pushed completely into the rack the locking tabs snap into the locked position Installing the phys...

Страница 33: ...r LAN port on controllers 1 and 2 to an Ethernet switch that is also connected to the LAN1 port on the SVP Procedure 1 Connect the LAN1 port to a switch on your IP network Note If your network uses IP addresses 192 168 0 15 17 do not connect the LAN1 port to your switch until after you complete the Initial Startup 2 Connect the LAN2 port to a management console PC Typically this is a notebook PC 3...

Страница 34: ...oses To use OpenSSL for SSL communication settings download one from the OpenSSL website http www openssl org For more information see the Service Processor Technical Reference Turning on power to the physical SVP When turning on the power to the physical SVP use only the power cable supplied with the SVP Do not use a power cable designed for another device Procedure 1 Attach the supplied power ca...

Страница 35: ...emote Desktop Connection a Configure the PC to use an IP address of 10 0 0 xxx where xxx 1 99 or 101 254 and a subnet mask of 255 255 255 0 b Click Start All Programs and then select Accessories Remote Desktop Connection c In the Computer field type 10 0 0 100 and click Connect d In the Windows Security screen type SVP PC SVP in the top field and raid login in the bottom field e Click OK f If prom...

Страница 36: ...ure shows a CBSS and CBSL storage system in a non bridged environment The following figure shows a CBLM and CBLH storage system in a non bridged environment Operating the physical SVP in a non bridged network configuration Chapter 4 Installing the Hitachi Vantara supplied SVP Service Processor Technical Reference 36 ...

Страница 37: ... the maintenance utility Before you begin Verify the management PC is connected to the LAN2 port on the SVP Verify the PC establishes a Remote Desktop Connection to the SVP Confirm the Management Utility window opens on the PC Procedure 1 In the desktop click the Start button and then click Control Panel 2 Click Clock Language and Region 3 Click Date and Time Setting the SVP date time and time zon...

Страница 38: ...he year month day and time and then click OK 6 In the Date and Time tab click Change time zone Setting the SVP date time and time zone settings Chapter 4 Installing the Hitachi Vantara supplied SVP Service Processor Technical Reference 38 ...

Страница 39: ... local time of the location of the installed SVP 7 Select a UTC time zone from the drop down list and then click OK Setting the SVP date time and time zone settings Chapter 4 Installing the Hitachi Vantara supplied SVP Service Processor Technical Reference 39 ...

Страница 40: ...he maintenance utility a In the left pane click Administration Date Time b To the right under Date Time click Set Up Setting the SVP date time and time zone settings Chapter 4 Installing the Hitachi Vantara supplied SVP Service Processor Technical Reference 40 ...

Страница 41: ...n the Set Up Date Time page enter the date and time settings Setting the SVP date time and time zone settings Chapter 4 Installing the Hitachi Vantara supplied SVP Service Processor Technical Reference 41 ...

Страница 42: ...ity time will synchronize with a Network Time Protocol NTP server Enter an IP address or a server name Click Add NTP Server to add up to five NTP servers Enter the IP address in IPv4 or IPv6 format Enter the server name up to 255 one byte alphanumeric characters Spaces can be used in the server name but the following symbols cannot be used No Date Time Set the date and time manually Click the fiel...

Страница 43: ...g the management console from the physical SVP If you need to disconnect the management console from the physical SVP use the following procedure Procedure 1 Click the Start button on the SVP desktop 2 Click Log off Disconnect Result The SVP disconnects from the PC Disconnecting the management console from the physical SVP Chapter 4 Installing the Hitachi Vantara supplied SVP Service Processor Tec...

Страница 44: ...on 1 6 GHz Random access memory 3 5 GB per storage system Hard drive 120 GB per storage system LAN connection one 1000Base T Windows 7 Professional 64 bit Windows Server 2012 64 bit Windows Server 2012 R2 64 bit Windows Server 2016 Windows 10 Professional 64 bit or Windows 10 Enterprise 64 bit Note The customer supplied server running the Windows operating system cannot be used with the storage sy...

Страница 45: ...ional 64 bit or Windows 10 Enterprise 64 bit The following procedures describe how to configure the Windows 7 Professional 64 bit operating system on the customer supplied server These procedures assume that the operating system has already been installed on the server Logging on to the operating system The log on procedure is performed using the Windows operating system installed on the SVP Using...

Страница 46: ...ktop Configure the Windows screen saver function on the SVP Procedure 1 Click Control Panel Personalization For Basic and High Contrast Themes 6 click Windows Classic 2 Click Screen saver 3 In Screen saver click Blank and then set Wait to 60 minutes 4 Click OK Configuring the Control Panel display Chapter 5 Installing the SVP software on a customer supplied server Service Processor Technical Refer...

Страница 47: ...properties on the Windows operating system running on the SVP Procedure 1 Click Control Panel Taskbar and Start Menu Properties task bar property and then click the Taskbar tab 2 Click Customize Configuring the task bar and the start menu properties Chapter 5 Installing the SVP software on a customer supplied server Service Processor Technical Reference 47 ...

Страница 48: ...s window check Always show all icons and notifications on the taskbar Configuring the task bar and the start menu properties Chapter 5 Installing the SVP software on a customer supplied server Service Processor Technical Reference 48 ...

Страница 49: ...t Menu Properties task bar property and then click the Start Menu tab 6 Click Customize Configuring the task bar and the start menu properties Chapter 5 Installing the SVP software on a customer supplied server Service Processor Technical Reference 49 ...

Страница 50: ...eck Run command and click Display on the All Programs menu and the Start menu Configuring the task bar and the start menu properties Chapter 5 Installing the SVP software on a customer supplied server Service Processor Technical Reference 50 ...

Страница 51: ...nder Music check Don t display this item Configuring the task bar and the start menu properties Chapter 5 Installing the SVP software on a customer supplied server Service Processor Technical Reference 51 ...

Страница 52: ...roperties configure the time settings Configuring the time settings Configure the SVP for Universal Coordinated Time and then configure it to not synchronize with an Internet time server Configuring the time settings Chapter 5 Installing the SVP software on a customer supplied server Service Processor Technical Reference 52 ...

Страница 53: ... window uncheck Synchronize with an Internet time server and then click OK 6 In the Date and Time window click OK Note After configuring the time settings configure the region settings Configuring region settings Configure the region and language the language for your region or preference Procedure 1 Click Control Panel Region and Language and then click the Keyboards and Languages tab Configuring...

Страница 54: ...Text Service and Input Languages window click the Language Bar tab 4 Click Hidden and then click OK Configuring region settings Chapter 5 Installing the SVP software on a customer supplied server Service Processor Technical Reference 54 ...

Страница 55: ...ick Restart now 10 After the restart click Control Panel Region and Language and then click the Keyboards and Languages tab 11 Click Change Keyboards and then click the General tab 12 In the Text Services and Input Languages window if Japanese Japan appears under Installed services click the current selection and then click Remove 13 Click OK Configuring region settings Chapter 5 Installing the SV...

Страница 56: ...he SVP requires specific power management settings Procedure 1 Click Control Panel Power Options and then click the Show additional plans list 2 Click Change settings that are currently unavailable 3 Click High Performance and Change plan settings Configuring the power management settings Chapter 5 Installing the SVP software on a customer supplied server Service Processor Technical Reference 56 ...

Страница 57: ...advanced power settings 6 In the Advanced settings tab of the Power Options window click Change settings that are currently unavailable Then click Hard disk Turn off hard disk after and select Never Configuring the power management settings Chapter 5 Installing the SVP software on a customer supplied server Service Processor Technical Reference 57 ...

Страница 58: ...ssor power management Minimum processor state and then select 5 Configuring the power management settings Chapter 5 Installing the SVP software on a customer supplied server Service Processor Technical Reference 58 ...

Страница 59: ...e Action Center settings Configuring Action Center settings All settings in the Windows Action Center must be disabled Procedure 1 Click Control Panel Action Center and then click Change Action Center settings Configuring Action Center settings Chapter 5 Installing the SVP software on a customer supplied server Service Processor Technical Reference 59 ...

Страница 60: ...s click OK and then close the window Note After configuring Action Center settings configure the troubleshooting settings Configuring Action Center settings Chapter 5 Installing the SVP software on a customer supplied server Service Processor Technical Reference 60 ...

Страница 61: ...hange settings window for Computer Maintenance click Off and clear all configuration options below Other settings 3 Click OK and then close the window Note After configuring the troubleshooting settings configure the Remote Desktop settings Configuring the troubleshooting settings Chapter 5 Installing the SVP software on a customer supplied server Service Processor Technical Reference 61 ...

Страница 62: ...b 3 Under Remote Assistance clear Allow Remote Assistance connections to this computer 4 Under Remote Desktop click Allow connections only from computers running Remote Desktop with Network Level Authentication more secure 5 Click OK 6 If a message states that the Remote Desktop Firewall will be enabled click OK Configuring the Remote Desktop settings Chapter 5 Installing the SVP software on a cus...

Страница 63: ...low a program or feature through Windows firewall 10 Click Change settings and then verify Remote Desktop and Remote Desktop RemoteFX for both Home Work Private and Public are selected Configuring the Remote Desktop settings Chapter 5 Installing the SVP software on a customer supplied server Service Processor Technical Reference 63 ...

Страница 64: ...ng Internet Explorer settings Configure Internet Explorer advanced security and properties settings Procedure 1 Click Control Panel Internet Options and then click the Advanced tab to modify the settings Configuring Internet Explorer settings Chapter 5 Installing the SVP software on a customer supplied server Service Processor Technical Reference 64 ...

Страница 65: ...urity select Allow active content to run in files on My Computer Configuring Internet Explorer settings Chapter 5 Installing the SVP software on a customer supplied server Service Processor Technical Reference 65 ...

Страница 66: ... SSL 2 0 is selected clear it 5 Select Use TLS 1 0 Use TLS 1 1 and Use TLS 1 2 Configuring Internet Explorer settings Chapter 5 Installing the SVP software on a customer supplied server Service Processor Technical Reference 66 ...

Страница 67: ...operties window 8 From the Control Panel window click System and Security Action Center Configuring Internet Explorer settings Chapter 5 Installing the SVP software on a customer supplied server Service Processor Technical Reference 67 ...

Страница 68: ...f the Set Up Windows Internet Explorer 8 window appears click Next 12 In the Turn on Suggested Sites window click No don t turn on and then click Next Configuring Internet Explorer settings Chapter 5 Installing the SVP software on a customer supplied server Service Processor Technical Reference 68 ...

Страница 69: ...and then click Finish 14 When an error indicates that an Internet connection is not established close Internet Explorer Configuring Internet Explorer settings Chapter 5 Installing the SVP software on a customer supplied server Service Processor Technical Reference 69 ...

Страница 70: ... Run and then type gpedit msc to start the Group Policy Editor 2 Click Local Computer Policy Computer Configuration click Administrative Templates Windows Components and then click AutoPlay Policies 3 From the items on the right double click Turn off Autoplay Disabling the auto execute feature Chapter 5 Installing the SVP software on a customer supplied server Service Processor Technical Reference...

Страница 71: ...lick Enabled and select All drives and then click OK 5 Close the Group Policy Editor Disabling the auto execute feature Chapter 5 Installing the SVP software on a customer supplied server Service Processor Technical Reference 71 ...

Страница 72: ...indows Registry on the SVP Procedure 1 Disable anonymous logon null connection a Click Start Run and then type regedit and press Enter b In the User Account Control menu click Yes to open the Registry Editor window c Navigate to HKEY_LOCAL_MACHINE SYSTEM CurrentControlSet Control Lsa Configuring the Registry Chapter 5 Installing the SVP software on a customer supplied server Service Processor Tech...

Страница 73: ...top Connection is connected a In the Registry Editor window navigate to HKEY_LOCAL_MACHINE System CurrentControlSet Control Terminal Server b In the Edit menu click New DWORD 32 bit Value c Type DisableBeep Configuring the Registry Chapter 5 Installing the SVP software on a customer supplied server Service Processor Technical Reference 73 ...

Страница 74: ... OK 3 Configure Remote Desktop Connection a In the Registry Editor window navigate to HKEY_LOCAL_MACHINE SOFTWARE Policies Microsoft Windows NT Terminal Services Configuring the Registry Chapter 5 Installing the SVP software on a customer supplied server Service Processor Technical Reference 74 ...

Страница 75: ...PromptForPassword e Set Value data to 1 verify Hexadecimal is selected and then click OK f In the Edit menu click New DWORD 32 bit Value g Type SecurityLayer Configuring the Registry Chapter 5 Installing the SVP software on a customer supplied server Service Processor Technical Reference 75 ...

Страница 76: ... network devices such as routers to send error messages and operational information indicating as an example a requested service is not available or a host or router could not be reached Procedure 1 Click Control Panel Administrative Tools and then start Windows Firewall with Advanced Security Enabling ICMP ping reply Chapter 5 Installing the SVP software on a customer supplied server Service Proc...

Страница 77: ...ht click and click Enable Rules File and Printer Sharing Echo Request ICMPv4 In Profile Domain File and Printer Sharing Echo Request ICMPv4 In Profile Private Enabling ICMP ping reply Chapter 5 Installing the SVP software on a customer supplied server Service Processor Technical Reference 77 ...

Страница 78: ... name Changing the computer name allows the SVP to be identified easily Procedure 1 Click Control Panel System and then click Change settings under Computer name domain and workgroup settings 2 In the System Properties window click the Computer Name tab and then click Change Changing the computer name Chapter 5 Installing the SVP software on a customer supplied server Service Processor Technical R...

Страница 79: ...3 In the Computer Name field type SVP PC Changing the computer name Chapter 5 Installing the SVP software on a customer supplied server Service Processor Technical Reference 79 ...

Страница 80: ...4 When prompted to restart your computer click OK Changing the computer name Chapter 5 Installing the SVP software on a customer supplied server Service Processor Technical Reference 80 ...

Страница 81: ...5 Click Close Changing the computer name Chapter 5 Installing the SVP software on a customer supplied server Service Processor Technical Reference 81 ...

Страница 82: ...it for the server to restart Note After changing the computer name change the account name Changing the computer name Chapter 5 Installing the SVP software on a customer supplied server Service Processor Technical Reference 82 ...

Страница 83: ... the Windows installation Procedure 1 Click Control Panel User Accounts and then click Change your account name 2 Type SVP for the new account name and then click Change Name Changing the account name Chapter 5 Installing the SVP software on a customer supplied server Service Processor Technical Reference 83 ...

Страница 84: ...nts window 4 Click Control Panel Administrative Tools and then click Computer Management Changing the account name Chapter 5 Installing the SVP software on a customer supplied server Service Processor Technical Reference 84 ...

Страница 85: ...ools and then click Local Users and Groups Users 6 In the right window right click User and then click Rename Changing the account name Chapter 5 Installing the SVP software on a customer supplied server Service Processor Technical Reference 85 ...

Страница 86: ...7 Rename User to SVP Changing the account name Chapter 5 Installing the SVP software on a customer supplied server Service Processor Technical Reference 86 ...

Страница 87: ...r Configuring the password setting for Administrator The Windows Administrator password must be configured for use with the SVP Procedure 1 Click Control Panel Administrative Tools and then click Computer Management Configuring the password setting for Administrator Chapter 5 Installing the SVP software on a customer supplied server Service Processor Technical Reference 87 ...

Страница 88: ...ator and then click Set Password 4 In the warning message click Proceed 5 In the New password and Confirm password fields type the administrator password raid login 6 Click OK Configuring the password setting for Administrator Chapter 5 Installing the SVP software on a customer supplied server Service Processor Technical Reference 88 ...

Страница 89: ...e password setting Change the password for the Windows operating system running on the SVP Procedure 1 Click Control Panel User Accounts 2 Click Create a password for your account 3 In the top two fields type the password raid login Leave the password hint field empty Changing the password setting Chapter 5 Installing the SVP software on a customer supplied server Service Processor Technical Refer...

Страница 90: ...tensible web server created by Microsoft for use with Windows operating systems Procedure 1 Click the Start button and then click Control Panel 2 Click Programs and Features Turn Windows Features On or Off 3 Expand Internet Information Services Configuring Internet Information Services Chapter 5 Installing the SVP software on a customer supplied server Service Processor Technical Reference 90 ...

Страница 91: ...Tools IIS 6 WMI Compatibility IIS Metabase and IIS 6 configuration compatibility IIS Management Console IIS Management Scripts and Tools IIS Management Service 5 Uncheck World Wide Web Services Configuring Internet Information Services Chapter 5 Installing the SVP software on a customer supplied server Service Processor Technical Reference 91 ...

Страница 92: ...ur storage system from the firmware distribution set Verify the ISO image corresponds to the firmware currently running on the storage system 2 Download the SVP ISO from TISC to the CE notebook and then use an ISO reader to mount the SVP ISO as the next available drive letter 3 Launch Remote Desktop Connection and click the Show Options drop down menu Installing the SVP software Chapter 5 Installi...

Страница 93: ...4 Click the Local Resources tab and then click More Installing the SVP software Chapter 5 Installing the SVP software on a customer supplied server Service Processor Technical Reference 93 ...

Страница 94: ...up application Otherwise click the mapped drive in the left pane and double click the Setup application in the workspace to the right of the pane see the following figures and then go to step 9 Note Using WinZip is the preferred method The alternative method performs the installation over the network and can take significantly longer to complete Installing the SVP software Chapter 5 Installing the...

Страница 95: ...n clear Public networks such as those in airports and coffee shops not recommended because the networks often have little or no security 10 Type the SVP IP address Installing the SVP software Chapter 5 Installing the SVP software on a customer supplied server Service Processor Technical Reference 95 ...

Страница 96: ...Click Apply 12 Add the storage system 13 Register the storage system Installing the SVP software Chapter 5 Installing the SVP software on a customer supplied server Service Processor Technical Reference 96 ...

Страница 97: ...ge system without upgrading the firmware 15 If the storage system firmware is current click Select Update Objects and clear Firmware Storage System Doing so adds the storage system without upgrading the firmware Installing the SVP software Chapter 5 Installing the SVP software on a customer supplied server Service Processor Technical Reference 97 ...

Страница 98: ...m to added the storage system to the SVP 17 On the Desktop click the Open StorageDevice List shortcut Installing the SVP software Chapter 5 Installing the SVP software on a customer supplied server Service Processor Technical Reference 98 ...

Страница 99: ...art 18 After the services are ready click the storage system to start Hitachi Device Manager Storage Navigator Installing the SVP software Chapter 5 Installing the SVP software on a customer supplied server Service Processor Technical Reference 99 ...

Страница 100: ...ical network connection for an Oracle Linux KVM based SVP configuration using the Hitachi Virtual Storage Platform G800 Adjust your connections appropriately if you use different VSP Gx00 models or VSP Fx00 models Note The Oracle Linux KVM server running the VM instance cannot be used with the storage system if it belongs to different subnets and if a router or a firewall is filtering packets acco...

Страница 101: ...r an Oracle Linux KVM SVP An SVP that will be used in an Oracle Linux KVM environment requires the following minimum requirements Prerequisites Linux KVM Server provided by the customer Oracle Linux 7 x server Two quad core processors Intel Xeon 2 29 GHz One port NIC SVP guest OS 128 GB RAM Minimum requirements for an Oracle Linux KVM SVP Chapter 6 Installing the SVP software on an Oracle Linux KV...

Страница 102: ...per threading is active for the Oracle Linux KVM server and VM guest host Hyper threading is enabled by default The following figure shows an example of hyper threading on an Oracle Linux KVM server The following figure shows an example of hyper threading on a VM guest host Hyper threading Chapter 6 Installing the SVP software on an Oracle Linux KVM host Service Processor Technical Reference 102 ...

Страница 103: ... in the Oracle Linux KVM environment Procedure 1 On the Oracle Linux KVM host create a VM that is appropriate for the Windows operating system being used 2 Verify that the virtual network connection is properly assigned to the appropriate virtual machine network Configuring the Oracle Linux KVM based SVP Chapter 6 Installing the SVP software on an Oracle Linux KVM host Service Processor Technical ...

Страница 104: ...or the VM The IP address must allow communication with the storage system controllers Configuring the Oracle Linux KVM based SVP Chapter 6 Installing the SVP software on an Oracle Linux KVM host Service Processor Technical Reference 104 ...

Страница 105: ...4 Configure a Remote Desktop connection Configuring the Oracle Linux KVM based SVP Chapter 6 Installing the SVP software on an Oracle Linux KVM host Service Processor Technical Reference 105 ...

Страница 106: ...e SVP on a VMware ESXi host Procedure 1 Configure the SVP guest OS 2 Install the SVP software 3 Deploy a cloned virtual SVP optional 4 Change the locale setting if the currently configured language is not appropriate Where to go from here Chapter 6 Installing the SVP software on an Oracle Linux KVM host Service Processor Technical Reference 106 ...

Страница 107: ...management To provide the highest level of trouble free operations observe the following rules Do not locate a virtual machine on a storage system being managed by the same virtual machine Do not start the SVP virtual machine from the storage system it is managing Setting up the SVP locale The SVP and storage management software support the English and Japanese languages If you intend to install t...

Страница 108: ...SVP application and the storage array being managed if they belong to the same subnet Virtual SVP requirements The virtual SVP must meet the following minimum requirements ESX Server provided by the customer VMware ESXi server 6 x Two quad core processors Intel Xeon 2 29 GHz One port network interface card NIC SVP guest OS 32 GB RAM Virtual SVP requirements Chapter 7 Installing the SVP software on...

Страница 109: ...i server and VM guest host Note Hyper threading is enabled by default Configuring the virtual SVP After preparing the environment activating hyper threading on both the ESXi server and VM guest host and verifying the configuration layout use the following procedure to configure the virtual SVP Procedure 1 Create a Windows 7 Professional x64 Service Pack 1 on the ESXi host 2 Verify the virtual netw...

Страница 110: ...s for the VM The specified IP address must allow communication with the storage system controllers Configuring the virtual SVP Chapter 7 Installing the SVP software on a VMware ESXi host Service Processor Technical Reference 110 ...

Страница 111: ...4 Configure a Remote Desktop connection Configuring the virtual SVP Chapter 7 Installing the SVP software on a VMware ESXi host Service Processor Technical Reference 111 ...

Страница 112: ...n ensure Hyper Threading is active for the ESXi server and VM guest host is configured Logging on to the operating system Using the Remote Desktop Connection log on as the specified user assigned during the guest OS installation for example Administrator Configuring the SVP guest OS Chapter 7 Installing the SVP software on a VMware ESXi host Service Processor Technical Reference 112 ...

Страница 113: ...fter configuring the control panel display configure the desktop Configuring the desktop Configure the Windows screen saver function on the SVP Procedure 1 Click Control Panel Personalization For Basic and High Contrast Themes 6 click Windows Classic Configuring the Control Panel display Chapter 7 Installing the SVP software on a VMware ESXi host Service Processor Technical Reference 113 ...

Страница 114: ...creen saver 3 In Screen saver click Blank and then set Wait to 60 minutes 4 Click OK Configuring the desktop Chapter 7 Installing the SVP software on a VMware ESXi host Service Processor Technical Reference 114 ...

Страница 115: ...nu properties on the Windows operating system running on the SVP Procedure 1 Click Control Panel Taskbar and Start Menu Properties task bar property and then click the Taskbar tab 2 Click Customize Configuring the task bar and the start menu properties Chapter 7 Installing the SVP software on a VMware ESXi host Service Processor Technical Reference 115 ...

Страница 116: ...cons window check Always show all icons and notifications on the taskbar Configuring the task bar and the start menu properties Chapter 7 Installing the SVP software on a VMware ESXi host Service Processor Technical Reference 116 ...

Страница 117: ...tart Menu Properties task bar property and then click the Start Menu tab 6 Click Customize Configuring the task bar and the start menu properties Chapter 7 Installing the SVP software on a VMware ESXi host Service Processor Technical Reference 117 ...

Страница 118: ... check Run command and click Display on the All Programs menu and the Start menu Configuring the task bar and the start menu properties Chapter 7 Installing the SVP software on a VMware ESXi host Service Processor Technical Reference 118 ...

Страница 119: ...8 Under Music check Don t display this item Configuring the task bar and the start menu properties Chapter 7 Installing the SVP software on a VMware ESXi host Service Processor Technical Reference 119 ...

Страница 120: ...u properties configure the time settings Configuring the time settings Configure the SVP for Universal Coordinated Time and then configure it to not synchronize with an Internet time server Configuring the time settings Chapter 7 Installing the SVP software on a VMware ESXi host Service Processor Technical Reference 120 ...

Страница 121: ...ings window uncheck Synchronize with an Internet time server and then click OK 6 In the Date and Time window click OK Note After configuring the time settings configure the region settings Configuring region settings Configure the region and language the language for your region or preference Procedure 1 Click Control Panel Region and Language and then click the Keyboards and Languages tab Configu...

Страница 122: ...he Text Service and Input Languages window click the Language Bar tab 4 Click Hidden and then click OK Configuring region settings Chapter 7 Installing the SVP software on a VMware ESXi host Service Processor Technical Reference 122 ...

Страница 123: ...w click Restart now 10 After the restart click Control Panel Region and Language and then click the Keyboards and Languages tab 11 Click Change Keyboards and then click the General tab 12 In the Text Services and Input Languages window if Japanese Japan appears under Installed services click the current selection and then click Remove 13 Click OK Configuring region settings Chapter 7 Installing th...

Страница 124: ...e the SVP requires specific power management settings Procedure 1 Click Control Panel Power Options and then click the Show additional plans list 2 Click Change settings that are currently unavailable 3 Click High Performance and Change plan settings Configuring the power management settings Chapter 7 Installing the SVP software on a VMware ESXi host Service Processor Technical Reference 124 ...

Страница 125: ...nge advanced power settings 6 In the Advanced settings tab of the Power Options window click Change settings that are currently unavailable Then click Hard disk Turn off hard disk after and select Never Configuring the power management settings Chapter 7 Installing the SVP software on a VMware ESXi host Service Processor Technical Reference 125 ...

Страница 126: ...rocessor power management Minimum processor state and then select 5 Configuring the power management settings Chapter 7 Installing the SVP software on a VMware ESXi host Service Processor Technical Reference 126 ...

Страница 127: ... the Action Center settings Configuring Action Center settings All settings in the Windows Action Center must be disabled Procedure 1 Click Control Panel Action Center and then click Change Action Center settings Configuring Action Center settings Chapter 7 Installing the SVP software on a VMware ESXi host Service Processor Technical Reference 127 ...

Страница 128: ...items click OK and then close the window Note After configuring Action Center settings configure the troubleshooting settings Configuring Action Center settings Chapter 7 Installing the SVP software on a VMware ESXi host Service Processor Technical Reference 128 ...

Страница 129: ...e Change settings window for Computer Maintenance click Off and clear all configuration options below Other settings 3 Click OK and then close the window Note After configuring the troubleshooting settings configure the Remote Desktop settings Configuring the troubleshooting settings Chapter 7 Installing the SVP software on a VMware ESXi host Service Processor Technical Reference 129 ...

Страница 130: ...e tab 3 Under Remote Assistance clear Allow Remote Assistance connections to this computer 4 Under Remote Desktop click Allow connections only from computers running Remote Desktop with Network Level Authentication more secure 5 Click OK 6 If a message states that the Remote Desktop Firewall will be enabled click OK Configuring the Remote Desktop settings Chapter 7 Installing the SVP software on a...

Страница 131: ... Allow a program or feature through Windows firewall 10 Click Change settings and then verify Remote Desktop and Remote Desktop RemoteFX for both Home Work Private and Public are selected Configuring the Remote Desktop settings Chapter 7 Installing the SVP software on a VMware ESXi host Service Processor Technical Reference 131 ...

Страница 132: ...guring Internet Explorer settings Configure Internet Explorer advanced security and properties settings Procedure 1 Click Control Panel Internet Options and then click the Advanced tab to modify the settings Configuring Internet Explorer settings Chapter 7 Installing the SVP software on a VMware ESXi host Service Processor Technical Reference 132 ...

Страница 133: ... Security select Allow active content to run in files on My Computer Configuring Internet Explorer settings Chapter 7 Installing the SVP software on a VMware ESXi host Service Processor Technical Reference 133 ...

Страница 134: ... If SSL 2 0 is selected clear it 5 Select Use TLS 1 0 Use TLS 1 1 and Use TLS 1 2 Configuring Internet Explorer settings Chapter 7 Installing the SVP software on a VMware ESXi host Service Processor Technical Reference 134 ...

Страница 135: ...t Properties window 8 From the Control Panel window click System and Security Action Center Configuring Internet Explorer settings Chapter 7 Installing the SVP software on a VMware ESXi host Service Processor Technical Reference 135 ...

Страница 136: ...1 If the Set Up Windows Internet Explorer 8 window appears click Next 12 In the Turn on Suggested Sites window click No don t turn on and then click Next Configuring Internet Explorer settings Chapter 7 Installing the SVP software on a VMware ESXi host Service Processor Technical Reference 136 ...

Страница 137: ...gs and then click Finish 14 When an error indicates that an Internet connection is not established close Internet Explorer Configuring Internet Explorer settings Chapter 7 Installing the SVP software on a VMware ESXi host Service Processor Technical Reference 137 ...

Страница 138: ...art Run and then type gpedit msc to start the Group Policy Editor 2 Click Local Computer Policy Computer Configuration click Administrative Templates Windows Components and then click AutoPlay Policies 3 From the items on the right double click Turn off Autoplay Disabling the auto execute feature Chapter 7 Installing the SVP software on a VMware ESXi host Service Processor Technical Reference 138 ...

Страница 139: ...w click Enabled and select All drives and then click OK 5 Close the Group Policy Editor Disabling the auto execute feature Chapter 7 Installing the SVP software on a VMware ESXi host Service Processor Technical Reference 139 ...

Страница 140: ...he Windows Registry on the SVP Procedure 1 Disable anonymous logon null connection a Click Start Run and then type regedit and press Enter b In the User Account Control menu click Yes to open the Registry Editor window c Navigate to HKEY_LOCAL_MACHINE SYSTEM CurrentControlSet Control Lsa Configuring the Registry Chapter 7 Installing the SVP software on a VMware ESXi host Service Processor Technica...

Страница 141: ...Desktop Connection is connected a In the Registry Editor window navigate to HKEY_LOCAL_MACHINE System CurrentControlSet Control Terminal Server b In the Edit menu click New DWORD 32 bit Value c Type DisableBeep Configuring the Registry Chapter 7 Installing the SVP software on a VMware ESXi host Service Processor Technical Reference 141 ...

Страница 142: ...lick OK 3 Configure Remote Desktop Connection a In the Registry Editor window navigate to HKEY_LOCAL_MACHINE SOFTWARE Policies Microsoft Windows NT Terminal Services Configuring the Registry Chapter 7 Installing the SVP software on a VMware ESXi host Service Processor Technical Reference 142 ...

Страница 143: ...ck fPromptForPassword e Set Value data to 1 verify Hexadecimal is selected and then click OK f In the Edit menu click New DWORD 32 bit Value g Type SecurityLayer Configuring the Registry Chapter 7 Installing the SVP software on a VMware ESXi host Service Processor Technical Reference 143 ...

Страница 144: ...d by network devices such as routers to send error messages and operational information indicating as an example a requested service is not available or a host or router could not be reached Procedure 1 Click Control Panel Administrative Tools and then start Windows Firewall with Advanced Security Enabling ICMP ping reply Chapter 7 Installing the SVP software on a VMware ESXi host Service Processo...

Страница 145: ... right click and click Enable Rules File and Printer Sharing Echo Request ICMPv4 In Profile Domain File and Printer Sharing Echo Request ICMPv4 In Profile Private Enabling ICMP ping reply Chapter 7 Installing the SVP software on a VMware ESXi host Service Processor Technical Reference 145 ...

Страница 146: ...uter name Changing the computer name allows the SVP to be identified easily Procedure 1 Click Control Panel System and then click Change settings under Computer name domain and workgroup settings 2 In the System Properties window click the Computer Name tab and then click Change Changing the computer name Chapter 7 Installing the SVP software on a VMware ESXi host Service Processor Technical Refer...

Страница 147: ...3 In the Computer Name field type SVP PC Changing the computer name Chapter 7 Installing the SVP software on a VMware ESXi host Service Processor Technical Reference 147 ...

Страница 148: ...4 When prompted to restart your computer click OK Changing the computer name Chapter 7 Installing the SVP software on a VMware ESXi host Service Processor Technical Reference 148 ...

Страница 149: ...5 Click Close Changing the computer name Chapter 7 Installing the SVP software on a VMware ESXi host Service Processor Technical Reference 149 ...

Страница 150: ... Wait for the server to restart Note After changing the computer name change the account name Changing the computer name Chapter 7 Installing the SVP software on a VMware ESXi host Service Processor Technical Reference 150 ...

Страница 151: ...ring the Windows installation Procedure 1 Click Control Panel User Accounts and then click Change your account name 2 Type SVP for the new account name and then click Change Name Changing the account name Chapter 7 Installing the SVP software on a VMware ESXi host Service Processor Technical Reference 151 ...

Страница 152: ...ccounts window 4 Click Control Panel Administrative Tools and then click Computer Management Changing the account name Chapter 7 Installing the SVP software on a VMware ESXi host Service Processor Technical Reference 152 ...

Страница 153: ...m Tools and then click Local Users and Groups Users 6 In the right window right click User and then click Rename Changing the account name Chapter 7 Installing the SVP software on a VMware ESXi host Service Processor Technical Reference 153 ...

Страница 154: ...7 Rename User to SVP Changing the account name Chapter 7 Installing the SVP software on a VMware ESXi host Service Processor Technical Reference 154 ...

Страница 155: ...rator Configuring the password setting for Administrator The Windows Administrator password must be configured for use with the SVP Procedure 1 Click Control Panel Administrative Tools and then click Computer Management Configuring the password setting for Administrator Chapter 7 Installing the SVP software on a VMware ESXi host Service Processor Technical Reference 155 ...

Страница 156: ...istrator and then click Set Password 4 In the warning message click Proceed 5 In the New password and Confirm password fields type the administrator password raid login 6 Click OK Configuring the password setting for Administrator Chapter 7 Installing the SVP software on a VMware ESXi host Service Processor Technical Reference 156 ...

Страница 157: ... the password setting Change the password for the Windows operating system running on the SVP Procedure 1 Click Control Panel User Accounts 2 Click Create a password for your account 3 In the top two fields type the password raid login Leave the password hint field empty Changing the password setting Chapter 7 Installing the SVP software on a VMware ESXi host Service Processor Technical Reference ...

Страница 158: ...ain the appropriate SVP ISO image for your storage system from the firmware distribution set Verify the ISO image corresponds to the firmware currently running on the storage system 2 Download the SVP ISO from TISC to the CE notebook and then use an ISO reader to mount the SVP ISO as the next available drive letter 3 Launch Remote Desktop Connection and click the Show Options drop down menu Instal...

Страница 159: ...4 Click the Local Resources tab and then click More Installing the SVP software Chapter 7 Installing the SVP software on a VMware ESXi host Service Processor Technical Reference 159 ...

Страница 160: ... setup application Otherwise click the mapped drive in the left pane and double click the Setup application in the workspace to the right of the pane see the following figures and then go to step 9 Note Using WinZip is the preferred method The alternative method performs the installation over the network and can take significantly longer to complete Installing the SVP software Chapter 7 Installing...

Страница 161: ...Then clear Public networks such as those in airports and coffee shops not recommended because the networks often have little or no security 10 Type the SVP IP address Installing the SVP software Chapter 7 Installing the SVP software on a VMware ESXi host Service Processor Technical Reference 161 ...

Страница 162: ...11 Click Apply 12 Add the storage system 13 Register the storage system Installing the SVP software Chapter 7 Installing the SVP software on a VMware ESXi host Service Processor Technical Reference 162 ...

Страница 163: ...orage system without upgrading the firmware 15 If the storage system firmware is current click Select Update Objects and clear Firmware Storage System Doing so adds the storage system without upgrading the firmware Installing the SVP software Chapter 7 Installing the SVP software on a VMware ESXi host Service Processor Technical Reference 163 ...

Страница 164: ...firm to added the storage system to the SVP 17 On the Desktop click the Open StorageDevice List shortcut Installing the SVP software Chapter 7 Installing the SVP software on a VMware ESXi host Service Processor Technical Reference 164 ...

Страница 165: ...achi Device Manager Storage Navigator Deploying a cloned virtual SVP To avoid management outages for the working storage system clone a virtual SVP image to an unregistered storage system Deploying a cloned virtual SVP Chapter 7 Installing the SVP software on a VMware ESXi host Service Processor Technical Reference 165 ...

Страница 166: ...IP address is used to communicate with the storage system 6 Register a storage system using the Storage Device List Detecting SVP failures SVP failures are detected and resolved using the following methods Failure detection method How a failure is detected Action to be taken Hi Track Remote Monitoring System No report from the agent during a 24 hour health check Hi Track detects SVP failure SVP re...

Страница 167: ...Detecting SVP failures Chapter 7 Installing the SVP software on a VMware ESXi host Service Processor Technical Reference 167 ...

Страница 168: ...f a Hyper V VM implementation and migration in a non clustered environment In this example eight Hitachi Virtual Storage Platform G200 storage systems are connected to a Windows server designated Hyper V1 The Hyper V1 server is running eight instances of SVP VMs one for each VSP G200 storage system and is connected to a second Windows server Hyper V2 that is also running Hyper V Both the Hyper V1 ...

Страница 169: ...on a customer supplied Microsoft Hyper V Server 2012 R2 VM requires the following minimum requirements Minimum requirements for Hyper V Server 2012 R2 VM Chapter 8 Installing the SVP software on a Microsoft Hyper V Server 2012 R2 Virtual Machine Service Processor Technical Reference 169 ...

Страница 170: ...2012 R2 Server When you install and configure a customer supplied version of Microsoft Hyper V on Windows 2012 R2 Server you configure the virtual switch A virtual switch allows VMs created on Hyper V hosts to communicate with other computers You can also configure the default stores Default stores are default locations for storing virtual hard disk files and virtual configuration files In the fol...

Страница 171: ... SVP software on a guest OS After you perform the host configuration install the SVP software on a guest OS You install the SVP software using Hitachi Device Manager Storage Navigator Procedure 1 Double click the Setup exe file for Device Manager Storage Navigator 2 When prompted select a language and accept the license agreement Installing the SVP software on a guest OS Chapter 8 Installing the S...

Страница 172: ... enter the IP address of the SVP port connecting the SVP and the storage system and then click Apply 5 Complete the fields in the Add System window Installing the SVP software on a guest OS Chapter 8 Installing the SVP software on a Microsoft Hyper V Server 2012 R2 Virtual Machine Service Processor Technical Reference 172 ...

Страница 173: ...ault IPv4 setting or select IPv6 and then enter the IP address in the appropriate format for the addressing method selected IP Address CTL 2 Enter the IP address for controller 2 Accept the default IPv4 setting or select IPv6 and then enter the IP address in the appropriate format for the addressing method selected Installing the SVP software on a guest OS Chapter 8 Installing the SVP software on ...

Страница 174: ... after addition immediately2 Check if you do not want to start service after adding the storage system Default is unchecked 1 Service personnel set the storage system information manually User should not select Manual to set it 2 To register multiple storage systems best practice is to check this check box for the settings so that they do not start services while they are added 6 When the target s...

Страница 175: ...e SVP software on a guest OS If you need to modify your configuration refer to the instructions for installing the SVP on a VMware ESXi host Installing the SVP software on a guest OS Chapter 8 Installing the SVP software on a Microsoft Hyper V Server 2012 R2 Virtual Machine Service Processor Technical Reference 175 ...

Страница 176: ...SVP software using Storage Device List View all active alerts see https support hitachivantara com en_us contact us html Stopping the service in each storage system You must stop the service to upgrade the SVP software After the software is upgraded you can restart the service In the following cases all the storage systems with Ready service status must be stopped in the Storage Device List Update...

Страница 177: ...to upgrade the SVP software without upgrading the storage management software and storage system firmware This procedure can be used with storage systems that have firmware version 83 01 21 or later This procedure assumes that the storage system is operating and that a console PC is connected to the SVP using Remote Desktop Client Upgrading the SVP software only Chapter 9 Upgrading the SVP softwar...

Страница 178: ...e SVP create a new folder and then copy all of the files from the SVP software media into the new folder 3 In the new folder right click the Setup exe file and click Execute as Administrator 4 In the following screens click Next accept the license agreement and click Next and then click Yes If the Windows Security Alert window opens click Allow access In the following screen click the top option a...

Страница 179: ...stems list window opens select the appropriate storage systems and then click Select Update Objects The Select Update Objects window opens 7 Check Software Storage Navigator and uncheck Firmware Storage Navigator Upgrading the SVP software only Chapter 9 Upgrading the SVP software Service Processor Technical Reference 179 ...

Страница 180: ...Click Confirm The Run update window opens and the software update starts automatically 10 Check the upgrade status in the Software Storage Navigator row Upgrading the SVP software only Chapter 9 Upgrading the SVP software Service Processor Technical Reference 180 ...

Страница 181: ...e upgrade failed Click Update to display the Update Firmware window and review the error details Not Update Not selected as a firmware upgrade target 11 In the Environmental Settings window click Close 12 In the Confirm exit window click Confirm 13 If you disabled the Hi Track Remote Monitoring System enable it see http hitrack hds com Upgrading the SVP software only Chapter 9 Upgrading the SVP so...

Страница 182: ... systems with firmware version 83 01 21 or later Note The upgrade time can take up to 9 hours to complete when NAS modules are installed Procedure 1 On the console PC connected to the physical SVP or running the SVP software insert the SVP software media 2 On the SVP create a new folder and then copy all the files from the SVP software media into the new folder 3 In the new folder right click the ...

Страница 183: ... for the upgrade 5 Wait for the preparation to complete and for the target storage systems list window to open Upgrading the storage management SVP software and storage system firmware Chapter 9 Upgrading the SVP software Service Processor Technical Reference 183 ...

Страница 184: ...date Objects window select Software Storage Navigator and Firmware Storage Navigator 8 Click Apply The Update software and firmware window opens 9 Click Confirm The Run update window opens and the software update starts automatically Upgrading the storage management SVP software and storage system firmware Chapter 9 Upgrading the SVP software Service Processor Technical Reference 184 ...

Страница 185: ... the upgrade status in the Software Storage Navigator row Upgrading the storage management SVP software and storage system firmware Chapter 9 Upgrading the SVP software Service Processor Technical Reference 185 ...

Страница 186: ...ess Software is running Completed Software upgrade is complete Failed Software upgrade failed Click Update to display the Update Firmware window and review the error details Communication Timeout The completion of the firmware update in time1 is not confirmed Verify the state in the Update Firmware window Not Update Not selected as a firmware upgrade target Note 1 When NAS Modules are not installe...

Страница 187: ...opens click Later If a JRE Security Warning window opens select the check boxes in each window and click Continue Run or Yes 13 During the upgrade the Update Firmware window closes and the following window opens Upgrading the storage management SVP software and storage system firmware Chapter 9 Upgrading the SVP software Service Processor Technical Reference 187 ...

Страница 188: ...gs window verify the firmware update status in Firmware Storage System Wait for the firmware update to complete The following table lists the status conditions Upgrading the storage management SVP software and storage system firmware Chapter 9 Upgrading the SVP software Service Processor Technical Reference 188 ...

Страница 189: ...ime is approximately 3 5 hours When NAS modules are installed the installation time is approximately 9 hours 16 In the Environmental Settings window click Close 17 At the Confirm exit window click Confirm Stopping the SVP service Before upgrading the SVP software stop the SVP service Procedure 1 Connect the management console PC attached to the SVP connect to the SVP using Windows Remote Desktop C...

Страница 190: ... restarted Store the new SVP software file in a location that can be accessed by the PC Procedure 1 On the SVP click Start All Programs Hitachi Device Manager Storage Navigator StorageDeviceList The Storage Device List window opens 2 In the Storage Device List window click Edit for the storage system whose SVP software you want to upgrade Upgrading the SVP software using Storage Device List Chapte...

Страница 191: ...3 In the Edit System window select Software and click Browse Upgrading the SVP software using Storage Device List Chapter 9 Upgrading the SVP software Service Processor Technical Reference 191 ...

Страница 192: ...the Edit System window check Start service automatically when the SVP is rebooted 6 Click Apply 7 In the Storage Device List window verify that the software version shown is later than the version you recorded prior to the upgrade Upgrading the SVP software using Storage Device List Chapter 9 Upgrading the SVP software Service Processor Technical Reference 192 ...

Страница 193: ...e again 8 If you disabled the Hi Track Remote Monitoring System go to the Hi Track website and enable it see http hitrack hds com Downgrading the SVP software Before downgrading the SVP software contact the customer support Downgrading the SVP software Chapter 9 Upgrading the SVP software Service Processor Technical Reference 193 ...

Страница 194: ...hes using a Windows Server Update Services server Users can also apply security patches using a Windows Server Update Services server For the latest antivirus details see the SVP Service Processor OS and Hypervisor support for Gx00 Fx00 report at https support hitachivantara com en_us interoperability html Online update Users with storage systems in an online environment can apply security patches...

Страница 195: ... ID 41269 Windows 10 Professional and Windows 10 Enterprise https support microsoft com en us help 4000825 windows 10 update history Windows Server 2012 https www microsoft com en us download details aspx id 35626 Installing antivirus software on the SVP Installing antivirus software might affect SVP performance Therefore install antivirus software according to the following procedure Offline upda...

Страница 196: ...such as Hitachi Device Manager Storage Navigator Doing so can delay processing or result in an error When the SVP restarts during installation data and logs monitored by the service information message or sense byte SIM SSB might be interrupted temporarily Procedure 1 Log on to the SVP 2 Install the antivirus software If the SVP restarts log on to the SVP again If the SVP does not restart restart ...

Страница 197: ...ecific public key and private key A server certificate is used to identify the SVP server to a client so that the server and client can communicate using SSL Certificates can be self signed or issued by a certificate authority CA Self signed certificates are generated by you and the subject of the certificate is the same as the issuer of the certificate A client PC and SVP on an internal LAN behin...

Страница 198: ...ertificate for Web server C Between the client PC and storage system Operation of maintenance utility The certificate for Web server To prevent a man in the middle attack the encryption shown in notation B between SVP and storage system verifies the validity of the connection by using the certificate that was uploaded to the SVP in advance and by using the certificate of the storage system The sam...

Страница 199: ...eb server SVP and storage system If a certificate for the SVP or storage system was uploaded the SVP will not operate normally Creating private and public keys requires a dedicated program such as those you can download from the OpenSSL website Setting up SSL communications In the following procedure you create private and public keys using a dedicated program such as those you can download form t...

Страница 200: ...oes Despite this behavior the certificate update completes Creating a private key key file A private key is required to create an SSL keypair Procedure 1 Download and install the openssl exe file from the OpenSSL website In the following example the openssl exe file is installed to the c openssl folder 2 If the read only attribute is set remove this attribute from the c openssl folder 3 Open a com...

Страница 201: ...ty Name Organization Name Organization Unit Name Common Name To create a self signed certificate enter the IP address of the server SVP The name you entered here is used as the server name host name To obtain a signed and trusted certificate verify that the server name matches the host name of the SVP Email Address Challenge password optional Company name optional The following example shows a sam...

Страница 202: ...period is set 10 000 days as an example This command uses SHA 256 as a hash algorithm Note Do not use MD5 or SHA 1 for a hash algorithm due to its low security level Use SHA 256 for a hash algorithm Acquiring a signed and trusted certificate To acquire a signed and trusted certificate you must acquire a CSR send that file to a CA and request the CA to issue a signed and trusted certificate Each ce...

Страница 203: ...input_key_file out output_key_file b Press the Enter key c Issue the following command Writing RSA key 5 Verify that the path phrase is released and then close the command prompt Converting the SSL certificate into the PKCS 12 format When uploading the created private key and the SSL certificate to the storage system you must convert the certificate into the PKCS 12 format If the SSL certificate i...

Страница 204: ... public key certificate server crt file has been acquired Change the file name to server crt unless the file already has that name All users are logged out of Device Manager Storage Navigator Procedure 1 On the SVP start a Windows command prompt as Administrator 2 Move the current directory to the directory where the certificate update tool MappApacheCrtUpdate bat is located Issue the following co...

Страница 205: ...em and the signed server certificate public key from the maintenance utility have been updated The private key server key file and the signed public key certificate server crt file are in the X 509 PEM or X 509 DER format All users are logged out of Device Manager Storage Navigator Procedure 1 On the SVP start a Windows command prompt as Administrator 2 Move the current directory to the directory ...

Страница 206: ...located Issue the following command C MAPP wk Supervisor MappIniSet MappSn2GumSslCrtUpdate bat r absolute path of the certificate file Note C MAPP indicates the installation directory of the SVP If you specify an installation directory other than C Mapp replace C Mapp with the specified installation directory 3 At the message Press any key to continue the process enter an arbitrary key 4 Close the...

Страница 207: ...he HTTP communication port used by the SVP Procedure 1 Request all users to log out of HDvM SN 2 Using a management console PC attached to the SVP connect to the SVP using Windows Remote Desktop Client 3 On the SVP exit to a Windows command prompt as Administrator 4 Move to the directory where the MappHttpBlock bat tool is located and then issue the following command C MAPP wk Supervisor MappIniSe...

Страница 208: ...the MappHttpBlock bat tool is located and then enter the following command C MAPP wk Supervisor MappIniSet MappHttpRelease bat In this command C MAPP indicates the installation directory of the storage management software and SVP software If the installation directory is different replace C MAPP with the specified installation directory 5 At the message Press any key to continue the process enter ...

Страница 209: ...Procedure 1 Start the SVP and then log on to it 2 Configure the SVP to use a temporary port of 192 168 0 xxx where xxx is a number from 1 to 254 excluding 16 and 17 3 Launch a web browser 4 In the address bar enter the IP address of controller 1 When NAS modules are installed the window for selecting Maintenance Utility or NAS Manager is displayed Select Maintenance Utility The Maintenance Utility...

Страница 210: ... 12 If you assigned a temporary IP address to the client PC change it to meet the subnet of your network environment Note If you encounter a problem troubleshoot the spanning tree protocol Changing storage system information in the Storage Device List Procedure 1 In the Storage Device List window click the Edit button for the storage system you want to edit The Edit System window opens Changing st...

Страница 211: ...Clear Start service automatically when the SVP is rebooted check box when Storage systems running S W Version 83 01 xx or later are registered Multiple storage systems are registered Changing storage system information in the Storage Device List Chapter 12 Changing the storage IP address Service Processor Technical Reference 211 ...

Страница 212: ...nt to set an IP address and then set the IP address Changing the SVP IP address using Storage Device List To change the SVP IP address in Storage Device List change the IP address registered using the SVP s Windows operating system and then perform the following procedure Before you begin Do not register the storage system on the SVP Do not start the start the storage system service Procedure 1 On...

Страница 213: ...ess window opens 3 Click IPv4 or IPv6 4 Enter the new IP address of the SVP 5 Click Apply Changing the SVP IP address using Storage Device List Chapter 13 Changing the SVP IP address Service Processor Technical Reference 213 ...

Страница 214: ...through Remote Desktop Connection Procedure 1 Request all users to log out of Device Manager Storage Navigator 2 On the SVP exit to a Windows command prompt as Administrator 3 Change to the directory to the location of the tool MappSetPortEdit bat 4 Enter the following command C Mapp wk Supervisor MappIniSet MappSetPortEdit bat _ port number key name _ port number where _ indicates a space and the...

Страница 215: ...ps HTTPS 443 No RMIClassLoad er RMI 51099 No RMIClassLoad erHttps RMI SSL 5443 No RMIIFRegist RMI 1099 No PreRMIServer RMI 51100 513551 No Automatic allocation 83 03 01 xx 00 or later DKCManPrivat e RMI 11099 N A 83 01 24 xx 00 or later SMI S SLP SLP 427 Yes only if SMI S is not used SMIS_CIMOM SMI S 5989 62441 Yes only if SMI S is not used 83 01 20 xx 00 or later Automatic allocation 83 03 01 xx ...

Страница 216: ...ly if Hi Track is not used 83 04 00 xx 00 or later Note 1 When the SVP software version is 83 03 01 xx 00 or later unused port numbers are allocated automatically from the described range during storage system registration and a firewall is also set The allocated ports numbers are used when starting the storage system When the SVP software version is earlier than 83 03 01 xx 00 ports 51100 and 598...

Страница 217: ...P Device Manager Storage Navigator and Hitachi suite components 23015 Used for Web browser communications 23016 Used for Web browser communications via SSL 28355 TCP Device Manager Storage Navigator Secure 31001 Used for communication by Hitachi Command Control Interface CCI data collection procedures 34001 Used by RAID Manager 51099 Used by Device Manager Storage Navigator for communication 51100...

Страница 218: ...essage is displayed following the service restart message The port number key name is case sensitive 5 A service restart message appears followed by a completion message 6 At the message Press any key to continue press any key to continue 7 Exit from the command prompt Initializing SVP port numbers You can reset SVP port numbers to their initial setting Resetting the port numbers restarts the SVP ...

Страница 219: ...Behavior when changing SVP port numbers If you change an SVP port number observe the following considerations Port number key name Effect MAPPWebServer Using Hitachi Device Manager Storage Navigator The URL specification method to log on to Storage Navigator changes Using Hitachi Command Suite Match the port number used in Hitachi Command Suite to SVP Change Port MAPPWebServerHttps Using Hitachi D...

Страница 220: ...sing Hitachi Command Suite Match the port number used in Hitachi Command Suite to the new SVP port PreRMIServer None DKCManPrivate None SMI S SLP Using SMI S Match the port number used in the SMI S communication to SVP Change Port SMIS_CIMOM Match the port number used in the SMI S communication to SVP Change Port For a storage system running firmware version 83 03 01 xx 00 or later register the st...

Страница 221: ...ystem 3 On the SVP start a Windows command prompt as an Administrator 4 Change the current directory to the directory where the tool exists Run the following command C Mapp wk Supervisor MappIniSet MappPortManageRenum bat_ Serial number arbitrary The _ character indicates a space The values in indicates a parameter When the Serial number is omitted the command is performed for storage systems runn...

Страница 222: ...ry is not C Mapp replace C Mapp with the appropriate installation directory 5 At the confirmation message for reallocation enter y and press Enter to continue or enter n and press Enter to cancel the processing 6 At the completion message press any key to continue 7 Perform the reallocation by running the following command C Mapp wk Supervisor MappIniSet MappPortManageRenum bat_ Serial number arbi...

Страница 223: ...o the directory where the tool exists and run the following command C Mapp wk Supervisor MappIniSet MappPortRangeSet batr Service port number _ Range of port numbers Tip C MAPP indicates the installation directory of the storage management software and SVP software If the installation directory is not C Mapp replace C Mapp with the appropriate installation directory Changing range of port numbers ...

Страница 224: ...he applications might not operate normally The available character strings in the effective range are as follows Number rm If rm is specified delete the setting of the specified port number key You can specify more than one command input parameter Service port number key name Port number range where is a one byte space For example MappPortRangeSet bat PreRMIServer 51200 55000 SMIS_CIMOM 5989 6244 ...

Страница 225: ...ng enter y and then press Enter To cancel the processing enter n and then press Enter A completion message appears Press any key to continue 4 Close the command prompt Viewing the port number to be used in the SVP You can view the port numbers to be used in the SVP Before you begin Verify the client PC is already connected to the SVP through the Remote Desktop connection Procedure 1 On the SVP sta...

Страница 226: ...llation directory 3 The information of the port numbers to be used in the SVP is displayed For the ports whose numbers are not allocated Not Defined is displayed 4 A completion message appears Press any key to continue 5 Close the command prompt Viewing the port number to be used in the SVP Chapter 14 Changing and initializing SVP port numbers Service Processor Technical Reference 226 ...

Страница 227: ...herwise skip to step 2 a If you use the physical SVP supplied by Hitachi Vantara verify the following connections b If you use the physical SVP supplied by Hitachi Vantara remove the cable from the LAN1 port on the SVP c Click Start Run d In the Run dialog box type regedit and then click OK e Go to the following key HKEY_LOCAL_MACHINE SYSTEM CurrentControlSet Services BridgeMP f Right click New DW...

Страница 228: ...ctivity through the network to the SVP 2 Using Remote Desktop Connection access the SVP using the storage system s maintenance LAN port of 10 0 0 100 3 In the Storage Device List window click Stop Service Wait up to five minutes for the service to stop 4 Log on to the maintenance utility Chapter 15 Editing the Storage Device List Service Processor Technical Reference 228 ...

Страница 229: ...lick Set Up Network Settings 6 Change the CTL1 and CTL2 LAN IP addresses as required 7 Change the properties of the network bridge to reflect your IP address subnet and default gateway settings Chapter 15 Editing the Storage Device List Service Processor Technical Reference 229 ...

Страница 230: ...the Storage Device List window click the SVP IP address setting in the top right of the window 10 Change the SVP IP address to match the new bridge IP address setting and then click Apply 11 In the Storage Device List window click Edit 12 Select the Connect Information check box change the IP addresses for CTL1 and CTL2 and then click Apply Chapter 15 Editing the Storage Device List Service Proces...

Страница 231: ...mation message click Confirm 14 Using Remote Desktop Connection access the SVP using the new user LAN IP address 15 Open the Storage Device List window and verify that services are ready Chapter 15 Editing the Storage Device List Service Processor Technical Reference 231 ...

Страница 232: ...r b If the default website and the existing FTP server including H8SRV are registered right click the FTP server under Sites and then click Delete At the Confirm Remove message click Yes Repeat this step for the default website and other FTP servers c Right click Sites and then click Add FTP Site Chapter 15 Editing the Storage Device List Service Processor Technical Reference 232 ...

Страница 233: ...ctory is created when the following storage systems are registered in the Storage Device List window 6000 VSP G800 or VSP F800 4000 VSP G400 G600 or VSP F400 F600 2000 VSP G200 yyyyyy serial number e For Port type 21 For SSL click No SSL Click Next Chapter 15 Editing the Storage Device List Service Processor Technical Reference 233 ...

Страница 234: ... Control Panel open Administrative Tools and start Windows Firewall with Advanced Security h In the tree in the left pane click Inbound Rules and then click FTP Server Passive FTP Server Secure and FTP Server Right click and then click Enable Rule Chapter 15 Editing the Storage Device List Service Processor Technical Reference 234 ...

Страница 235: ...re For Symantec Endpoint Protection for example right click the Symantec Endpoint Protection icon on the desktop and then click Disable Symantec Endpoint Protection Chapter 15 Editing the Storage Device List Service Processor Technical Reference 235 ...

Страница 236: ... the following procedure if you must delete the registered storage system from the Storage Device List window Procedure 1 Stop the SVP service see Stopping and restarting the service in each storage system on page 176 2 On the SVP desktop double click the Open StorageDeviceList icon The Storage Device List window opens 3 In the Storage Device List window click x for the storage system that you wan...

Страница 237: ...approximately 200 minutes for each storage system that needs a firmware upgrade Note The upgrade time can take up to 9 hours to complete when NAS modules are installed Procedure 1 At the console PC connected to the physical SVP or running the SVP software insert the media containing the SVP firmware media 2 On the SVP create a new folder and then copy all of the files from the SVP firmware media i...

Страница 238: ...llow access 5 Select the top option and then click Finish 6 When prompted select the IP addressing method IPv4 or IPv6 enter the IP address of the port connecting the SVP and the storage system and then click Apply Registering the storage system on the SVP Chapter 16 Deleting and registering the storage system Service Processor Technical Reference 238 ...

Страница 239: ...rget storage systems list window opens click Add The Add System window opens Registering the storage system on the SVP Chapter 16 Deleting and registering the storage system Service Processor Technical Reference 239 ...

Страница 240: ...llowing methods to discover the storage system Auto Discovery Acquire the storage system information automatically default Manual Specify the storage system manually Registering the storage system on the SVP Chapter 16 Deleting and registering the storage system Service Processor Technical Reference 240 ...

Страница 241: ...80 characters User Name Enter a user name Permitted characters are one byte alphanumeric characters and symbols _ The GUI includes a 256 character limit Password Enter a password The GUI includes a 256 character limit Do not start service after addition immediately2 Select if you do not want to start service after adding the storage system Default is unchecked Notes 1 Service personnel set the sto...

Страница 242: ...date the firmware and add storage systems at the same time select the storage systems and click Select Update Objects The Select Update Objects window opens Registering the storage system on the SVP Chapter 16 Deleting and registering the storage system Service Processor Technical Reference 242 ...

Страница 243: ...he firmware click Confirm when the Update software and firmware window opens The Run Update Firmware window opens and the upgrade starts automatically 15 When the following screen opens use the status bar under the Software Storage Navigator column to monitor the update status The following table lists the status conditions Registering the storage system on the SVP Chapter 16 Deleting and register...

Страница 244: ...ailed If storage systems were added the addition might not be complete Follow the on screen instructions Not Update This is not selected as a software update target If storage systems were added this status does not appear 16 If you did not check Firmware Storage System in step 10 skip steps 15 through 18 Otherwise update the firmware by clicking Update below the Firmware Storage System column Reg...

Страница 245: ...ning window opens select the check boxes in each window and click Continue Run or Yes 17 When the Update Firmware window opens click Apply The Update Firmware Online window shows the status of the firmware upgrade When the upgrade completes the following window opens Registering the storage system on the SVP Chapter 16 Deleting and registering the storage system Service Processor Technical Referen...

Страница 246: ...mpleted Firmware upgrade is complete Failed Firmware upgrade failed Click Update to display the Update Firmware window and review the error details Communication Timeout The time1 required to complete the firmware upgrade cannot be confirmed Verify the state in the Update Firmware window Not Update Not selected as a firmware upgrade target Note 1 When NAS Modules are not installed the installation...

Страница 247: ... registering the storage system on the SVP terminate the procedure and then register the storage system on the SVP again Registering the storage system on the SVP Chapter 16 Deleting and registering the storage system Service Processor Technical Reference 247 ...

Страница 248: ...p the encryption key on the client PC Window view setting table width Warning message in the logon window Task information SMI S application settings HTTPS and SMI S SSL certificates and RMI Procedure 1 From a management console PC connect to the SVP using Windows Remote Desktop Connection 2 Close all Device Manager Storage Navigator sessions on the SVP 3 On the SVP exit to a Windows command promp...

Страница 249: ...e 1 Copy the backup file to a folder on the SVP 2 On the SVP exit to a Windows command prompt as Administrator 3 Move to the directory where the backup file exists and then issue the following command C MAPP wk Supervisor MappIniSet MappRestore bat absolute path of the backup tgz zip file Note In this command C MAPP indicates the installation directory of the SVP If the installation directory is d...

Страница 250: ...he up arrow option in the power menu 4 From the displayed menu click Shut down If you have the physical SVP supplied by Hitachi Vantara the POWER LED goes off Restarting the SVP Procedure 1 On the SVP click Start in Windows desktop 2 From the displayed menu click Windows Security 3 In the Windows Security window click the up arrow option in the power menu 4 From the displayed menu click Reboot Cha...

Страница 251: ...ved using the following methods Failure detection method How a failure is detected Action to be taken Hi Track Remote Monitoring System No report from the agent during a 24 hour health check Hi Track detects SVP failure SVP replacement For information about Hi Track go to the Hi Track website http hitrack hds com Hitachi Command Suite HCS RMI connection error not alert See the Hitachi Command Suit...

Страница 252: ...ion are in the Hardware Guide for your system Recovering the operating system Recovery of the SVP operating system is achieved using Operating System Recovery Tool OSRT The SVP supports OSRT as a backup solution for the C partition With this tool users or CEs can back up the C partition and restore it at any time without requiring a USB This tool can recover the SVP from OS or data corruption on t...

Страница 253: ...settings of the SVP network ports for your subnet 4 Install the Hitachi Device Manager Storage Navigator software 5 Install the Hi Track Remote Monitoring system Steps 1 through 4 are described in the procedures that follow For information about installing Hi Track go to http hitrack hds com Mapping the internal SVP network adapters The SVP has four internal network adapters that correspond to fou...

Страница 254: ...tion 6 is assigned to the LAN2 port 7 Repeat step 6 with the LAN3 and LAN4 ports on the SVP When you connect the Ethernet cable to these ports Local Area Connection 8 will be assigned to the LAN3 port and Local Area Connection 5 will be assigned to the LAN4 port Note Verify that no IP address is configured for the SVP LAN ports Otherwise the storage system could become blocked Renaming the interna...

Страница 255: ...ge for the management LAN 4 Leave the Network Connections window open Then either configure the SVP for bridge mode or configure the IP addresses for the SVP LAN ports to match the IP addressing scheme of your subnet Setting the IP address After renaming the internal SVP network adapters perform the initial startup procedures to specify the IP addresses for the SVP and storage system Procedure 1 C...

Страница 256: ...subnet 7 In the dialog box click Use the following IP address 8 Enter the IP address subnet mask and gateway settings in the appropriate fields and then click OK 9 Click OK to close the Local Area Connection Properties window 10 In the Network Connections window right click the Management CTL2 network adapter which corresponds to the LAN4 port on the physical SVP and click Properties Then repeat s...

Страница 257: ...nce of Network Bridge appears 3 Right click the Network Bridge icon and then click Rename Configuring bridge settings Chapter 19 Replacing the Hitachi Vantara supplied SVP Service Processor Technical Reference 257 ...

Страница 258: ...dge Type this name as one word with no spaces 5 Right click the ManagementBridge icon and then click Properties Configuring bridge settings Chapter 19 Replacing the Hitachi Vantara supplied SVP Service Processor Technical Reference 258 ...

Страница 259: ...6 Click Internet ProtocolVersion 4 TCP IPv4 Configuring bridge settings Chapter 19 Replacing the Hitachi Vantara supplied SVP Service Processor Technical Reference 259 ...

Страница 260: ...ManagementBridge IP address 192 168 0 15 default Subnet mask 255 255 255 0 8 Click Advanced and then click the WINS tab Configuring bridge settings Chapter 19 Replacing the Hitachi Vantara supplied SVP Service Processor Technical Reference 260 ...

Страница 261: ...9 Under NetBIOS setting click Disable NetBIOS over TCP IP and then click OK Configuring bridge settings Chapter 19 Replacing the Hitachi Vantara supplied SVP Service Processor Technical Reference 261 ...

Страница 262: ...10 Right click the Maintenance icon LAN2 and then click Properties Configuring bridge settings Chapter 19 Replacing the Hitachi Vantara supplied SVP Service Processor Technical Reference 262 ...

Страница 263: ...Pv4 12 Configure the following IP settings for Maintenance LAN2 IP address 10 0 0 100 default Subnet mask 255 255 255 0 Configuring bridge settings Chapter 19 Replacing the Hitachi Vantara supplied SVP Service Processor Technical Reference 263 ...

Страница 264: ...13 Click Advanced and then click the WINS tab Configuring bridge settings Chapter 19 Replacing the Hitachi Vantara supplied SVP Service Processor Technical Reference 264 ...

Страница 265: ...14 Under NetBIOS setting click Disable NetBIOS over TCP IP and then click OK Configuring bridge settings Chapter 19 Replacing the Hitachi Vantara supplied SVP Service Processor Technical Reference 265 ...

Страница 266: ...y 10 minutes Procedure 1 Connect a PC to the LAN2 port on the SVP 2 Insert the attached SVP firmware media into the PC s CD drive or DVD drive 3 On the root folder of the SVP firmware media right click Setup exe and then click Execute as Administrator 4 In the Choose Setup Language window click a language and then click Next Installing Hitachi Device Manager Storage Navigator Chapter 19 Replacing ...

Страница 267: ...while the software is prepared for installation 5 At the Install Shield window click Next Installing Hitachi Device Manager Storage Navigator Chapter 19 Replacing the Hitachi Vantara supplied SVP Service Processor Technical Reference 267 ...

Страница 268: ...pecify the folder where Device Manager Storage Navigator will be installed Either accept the default folder shown in the window or click Browse to select a different folder Installing Hitachi Device Manager Storage Navigator Chapter 19 Replacing the Hitachi Vantara supplied SVP Service Processor Technical Reference 268 ...

Страница 269: ...indows Security Alert window appears click Allow access A status bar shows the progress of the installation Installing Hitachi Device Manager Storage Navigator Chapter 19 Replacing the Hitachi Vantara supplied SVP Service Processor Technical Reference 269 ...

Страница 270: ...ll settings and anti virus software click The setting is not completed I will install and update the software after I complete the setting 10 Click Finish 11 At the Environmental Settings window click IPv4 or IPv6 and then enter the IP address of the SVP and click Apply Installing Hitachi Device Manager Storage Navigator Chapter 19 Replacing the Hitachi Vantara supplied SVP Service Processor Techn...

Страница 271: ...are ready to specify the IP address restart the SVP and then set the SVP IP address using the procedure under Setting the IP address on page 255 Installing Hitachi Device Manager Storage Navigator Chapter 19 Replacing the Hitachi Vantara supplied SVP Service Processor Technical Reference 271 ...

Страница 272: ...esolve the problem perform the following procedure to stop the SVP port from issuing BPDU frames Note If you perform this procedure while the cable connection between the SVP and network switch is looped it creates a logical loop of the network connection and the entire network becomes inoperable Verify the network connection is not looped before performing this procedure Procedure 1 From the PC c...

Страница 273: ...bles in the URL If your storage system model number is and the storage system serial number is type the following URL 8320004 456789 http 192 168 0 15 dev storage 8320004456789 emergency do 8340004 456789 http 192 168 0 15 dev storage 8340004456789 emergency do 8360004 456789 http 192 168 0 15 dev storage 8360004456789 emergency do SVP emergency logon procedure Chapter 20 Troubleshooting Service P...

Страница 274: ...SP G350 and VSP G370 VSP F350 and VSP F370 HDW2 F850 SVP P VSP G700 VSP F700 VSP G900 VSP F900 HDW F850 SVP P VSP G200 HDW2 SVP2OS10 P VSP G400 G600 G800 HDW SVP2OS10 P VSP F400 F600 F800 FHW SVP2OS10 P Service processor Windows 7 VSP G200 3919435 HDW2 P VSP G400 G600 G800 3919435 P VSP F400 F600 F800 H3919435 P Appendix A SVP replacement list Service Processor Technical Reference 274 ...

Страница 275: ...050 2639 USA www HitachiVantara com community HitachiVantara com Regional Contact Information Americas 1 866 374 5822 or info hitachivantara com Europe Middle East and Africa 44 0 1753 618000 or info emea hitachivantara com Asia Pacific 852 3189 7900 or info marketing apac hitachivantara com ...

Отзывы: