background image


2-5 

StarBoard 

WT-1


Usage Procedures 

English 


2.2 Using the Stylus Pen 

This section describes how to use the Stylus pen. 

2.2.1 Basic Stylus Pen Operations 

The stylus pen can be used in the same way as a mouse. Under the stylus pen’s default 
settings, the pen tip button is set to correspond to the left mouse button. When Windows is 
open, the pen tip button may be used to perform the following mouse actions. 


Clicking 

Tap the pen tip against the tablet operating area with a suitable amount of pressure and then 
release it quickly. 


Double-clicking 

Double tap the pen tip against the tablet operating area with a suitable amount of pressure 
and then release it.   


Dragging 

Press the pen tip against the tablet operating area with a suitable amount of pressure and 
then move the pen while keeping it pressed against the tablet operating area (without 
releasing it from the tablet operating area). 


The pen can be angled at up to 30

°

from vertical but it may not work correctly, if the pen is 

tilted at an angle greater than 30

°

.  


2.2.2 Stylus pen Settings 

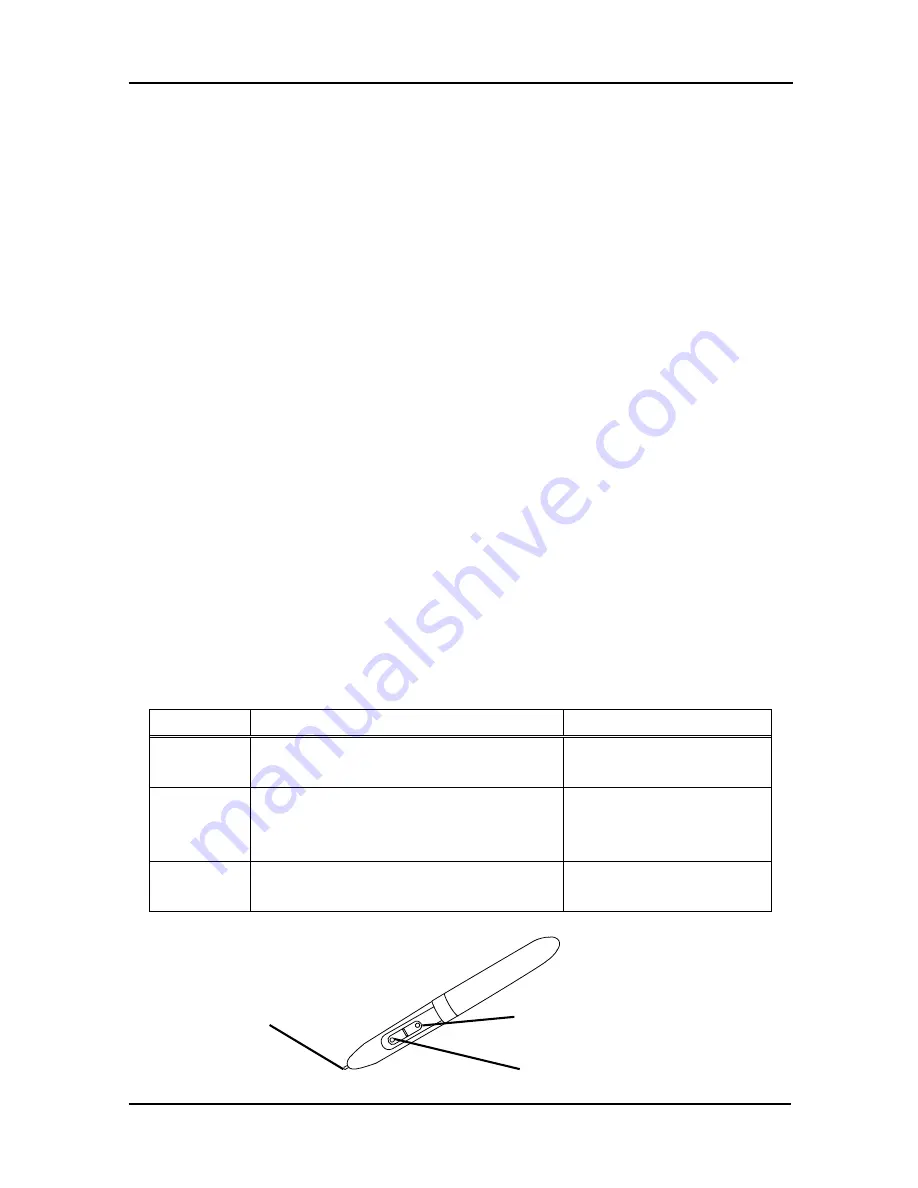
The stylus pen has one pen tip button, and two side buttons. Mouse actions can be assigned 
to these three buttons. The default button settings are summarized in the following table. 


Button 

User action 

Corresponding mouse action 

Pen tip 

Press the pen tip against the tablet operating 
area 

Mouse left-click 

Side Button 
No.0 

Press the button with the pen tip very 
slightly above the tablet operating area 
(5 mm or less) 

Mouse left double-click 

Side Button 
No.1 

Same as above 

Mouse right-click 

Pen tip

Side Button No.0 

Side Button No.1 

Содержание StarBoard WT-1

Страница 1: ...f this user s guide specify WT1 090101 WT1 090101 Hitachi Software Engineering Co Ltd Read this user s guide and carefully retain it for future reference Before using this product carefully read and fully understand the safety instructions Store this User s Guide nearby for ease of reference ...

Страница 2: ......

Страница 3: ...ability and makes no warranty either express or implicit regarding the contents of this user s guide Also the company makes no warranty as to the product s suitability merchantability or fitness for a particular intended use All products of Hitachi Software Engineering Co Ltd described in this user s guide are presently for sale or are site licensed Users who purchased the aforesaid product s will...

Страница 4: ...WT 1 incorporates WALTOP s wireless tablet integrated digitizer and 2 4G RF technology Windows 2000 Windows XP Windows Vista are trademarks of Microsoft Corporation U S and in other countries Mac OS are trademarks of Apple Inc registered in the U S and other countries Any use of these marks by Waltop International Corporation is under license Other trademarks and trade names are those of their res...

Страница 5: ...nal injury hazards Obey all safety messages that follow this symbol to avoid possible injury or death WARNING Indicates a potentially hazardous situation which if not avoided could result in death or serious injury CAUTION Indicates a potentially hazardous situation which if not avoided may could result in minor or moderate injury NOTICE Indicates a potentially hazardous situation which if not avo...

Страница 6: ...amaged Do not leave this product orany of its accessories on the floor Someone mightstepon itand break it or mightbeinjuredby trippingon it Do not dispose the equipment as unsorted municipal waste but use the return and collection systems available Contact your dealer for details Always keep the device more that 6 inches 15 3 centimeters from the pacemaker If you suspect interference switch odd yo...

Страница 7: ...garding battery replacement P 4 4 Notice Details Page Use a computer USB port or the included AC adaptor to charge the tablet Using other charging devices or AC adaptors for charging will charge the tablet under different conditions which may pose a risk of overheating or fire P 2 1 Be sure to orient the battery correctly Do not reverse the and terminals of the battery and use only the specified t...

Страница 8: ... 2 Basic Tablet operation 2 2 2 1 3 LCD indicator 2 4 2 2 Using the Stylus Pen 2 5 2 2 1 Basic Stylus Pen Operations 2 5 2 2 2 Stylus pen Settings 2 5 2 2 3 Changing the battery in the Stylus pen 2 6 2 2 4 Replacing the Stylus pen Tip 2 7 3 Start to use 3 1 3 1 Setup Hardware 3 1 3 2 Setup Software 3 1 3 2 1 For Windows User 3 1 3 2 2 For Mac User 3 1 3 3 How to connect WT 1 3 2 4 Appendix 4 1 4 1...

Страница 9: ...luded Parts No Name Qty 1 2 4G RF Tablet 1 2 2 4G RF adaptor 1 3 AC adaptor 1 4 AC adaptor plug 3 5 Stylus pen 1 6 AAA alkaline battery 1 7 Pen tip replacement pin 1 8 Spare pen tips 2 9 USB cable 1 10 WT 1 Setup Software CD ROM for Windows Mac 2 11 WT 1 Quick Start Guide 1 In the holder on the back of the tablet 1 2 3 4 5 6 7 8 9 10 11 ...

Страница 10: ...nd PC as well as the remaining battery level For details on LCD indicator see 2 1 3 LCD indicator on page 2 4 of this User s Guide 3 Function area Sixteen functions can be assigned to this area For details on function area initial settings see 2 1 2 Basic Tablet operation on page 2 2 of this User s Guide 4 Page up Page down For scrolling pages 5 Volume control Volume adjustment is possible by draw...

Страница 11: ...g button Button to establish a connection between the tablet and the 2 4G RF adaptor 1 2 3 Side View of the Tablet 1 USB port A USB cable can be connected here when charging the battery 1 2 4 2 4G RF Adaptor 1 Connecting buttonButton to establish a connection between the tablet and the 2 4G RF adaptor 1 2 3 1 1 ...

Страница 12: ...mately 2 hours AC adaptor Mode Connect the tablet and the AC adaptor with the USB cable and then plug the AC adaptor into an electrical outlet PC Mode Turn on the PC Connect the tablet to the PC with the USB cable When charging the tablet from a PC unplug any other USB devices from the port before connecting the tablet If other devices are connected use another port or charge the tablet in AC adap...

Страница 13: ...ould automatically correspond If they do not suit please reboot the PC 2 Function area There are 16 function areas on top of the tablet active area You can assign applications documents or URL to these To assign the function use Macro Key Manager For details on Macro Key Manager refer to the electronic manual in the included software When using StarBoard Software do not install Macro Key Manager A...

Страница 14: ... follows Symbol Description Symbol Description Hides displays the StarBoard Software Toolbar Select Marker Pen Add a new blank page Switch to PC Operation Show previous page Select Eraser Show next page Select Clear Hides displays the Topic List Select Select Solid Pen Black Select Exit Select Solid Pen Red Programable1 Select Solid Pen Blue Programable2 ...

Страница 15: ...ea or there is no activity Communication status Displayed when the 2 4G RF adaptor detects input Connection status Displayed when communication with the 2 4G RF adaptor is possible Flashing Flashes when the pen is within range of input Pen down Lit Lit when the pen is in contact with the active area Flashing Flashes when the tablet is charging Battery level Lit Indicates the remaining tablet batte...

Страница 16: ...against the tablet operating area with a suitable amount of pressure and then move the pen while keeping it pressed against the tablet operating area without releasing it from the tablet operating area The pen can be angled at up to 30 from vertical but it may not work correctly if the pen is tilted at an angle greater than 30 2 2 2 Stylus pen Settings The stylus pen has one pen tip button and two...

Страница 17: ...urn the stylus pen grip to separate the two halves 2 Remove the AAA alkaline battery contained in the grip and insert a new cell with the positive end facing the pen tip Be sure to orient the battery correctly Do not reverse the and terminals of the battery and use only the specified type of battery Otherwise it will overheat and fail When changing the battery be careful not to close the pen s rea...

Страница 18: ...t the stylus pen back together 2 2 4 Replacing the Stylus pen Tip When the stylus pen tip wears down and becomes too short replace it as described below 1 Using the special pin set remove the stylus pen tip 2 Insert a new pen tip into the stylus pen ...

Страница 19: ...8 11 or later In this case do not install the included setup software Use either StarBoard Software or the setup software 1 Insert WT 1 Setup Software for Windows CD to your PC 2 Click Macro Key Manager Installation will start automatically 3 After the installation select Yes I want to restart my computer now and then click Finish 3 2 2 For Mac User 1 Insert WT 1 Setup Software for Mac CD to your ...

Страница 20: ... to the PC 3 Press the connecting buttons on the back of the tablet and on the 2 4G RF adaptor at the same time While the LED indicator is flashing press the connecting button on the back of the tablet 4 When pairing is successful a number is displayed on the LCD indicator The receiving quality of the tablet may be influenced by environment The best environment for the tablet is where no other cor...

Страница 21: ...nstall For details on how to setup the system see 3 2 Setup Software on page 3 1 of this User s Guide Are there any wireless devices located nearby WT 1 such as cordless phone video transmitters or radio transmitters 2 4G RF uses 2 4GHz unlicensed ISM band Other wireless devices may caused unstable connection So use the WT 1 away from other wireless devices Are there any electronic devices located...

Страница 22: ...e pen tip is worn down or is too short For details on how to replace the stylus pen tip see 2 2 4 Replacing the Stylus pen Tip on page 2 7 of this User s Guide Restart Windows and StarBoard Software Stylus pen does not operate Other Contact technical support StarBoard Software related problems In this case Check this And do this Stylus pen does not operate under installing StarBoard Software Is th...

Страница 23: ...ondition 4 Power supply USB bus power Physical Dimensions 20 00mm W x 9 4mm H x 47 8mm D 2 4G RF adaptor Weight 10g AC adaptor Input AC100 240V 47Hz 63Hz 0 15A Output 5VDC 0 5A Temperature During use 10 35 in storage 20 60 Environmental conditions Humidity During use 20 80 no condensation In storage 20 95 no condensation Safety Standard approvals CE FCC class B OS Required Windows 2000 XP Vista Ma...

Страница 24: ... in terms of cycles of use and recharging are defined However battery capacity does decline after repeated use and recharging The point at which batteries can only be charged to about 80 of the original capacity is defined as their cycle life The cycle life of the tablet battery is approximately 400 charges Although you can continue to use the battery after this point if the battery only lasts for...

Страница 25: ...e warranty is not presented 3 If specified fields on the registration card accompanying the warranty are not completed or if the wording has been changed without authorisation 4 The warranty applies only to the original purchasers It does not apply to a third party to whom the customer resold this product 5 In the event of a malfunction or damage resulting from the customer s improper handling e g...

Страница 26: ...erchandise Authorisation number it might not be covered by warranty 6 As a rule the customer is responsible for shipping charges required to send all or part of the product for repair etc Our company will assume responsibility for the return shipping to the customer 7 This warranty does not cover labour fees for repair associated equipment assembly or disassembly 8 Incidental damage caused by the ...

Отзывы: