36
Care and Maintenance
Cleaning Auto dosing part (Detergent/Softener Tank) and Tank mounting part
3
Clean Tank
– Rinse until there is no foaming or sliminess.
– If it is very dirty, soak it in hot water (about 40°C) for about
10 minutes or more and rinse it.
– After rinsing, wipe it o
ff
with a dry cloth or let it air dry.
4
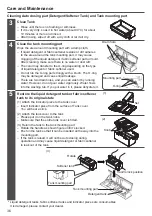
Clean the tank mounting part
Wipe the area around mounting part with a damp cloth.
– If liquid detergent or fabric softener residue or dirt adheres
to the area around the tank mounting part, it may cause
clogging of the liquid detergent / fabric softener path or mold.
After cleaning, make sure there is no water or dust left.
– The color may transfer to the O-ring depending on the type
of liquid detergent or fabric softener used.
– Do not rub the O-ring part strongly with a brush. The O-ring
may be damaged and cause liquid leakage.
– There are two drain holes, and you can wash it by running
water. However, do not pour water vigorously. Water
fl
ows
into the washing tub. If you put water in it, please dehydrate it.
Drain hole
Mounting part
O-ring
5
Restore the liquid detergent tank or fabric softener
tank to its original state
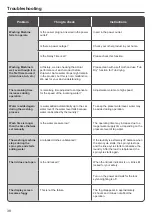
(1) Attach the indicator piece to the tank cover
– Insert Indicator piece from the surface of Tank cover.
You will hear a click.
(2) Attach the tank cover to the tank
– Please put it on the two knobs.
– Make sure that the entire tank cover is
fi
tted.
(3) Return the tank to the tank mounting part
– Rotate the handle as shown
fi
gure until it’s locked.
– Push in the tank so that it can be inserted all the way into the
mounting part.
– If the tank is raised, it will not be Auto dosing during
operation and may cause liquid detergent or fabric softener
to leak out of the tank.
Set
(1)
Knob
(2)
Tank mounting part
Detergent tank
Softener tank
Rotate
Handle lock position
Tank mounting part
(3)
* Liquid detergent tanks, fabric softener tanks and indicator pieces are consumables.
It is damaged, please contact your dealer.


