


--- 7 ---
9. PRECAUTIONS IN DISASSEMBLY AND REASSEMBLY
Precautions on operation are given in the instruction manual; the following are special precautions on
disassembly, reassembly and repair.
When tightening a tapping screw, align the holes on both sides.
The
[Bold]
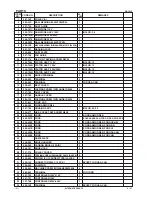
numbers in the descriptions below correspond to the item numbers in the Parts List and the exploded
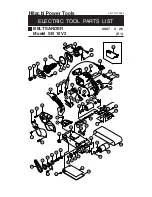
assembly diagram for the Model SB 10S2, and the
<Bold>
numbers to those in the Parts List and the exploded
assembly diagram for the Model SB 10V2.
The disassembly and reassembly procedures described are common to the Models SB 10S2 and SB 10V2.
CAUTION: Be sure that the plug is disconnected from the power source during disassembly, reassembly
and sanding belt replacement.
9-1. Disassembly
(1) Removal of the Fork Ass'y
[51] <53>
and the Idle Pulley Ass'y
[38] <40>
(Fig. 1)
(a) After removing the sanding belt, return the lever to its original position and remove the Knob Nut
[41] <43>
.
Then loosen the two Machine Screws M4 x 14
[50] <52>
and pull out the Fork Ass'y
[51] <53>
.
(b) After taking out the two Retaining Rings for D12 Shaft
[45] <47>
and removing the Shaft
[46] <48>
,
remove the Idle Pulley Ass'y
[38] <40>
.
Washer
[36] <38>
Body Ass'y
[42] <44>
Idle Pulley Ass'y
[38] <40>
Fig. 1
(2) Removal of Pulley (B)
[53] <55>
, Gear
[59] <61>
, Drive Pulley
[65] <67>
and Dust Cover
[16] <16>
(Figs. 2 (a) and (b))
(a) Loosen the Machine Screw (W/Washers) M4 x 12 (Black)
[6] <6>
and the Tapping Screw (W/Flange)
D4 x 30 (Black)
[39] <41>
. Then remove the Belt Cover
[14] <14>
.
(b) Remove the Belt
[52] <54>
.
Washer
[36] <38>
Machine Screw
M4 x 14
[50] <52>
Fork Ass'y
[51] <53>
Shaft
[46] <48>
Retaining Ring
for D12 Shaft
[45] <47>
Retaining Ring
for D12 Shaft
[45] <47>
Knob Nut
[41] <43>
Spring
[44] <46>
Washer
[43] <45>
Содержание SB 10S2
Страница 28: ......


