background image

9-8

REMOTE CONTROLLERS OPERATION

9.1.2. 

AUTOMATIC OPERATION 

The  device  will  automatic  determines  the  mode  of 
operation,  HEAT,  COOL,  or  DEHUMIDIFY  depending  on 
the  current  room  temperature.  The  selected  mode  of 
operation will change when the room temperature varies.  
1.  Press  the  function  selector  so  that  the  display 

indicates AUTO mode of operation. 

2.  Press  the  START  /  STOP  button,  operation  will  starts 

with a beep. Press again to stop the operation. 

3.  Press  the  temperature  button  and  the  temperature 

setting will change by 1

o

C each time. 

NOTE: 

1.  The preset temperature and actual room temperature 

may vary somewhat depending on the conditions.  

2.  The display does not indicate the preset temperature 

in  the  AUTO  mode.  If  you  change  the  setting,  the 
indoor unit will produce a beep. 

9.1.3. 

AUTO RESTART CONTROL 

If there is a power failure, operation will be automatically 

restarted  when  the  power  is  resumed  with  previous 
operation  mode  and  airflow  direction.  (As  the  operation  is 
not stopped by the remote controller) 

When  the  circuit  breaker  is  resumed,  the  operation  will 

be  automatically  restarted  with  previous  operation  mode 
and  airflow  direction.  If  you  do  not  intend  to  continue  the 
operation when the power is resumed, switch of the power 
supply. 

9.1.4. 

HEATING OPERATION 

1.  Press the function selector so that the display 

indicates HEAT mode of operation. 

2.  Set the desired room temperature with the TEMP 

button. 

3.  Press the START / STOP button, operation will starts 

with a beep. Press again to stop the operation. 

NOTE: 

1.  The preset temperature and actual room 

temperature may vary somewhat depending on the 
conditions.  

9.1.5. 

COOLING OPERATION 

1.  Press  the  function  selector  so  that  the  display 

indicates COOL mode of operation.  

2.  Set  the  desired  FAN  SPEED  with  the  FAN  SPEED 

button. 

3.  Set  the  desired  room  temperature  with  the  TEMP 

button. 

4.  Press  the  START  /  STOP  button,  operation  will  starts 

with a beep. Press again to stop the operation. 

9.1.6. 

DEHUMIDIFYING OPERATION 

1.  Press  the  function  selector  so  that  the  display 

indicates  DEHUMIDIFY  mode  of  operation.  The  FAN 
SPEED is set at LOW automatically. 

2.  The FAN SPEED button does not work. 
3.  Set  the  desired  room  temperature  with  the  TEMP 

button. 

5.  Press  the  START  /  STOP  button,  operation  will  starts 

with a beep. Press again to stop the operation. 

NOTE: 

1.  When  the  room  temperature  is  higher  that  the 

temperature  setting,  the  device  will  dehumidify  the 
room,  reducing  the  room  temperature  to  the  preset 
level. 

2.  When  the  room  temperature  is  lower  than  the 

temperature  setting,  dehumidifying  will  be  performed 
at  the  temperature  setting  slightly  lower  than  the 
current  room  temperature,  regardless  of  the 
temperature setting. The function will stop as soon as 
the room temperature becomes lower than the setting 
temperature. 

9.1.7. 

AUTO CHANGEOVER* 

Auto  changeover  function  only  applicable  during  auto 

mode is on. During the auto mode, the changeover function 
is triggered by determine the outdoor temperature and the 
indoor temperature. 
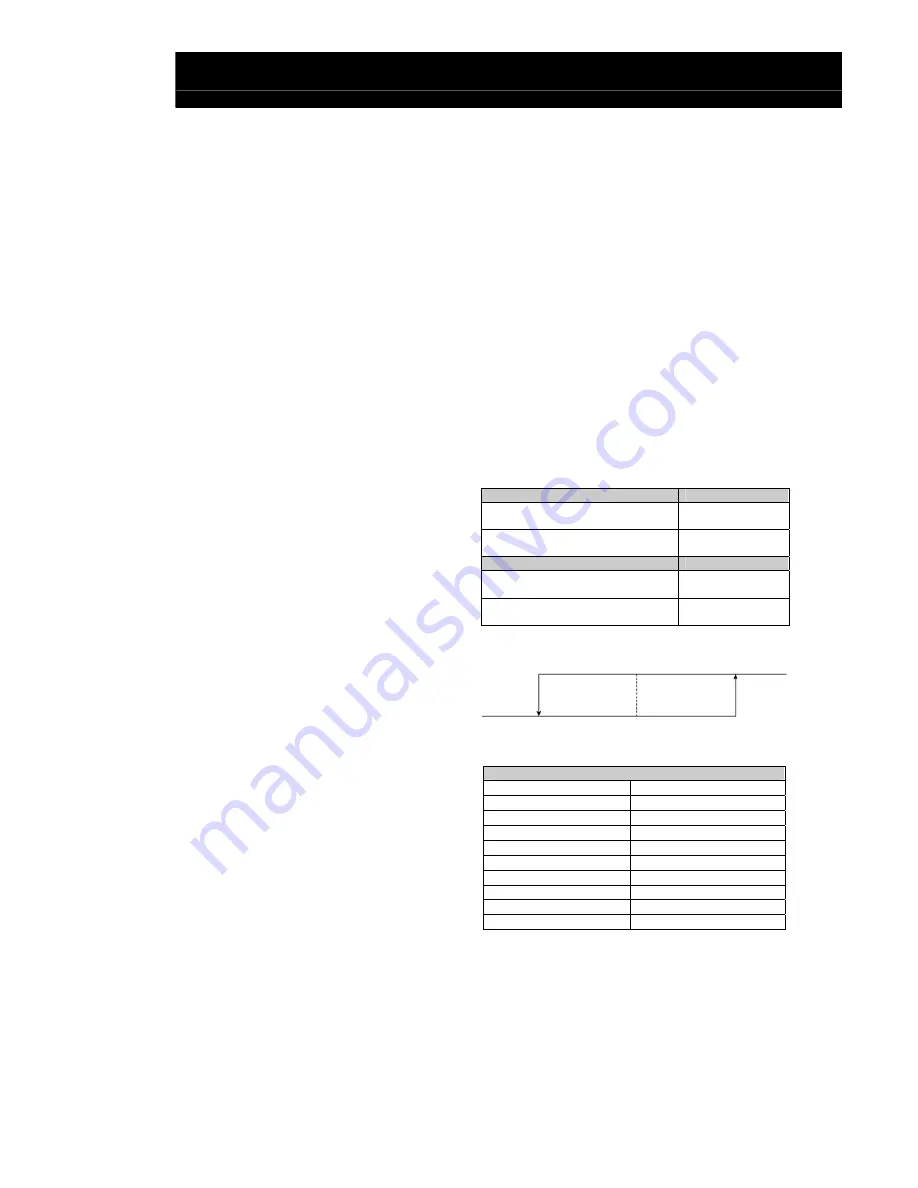
The  auto-changeover  mode  operation  will  be  restricted  or 
automatically  changeover  when  the  temperature  of  the 
outdoor and indoor matches the criteria as below, 

During cooling 
Outdoor temperature >27

o

Restricted to 
cooling 

Room temperature < 3

o

C below 

preset temperature 

Change to heating 

During heating 
Outdoor temperature<16

o

Restricted to 
heating 

Room temperature > 2

o

C above 

preset temperature 

Change to cooling 

The auto changeover mode is only applicable to  

Applicable models 

RAC-25WX8 

RAC-25YH5 

RAC-35WX8 

RAC-35YH5 

RAC-50WX8 

RAC-18YH6 

RAC-25FX8 

RAC-25YH6 

RAC-35FX8 

RAC-35YH6 

RAC-50FX8 

RAC-50YH6 

RAC-25NH5 

RAC-60YH5 

RAC-35NH5 

RAC-70YH5 

RAC-50NH5 

RAC-80YH5 

RAC-65NH5 


*Auto changeover function not applicable when connected 

to Multizone outdoor unit. 

Final preset 

temperature 25

o

C

-3

o

C from preset 

temperature 

2

o

C from preset 

temperature 

Heating

Cooling 

Содержание RAR-3R5

Страница 1: ...ess this button to set the room temperature START STOP BUTTON Press this button to start operation Press again to stop operation HEAT Button Press this button to start heating operation Transmission Part DEHUMIDIFY Button Press this button to start dehumidify operation COOL Button Press this button to start cooling operation DRY COOL Button Press this button to start dry cooling operation IONIZED ...

Страница 2: ...an speed Every time you press this button the intensity of circulation will change from AUTO to HI to MED to LOW to EX LOW This button allows optimal setting SLEEP button Use these buttons to raise or lower the temperature setting Keep pressed and the value will change more quickly Use this button to set the sleep timer TEMPERATURE button TIME button Use this button to set and check the time and d...

Страница 3: ...s this button the intensity of circulation will change from AUTO to HI to MED to LOW to EX LOW This button allows optimal setting SLEEP button Use these buttons to raise or lower the temperature setting Keep pressed and the value will change more quickly Use this button to set the sleep timer TEMPERATURE button TIME button Use this button to set and check the time and date RESET button Press this ...

Страница 4: ...ed Every time you press this button the intensity of circulation will change from AUTO to HI to MED to LOW to EX LOW This button allows optimal setting SLEEP button Use these buttons to raise or lower the temperature setting Keep pressed and the value will change more quickly Use this button to set the sleep timer TEMPERATURE button TIME button Use this button to set and check the time and date RE...

Страница 5: ...elector This determines the fan speed Every time you press this button the intensity of circulation will change from AUTO to HI to MED to LOW to EX LOW This button allows optimal setting SLEEP button Use these buttons to raise or lower the temperature setting Keep pressed and the value will change more quickly Use this button to set the sleep timer TEMPERATURE button TIME button Use this button to...

Страница 6: ...teries are replaced or when some irregular operation is found FUNCTION button Use this button to select the operating mode Every time you press it the mode will change from AUTO to HEAT to DEHUMIDIFY to COOL and to FAN cyclically FAN SPEED selector AUTO SWING button TIMER control Use these buttons to set the timer OFF TIMER button Select the turn OFF time ON TIMER button Select the turn ON time CA...

Страница 7: ...he TEMP button 4 Press the START STOP button operation will starts with a beep Press again to stop the operation 9 1 6 DEHUMIDIFYING OPERATION 1 Press the function selector so that the display indicates DEHUMIDIFY mode of operation The FAN SPEED is set at LOW automatically 2 The FAN SPEED button does not work 3 Set the desired room temperature with the TEMP button 5 Press the START STOP button ope...

Страница 8: ...tal air deflector swings up and down If the button is pressed again the deflector stops in it current position 2 When the operation stop the horizontal air deflector moves and stops at the position where the air outlet closes CAUTION 3 In cooling operation do not keep the horizontal 9 1 10 HOW TO SET TIME For RAR 3U1 RAR 3U2 RAR 3U3 RAR 3U4 1 Set the current time with the TIMER control button 2 Pr...

Страница 9: ...hting instead of flashing and the RESERVE sign lights A beep occurs and the TIMER lamp lights on the indoor unit The device will turn on at 7 00 a m The setting of the turn on time is now complete 9 1 14 HOW TO SET ON OFF TIMER 1 Press the OFF TIMER button so that the OFF mark blinks Then set the turn off time with the timer control button 2 Set the turn off time with the TIMER control button Pres...

Страница 10: ...the EXTENDED AIRFLOW button is pressed while the AUTO SWING mode is set the AUTO SWING mode is cancelled and the EXTENDED AIRFLOW mode is set x If the AUTO SWING button is pressed while the EXTENDED AIRFLOW mode is set the EXTENDED AIRFLOW mode is cancelled and the AUTO SWING mode is set x If the EXTENDED AIRFLOW button is pressed when the horizontal air deflector stops at your preferred angle the...

Отзывы: