background image

– 14 –

PM

Start

Stop

PM

AM

PM

AM

Start

Stop

RESET

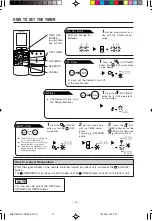
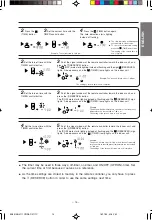
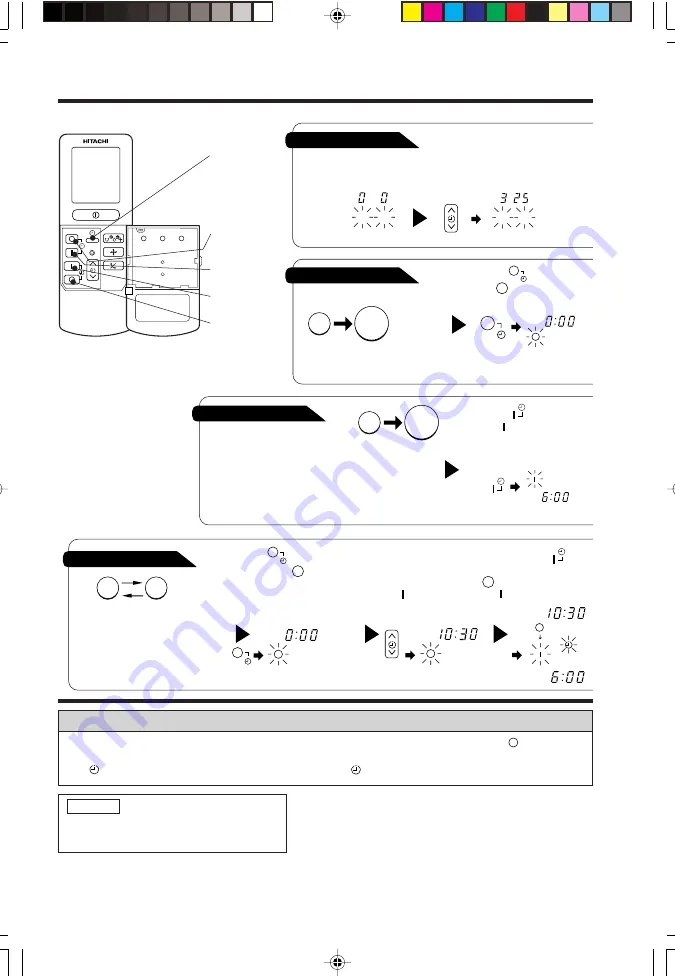
HOW TO SET THE TIMER

ON/OFF-Timer

The device will turn on (off) and off
(on) at the designated times.

The switching occurs first at the
preset time that comes earlier.

The arrow mark appearing on the
display indicates the sequence of
switching operations.

1


Press the        (ON-OFF)

button so that the     (OFF)
mark blinks.

OFF-Timer

You can set the device to turn off
at the present time.

After you change the
batteries;

How to Cancel Reservation

Point the signal window of the remote controller toward the indoor unit, and press the    (CANCEL)
button.
The    (RESERVED) sign goes out with a beep and the    (TIMER) lamp turns off on the indoor unit.

1


Set the current month and

day with the TIMER control
button.

1


Press the        (OFF-TIMER)

button. The      (OFF) mark blinks
on the display.

1


Press the       (ON-TIMER)

button the     (ON) mark blinks
on the display.

2


Set the turn-off time

with the TIMER control
button.
Press the    (RESERVE)
button.

3


Press the    (ON-

TIMER) button so that the
    (OFF) mark lights and
the   (ON) mark blinks.

 NOTE

You can set only one of the OFF-timer,
ON-timer and ON/OFF-timer.

ON-Timer

Time, Day, Month

The device will turn on at
the designated times.

TIME, DAY,
MONTH
(current time,
day, month)

OFF TIMER

ON TIMER

RESERVE

CANCEL

M

D

M

D

AM

STOP

Start

EN2-RAS-5111CS/RAC-5111C

16/11/05, 4:16 PM

14

Содержание RAC-5111C

Страница 1: ...anual Page 1 26 To obtain the best performance and ensure years of trouble free use please read this instruction manual completely Arahan pengendalian Muka surat 27 51 Untuk mendapatkan prestasi yang tinggi dan mengelakkan masalah untuk jangka masa yang lama sila baca arahan ini sepenuhnya EN1 RAS 5111CS RAC 5111C 16 11 05 4 15 PM 1 ...

Страница 2: ...uit breaker the danger of electric shock exists Do not install near location where there is flammable gas The outdoor unit may catch fire if flammable gas leaks around it Please ensure smooth flow of water when installing the drain hose CAUTION PRECAUTIONS DURING SHIFTING OR MAINTENANCE PRECAUTIONS DURING OPERATION Avoid an extended period of direct air flow for your health W A R N I N G Should ab...

Страница 3: ... room is above the cooling or heating capability of the unit for example more people entering the room using heating equipments and etc the preset room temperature cannot be achieved This appliance is not intended for use by young children or infirm persons unless they have been adequately supervised by a responsible person to ensure that they can use the appliance safely Young children should be ...

Страница 4: ... INDOOR UNIT INDICATORS Light indicator showing the operating condition Refer page 5 HORIZONTAL DEFLECTOR VERTICAL DEFLECTOR AIR OUTLET Refer page 13 REMOTE CONTROL Send out operation signal to the indoor unit So as to operate the whole unit Refer page 6 860 700 285 570 188 210 DRAIN PIPE Condensed water drain to outside CONNECTING CORD AIR INLET BACK LEFT SIDE AIR OUTLET RAC 5111C RAS 5111CS EN1 ...

Страница 5: ...s lamp lights during operation TIMER LAMP This lamp lights when the timer is working FILTER LAMP When the device is operated for a total of about 200 hours the FILTER lamp lights to indicate that it is time to clean the filter The lamp goes out when the POWER SWITCH set to OFF and ON again TEMPORARY AUTORESTART TEMPORARY AUTORESTART TEMPORARY SWITCH By setting the temporary switch the operation is...

Страница 6: ...ll change more quickly OFF TIMER button Select the turn OFF time ON TIMER button Select the turn ON time TIME button Use this button to set and check the time and date RESET button FUNCTION selector Use this button to select the operating mode Every time you press it the mode will change from AUTO to COOL to DEHUMIDIFY to CIRCULATION and to FAN cyclically FAN SPEED selector This determines the fan...

Страница 7: ...s with a beep Press the button again to stop operation You can raise or lower the temperature setting as necessary by maximum of 3 C Press the temperature button and the temperature setting will change by 1 C each time The preset temperature and the actual room temperature may vary somewhat depending on conditions The display does not indicate the preset temperature in the AUTO mode If you change ...

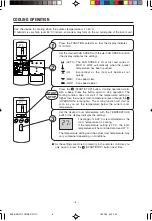
Страница 8: ...beep Press the button again to stop operation The cooling function does not start if the temperature setting is higher than the current room temperature even though the OPERATION lamp lights The cooling function will start as soon as you set the temperature below the current room temperature Set the desired room temperature with the TEMPERATURE button the display indicates the setting The range of...

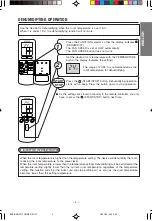
Страница 9: ...e setting The function will stop the indoor unit will stop emitting air as soon as the room temperature becomes lower than the setting temperature As the settings are stored in memory in the remote controller you only have to press the START STOP button next time Set the desired room temperature with the TEMPERATURE button the display indicates the setting The range of 20 26 C is recommended as th...

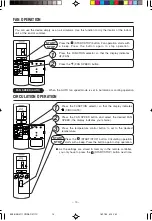
Страница 10: ...is set in Automatic or cooling operation START STOP 2 1 CIRCULATION OPERATION Press the FUNCTION selector so that the display indicates CIRCULATE Press the FAN SPEED button and select the desired FAN SPEED the display indicates your choice Press the temperature control button to set to the desired temperature As the settings are stored in memory in the remote controller you only have to press the ...

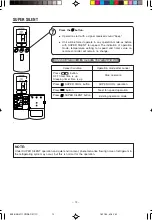
Страница 11: ... COOL mode Temperature and fan speed will change to previous setting Air blow sound will be slightly high due to forced operation 1 NOTE 1 OFF TIME setting OFF timer will be a priority over the SUPER COOLING operation time 2 ON TIME setting SUPER COOLING operation will be a priority over the ON timer operation time CANCELLATION of SUPER COOLING Operation Cancel Condition Operation mode after cance...

Страница 12: ...ANCELLATION of SUPER SILENT Operation Cancel Condition Operation mode after cancel Press button OFF timer time is up Sleeping timer time is up Stop operation Press SUPER COOL button SUPER COOL operation Press button Press SUPER SILENT button Next fan speed operation Existing operation mode NOTE Under SUPER SILENT operation and quiet environment phenomena like flowing noise of refrigerant in the re...

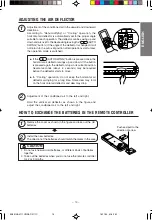
Страница 13: ...TO EXCHANGE THE BATTERIES IN THE REMOTE CONTROLLER If the AUTO SWING button is pressed once the horizontal air deflector swings up and down If the button is pressed again the deflector stops in its current position Several seconds about 6 seconds may be required before the deflector starts to move In Cooling operation do not keep the horizontal air deflector swinging for a long time Some dew may f...

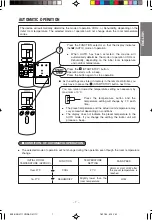
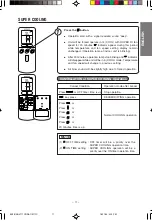
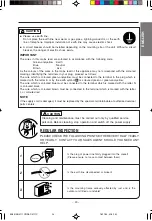
Страница 14: ...it and press the CANCEL button The RESERVED sign goes out with a beep and the TIMER lamp turns off on the indoor unit 1 Set the current month and day with the TIMER control button 1 Press the OFF TIMER button The OFF mark blinks on the display 1 Press the ON TIMER button the ON mark blinks on the display 2 Set the turn off time with the TIMER control button Press the RESERVE button 3 Press the ON ...

Страница 15: ...he device will turn off at 11 00p m Example The device will automatically turn on earlier so that the preset temperature can be reached at 7 00 a m The setting of the turn on time is now complete 4Set the turn on time with the TIMER control button 5 Point the signal window of the remote controller toward the indoor unit and press the RESERVE button The ON mark starts lighting instead of flashing a...

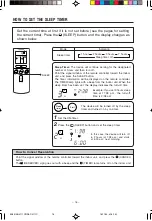
Страница 16: ...emote controller The TIMER lamp lights with a beep from the indoor unit When the sleep timer has been set the display indicates the turn off time Example If you set 3 hours sleep time at 11 38 p m the turn off time is 2 38 a m 2 Press the SLEEP button and set the sleep timer The device will be turned off by the sleep timer and turned on by on timer How to Cancel Reservation Point the signal window...

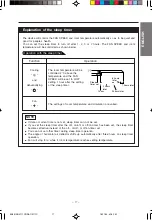
Страница 17: ...ll be set to LOW setting 1 hour after the setting of the sleep timer Fan Operation with the sleep timer If date or current time is not set sleep timer can not be set If you set the sleep timer after the off on off or off on timer has been set the sleep timer becomes effective instead of the off on off or off on timer set You can not set other timer during sleep timer operation The angle of horizon...

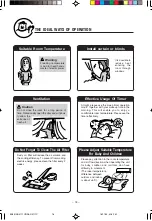
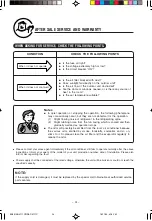
Страница 18: ...ning This will enable you to enjoy a comfortable room temperature Please use the timer effectively Dusty air filter will reduce the air volume and the cooling efficiency To prevent from wasting electric energy please clean the filter every 2 weeks Please pay attention to the room temperature and air flow direction when operating the unit for baby children and old folks who have difficulty in movem...

Страница 19: ...period of time please switch off the power from the mains If the power from mains remains ON the indoor unit still consumes about 8W in the operation control circuit even if it is in OFF mode Warning To protect the whole unit during lightning please stop operating the unit and remove the plug from the socket OFF Interference From Electrical Products Inverter type fluorescent lamp To prevent interf...

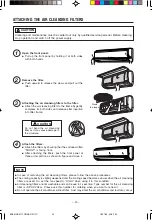
Страница 20: ...e carried out only by qualified service personal Before cleaning stop operation and switch off the power supply CAUTION CAUTION Do not bend the air cleansing filter as it may cause damage to the structure NOTE In case of removing the air cleansing filters please follow the above procedures The cooling capacity is slightly weakened and the cooling speed becomes slower when the air cleansing filters...

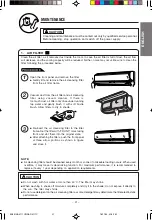
Страница 21: ...soft bristle brush Allow filters to dry in shade 3 Re insert the air cleansing filter to the filter frame Set the filter with FRONT mark facing front and slot them into the original state After attaching the filters push the front panel at three arrow portions as shown in figure and close it CAUTION Do not wash with hot water at more than 40 C The filter may shrink When washing it shake off moistu...

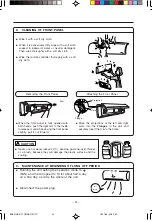
Страница 22: ...g Removing the Front Panel When the front panel is fully opened with both hands push the right arm to the inside to release it and while closing the front panel slightly pull it out forward Attaching the Front Panel Move the projections of the left and right arms into the Flanges in the unit and securely insert them into the holes Projection Hole Flange 3 MAINTENANCE AT BEGINNING OF LONG OFF PERIO...

Страница 23: ...ows The wire which is coloured green and yellow must be connected to the terminal in the plug which is marked with the letter E or by the earth symbol or coloured green or green and yellow The wire which is coloured blue must be connected to the terminal which is marked with the letter N or coloured black The wire which is coloured brown must be connected to the terminal which is marked with the l...

Страница 24: ...ing noise from the fan casing which is cooled and then gradually warmed as operation stops The odor will possibly be emitted from the room air conditioner because the various odor emitted by smoke foodstuffs cosmetics and so on sticks to it So please clean the air filter and the evaporator regularly to reduce the odor Please contact your sales agent immediately if the air conditioner still fails t...

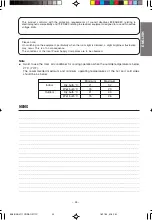
Страница 25: ...ight is dimmed a slight brightness fluctuation may occur This is of no consequence The conditions of the local Power Supply Companies are to be observed Minimum Maximum Indoor Dry bulb C 21 32 Wet bulb C 15 23 Outdoor Dry bulb C 21 43 Wet bulb C 15 26 Note Avoid to use the room air conditioner for cooling operation when the outside temperature is below 21 C 70 F The recommended maximum and minimum...

Страница 26: ... 26 MEMO EN2 RAS 5111CS RAC 5111C 16 11 05 4 16 PM 26 ...

Страница 27: ...K Instruction manual Page 1 26 To obtain the best performance and ensure years of trouble free use please read this instruction manual completely Arahan pengendalian Muka surat 27 51 Untuk mendapatkan prestasi yang tinggi dan mengelakkan masalah untuk jangka masa yang lama sila baca arahan ini sepenuhnya BM1 RAS 5111CS RAC 5111C 16 11 05 4 17 PM 27 ...

Страница 28: ...angan Jika tidak memasang alat ini terdapat kemungkinan berlaku kejutan elektrik Jangan pasang di tempat yang terdapat gas mudah terbakar kerana kebocoran gas ke sekeliling unit luar bilik akan menyebabkan kebakaran Pastikan air dapat mengalir dengan lancar semasa memasang salur air AMARAN PERKARA YANG PERLU DIAMBIL PERHATIAN DALAM PEMASANGAN PERHATIAN PERKARA YANG PERLU DIAMBIL PERHATIAN SEMASA M...

Страница 29: ...mah Jika terdapat sumber haba yang melebihi kapasiti penyaman udara terdapat terlalu ramai orang atau menggunakan alat pemanasan suhu dalam bilik tidak akan mencapai suhu yang ditetapkan Alat ini tidak sesuai digunakan oleh kanak kanak atau mereka yang kurang upaya melainkan jika mereka telah diawasi oleh orang yang bertanggungjawab untuk memastikan mereka boleh menggunakan alat ini dengan selamat...

Страница 30: ...AL ALIRAN UDARA MENDATAR DAN MENEGAK LUBANG UDARA KELUAR Lihat mukasurat 39 ALAT KAWALAN JAUH Memberi isyarat kepada unit dalam bilik untuk mengawal operasi penyaman udara Lihat mukasurat 32 SALUR AIR Menyalurkan air terkondesasi keluar PAIP DAN KABEL PENYAMBUNG LUBANG UDARA MASUK SEBELAH KIRI DI BELAKANG LUBANG UDARA KELUAR Mengeluarkan udara panas LEBAR mm MODEL RAS 5111CS RAC 5111C TINGGI mm TE...

Страница 31: ...t beroperasi Setelah menyelaraskan suis sementara penyaman udara akan beroperasi dalam mode operasi yang terdahulu ditetapkan Tekan suis sementara sekali lagi apabila suis bekalan kuasa ditukar dari OFF kepada ON dan penyaman udara akan beroperasi dalam mode automatik SUIS AUTO RESTART Apabila ada gangguan bekalan elektrik penyaman udara akan beroperasi semula secara automatik pada mod yang telah ...

Страница 32: ...uk memilih pemasa OFF Butang Pemasa ON Untuk memilih pemasa ON Butang MASA Gunakan butang ini untuk mengatur dan memeriksa masa dan tarikh Butang PENGATURAN SEMULA Pemilih FUNGSI Gunakan butang ini untuk memilih operasi Setiap kali anda menekannya operasi akan bertukar dari AUTO ke DINGIN ke KERING ke PEREDARAN dan ke KIPAS yang berputar Pemilih KELAJUAN KIPAS Butang ini adalah untuk memilih kelaj...

Страница 33: ...kan menunjukkan suhu tetapan ketika mode AUTO Jika anda menukar tetapan tersebut unit penyaman udara akan mengeluarkan bunyi beep 1 MULA BERHENTI Mode operasi yang telah dipilih tidak akan berubah walaupun suhu bilik berubah C SYARAT OPERASI AUTOMATIK Melebihi 27 C PENDINGINAN 16 27 C FUNGSI 27 C Lebih rendah sedikit dari suhu bilik PERLAHAN KELAJUAN KIPAS TINGGI pada permulaan RENDAH setelah suhu...

Страница 34: ... dengan bunyi beep Tekan butang sekali lagi untuk menghentikan operasi Operasi pendinginan tidak akan bermula jika tetapan suhu lebih tinggi daripada suhu semasa yang ada di dalam bilik walaupun lampu OPERASI menyala Fungsi pendinginan akan bermula sebaik sahaja anda membuat tetapan suhu di bawah suhu semasa bilik berkenaan Tetapkan suhu bilik yang dikehendaki dengan butang SUHU paparan akan menun...

Страница 35: ...penyaman udara berhenti mengeluarkan udara sebaik sahaja suhu bilik menjadi lebih rendah dari suhu tetapan Disebabkan tetapan telah disimpan di dalam memori di dalam alat kawalan jauh anda hanya perlu menekan butang MULA BERHENTI pada masa yang akan datang Tetapkan suhu bilik yang dikehendaki dengan butang SUHU paparan akan menunjukkan tetapan Jarak di antara 20 26 C adalah suhu bilik yang disyork...

Страница 36: ...an menunjukkan PEREDARAN Tekan butang KELAJUAN KIPAS dan pilih KELAJUAN KIPAS yang diingini paparan akan menunjukkan pilihan anda Tekan butang kawalan suhu untuk tetapan suhu yang diingini Disebabkan tetapan telah disimpan di dalam memori di dalam alat kawalan jauh anda hanya perlu menekan butang MULA BERHENTI pada masa yang akan datang MULA BERHENTI KELAJUAN KIPAS AUTOMATIK Apabila kelajuan kipas...

Страница 37: ...operasi PENDINGINAN Penetapan suhu dan kelajuan kipas akan berubah seperti sebelumnya Bunyi tiupan angin akan menjadi kuat sedikit disebabkan oleh penggesaan operasi 1 NOTA 1 Tetapan PEMASA OFF Pemasa OFF adalah keutamaan ke atas masa operasi PENDINGINAN SUPER 2 Tetapan PEMASA ON Operasi PENDINGINAN SUPER adalah keutamaan ke atas masa operasi pemasa ON PEMBATALAN Operasi PENDINGINAN SUPER Syarat p...

Страница 38: ... 1 PEMBATALAN Operasi SENYAP SUPER Syarat pembatalan Operasi selepas pembatalan Tekan butang Pemasa OFF tamat Pemasa tidur tamat Operasi berhenti Tekan butang Operasi PENDINGINAN SUPER Tekan butang SENYAP SUPER Operasi kelajuan kipas yang berikut Operasi sebelum kekal Tekan butang NOTA Pada operasi SENYAP SUPER dan keadaan sekeliling yang senyap fenomena seperti bunyi aliran bahan pendingin dalam ...

Страница 39: ...n bateri yang berlainan jenis 2 Keluarkan bateri jika anda tidak menggunakan alat kawalan jauh untuk jangka masa 2 atau 3 bulan PERKARA YANG PERLU DIAMBIL PERHATIAN 2 Penyelarasan arah aliran udara ke kiri dan ke kanan Pegangkan pengawal arah aliran udara menegak seperti yang ditunjukkan dalam gambarajah dan selaraskan arah aliran udara ke kiri dan ke kanan Jika butang Peredaran AUTO ditekan sekal...

Страница 40: ...atan dengan bunyi beep dan lampu PEMASA akan bertukar off pada unit penyaman udara 1Tetapkan bulan semasa dan hari dengan butang kawalan PEMASA 1 Tekan butang PEMASA OFF Penanda OFF berkelip pada paparan 1 Tekan butang PEMASA ON Penanda ON berkelip pada paparan 2 Tetapkan masa tamat dengan butang kawalan PEMASA Tekan butang SIMPAN 3 Tekan butang PEMASA ON Penanda OFF bernyala dan penanda ON berkel...

Страница 41: ...rasi telah sempurna sekarang Contoh Unit akan off pada 11 00 p m Contoh Unit secara automatik akan mula beroperasi lebih awal jadi tetapan suhu boleh sampai 7 00 a m Tetapan masa mula operasi telah sempurna sekarang 4Tetapkan masa mula operasi dengan butang kawalan PEMASA 2 Tetapkan masa mula operasi dengan butang kawalan PEMASA Contoh Unit akan tamat operasi pada 10 30 p m dan kemudian secara aut...

Страница 42: ...bila pemasa tidur telah ditetapkan paparan akan menunjukkan masa off Contoh Jika anda membuat tetapan 3 jam masa tidur pada 11 38 p m masa unit berhenti adalah pada 2 38 a m 2 Tekan butang TIDUR dan buat tetapan pemasa tidur Unit akan bertukar off dengan pemasa tidur dan bertukar on dengan pemasa on Bagaimana Membatalkan Penyimpanan Arahkan isyarat pemuka alat kawalan jauh setentang ke unit penyam...

Страница 43: ...rada pada tetapan RENDAH 1 jam selepas tetapan pemasa tidur Kipas Operasi dengan pemasa tidur Jika tarikh atau masa semasa tidak ditetapkan pemasa tidur tidak boleh ditetapkan Jika anda membuat tetapan pemasa tidur selepas off on off atau off on timer ditetapkan tetapan masa oleh pemasa tidur lebih diutamakan Anda tidak boleh membuat tetapan pemasa yang lain semasa pemasa tidur beroperasi Pengawal...

Страница 44: ...waktu bangun untuk mendapat suhu bilik yang selesa Penapis udara yang tersumbat akan menghalang pergerakan udara serta mengurangkan kesan pendinginan Sila bersihkan penapis udara setiap 2 minggu untuk menjimatkan tenaga elektrik Sila ambil perhatian terhadap suhu dalam bilik dan arah aliran udara apabila terdapat bayi kanak kanak atau orang tua di dalam bilik Biasanya suhu bilik yang berbeza seban...

Страница 45: ...angka masa panjang sila padamkan suis bekalan kuasa Jika suis bekalan kuasa dipasang walaupun unit dalam bilik tidak beroperasi tenaga elektrik akan dibazirkan dalam litar pengawal kira kira 8W Amaran Semasa berlakunya kilat hentikan operasi penyaman udara dan keluarkan plagnya demi melindungi unit ini OFF Gangguan Daripada Alat Alat Elektrik Lampu fluoresen jenis terbalik Untuk mengelak gangguan ...

Страница 46: ...a HIGH jika menggunakannya dengan cara seperti ini Penapis pembersih udara tidak boleh dibasuh dan ia boleh digunakan selama satu tahun Jenis nombor penapis pembersih udara ini adalah SPX CFH14 Sila gunakan no ini untuk membuat pesanan Jangan pasang penyaman udara tanpa penapis udara Habuk akan memasuki penyaman udara dan boleh mengakibatkan kerosakan 4 Memasang penapis udara Pasang penapis udara ...

Страница 47: ... kerana sabun boleh mengakibatkan ia kehilangan keupayaan elektrostatik 1 Buka panel depan dan keluarkan penapis udara Angkat dan keluarkan penapis pembersih udara daripada penapis udara dengan perlahan 3 Masukkan semula penapis pembersih udara ke penapis udara Pastikan bahagian penapis udara yang bertanda FRONT menghala ke atas dan sorongkan penapis udara ke kedudukan asalnya Setelah memasang pen...

Страница 48: ...permukaan plastik dan lapiskan pelindung Membuka Panel Depan Buka panel depan tolakkan penyangga dibahagian kanan dan kiri sehingga terkeluar dari lubang penyangga Pemasangan Panel Depan Gerakkan penyangga di bahagian kanan dan kiri melalui tapak sehingga ke lubang penyangga Penyangga 3 PENGENDALIAN SEKIRANYA TIDAK MENGGUNAKAN UNTUK JANGKA MASA PANJANG Pasangkan penyaman udara dengan operasi KIPAS...

Страница 49: ...di palam ikuti arahan berikut Wayar yang berwarna hijau dan kuning mesti disambungkan ke palam terminal yang bertanda E atau simbol Earth atau warna hijau atau hijau dan kuning Wayar yang berwarna biru mesti disambungkan keterminal bertanda N atau warna hitam Wayar yang berwarna coklat mesti di sambungkan ke terminal bertanda L atau warna merah NOTA Sekiranya wayar didapati rosak ia mesti ditukark...

Страница 50: ...penyaman udara terhalang Adakah pintu atau tingkap bilik terbuka ataupun terdapat sumber haba dalam bilik Adakah suhu yang ditetapkan itu sesuai Nota Semasa dalam operasi yang senyap atau penyaman udara telah dihentikan perkara berikut mungkin berlaku sekali kala tetapi semuanya normal bagi operasi itu 1 Bunyi pengaliran agen penyejuk dalam saluran kitarannya 2 Bunyi geseran daripada kipas yang pa...

Страница 51: ...g C 21 43 Bebuli Basah C 15 26 Nota Apabila suhu luar bilik dibawah 21 C 70 F elakkan daripada menggunakan penyaman udara untuk operasi kesejukan Suhu operasi maksimum dan minimum untuk bahagian sejuk dan panas adalah seperti berikut MEMO Produk ini telah diuji dan disahkan mengikut akta 89 336 EEC pemeriksaan sambungan arus elektromagnet dan 73 23 EEC pemeriksaan alatan elektrik dengan had voltag...

Страница 52: ... 52 H349 A BM2 RAS 5111CS RAC 5111C 16 11 05 4 19 PM 52 ...

Отзывы: