background image

— 10 —

English

COLD WEATHER CARE

Do not store the Stapler in a cold weather
environment.
Keep the Stapler in a warm area until beginning the
work.

If the Stapler is already cold, bring it in a warm area
and allow the Stapler to warm up before use.

1

Reduce the air pressure to 40 psi (2.8 bar   2.8 kgf/
cm

2

).

2

Remove all staples from the Stapler.

3

Connect the air hose and free-fire (blank-fire) the
Stapler.
The lowered air pressure will be enough to free-fire
the Stapler.
Slow speed operation tends to warm up the
moving part.

CAUTION:

Do not free-fire the Stapler at high pressure.

TESTING THE STAPLER

DANGER

Always wear eye protector.

WARNING

Never use Stapler unless push lever is operating
properly.

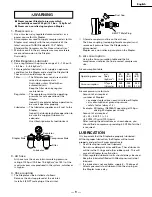
Before actually beginning the stapling work, test the
Stapler by using the checklist below. Conduct the tests in
the following order.
If abnormal operation occurs, stop using the Stapler and
contact a Hitachi authorized service center immediately.

(1) DISCONNECT AIR HOSE FROM STAPLER.

REMOVE ALL STAPLES FROM STAPLER.

ALL SCREWS MUST BE TIGHTENED.
If any screws are loose, tighten them.

THE PUSH LEVER AND TRIGGER MUST MOVE
SMOOTHLY.

(2) Adjust the air pressure to 70 psi (4.9 bar

5 kgf/cm

2

).

Connect the air hose.
Do not load any staples in the Stapler.

THE STAPLER MUST NOT LEAK AIR.

Hold the Stapler downward and pull the trigger.

THE STAPLER MUST NOT OPERATE.

(3) With finger off the trigger, depress the push lever

against the workpiece.

THE STAPLER MUST NOT OPERATE.

(4) Without touching the trigger, depress the push lever

against the workpiece.
Pull the trigger.

Trigger

Push
Lever

Do not connect

air hose

Pull Trigger

Push
Lever

Do not pull Trigger

Depress
Push Lever

Содержание N 5008AC

Страница 1: ... producto Lea y entienda este manual antes de utilizar la grapadora Guarde este manual a mano para que puedan consultarlo otras personas antes de utilizar la grapadora No deje manejar esta herramienta a nadie que no haya leído este manual INSTRUCTION AND SAFETY MANUAL MANUEL D INSTRUCTIONS ET DE SECURITE INSTRUCCIONES Y MANUAL DE SEGURIDAD DANGER Une utilisation incorrecte et sans respecter la séc...

Страница 2: ...CARGA DE GRAPAS 37 OPERACIÓN DE LA GRAPADORA 38 MÉTODOS DE OPERACIÓN 38 ADJUSTE DE LA PROFUNDIDAD DE GRAPADO 39 MANTENIMIENTO MANTENIMIENTO E INSPECCIÓN 41 SERVICIO Y REPARACIONES 41 Page BEFORE OPERATION 8 WORKING ENVIRONMENT 8 AIR SUPPLY 8 LUBRICATION 9 COLD WEATHER CARE 10 TESTING THE STAPLER 10 ADJUSTING AIR PRESSURE 11 LOADING STAPLES 11 STAPLER OPERATION 11 METHODS OF OPERATION 12 ADJUSTING ...

Страница 3: ...Manual and in the sections which contain the operation and maintenance instructions Hazards that must be avoided to prevent bodily injury or machine damage are identified by DANGERS and WARNINGS on the Stapler and in this Manual Never use this Stapler for applications other than those specified in this Manual DEFINITIONS OF SIGNAL WORDS DANGER indicates an imminently hazardous situation which if n...

Страница 4: ...hich potentially exceeds 200 psi 13 7 bar 14 kgf cm2 as the Stapler can burst 4 NEVER POINT STAPLER TOWARD YOURSELF OR ANYONE ELSE Always assume the Stapler contains fasteners Never point the Stapler toward yourself or anyone else whether it contains fasteners or not If fasteners are mistakenly driven it can lead to severe injuries Never engage in horseplay with the Stapler Respect the Stapler as ...

Страница 5: ...ers into the Stapler or when connecting the air hose 1 do not pull the trigger 2 do not depress the push lever and 3 keep the Stapler pointed downward SAFETY Continued WARNING 16 KEEP HANDS AND FEET AWAY FROM FIRING HEAD DURING USE Never place your hands or feet closer than 8 inches 200 mm from the firing head A serious injury can result if the fasteners are deflected by the workpiece or are drive...

Страница 6: ...pler according to this Manual Never allow the Stapler to be operated by children individuals unfamiliar with its operation or unauthorized personnel 29 NEVER USE STAPLER FOR APPLICATIONS OTHER THAN THOSE SPECIFIED IN THIS MANUAL 30 HANDLE STAPLER CAREFULLY Because of high air pressure in the Stapler cracks in the surface are dangerous To avoid this do not drop the Stapler or strike the Stapler aga...

Страница 7: ...ome illustrations in this Manual may show details or attachments that differ from those on your own Stapler NAME OF PARTS Piston O Ring Piston Nose Driver Blade Lock Lever Blade Guide Push Lever Firing Head Outlet Staple Feeder Push Lever Piece Magazine Assembly Magazine Cover Air Plug Sold Separately Cap Body Trigger Exhaust Cover ...

Страница 8: ...Allen wrench for M5 screw 1 1 OPTIONAL ACCESSORIES sold separately 䡬 Sequential Trip Mechanism Kit Code No 876762 Single Shot Parts 䡬 Pneumatic Tool Lubricant 8 oz 25 cc oil feeder Code No 877153 4 oz 120 cc oil feeder Code No 874042 1 quart 1 ltr can Code No 876212 NOTE Accessories are subject to change without any obligation on the part of HITACHI APPLICATIONS 䡬 Construction work such as wall sh...

Страница 9: ...er can be installed as follows Remove the dust cap placed at the air inlet Install a 3 8 NPT male plug at the air inlet 䡬 A female coupler must be on the air hose The hose coupling male plug female coupler must remove all pressure from the Stapler when disconnected Stapler use a non relieving coupler on the Stapler 5 Air consumption Using the Air consumption table and the Air compressor size formu...

Страница 10: ...e stapling work test the Stapler by using the checklist below Conduct the tests in the following order If abnormal operation occurs stop using the Stapler and contact a Hitachi authorized service center immediately 1 DISCONNECT AIR HOSE FROM STAPLER REMOVE ALL STAPLES FROM STAPLER 䡺 ALL SCREWS MUST BE TIGHTENED If any screws are loose tighten them 䡺 THE PUSH LEVER AND TRIGGER MUST MOVE SMOOTHLY 2 ...

Страница 11: ...ll trigger 2 do not depress push lever and 3 keep Stapler pointed downward 1 Pull the staple feeder backward and attach it securely to a groove of the magazine 2 Place the staple strip over the magazine Make sure that the staple strip slides freely on the magazine 3 Pull the staple feeder backward Then detach it from the groove of magazine and softly bring the staple back as if it were being gentl...

Страница 12: ...on METHODS OF OPERATION This Stapler is equipped with the push lever and does not operate unless the push lever is depressed upward position There are two methods of operation to drive staples with this Stapler They are 1 Intermittent operation Trigger fire 2 Continuous operation Push lever fire 1 Intermittent operation Trigger fire 1 Position the staple outlet on the workpiece with finger off the...

Страница 13: ... carefully If staples are dropped collating bond may be broken 䢇 After stapling 1 disconnect air hose from the Stapler 2 remove all staples from the Stapler 3 supply 5 10 drops of Hitachi pneumatic tool lubricant into the air plug on the Stapler and 4 open the petcock on the air compressor tank to drain any moisture ADJUSTING THE STAPLING DEPTH To assure that each nail penetrates to the same depth...

Страница 14: ...aintenance chart See page 15 3 Operator troubleshooting See page 15 4 Storing 䡬 When not in use for an extended period apply a thin coat of the lubricant to the steel parts to avoid rust 䡬 Do not store the Stapler in a cold weather environment Keep the Stapler in a warm area 䡬 When not in use the Stapler should be stored in a warm and dry place Keep out of reach of children 5 WARNING LABEL Change ...

Страница 15: ...ce center for assistance Check for a jam Staple feeder damaged Ribbon spring weakened or damaged Check for proper staples Check air pressure Driver blade worn Piston O ring worn or damaged Check air presure Check for proper staples Staple feeder damaged Ribbon spring weakened or damaged Piston O ring worn or damaged Check for proper staples Driven blade worn Check inside diameter of air hose PROBL...

Страница 16: ... relatives aux instructions d utilisation et d entretien Les dangers à éviter pour empêcher tout risque de blessures ou de dommage de l outil sont identifiés par les mots DANGER et AVERTISSEMENT sur l agrafeuse et dans ce manuel Ne jamais utiliser cette agrafeuse pour des applications autres que celles qui sont spécifiées dans cette manuel DEFINITION DES MOTS DE SIGNALISATION DANGER indique une si...

Страница 17: ...ropre sec et régulé AVERTISSEMENT 3 NE PAS DEPASSER 120 PSI Ne pas dépasser la pression d air maximale recommandée de 120 psi 8 3 bars 8 5 kgf cm2 Ne jamais raccorder l agrafeuse à une pression susceptible de dépasser 200 psi 13 7 bars 14 kgf cm2 car l agrafeuse pourrait exploser 4 NE JAMAIS AGRAFER VERS SOI NI VERS QUELQU UN D AUTRE Toujours supposer que l agrafeuse renferme des agrafes Ne jamais...

Страница 18: ...SERRES Veiller à ce que les vis et les couvercles soient solidement fixés Les vérifier périodiquement Ne jamais utiliser l agrafeuse si des pièces manquent ou sont endommagées SECURITE suite AVERTISSEMENT 15 NE PAS CHARGER DE AGRAFES SI LA GACHETTE OU LE LEVIER POUSSOIR SONT ENFONCES Quand on charge des agrafes dans l agrafeuse ou qu on raccorde le tuyau d air 1 ne pas tirer sur la gâchette 2 ne p...

Страница 19: ...on autorisées 29 NE JAMAIS UTILISER L AGRAFEUSE POUR DES APPLICATIONS AUTRES QUE CELLES QUI SONT SPECIFIEES DANS CE MANUEL 30 MANIPULER L AGRAFEUSE AVEC PRECAUTION A cause de la pression d air élevée à l intérieur de l agrafeuse les fissures en surface sont dangereuses Pour éviter tout risque ne pas faire tomber l agrafeuse ni la heurter contre des surfaces dures et ne pas la rayer ni graver des i...

Страница 20: ...t montrer des détails ou des accessoires qui diffèrent de ceux de votre agrafeuse NOM DES PIECES Joint torique du piston Piston Bec Lame d entraînement Levier de verrouillage Guide de lame Levier poussoir Tête de clouage sortie Alimenteur d agrafes Fixation du levier poussoir Ensemble de mgasin Couvercle de magasin Bouchon d air vendu séparément Capuchon Corps Gâchette Couvercle d échappement ...

Страница 21: ...our vis M5 1 1 ACCESSOIRES EN OPTION vendus séparément 䡬 Mécanisme de déclenchement par contact activation par band Code No 876762 䡬 Huile de machine pneumatique Alimenteur d huile 8 oz 25 cc Code No 877153 Alimenteur d huile 4 oz 120 cc Code No 874042 Alimenteur d huile 1 quart 1 l Code No 876212 REMARQUE Les accessoires sont sujets à modification sans préavis et sans aucune obligation de la part...

Страница 22: ...avail minimum de 150 psi 10 4 bars 10 6 kgf cm2 ou 150 de la pression maximum produite par le système à savoir la plus élevée 4 Couplage de tuyau 䡬 L agrafeuse s installe comme suit Retirer le joins à poussière situé sur l arrivée d air Installer un bouchon mâle 3 8 NPT sur l arrivée d air 䡬 Le coupleur famelle doit être placé sur le tuyau d air Le couplage de tuyau bouchon mâle coupleur femelle d...

Страница 23: ...MENT 䢇 Ne jamais utiliser l agrafeuse si le levier poussoir ne fonctionne pas correctement Avant de commencer le travail proprement dit faire un essai d agrafage en vérifiant les points ci dessous Effectuer les essais dans l ordre indiqué 1 DEBRANCHER LE TUYAU D AIR D AGRAFAGE SORTIR TOUS LES AGRAFES D AGRAFAGE 䡺 TOUTES LES VIS DOIVENT ETRE SERREES A FOND Si certaines vis sont relâchées les reviss...

Страница 24: ...ment des agrafes dans l agrafeuse 1 ne pas tirer sur la gâchette 2 ne pas actionner le levier poussoir et 3 diriger l agrafeuse vers le bas 1 Tirer l alimenteur d agrafes vers l arrière et le fixer solidement à une encoche du magasin 2 Placer la bande d agrafes sur le magasin Vérifier que la bande d agrafes glisse en douceur sur le magasin 3 Tirer l alimenteur d agrafes vers l arrière Ensuite le d...

Страница 25: ...Ctte agrafeuse Hitachi possède un MÉCANISME DE DÉCLENCHEMENT PAR CONTACT STANDARD activation par band Il existe un lot de MÉCANISME DE DÉCLENCHEMENT SÉQUENTIEL EN OPTION CLOUAGE SIMPLE dont le numéro de pièce de commande est 876762 On utilisera LE MÉCANISME DE DÉCLENCHEMENT PAR CONTACT STANDARD activation par band pour effectuer un clouage rapide et en respectant la méthode d utilisation ci dessou...

Страница 26: ...oussoir position haut à l endroit où l on veut enfoncer l agrafe puis tirer sur la gâchette Après avoir enfoncé chaque agrafe relâcher complètement la gâchette et relever l outil de la surface de travail Le MÉCANISME DE DÉCLENCHEMENT SÉQUENTIEL EN OPTION réduit les risques de blessures pour l opérateur et les personnes qui se trouvent dans l aire de travail En effet il risque moins d enfoncer acci...

Страница 27: ...e 28 4 Remisage 䡬 Si l on ne se sert pas de l agrafeuse pendant un certain temps enduire ses pièces en acier d une mince couche de graisse pour éviter toute corrosion 䡬 Ne pas remiser l agrafeuse dans un environnement froid La laisser dans un endroit chaud 䡬 Lorsqu on ne se sert pas de l agrafeuse la remiser dans un endroit chaud et sec La ranger hors de portée des enfants 5 ETIQUETTE D AVERTISSEM...

Страница 28: ...fe est coincée L alimenteur d agrafes est il endommagé Le ressort à ruban est il distendu ou endommaré Vérifier sl l on utilise les bonnes agrafes Vérifier la pression d air La lame d entraînement est elle usée La joint torique du piston est il usé ou endommagé Vérifier la pression d air Vérifier sl l on utlise les bonnes agrafées L alimenteur d agrafes est il endommagé Le ressort à ruban est il d...

Страница 29: ...n en la sección SEGURIDAD de este manual y en las secciones que contienen las instrucciones sobre operación y mantenimiento Los riesgos que habrá que eludir para evitar lesiones o el daño de la máquina se identifican mediante PELIGRO y ADVERTENCIA en la grapadora y en este manual No utilice nunca esta grapadora para aplicaciones que no sean las especificadas en este manual DEFINICIÓN DE LAS PALABR...

Страница 30: ...solamente aire comprimido limpio seco y regulado ADVERTENCIA 3 NO SOBREPASE 120 psi No sobrepase nunca la presión de aire máxima recomendada de 120 psi 8 3 barias 8 5 kgf cm2 No conecte nunca la grapadora a una presión que pueda sobrepasar potencialmente 200 psi 13 7 barias 14 kgf cm2 ya que la grapadora podría explotar 4 NO APUNTE NUNCA CON LA GRAPADORA HACIA SÍ MISMO NI HACIA OTRAS PERSONAS Pien...

Страница 31: ...eriódicamente su condición No utilice nunca la grapadora si hay piezas perdidas o dañadas 15 NO CARGUE GRAPAS CON EL GATILLO ACCIONADO NI CON LA PALANCA DE EMPUJE PRESIONADA Cuando cargue grapas en la grapadora o cuando conecte la manguera de aire 1 no accione el gatillo 2 no presione la palanca de empuje ni 3 mantenga la grapadora apuntado hacia abajo 16 MANTENGA LAS MANOS Y LOS PIES ALEJADOS DE ...

Страница 32: ...zadas o no autorizadas toquen la grapadora 29 NO UTILICE NUNCA LA GRAPADORA PARA APLICACIONES QUE NO SEAN LAS ESPECIFICADAS EN ESTE MANUAL 30 MANEJE LA GRAPADORA CON CUIDADO Debido a la alta presión de aire de la grapadora las rajas en su superficie pueden resultar peligrosas Para evitar esto no deje caer la grapadora ni la golpee contra superficies duras y no grabe nada en la misma Maneje cuidado...

Страница 33: ...eden mostrar detalles o accesorios diferentes a los de su propia grapadora NOMENCLATURA Anillo O del pistón Pistón Morro Cuchilla impulsora Palanca de bloqueo Guía de cuchilla Palanca de empuje Cabeza de salida de los grapas Alimentador de grapas Pieza de la palanca de empuje Conjunto del cargador Cubierta de cargador Toma de aire Vendida aparte Tapa Cuerpo Gatillo Cubierta de escape ...

Страница 34: ...ornillos M5 1 ACCESORIOS OPCIONALES vendido aparte 䡬 Mecanismo de disparo por contacto Disparo con rebote Núm de código 876762 䡬 Lubricante para herramientas neumáticas Aceitador de 8 onzas 25 cc Núm de código 877153 Aceitador de 4 onzas 120 cc Núm de código 874042 Lata de 1 cuarto de galón 1 litro Núm de código 876212 NOTE Los accesorios están sujetos a cambio sin ninguna obligación por parte de ...

Страница 35: ...de la operación a fin de asegurarse de que funcione adecuadamente Lubricador El lubricador rocía aceite a la grapadora Inspeccione el lubricador antes de utilizarlo para comprobar si el suministro de lubricante es adecuado Utilice lubricante para herramientas neumáticas Hitachi 3 Manguera de aire La manguera de aire deberá poder resistir una presión mínima de 150 psi 10 4 barias 10 6 kgf cm2 o el ...

Страница 36: ...ire a 40 psi 2 8 barias 2 8 kgf cm2 2 Quite todas las grapas de la grapadora 3 Conecte la manguera de aire y dispare disparo en vacío la grapadora La reducción de la presión de aire será suficiente para disparar en vacío la grapadora La operación a baja velocidad tiende a calentar las partes móviles PRECAUCIÓN 䢇 No dispare en vacío la grapadora a alta presión PRUEBA DE LA GRAPADORA PELIGRO 䢇 Utili...

Страница 37: ... 8 5 kgf cm2 de acuerdo con la longitud de las grapas y la dureza de la pieza de trabajo La presión de aire correcta es la más baja con la que pueda realizarse el trabajo La utilización de la grapadora con una presión de aire más alta de la requerida lo forzará innecesariamente CARGA DE GRAPAS ADVERTENCIA 䢇 Cuando cargue las grapas en la grapadora 1 no apriete el gatillo 2 no apriete la palanca de...

Страница 38: ...pas desde ambos lados de una pared al mismo tiempo Las grapas podrían traspasar la pared y lesionar a la persona de la otra parte 䢇 No utilice nunca una grapadora defectuosa o que funcione anormalmente 䢇 No utilice la grapadora a modo de martillo 䢇 Desconecte la manguera de aire de la grapadora cuando 1 no vaya a utilizarla 2 vaya a abandonar el área de trabajo 3 vaya a trasladarse a otro lugar y ...

Страница 39: ...apas si mantiene el disparador apretado y golpea accidentalmente la palanca de empuje contra su cuerpo o el de otras personas El MECANISMO DE DISPARO SECUENCIAL OPCIONAL puede reducir también la velocidad de operación en comparación con el mecanismo de disparo por contacto estándar NOTA 䢇 Tanto el MECANISMO DE DISPARO POR CONTACTO ESTÁNDAR como el MECANISMO DE DISPARO SECUENCIAL OPCIONAL serán seg...

Страница 40: ...ieza de la palanca de empuje 3 Conecte la manguera de aire UTILICE SIEMPRE GAFAS PROTECTORAS PARA LOS OJOS Realice una prueba de clavado 4 DESCONECTE LA MANGUERA DE AIRE DE LA GRAPADORA 5 Elija la posición adecuada para el adjustador Poca profundidad ...

Страница 41: ...ágina 42 3 Solución de problemas por parte del operador Consulte la página 42 4 Almacenamiento 䡬 Cuando no vaya a utilizar la grapadora durante mucho tiempo aplique una capa fina de lubricante a las piezas de acero para evitar que se oxiden 䡬 No guarde la grapadora en un lugar frío Guarde la grapadora en un lugar cálido 䡬 Cuando no vaya a utilizar la grapadora deberá guardarla en un lugar cálido y...

Страница 42: ...dañado el alimentador de grapas Está flojo o dañado el resorte de cinta Compruebe si las grapas las apropiadas Compruebe la presión de aire Está gastada la cuchilla impulsora Está desgastada o dañada la junta tórica del pusón Compruebe la presión de aire Compruebe si las grapas las apropiadas Está dañado el alimentador de grapas Está flojo o dañado el resorte de cinta Está desgastada o dañada la j...

Страница 43: ... 43 ...

Страница 44: ...N Printed in Japan Issued by Shinagawa Intercity Tower A 15 1 Konan 2 chome Minato ku Tokyo 108 6020 Japan Distributed by 3950 Steve Reynolds Blvd Norcross GA 30093 Hitachi Koki Canada Co 6395 Kestrel Road Mississauga ON L5T 1Z5 ...

Отзывы: