background image

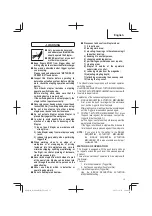
WARNING

●  

Only person who have read 

and understand this MANUAL 

should operate the Stapler.

   NEVER point tool at yourself 

or others in work area.

 Keep 

fi

 ngers AWAY from trigger when not 

driving staples to avoid accidental discharge. 

 Know and understand what trigger system 

you are using.

  Please read and understand “METHODS OF 

OPERATION” found below.

 Inspect the Stapler before operating to 

determine actuation system. Before starting 

work, check the stapling operation switching 

device.

  This Hitachi stapler includes a stapling 

operation switching device.

  Before  starting  work,  make  sure  that  the 

switching device is properly set.

  If the switching device is not set properly, the 

stapler will not operate correctly.

● 

Never place your hands or body closer than 8 

inches (200 mm) from 

fi

 ring head when using.

● 

Do not drive staples into other staples; 

staples can ricochet and hurt someone.

● 

Do not actuate Stapler unless Stapler is 

placed 

fi

 rmly against the workpiece.

 In order to avoid  double 

fi

 re or unwanted 

ejection  of  a  staple  due  to  bouncing  of  the 

Stapler.

1) do not push Stapler on workpiece with 

strong force;

2)  take Stapler away from workpiece using 

recoil;

3) release trigger quickly when performing 

trigger 

fi

 re.

 When working close to an edge of a 

workpiece or at steep angles, or driving 

fasteners into thin workpiece use care to 

minimize chipping, splitting or splintering, or 

free 

fl

 ight, ricochet or piercing of fasteners, 

which may cause injury.

 Never drive staples from both sides of a wall 

at the same time. Staples can be driven into 

and through the wall and hit a person on the 

opposite side.

 Never use Stapler which is defective or 

operating abnormally.

  Do not use Stapler as hammer.

  Disconnect air hose from Stapler when:

1)  it is not in use;

2)  leaving work area;

3)  elevating, lowering or otherwise moving it 

to another location;

4)  handing it to another person;

5)  changing switching device;

6)  performing any maintenance or repairs;

7)  clearing a jam;

8) Stapler is outside of the operator's 

supervision or control;

9)  removing staples from the magazine;

10) adjusting stapling depth;

11) attaching or removing the nose cap; and

12) turning the top cover.

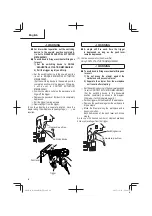
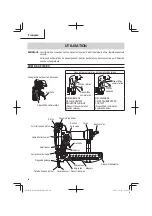
This Hitachi stapler is equipped with a stapler operation 

switching device.

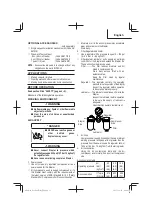
Use SINGLE SEQUENTIAL ACTUATION MECHANISM or 

CONTACT ACTUATION MECHANISM in accordance with 

the work to be performed.
Explanation of the various stapling operations

  SINGLE SEQUENTIAL ACTUATION MECHANISM: 

First, press the push lever against the workpiece; 

next, pull the trigger to drive the staple. 


After stapling once, stapling will not be possible again 

until the trigger is released and pressed again.

  CONTACT ACTUATION MECHANISM: First, press 

the push lever against the workpiece; next, pull the 

trigger to drive the staple. Or, 


pull the trigger; next, press the push lever against the 

workpiece to drive the staple.


If the trigger is held back, a staple will be driven each 

time the push lever is pressed against the workpiece.

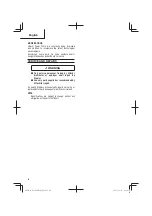
NOTE:

  If you wish to 

fi

 x the setting to the SINGLE 

SEQUENTIAL ACTUATION MECHANISM, 

the SINGLE SEQUENTIAL ACTUATION 

MECHANISM KIT is also available as order part 

number 887916.

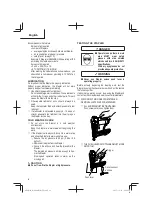
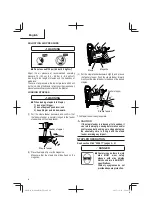
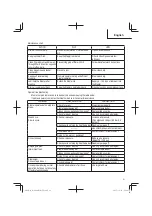
METHODS OF OPERATION

This Stapler is equipped with the push lever and does 

not operate unless the push lever is depressed (upward 

position).

There are two methods of operation to drive staples with 

this Stapler.

They are:

1.  Intermittent operation (Trigger 

fi

 re):

2.  Continuous operation (Push lever 

fi

 re):

(1)  Intermittent operation (Trigger 

fi

 re)

  Use the SINGLE SEQUENTIAL ACTUATION 

MECHANISM setting.

15

English

000Book̲N3804AB3(S)̲US.indb   15

000Book̲N3804AB3(S)̲US.indb   15

2015/12/25   16:49:54

2015/12/25   16:49:54

Содержание N 3804AB3

Страница 1: ...uctions importantes sur la sécurité de l outil Lire et bien assimiler ce manuel avant d utiliser l agrafeuse Conserver ce manuel à l intention des autres utilisateurs de la agrafeuse Cet outil ne doit jamais être utilisé par une personne n ayant pas pris connaissance du manuel Ce mode d emploi doit être conservé dans un endroit sûr PELIGRO La utilización inadecuada e insegura de esta grapadora pue...

Страница 2: ...N 30 APPLICATIONS 30 AVANT L UTILISATION 30 ENVIRONNEMENT DE TRAVAIL 30 ALIMENTATION D AIR 30 GRAISSAGE 31 ENTRETIEN PAR TEMPS FROID 31 ESSAI DE L AGRAFEUSE 31 REGLAGE DE LA PRESSION D AIR 33 CHARGEMENT DES AGRAFES 33 UTILISATION DE L AGRAFEUSE 34 METHODES D UTILISATION 35 REGLAGE DE LA PROFONDEUR DE AGRAFAGE 37 CHANGEMENT DU SENS D ECHAPPEMENT 38 UTILISATION DU CAPUCHON DE BEC 38 ENTRETIEN ENTRET...

Страница 3: ...INITIONS OF SIGNAL WORDS DANGER indicates an imminently hazardous situation which if not avoided will result in death or serious injury WARNING indicates a potentially hazardous situation which if not avoided could result in death or serious injury CAUTION indicates a potentially hazardous situation which if not avoided may result in minor or moderate injury or may cause machine damage NOTE emphas...

Страница 4: ...A RISK OF FIRE ELECTRIC SHOCK OR INJURY TO PERSONS General To reduce the risks of electric shock fire and injury to persons READ ALL THE INSTRUCTIONS BEFORE USING THE TOOL DANGER WARNING 3 NEVER POINT TOOL AT YOURSELF OR OTHERS IN WORK AREA Always assume that the Stapler contains fasteners Never point the Stapler toward yourself or others whether it contains fasteners or not If fasteners are mista...

Страница 5: ...g it to another person elevating lowering or otherwise moving the Stapler to a new location Never attempt to clear a jam or repair the Stapler unless you have disconnected air hose from the Stapler and removed all remaining fasteners from the Stapler The Stapler should never be left unattended since people who are not familiar with the Stapler might handle it and injure the themselves Such precaut...

Страница 6: ...for use with the specific Stapler increases the risk of injury to persons 10 Use only those fasteners listed in the Accessories section of this manual Fasteners not identified for use with this Stapler by Hitachi are able to result in a risk of injury to persons or Stapler damage when used in this Stapler 4 Service 1 Tool service must be performed only by qualified repair personnel 2 When servicin...

Страница 7: ...covers tightly mounted Check their condition periodically Never use the Stapler if parts are missing or damaged 7 Do not load fasteners with Trigger or Push Lever depressed When loading fasteners into the Stapler or when connecting the air hose 1 do not depress the Trigger 2 do not depress the Push Lever and 3 keep the Stapler pointed downward 8 Keep hands and body away from firing head during use...

Страница 8: ...ork area are wearing EYE PROTECTION and other appropriate personal protective equipment such as HEAD HEARING FOOT PROTECTION 6 Enforce the use of EYE PROTECTION by operators and others in work area 7 Ensure that Staplers are kept in safe working order as described in this MANUAL 8 Maintain Staplers properly 9 Ensure that only qualified personnel shall repair Staplers 10 Ensure that Staplers that r...

Страница 9: ...r plug Staple feeder Feeder stopper Firing head Outlet Lock lever Guide plate Top cover Adjuster Trigger Ribbon spring Trigger Switching device Enlarged view of the valve part Stapling operation switching device Switching device Upward position Switching device Downward position SINGLE SEQUENTIAL ACTUATION MECHANISM Switching device upward position CONTACT ACTUATION MECHANISM Switching device down...

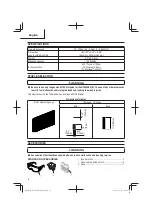
Страница 10: ...enuine HITACHI staples for the N3804AB3 S The use of any other staples can result in tool malfunction and or staple breakdown leading to serious injuries Only staples shown in the Table below can be driven with this Stapler Dimensions of staples Finish staples 18 gauge 18 Gauge 1 4 Crown Min Max 043 1 08mm 049 1 25mm 138 3 5mm 1 2 13mm 1 1 2 38mm ACCESSORIES WARNING Accessories other than those sh...

Страница 11: ...le Operating pressure psi bar kgf cm2 80 5 5 5 6 90 6 2 6 3 100 6 9 7 Air consumption ft3 cycle ltr cycle 019 55 023 64 025 73 OPTIONAL ACCESSORIES sold separately Single sequential actuation mechanism kit Code No 887916 Pneumatic Tool Lubricant 8 oz 25 cc oil feeder Code No 877153 4 oz 120 cc oil feeder Code No 874042 1 quart 1 ltr can Code No 876212 NOTE Accessories are subject to change without...

Страница 12: ...find a compressor providing 2 7 CFM of air that is required LUBRICATION It is important that the Stapler be properly lubricated Without proper lubrication the Stapler will not work properly and parts will wear prematurely Use Hitachi pneumatic tool lubricant Do not use detergent oil or additives These lubricants will harm the O rings and other rubber parts This will cause the Stapler to malfunctio...

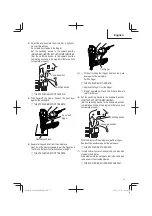
Страница 13: ...Pull trigger 5 1 Without touching the trigger depress the push lever against the workpiece Pull the trigger THE STAPLER MUST OPERATE 2 Remove the finger from the trigger Stapler operation will end the driver blade will return to the top 6 Set the switching device to the downward position CONTACT ACTUATION MECHANISM Set the switching device to the downward position completely as shown in the diagra...

Страница 14: ...JUSTING AIR PRESSURE WARNING Do not exceed 120 psi 8 3 bar 8 5 kgf cm2 Adjust the air pressure at recommended operating pressure 70 120 psi 4 9 8 3 bar 5 8 5 kgf cm2 according to the length of staples and the hardness of workpiece The correct air pressure is the lowest pressure which will do the job Using the Stapler at a higher than required air pressure unnecessarily over stresses the Stapler LO...

Страница 15: ...m Stapler when 1 it is not in use 2 leaving work area 3 elevating lowering or otherwise moving it to another location 4 handing it to another person 5 changing switching device 6 performing any maintenance or repairs 7 clearing a jam 8 Stapler is outside of the operator s supervision or control 9 removing staples from the magazine 10 adjusting stapling depth 11 attaching or removing the nose cap a...

Страница 16: ...ion Push lever Trigger 4 3 WARNING A staple will fire each time the trigger is depressed as long as the push lever remains depressed 2 Continuous operation Push lever fire Using CONTACT ACTUATION MECHANISM WARNING To avoid double firing or accidental firing due to recoil 1 Do not press the stapler against the workpiece with excessive force 2 Separate the stapler from the workpiece as it recoils af...

Страница 17: ... others in work area Keep hands and body away from the discharge area The Stapler with contact trip mechanism may bounce from the recoil of driving a fastener and unwanted subsequent fastener may be driven possibly causing injury Some types of loaded staples can spark out of the muzzle during a staple driving operation Exercise caution The SINGLE SEQUENTIAL ACTUATION MECHANISM is for use where pre...

Страница 18: ...ure to remove your finger from the trigger and disconnect the air hose from the stapler The direction of the exhaust vent can be changed by turning the top cover Exhaust vent Top cover USING THE NOSE CAP WARNING When detaching or attaching the nose cap be sure to remove your finger from the trigger and disconnect the air hose from the stapler The nose cap is attached to the push lever tip to prote...

Страница 19: ...fication and inspection of Hitachi Power Tools must be carried out by an Hitachi Authorized Service Center This Parts List will be helpful if presented with the tool to the Hitachi Authorized Service Center when requesting repair or other maintenance In the operation and maintenance of power tools the safety regulations and standards prescribed in each country must be observed MAINTENANCE AND INSP...

Страница 20: ...ervice personnel trained by Hitachi distributor or employer shall repair the Stapler Use only parts supplied or recommended by Hitachi for repair All quality Staplers will eventually require servicing or replacement of parts because of wear from normal use NOTE Specifications are subject to change without any obligation on the part of HITACHI 20 English 000Book N3804AB3 S US indb 20 000Book N3804A...

Страница 21: ...am per page 19 Staple feeder damaged Replace staple feeder Ribbon spring weakened or damaged Replace ribbon spring Check for proper staples Use only recommended staples Weak drive Slow to cycle Check air pressure Increase air pressure Do not exceed 120 psi 8 3 bar 8 5 kgf cm2 Check position of stapling depth adjuster Readjust per page 17 Use Hitachi pneumatic tool lubricant Driver blade worn Conta...

Страница 22: ...e manuel DEFINITION DES MOTS DE SIGNALISATION DANGER indique une situation imminente dangereuse qui si elle n est pas évitée entraînera la mort ou des blessures graves AVERTISSEMENT indique une situation potentiellement dangereuse qui si elle n est pas évitée risque d entraîner la mort ou des blessures graves ATTENTION indique une situation potentiellement dangereuse qui si elle n est pas évitée r...

Страница 23: ...FEUSE CONSIGNES RELATIVES À UN RISQUE D INCENDIE DE CHOC ÉLECTRIQUE OU DE BLESSURES CORPORELLES Généralités Afin de réduire les risques de choc électrique d incendie et de blessures physiques LIRE TOUTES LES INSTRUCTIONS AVANT D UTILISER L OUTIL DANGER AVERTISSEMENT 3 NE JAMAIS DIRIGER L OUTIL VERS SOI NI VERS QUELQU UN D AUTRE DANS L AIRE DE TRAVAIL Toujours supposer que l agrafeuse renferme des ...

Страница 24: ...es agrafes coincés on actionne le levier poussoir fixation et retrait du capuchon avant on ne s en sert pas on quitte l aire de travail on le laisse hors de la supervision ou du contrôle de l opérateur on le charge ou le décharge on le passe à quelqu un d autre on le soulève ou l abaisse ou on le déplace dans un autre endroit Ne jamais essayer de retirer des agrafes coincées ou de réparer l agrafe...

Страница 25: ...e l agrafeuse les fissures en surface sont dangereuses Pour éviter tout risque ne pas faire tomber l agrafeuse ni la heurter contre des surfaces dures et ne pas la rayer ni y graver d inscriptions De nombreux accidents sont provoqués par des agrafeuses mal entretenues Il y a un risque d éclatement si l agrafeuse est endommagée 8 Ne pas utiliser une agrafeuse en mauvais état de marche Des étiquette...

Страница 26: ...spositif de commutation sur la position MÉCANISME DE DÉCLENCHEMENT PAR CONTACT 2 Ne pas appuyer l agrafeuse trop fort contre le bois 3 Eloigner l agrafeuse du bois car elle effectue un rappel après l agrafage 4 éloignant le visage et les parties du corps de l agrafeuse 4 Ne jamais utiliser de coupleur NON dégageant sur l agrafeuse Si l on utilise un coupleur non dégageant sur l agrafeuse celui là r...

Страница 27: ...17 Ne jamais modifier ni altérer une agrafeuse Cela pourrait provoquer un mauvais fonctionnement et entraîner des blessures physiques SECURITE suite AVERTISSEMENT RESPONSABILITÉS DE L EMPLOYEUR DU PROPRIÉTAIRE DE L OUTIL ET DE L OPÉRATEUR DE L OUTIL 1 Veiller à ce que ce MANUEL reste à la disposition des personnes qui doivent utiliser ou entretenir l agrafeuse 2 Sélectionner un dispositif de commu...

Страница 28: ...sitif d alimenter Tête de clouage sortie Levier de verrouillage Plague de guidage Couvercle supérieur Adjuster Gâchette Ressort à boudin Gâchette Dispositif de commutation Vue agrandie de la section de la valve Dispositif de commutation de l opération d agrafage Dispositif de commutation Position relevée Dispositif de commutation Position abaissée MÉCANISME DE DÉCLENCHEMENT SÉQUENTIEL UNIQUE Dispo...

Страница 29: ...s fonctionnement de l outil et ou une rupture des agrafes et d entraîner des blessures Seuls les agrafes indiquées dans le tableau ci dessous pourront être utilisées avec ce agrafeuse Dimensions des agrafes Agrafes à finition de calibre 18 Calibre 18 Couronne 1 4 Min Max 043 1 08mm 049 1 25 mm 138 3 5mm 1 2 13mm 1 1 2 38mm ACCESSOIRES AVERTISSEMENT Les accessoires autres que ceux indiqués ci desso...

Страница 30: ...on Utiliser exclusivement de l air comprimé propre sec et régulé avec cette agrafeuse Les compresseurs d air utilisés pour alimenter l air comprimé à l agrafeuse devront respecter les exigences ANSI B19 3 Normes de sécurité pour les compresseurs des industries de transformation L humidité ou l huile dans le compresseur d air peuvent accélérer l usure et la corrosion de l agrafeuse Purger tous les ...

Страница 31: ...t ou égale ou supérieure à 150 psi 10 4 bar 10 6 kgf cm2 à savoir la plus élevée 4 Consommation d air Sélectionner la taille du compresseur en se reportant au tableau de consommation d air et aux formules de taille du compresseur Tableau de consommation d air Pression de fonctionnement psi bar kgf cm2 80 5 5 5 6 90 6 2 6 3 100 6 9 7 Consommation d air ft3 cycle ltr cycle 019 55 023 64 025 73 Formu...

Страница 32: ...AGRAFAGE SORTIR TOUS LES AGRAFES D AGRAFAGE TOUTES LES VIS DOIVENT ETRE SERREES A FOND Si certaines vis sont relâchées les revisser LE LEVIER POUSSOIR ET LA GACHETTE DOIVENT FONCTIONNER AVEC SOUPLESSE Levier poussoir Ne pas raccorder le tuyau d air Gâchette 2 Régler la pression d air sur 70 psi 4 9 bars 5 kgf cm2 Raccorder le tuyau d air Ne pas mettre d agrafes dans l agrafeuse Mettre le dispositi...

Страница 33: ...E DE LA PRESSION D AIR AVERTISSEMENT Ne pas dépasser 120 psi 8 3 bars 8 5 kgf cm2 Régler la pression d air à la pression de travail recommandée de 70 120 psi 4 9 8 3 bars 5 8 5 kgf cm2 en fonction de la longueur des agrafes et de la dureté du matériau La pression d air correcte est la pression la plus basse capable d effectuer le travail L utilisation d une pression d air supérieure à la pression n...

Страница 34: ...t provoquer des blessures Ne jamais enfoncer d agrafes des deux côtés d un mur en même temps Les agrafes pourraient traverser le mur et blesser quelqu un de l autre côté Ne jamais utiliser l agrafeuse si elle est défectueuse ou qu elle ne fonctionne pas normalement Ne pas se servir de l agrafeuse comme d un marteau Débrancher le tuyau d air de l agrafeuse quand 3 Tirer l alimenteur d agrafes légèr...

Страница 35: ...UNIQUE est aussi disponible comme numéro de pièce de commande 887916 METHODES D UTILISATION L agrafeuse est équipée d un levier poussoir et elle ne fonctionne pas tant que le levier poussoir n est pas enfoncé position supérieure Il y a deux façons d enfoncer des agrafes avec l agrafeuse Ces deux méthodes sont 1 Fonctionnement intermittent déclenchement par gâchette 2 Fonctionnement continu déclenc...

Страница 36: ... enfoncer une agrafe 4 Déplacer l agrafeuse le long de la pièce en lui faisant faire des bonds Chaque pression du levier poussoir enfonce une agrafe Dès que le nombre d agrafes voulu est enfoncé retirer le doigt de la gâchette Dispositif de commutation 1 Position abaissée Levier poussoir Au préalable tirer sur la gâchette 4 2 AVERTISSEMENT Ne pas mettre le doigt sur la gâchette sauf pendant une op...

Страница 37: ...ateurs débutants d utiliser LE MÉCANISME DE DÉCLENCHEMENT SÉQUENTIEL UNIQUE REMARQUE Si l on respecte bien tous les avertissements et toutes les instructions le fonctionnement s effectuera sans danger avec les trois systèmes MÉCANISME DE DÉCLENCHEMENT SÉQUENTIEL UNIQUE MÉCANISME DE DÉCLENCHEMENT PAR CONTACT Toujours manier les agrafes et le paquet avec précaution Si les agrafes tombent le liant d a...

Страница 38: ...supérieur Event d échappement Couvercle supérieur UTILISATION DU CAPUCHON DE BEC AVERTISSEMENT Lors du retrait ou de la fixation du capuchon avant s assurer de retirer son doigt de la gâchette et de débrancher le tuyau d air de l agrafeuse Le capuchon de bec se fixe au bout du bras de contact pour protéger la pièce à travailler des éraflures ou des dommages Retirer selon la séquence ci dessous lor...

Страница 39: ...s enduire ses pièces en acier d une mince couche de graisse pour éviter toute corrosion Ne pas remiser l agrafeuse dans un environnement froid La laisser dans un endroit chaud Lorsqu on ne se sert pas de l agrafeuse la remiser dans un endroit chaud et sec La ranger hors de portée des enfants 3 ETIQUETTE D AVERTISSEMENT Ne pas utiliser l agrafeuse si l ÉTIQUETTE D AVERTISSEMENT manque ou est endomm...

Страница 40: ... et de poussière Ouvrir le robinet de purge manuel Veiller à ce que le lubrificateur soit toujours plein Maintenir l agrafeuse bien graissée Remplir d huile de machine pneumatique Hitachi Nettoyer l élément du filtre et souffler de l air à travers le filtre dans le sens opposé au flux normal tous les jours Eviter le colmatage du filtre par la saleté Suivre les instructions du fabricant Nettoyer le m...

Страница 41: ...le remplacement La joint torique du piston est il usé ou endommagé Les agrafes s enfoncement trop profondément Vérifier la pression d air Réduire la pression d air Régler sur 70 120 psi Vérifier la position du dispositif de réglage de profondeur d agrafage Refaire le réglage selon les indications de la page 37 Certaines agrafes sont sautées Alimentation intermittente Vérifier si l on utilise les b...

Страница 42: ...s en este manual DEFINICIÓN DE LAS PALABRAS CLAVE PELIGRO indica una situación inminentemente peligrosa que si no se evita puede resultar en lesiones serias o en la muerte ADVERTENCIA indica una situación potencialmente peligrosa que si no se evita puede resultar en lesiones serias o en la muerte PRECAUCIÓN indica una situación potencialmente peligrosa que si no se evita puede resultar en lesiones...

Страница 43: ... IMPORTANTES DE SEGURIDAD PARA LA UTILIZACIÓN DE LA GRAPADORA INSTRUCCIONES PARA EVITAR UN RIESGO DE INCENDIO UNA DESCARGA ELÉCTRICA O LESIONES General Para reducir el riesgo de descarga eléctrica incendio o lesiones LEA TODAS LAS INSTRUCCIONES ANTES DE UTILIZAR LA HERRAMIENTA ADVERTENCIA 3 NO DIRIJA NUNCA LA HERRAMIENTA HACIA SÍ MISMO O HACIA OTRAS PERSONAS DEL ÁREA DE TRABAJO Piense siempre que ...

Страница 44: ...la tapa del morro cuando no la esté usando al salir del área de trabajo al dejar la grapadora fuera de la supervisión o el control del operador al cargar o descargar la grapadora al entregársela a otra persona al elevar bajar o mover en cualquier otra forma la grapadora a una nueva ubicación No trate de desatascar o reparar la grapadora salvo que haya desconectado el conducto de aire de la grapado...

Страница 45: ...o golpee contra superficies duras y no arañe o haga grabaciones en el mismo Muchos accidentes se producen por un mantenimiento incorrecto de las grapadoras Existe riesgo de explosión si la grapadora está dañada 8 No utilice la grapadora si no está en orden de operación adecuado Etiquetas y divisiones físicas deberán ser usadas para el control 9 Utilice solo accesorios identificados por Hitachi par...

Страница 46: ... un acoplador sin descarga en la grapadora éste podría permanecer cargado con aire después de haberlo desconectado y por lo tanto disparar una fijación incluso después de haberlo desconectado La grapadora y la manguera de aire deben contar con un acople de manguera de manera que se pueda remover toda la presión de la grapadora al desconectar la junta de acoplamiento 5 Compruebe la palanca de empuj...

Страница 47: ...odría funcional mal y provocar lesiones RESPONSABILIDADES DEL EMPLEADOR EL PROPIETARIO DE LA HERRAMIENTA Y EL OPERADOR DE LA HERRAMIENTA SEGURIDAD Continuación ADVERTENCIA 1 Asegúrese de que este MANUAL esté al alcance de los operadores y del personal de mantenimiento 2 Seleccione un dispositivo de comunicación apropiado considerando las aplicaciones para las que se usa la grapadora 3 Capacite al ...

Страница 48: ...ón de engrapado Dispositivo de conmutación Posición hacia arriba Dispositivo de conmutación Posición hacia abajo MECANISMO DE ACTUACIÓN SECUENCIAL SIMPLE Switching device upward position MECANISMO DE ACTUACIÓN POR CONTACTO Switching device downward position OPERACIÓN NOTA La información contenida en este manual ha sido diseñada para ayudarle a utilizar con seguridad esta grapadora Algunas de las i...

Страница 49: ...rapas legítimos HITACHI para el N3804AB3 S El uso de otras grapas puede producir un fallo de funcionamiento de la herramienta y o la rotura del grapa lo que provocaría a su vez lesiones de gravedad Con esta grapadora solamente podrán utilizarse las grapas indicadas en la tabla siguiente Dimensiones de las grapas 18 medida grapas de acabado Calibre 18 Corona de 1 4 Mín Máx 043 1 08mm 049 1 25mm 138...

Страница 50: ...ra comprobar si el suministro de lubricante es adecuado Utilice lubricante para herramientas neumáticas Hitachi Lado del compresor Lado de la grapadora Filtro Lubricador Regulador ACCESORIOS OPCIONALES vendido aparte Kit de mecanismo de actuación secuencial simple n º de código 887916 Lubricante para herramientas neumáticas Aceitador de 8 onzas 25 cc Núm de código 877153 Aceitador de 4 onzas 120 c...

Страница 51: ...guera de aire Las mangueras de suministro de aire comprimido deben tener una presión operativa mínima igual o mayor que la presión procedente de la fuente de potencia si un regulador falla o 150 psi 10 4 bares 10 6 kgf cm2 el valor que sea mayor 4 Consumo de aire Utilizando la tabla de consumo de aire y la fórmula de tamaño del compresor de aire busque el tamaño de compresor correcto Tabla de cons...

Страница 52: ...ción completamente hacia arriba tal como se muestra en el diagrama De lo contrario no funcionará correctamente Posición hacia arriba Dispositivo de conmutación LA GRAPADORA NO DEBERÁ TENER FUGAS DE AIRE 3 Con el dedo en el gatillo presione la palanca de empuje contra la pieza de trabajo LA GRAPADORA NO DEBERÁ FUNCIONAR No apriete el gatillo Presione la palanca de empuje 4 Separe la palanca de empu...

Страница 53: ...apas Cargador 5 1 Sin tocar el gatillo presione la palanca de empuje contra la pieza de trabajo Apriete el gatillo LA GRAPADORA DEBE OPERAR 2 Retire el dedo del disparador Finaliza la operación de la grapadora la cuchilla impulsora vuelve a la parte superior 6 Ajuste el dispositivo de conmutación a la posición hacia abajo MECANISMO DE ACTUACIÓN POR CONTACTO Ajuste el dispositivo de conmutación a l...

Страница 54: ... para determinar el sistema de accionamiento Antes de iniciar el trabajo controle el dispositivo de encendido de la grapadora Esta grapadora Hitachi incluye un dispositivo de encendido de la operación de engrapado Antes de iniciar el trabajo asegúrese de que el dispositivo de encendido esté correctamente ajustado Si no está ajustado en forma apropiada la grapadora no funcionará correctamente Nunca...

Страница 55: ...MECANISMO DE ACTUACIÓN SECUENCIAL SIMPLE también está disponible como el número de pedido de parte 887916 MÉTODOS DE OPERACIÓN Esta grapadora está equipada con una palanca de empuje y no funcionará a menos que ésta esté presionada posición hacia arriba Existen dos métodos de operación para clavar grapas con esta grapadora Estos métodos son 1 Operación intermitente Disparo con el gatillo 2 Operació...

Страница 56: ...ona la palanca de manera accidental Palanca de empuje Gatillo 4 3 ADVERTENCIA Se dispara una grapa cada vez que se presiona el gatillo siempre que la palanca de empuje permanezca presionada 2 Operación continua Disparo con la palanca de empuje Utilización del mecanismo de actuación por contacto ADVERTENCIA Para evitar el doble disparo o el disparo accidental debido a la reculada 1 No presione la g...

Страница 57: ...dor asegúrese de retirar su dedo del disparador y de desconectar la manguera de aire del grapadora Para asegurar que cada grapa penetre con la misma profundidad cerciórese de que 1 la presión de aire suministrada a la grapadora permanezca constante regulador instalado y trabajando adecuadamente y 2 esté sujetando firmemente la grapadora contra la pieza de trabajo Si las grapas penetran demasiado o...

Страница 58: ...ta superior UTILIZACIÓN DE LA TAPA PARA EL MORRO ADVERTENCIA Cuando retire o coloque la tapa para el morro asegúrese de retirar su dedo del gatillo y desconecte la manguera de aire de la grapadora La tapa para el morro está fijada a la punta de la palanca de empuje para proteger la pieza de trabajo de ralladuras o daños Cuando no estén en uso retírelos en el orden indicado abajo 1 DESCONECTE LA MA...

Страница 59: ... inspección de las herramientas eléctricas Hitachi deben ser realizadas por un Centro de Servicio Autorizado de Hitachi Esta lista de repuestos será de utilidad si es presentada junto con la heramienta al Centro de Servicio Autorizado de Hitachi para solicitar la reparación o cualquier otro tipo de mantenimiento En el manejo y el mantenimiento de las herramientas eléctricas se deberán observar las...

Страница 60: ...enimiento de la palanca de empuje en perfectas condiciones Garantizar la seguridad del operador y la operación eficaz de la grapadora Sople diariamente Lubricación de la grapadora después de haberla utilizada Prolongar la duración de la grapadora Aplique 5 10 gotas de lubricante a la grapadora Drene el compresor de aire todos los días Mantener la grapadora en buenas condiciones de operación Abra l...

Страница 61: ...otra de reemplazo a Hitachi Está desgastada o dañada la junta tórica del pusón Las grapas penetran demasiado Compruebe la presión de aire Reduzca la presión de aire Adjústela a 70 120 psi Controle la posición del ajustador de profundidad de engrapado Reajuste de acuerdo a la página 57 Salto de grapas Alimentación intermitente Compruebe si las grapas las apropiadas Utilice solamente las grapas reco...

Страница 62: ...13 14A 15 16 18 23 24A 25 26 46A 27A 30 31A 32A 33 34 35 38 44 21 50 51 45 52 53 54 39 40 41 42A 43 53 41 55 56 57 44 58 59A 60 61 62 63 64 21 66 67 68 69 70 71 72 73 74 75 77 78 65A 17A 62 000Book N3804AB3 S US indb 62 000Book N3804AB3 S US indb 62 2015 12 25 16 49 57 2015 12 25 16 49 57 ...

Страница 63: ...71 2 45 884975 1 D3 x 32 46A 1 48 959155 1 D3 97 50 877763 1 I D 14 A B C D 51 884963 1 52 873570 1 P 18 53 676531 2 P 7 54 884964 1 55 885984 1 56 885985 1 57 880032 1 M4 x 22 58 885977 1 59A 886737 1 60 885970 1 61 885975 1 62 885976 1 63 885974 1 64 885978 1 65A 1 66 874759 1 67 885983 1 68 885889 1 69 885971 1 70 949813 2 M4 x 12 71 885982 1 72 885981 1 73 949518 2 D3 x 18 74 949821 2 M5 x 16 ...

Страница 64: ...Intercity Tower A 15 1 Konan 2 chome Minato ku Tokyo 108 6020 Japan Distributed by PO Box 970 Braselton GA 30517 Hitachi Koki Canada Corp 450 Export Blvd Unit B Mississauga ON L5S 2A4 000Book N3804AB3 S US indb 64 000Book N3804AB3 S US indb 64 2015 12 25 16 49 57 2015 12 25 16 49 57 ...

Отзывы: