background image

English

   - 20 -

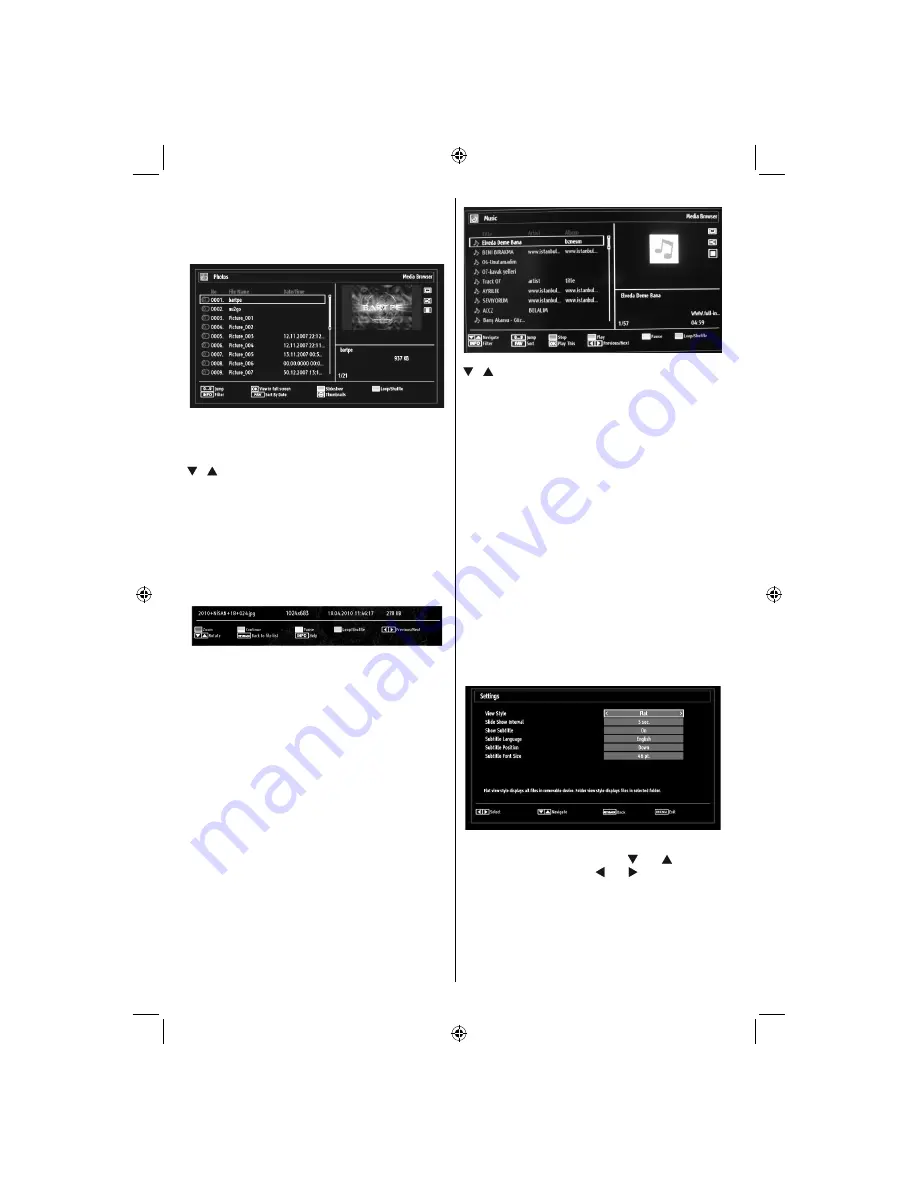
Viewing Photos via USB

When you select Photos from the main options, 
available image 

fi

 les will be 

fi

 ltered and listed on this 

screen.

0...9 (Jump) (Numeric buttons)

: Jump to selected 

fi

 le using the numeric buttons.

OK

: Views the selected picture in full screen.

 /   : Navigate.

Slideshow (GREEN button)

: Starts the slideshow 

using all images.

TXT button

: Views images in thumbnails.

FAV button

: Sorts 

fi

 les by date.

OK


button

: Toggles viewing style.

BLUE button

: Loop/shuf

fl

 e.

Slideshow Options

Pause (YELLOW button)

: Pauses the slideshow.

Continue (GREEN button)

: Continues the slideshow.

Loop/Shuf

fl

 e (BLUE button)

: Press once to disable 

Loop. Press again to disable both Loop and Shuf

fl

 e. 

Press once more to enable only Shuf

fl

 e. Press again 

to enable all. You can follow the disabled functions 
with the change of the icons. 

Previous/Next (Left/Right buttons)

: Jumps to 

previous or next 

fi

 le on slideshow.

Rotate (Up/Down buttons)

: Rotates the image using 

up/down buttons.

RET/BACK

: Back to 

fi

 le list.

INFO

: Displays help screen.

Playing Music Files via USB 

When you select Music from the main options, 
available audio 

fi

 les will be 

fi

 ltered and listed on this 

screen.

 /   : Navigate.

Play (GREEN button)

: Plays all media 

fi

 les starting 

with the selected one.

Stop (RED button)

: Stops playback.

Pause (YELLOW  button)

: Pauses the selected 

playback.

Sort (FAV button)

: Sorts files by Title, Artist or 

Album.

Loop/Shuf

fl

 e (BLUE button)

: Press once to disable 

Loop. Press again to disable both Loop and Shuf

fl

 e. 

Press once more to enable only Shuf

fl

 e. Press again 

to enable all. You can follow the disabled functions 
with the change of the icons.

0..9 (Numeric buttons)

: The TV will jump to the 

fi

 le starting with the letter you input via the numeric 

buttons on your remote control.

Play This (OK button)

: Plays the selected 

fi

 le.

Previous/Next (Left/Right buttons)

: Jumps to 

previous or next 

fi

 le to play.

INFO

: Changes 

fi

 lter options.

Media Browser Settings

You can set your Media Browser preferences by 
using the Settings dialog. Press “ ” or “ ” button to 
highlight an item and use “ ” or “ ” button to set.

View Style

:


Sets default browsing mode.

Slide Show Interval

:


Sets slide show interval time.

Show Subtitle

:


Sets subtitle enabling preference.

Subtitle Position

:


Sets subtitle position as up or 

down.

Subtitle Font Size

: Sets subtitle font size (max. 

54pt).

[GB]_MB65_3900UK_IDTV_42843W_BRONZE18_10073078_50189657.indd   20

[GB]_MB65_3900UK_IDTV_42843W_BRONZE18_10073078_50189657.indd   20

31.05.2011   14:51:24

31.05.2011   14:51:24

Содержание L42VK04U

Страница 1: ...ure reference These instructions contain important information which will help you get the best from your television and ensure safe and correct installation and operation For any help concerning set up and use of your TV please call the Customer Helpline 0845 604 0105 Lines open 9am 8pm Monday to Saturday and 10am 4pm Sunday 529 8439 ...

Страница 2: ...www hitachidigitalmedia com 50189657 ...

Страница 3: ...s Favourites 18 Button Functions 18 Managing Stations Sorting Channel List 18 On Screen Information 19 Media Playback Using Media Browser 19 Viewing Videos via USB 19 Viewing Photos via USB 20 Media Browser Settings 20 Changing Image Size Picture Formats 21 Configuring Picture Settings 22 Operating Picture Settings Menu Items 22 Picture Settings Menu Items 22 PC Picture Settings Operation 22 Confi...

Страница 4: ...ly give these direction for use Thank you for choosing this product This Instruction Book will guide you for the proper operation of your TV Before operating the TV please read this Instruction Book thoroughly Keep this Instruction Book in a safe place for future references Intended Use This device is intended to receive and display TV programs The different connection options make an additional e...

Страница 5: ...ween the pieces of equipment are properly made and in accordance with the manufacturer s instructions Switch off and withdraw the mains plug before making or changing connections DO consult your dealer if you are ever in doubt about the installation operation or safety of your equipment DO be careful with glass panels or doors on equipment DO route the mains lead so that it is not likely to be wal...

Страница 6: ...sion leads to the set Check the fuse rating on the new plug this should be fitted with a 5 Amp fuse which conforms to either ASTA or BSI BS1362 approvals these are easily identifiable by either the ASA or symbols If you are in any doubt about the installation of an extension lead please consult a competent electrician Moisture and Water Do not use this device in a humid and damp place avoid the ba...

Страница 7: ...on System Cable TV etc from Tuner Device connected to the protective earthing of the building installation through the mains connection or through other apparatus with a connection to protective earthing and to a television distribution system using coaxial cable may in some circumstances create a fire hazard Connection to a cable distribution system has therefore to be provided through a device p...

Страница 8: ... control and pack the remote control with the TV set NOTE The TV set should be stored in a dry and dust free room Package Contents LCD TV SCREEN SCREEN LANG LANG SUBTITLE SUBTITLE PIP PIP MENU MENU RETURN RETURN OK OK SOURCE SOURCE FAV FAV PRESETS PRESETS SLEEP SLEEP INFO INFO EPG EPG V V V V P P P P 1 2 3 4 6 5 9 7 8 0 RC 3900 Remote Control Batteries 2 X AAA Quick Guide Instruction Book Digital ...

Страница 9: ...ptimum level Note that some picture settings will be unavailable to be changed when the TV is in Power Save Mode When the TV is not in use please switch off or disconnect the TV from the mains wall socket This will also reduce energy consumption Disconnect power when going away for longer time Please help us to save environment by following these steps Repair Information Please refer all servicing...

Страница 10: ...picture mode 20 in Media Browser video mode Okay Confirm Hold in TXT mode Edit 21 Channel List Cursor Down 22 Exit Return Index page in TXT mode 23 Cursor Right Subpage in TXT mode 24 Cursor Up 25 Previous programme 26 Yellow button Pause in Media Browser 27 Timeline Schedule in EPG Blue button Edit Channel List Filter İn Favourite 28 List EPG Loop Shuffle in Media Browser No function 29 Subtitle ...

Страница 11: ...connecting component video You can connect the component video and audio sockets with a device that has component output Connect the component video cables between the COMPONENT VIDEO INPUTS on on the TV and the component video outputs of your device While connecting be sure that the letters on your TV Y Pb Pr correspond with your device s connectors PC YPbPr Audio Inputs 4 are used for connecting...

Страница 12: ...CI card A CI card allows you to view all the channels that you subscribe 1 to For more information see Conditional Access section Side USBs 2 Headphone jack is used for connecting an external headphone to the 3 system Connect to the HEADPHONE jack to listen to the TV from headphones optional Video Input is used for connecting video signals of external 4 devices Connect the video cable between the ...

Страница 13: ...o the USB inputs of the TV You can connect two usb device to your TV by using the USB inputs of the TV at the same time NOTE It is possible certain types of hard disk drives are not supported Connecting the LCD TV to a PC For displaying your computer s screen image on your LCD TV you can connect your computer to the TV set Power off both computer and display before making any connections Use 15 pi...

Страница 14: ...yer to your LCD TV you can use connectors of the TV set DVD players may have different connectors Please refer to your DVD player s instruction book for additional information Power off both the TV and the device before making any connections NOTE Cables shown in the illustration are not supplied If your DVD player has an HDMI socket you can connect via HDMI When you connect to DVD player as illus...

Страница 15: ... to indicate that features such as Standby Search Over Air Download or Timer is active Digital Teletext for UK only Press the button The digital teletext information appears Operate it with the coloured buttons cursor buttons and OK button The operation method may differ depending on the contents of the digital teletext Follow the instructions displayed on digital teletext screen When Press SELECT...

Страница 16: ...ed programme To select programmes press the numeric buttons consecutively When the pressing time is due for the second numeric button only the first digit programme will be displayed Press directly the programme number to reselect single digit programmes First Time Installation IMPORTANT Ensure that the aerial is connected and a Common Interface module is not inserted before switching on the TV fo...

Страница 17: ...s To view the EPG menu please press EPG button on the remote control Press buttons to navigate through channels Press buttons to navigate through the programme list EPG menu displays available information on all channels Please note that event information is updated automatically If there are no event information data available for channels EPG will be displayed with blanks OK Options Displays pro...

Страница 18: ...ton Press OK button and the following menu screen will be displayed Select Automatic Channel Scan by using button and press OK button Automatic Channel Scan options will be displayed You can select Digital Aerial Analogue or Digital Aerial Analogue tuning using and OK buttons Auto Channel Scan Menu Operation Digital Searches and stores aerial DVB stations Analogue Searches and stores analogue stat...

Страница 19: ...on again Clear Service List This setting is visible only when the Country option is set to Denmark Sweden Norway or Finland Use this setting to clear channels stored Press or button to select Clear Service List and then press OK The following OSD message will be displayed on the screen Press OK to cancel Select Yes by pressing or button and press OK to delete all of the channels Managing Stations ...

Страница 20: ... to tag untag a single channel Select the channel that you want to lock and select Lock option Press OK button to continue You will be asked to enter parental control PIN Default PIN is set as 0000 Enter the PIN number Press OK button when the desired channel is highlighted to lock unlock the channel Lock symbol will be displayed next to the selected channel Managing Stations Favourites You can cr...

Страница 21: ...ou can play music picture and video files from the connected USB memory stick Use or button to select Videos Photos Music or Settings You can connect two USB devices to your TV If both USB devices include music picture or video files USB selection osd will be displayed on the screen The first USB device connected to the TV will be named as USB Drive1 Select a device by using or button and press OK...

Страница 22: ...isted on this screen Navigate Play GREEN button Plays all media files starting with the selected one Stop RED button Stops playback Pause YELLOW button Pauses the selected playback Sort FAV button Sorts files by Title Artist or Album Loop Shuffle BLUE button Press once to disable Loop Press again to disable both Loop and Shuffle Press once more to enable only Shuffle Press again to enable all You ...

Страница 23: ...r 16 9 aspect ratio pictures that have been squeezed into a normal picture 4 3 aspect ratio use the 16 9 mode to restore the picture to its original shape Subtitle This zooms up the wide picture 16 9 aspect ratio with subtitles to the full screen NOTE You can shift to screen up or down by pressing buttons while picture zoom is selected as panaromic 14 9 Zoom Cinema or Subtitle 14 9 This zooms up t...

Страница 24: ... will be unavailable to be set Picture Zoom Sets the picture size to Auto 16 9 Subtitle 14 9 14 9 Zoom 4 3 Panoramic or Cinema Reset Resets the picture settings to factory default settings While in VGA PC mode some items in Picture menu will be unavailable Instead VGA mode settings will be added to the Picture Settings while in PC mode PC Picture Settings Operation For adjusting PC picture items d...

Страница 25: ...ammes For instance volume level of advertisements tend to be louder than programmes Dynamic Bass Dynamic Bass is used to increase bass effect of the TV set Surround Mode Surround mode can be changed as On or Off Digital Out Sets digital out audio type Configuring Your TV s Settings Detailed settings can be configured to suit your personal preferences Press MENU button and select Settings icon by u...

Страница 26: ...ing or button Press OK button to view Settings menu Use or button to highlight Conditional Access and press OK to view menu items Configuring Language Preferences You can operate the TV s language settings using this menu Press MENU button and select the fifth icon by using or button Press OK button to view Settings menu Use or button to highlight Language and press OK to continue Use or button to...

Страница 27: ...n Use or button to set an item Press OK button to view more options If you set Country option as UK in the first time installation Maturity Lock option will not be visible This setting is available only for EU countries Menu Lock Menu lock setting enables or disables the menu access You can disable access to the installation menu or the whole menu system Maturity Lock When set this option gets the...

Страница 28: ...the timer Press RED button to cancel Editing a Timer Select the timer you want to edit by pressing or button Press GREEN button Edit Timer menu screen will be displayed When finished with editing press GREEN button to save You can press MENU button to cancel Deleting a Timer Select the timer you want to delete by pressing or button Press RED button Select YES by using or buttons to delete the time...

Страница 29: ...er information on Power Save Mode NOTE Backlight function will be invisible if Power Save Mode is set to on Blue Background Activates or deactivates blue background system when the signal is weak or absent Software Upgrade To ensure that your TV always has the most update information you can use this setting In order for the proper operation please ensure that the TV is set to standby mode You can...

Страница 30: ...her on your TV Note that is the signal degrades for example in poor adverse weather conditions some text errors may occur or the teletext mode may be aborted Teletext function buttons are listed below Teletext Mix Activates teletext mode when pressed once Press again to place the teletext screen over the programme mix Pressing again will quit the teletext mode RETURN Index Selects the teletext ind...

Страница 31: ...uency Please retune the channels The picture quality may degrade when two peripherals are connected to the TV at the same time In such a case disconnect one of the peripherals No Picture Is the aerial connected properly Are the plugs connected tightly to the aerial socket Is the aerial cable damaged Are suitable plugs used to connect the aerial If you are in doubt consult your dealer No Picture me...

Страница 32: ...0Hz O 1080I 50Hz O 1080I 60Hz O 1080P 50Hz O 1080P 60Hz O 1080P 24 HZ O X Not Available O Available In some cases a signal on the LCD TV may not be displayed properly The problem may be an inconsistency with standards from the source equipment DVD Set top box etc If you do experience such a problem please contact your dealer and also the manufacturer of the source equipment Index Resolution Freque...

Страница 33: ...1 1024x768 70Hz 12 1024x768 72Hz 13 1024x768 75Hz 14 1152x864 75Hz 15 1280x768 60Hz 16 1360x768 60Hz 17 1280x768 75Hz 18 1280x960 60Hz 19 1280x960 75Hz 20 1280x1024 60Hz 21 1280x1024 75Hz 22 1400x1050 60Hz 23 1600x1200 60Hz 24 1920x1080 60Hz 25 1920x1200 60Hz 26 480p 60Hz 27 576p 50Hz 28 720p 50Hz 29 720p 60Hz 30 1080i 50Hz 31 1080i 60Hz 32 1080p 24Hz 33 1080p 25Hz 34 1080p 30Hz 35 1080p 50Hz 36 1...

Страница 34: ... Audio WAV AIFF None LPCM MPEG1 Program Stream MPEG 1 MPEG1 MP3 AC 3 optional and PCM MPEG2 Program Stream MPEG 2 MPEG2 MP3 AC 3 optional and PCM AVI Xvid XVID MPEG2 MP3 AC 3 and PCM GB _MB65_3900UK_IDTV_42843W_BRONZE18_10073078_50189657 indd 32 GB _MB65_3900UK_IDTV_42843W_BRONZE18_10073078_50189657 indd 32 31 05 2011 14 51 39 31 05 2011 14 51 39 ...

Страница 35: ... version Note on reboot operation Reboot is the last step in software upgrade operation if download of new software is finished successfully During reboot TV makes final initializations In reboot sequence panel power is closed and front led indicates the activity with blinking Around 5 minutes later TV restarts with new software activated If your TV fails to restart in 10 minutes unplug power for ...

Страница 36: ...put signal Pin Input signal 1 TMDS Data2 11 TMDS Clock Shield 2 TMDS Data2 Shield 12 TMDS Clock 3 TMDS Data 2 13 CEC 4 TMDS Data 1 14 Reserved N C on device 5 TMDS Data1 Shield 15 SCL 6 TMDS Data1 16 SDA 7 TMDS Data0 17 DDC CED Ground 8 TMDS Data0 Shield 18 5V Power 9 TMDS Data0 19 Hot Plug Detect 10 TMDS Clock Signal Input PC RGB Terminal D sub 15 pin connector Pin Input signal 1 R 2 G or sync on...

Страница 37: ...ompliant with ISO IEC 13522 5 UK engine Profile 1 for UK Object carousel support compliant with ISO IEC 135818 6 and UK DTT profile Frequency range 474 850 MHz for UK models 170 862 MHz for EU models Transmission standard DVB T MPEG 2 Demodulation COFDM with 2K 8K FFT mode FEC all DVB modes Video MP ML PAL 4 3 16 9 Audio MPEG Layer I II 32 44 148kHz DIMENSIONS mm DxLxH with foot 246 x 1014 x 687 W...

Страница 38: ...erent languages This is possible if on an analogue TV each of the two channels of the stereo tracks for left and right channels are occupied with one audio track in mono single channel In digital TV multiple audio streams can be broadcasted and selected on the receiver side NTSC United States standard for scanning television signals that has been adopted by some other countries OSD On Screen Displ...

Страница 39: ...ges that may be implemented in broadcast signals and technologies Some digital television functions may not be available in all countries We continually strive to improve our products therefore specifications may change without prior notice For advice on where to purchase accessories please contact the store where you purchased your equipment GB _MB65_3900UK_IDTV_42843W_BRONZE18_10073078_50189657 ...

Страница 40: ...erated in accordance with the instructions contained in this manual It must be used solely for domestic purpose The guarantee will be rendered invalided if the product is re sold or has been damaged by inexpert repair Specifications are subject to change without notice The manufacturer disclaims any liability for the incidental or consequential damages The guarantee is in addition to and does not ...

Отзывы: