background image

11 

COMPONENT NAMES (continued) 
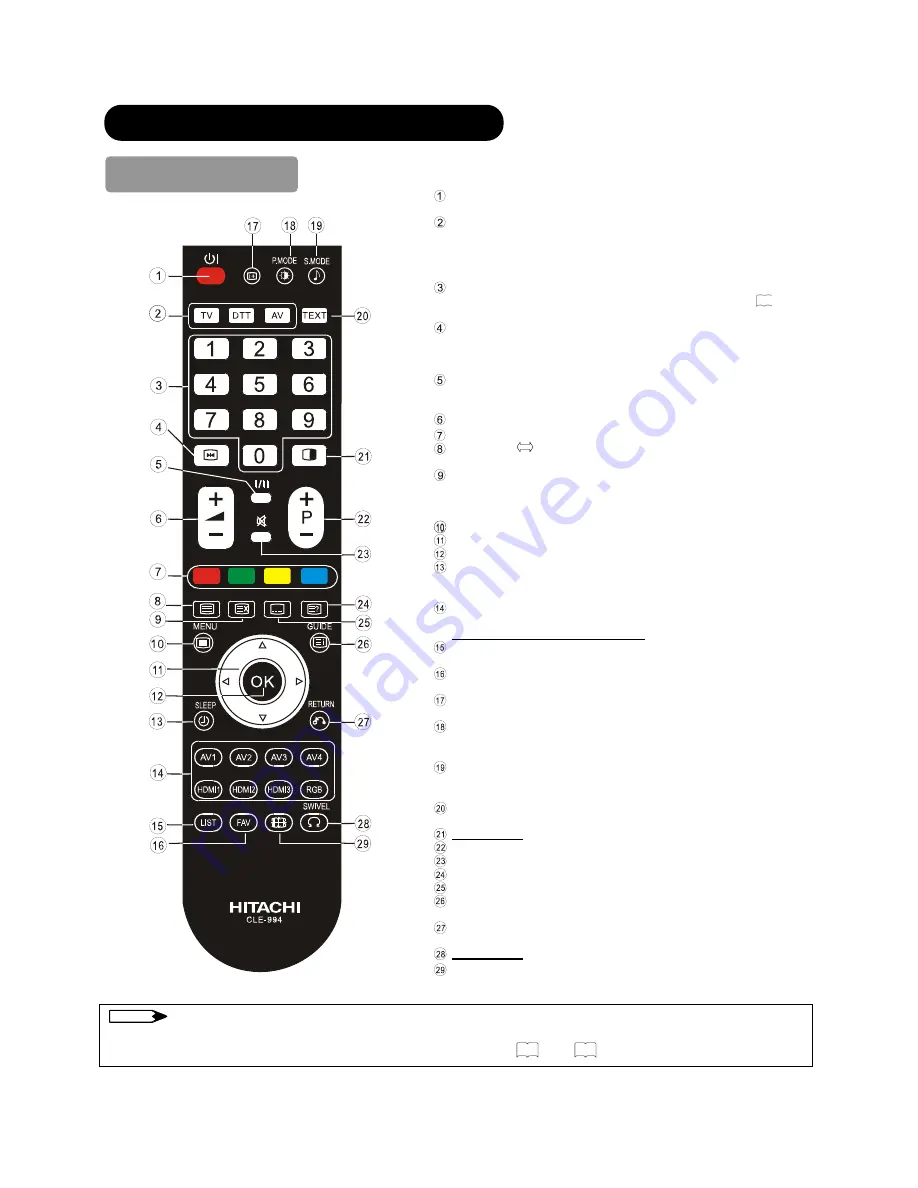
Remote Control    

 Sub Power  

Press this button to switch TV On or Off standby.

  Device Select (TV/DTT/AV) 

Press these buttons to select the device (TV/DTT/AV) to be controlled 
by this remote control. 
The selected button will light up to display the selected mode.Normally, 
select “DTT”. 

  Program Select [Page Select] 

Press these buttons to select a TV program directly.Refer to

26

 for 

details.

 Freeze [Hold] 

Press this button to change the picture to freeze mode. 
Press it again to return to normal picture. (Also, it holds the page in 
teletext mode.) 

 CHI/II 

This is exclusively for TV audio A2/NICAM mode. 
Also,press this button to select Audio Language in DTT mode. 

 Volume Up/Down 

 [Color] 
 TV/Text [TV

!

Text] 

This switches between the TV mode and the Teletext mode. 

 Time [Cancel] 

Press this button to display the time when receiving an analog TV 
program. The time is not displayed if the recevied signal does not have 
any time information. 

  Menu [Back Light] 
 Cursor 
 OK 
 Off Timer 

This automatically sets the power to standby mode when the selected 
time period has elapsed. (0

ĺ

30

ĺ

60

ĺ

90

ĺ

120min.) 

  Input Select/DVD Control 

Press these buttons to change input mode.   

HDMI2, HDMI3 input are not available.

Program List 

It displays program list in DTT mode.

Favorite List 

It displays favorite list in DTT mode.

 Recall  

Press this button shows the input signal status.

 Picture Mode 

Picture mode can be changed each time pressed in the following 
sequence. Dynamic

ĺ

Natural

ĺ

Cinema 

 Sound Mode 

Sound mode can be changed each time pressed in the following 
sequence. Movie

ĺ

Music

ĺ

Speech

ĺ

Favorite.

Text 

Press to activate and to exit from Teletext.

 Not Available
  Channel Up/Down[Page select] 
 Mute 
 [Reveal] 
 [Subtitle] 
 Guide [Index] 

It displays EPG screen in DTT mode 

 Return 

You can use this to return to the previous menu.

Not Available

  Picture Size [Zoom] 

Press this button to change picture size.

NOTE

Some buttons are only for Teletext mode, and other buttons have different functions in Teletext mode from the use of TV 
mode. Those buttons are indicated by 

[  ]

. Refer to "Analog Teletext" on

34

and

35

.

Содержание L26H01AU

Страница 1: ......

Страница 2: ...ion Please read this user manual carefully before operating this product To ensure proper operation please read and follow ALL the instructions especially the IMPORTANT SAFETY INSTRUCTIONS and SAFETY PRECAUTIONS Please keep this user manual for future reference ...

Страница 3: ...e the On Screen Display OSD system 36 DTT Main Menu List 36 Installing Channels 37 Restoring Channels 37 Channel Selections 38 Making Favorite List 39 Information Banner 39 Digital Teletext 40 Electronic Program Guide EPG 40 Subtitle 41 Parental Guidance 41 Audio Language MPEG Dolby Digital 41 Digital Audio Output 41 Change Pin 42 Local Time 42 Checking DTT System Information 42 Jump to TV Setup M...

Страница 4: ...ssionˁ Ⴠ All other products and company names used in this manual are trademarks or registered trademarks of their respective owners Tra ademark Credits Ⴠ VGA and XGA are trademarks of International Business Machines Corporation Ⴠ VESA is a registered trademark of the Video Electronics Standard Association Ⴠ HDMI the HDMI logo and High Definition Multimedia Interface are trademarks or registered t...

Страница 5: ...ory action The contents will be clearly indicated in an illustration or nearby the symbol at the left indicates that the power plug should be disconnected from the power outlet WARNING There is a risk of fire electric shock or serious injury Unplug the power cord immediately when serious problems occur Serious problems such as Ⴠ Smoke abnormal odor or sound comes out from the product Ⴠ No picture ...

Страница 6: ... shock do not touch the product when starts lightning Disconnect the plug from the power outlet Do not do anything that may damage the power cord Ⴠ Do not damage modify twist forcibly bend heat or pull excessively the power cord Ⴠ Do not place heavy objects including the unit itself on top of the power cord Ⴠ If the power cord is damaged contact your dealer for repairs or exchange Use only with de...

Страница 7: ...of the image on the CRT based television Disconnect all of the external connection cables and detach the anti tumble measures before moving the unit Ɣ It may cause fire electrical shock or personal injuries Connect the power plug securely Ɣ Improper connection will cause overheating and may result in fire Ɣ Do not touch the blades of the plug while connecting it to the wall socket It could cause e...

Страница 8: ... unit It is because of the communication failure Please note that this is not malfunction When you dispose this product at the end of its life follow the regulations in your residential area Ɣ For more information contact the local authority or the dealer where you purchased the product Cleaning and Maintenance Please make sure to unplug the power cord before cleaning the unit How to clean the LCD...

Страница 9: ...he display surface In addition do not impact strongly on the surface of the panel because LCD panel is made with fine processing glass ŏ Residual image When a still image or menu is displayed on the screen for a short time about a minute and then switches to another image it may leave an after image on the screen The residual image will disappear on its own ŏ The Usage under the Low Temperature En...

Страница 10: ...LE 994 i OK AA size batteries X2 Power Cord The type of power plug provided may be different from this drawing for some countries 2 Connection 14 20 Connect the power cord to the rear panel ཱ Connect to the aerial lead and external equipment Example Connecting aerial lead through DVD STB ི Connect the plug into the wall socket after all other connections are completed CAUTION Ɣ Ensure that both en...

Страница 11: ... will appear as and enter 0000 as your initial password ུ Select one of the scanning methods from Manual scan Quick scan or Auto scan TV Then go to with TV channel installation Press button to access TV Main Menu ཱ Select Setup from Main Menu ི Select Auto scan From Setup menu and press button ཱི Select Search to turn the local channels automatically NOTE Ɣ If you want to change the setting after c...

Страница 12: ...1AU L32H01AU ᐭ Side Input ᐮ Power Cord Socket ᐯ Terminal Board External Device Connection ᐰ Control Panel see below for details Please refer to 14 18 for the detailed information for the connections Control Panel including Top Input 1 2 3 6 7 4 5 ᐭ Sub Power button ᐮ Menu button ᐯ Channel Up S button ᐰ Channel Down T button ᐱ Volume Up f button ᐲ Volume Down ebutton ᐳ Input Select OK button ཱ ᐲ ᐴ ...

Страница 13: ... information Menu Back Light Cursor OK Off Timer This automatically sets the power to standby mode when the selected time period has elapsed 0ĺ30ĺ60ĺ90ĺ120min Input Select DVD Control Press these buttons to change input mode HDMI2 HDMI3 input are not available Program List It displays program list in DTT mode Favorite List It displays favorite list in DTT mode Recall Press this button shows the in...

Страница 14: ...esult in physical injury and or property damage including fire Ⴠ Never mix used and new batteries in the device Ⴠ Replace all the batteries in a device at the same time Ⴠ Remove the batteries if the remote control is not going to be used for an extended period of time To avoid possible failure read the following instructions and handle the remote control properly Ɣ Do not drop or have an impact on...

Страница 15: ...vision in the small space such as inside the rack closet or the box Leave more than 10cm of clearance from each side of television and 30cm from the top of television to wall Without Swivel function Leave at least 10cm of clearance behind rear unit With Swivel functrion Leave at least 35cm of clearance to obtain the maximum performance of Swivel Function for L32H01AU Anti Tumble Measures Install i...

Страница 16: ...ave any other external equipment Connect the aerial lead directly into the socket at rear panel ᐮ When you have one or more external devices to connect 1 Use RF cable to connect between each equipment and aerial 2 Connect the Aerial Lead to an equipment In socket marked 3 Connect the RF cable from the equipment Out to the other equipment In 4 Then connect from the equipment Out to ANT on the LCD s...

Страница 17: ...s recommended for higher quality picture AV3 can be connected to the equipment with S Video output and Composite output If your external device has a S Video terminal S Video connection is recommended for higher quality picture NOTE Ɣ If both S video and Composite Video input terminals of AV3 are connected at the same time S Video will have its priority OUT VCR DVD player recorder Set Top Box Exam...

Страница 18: ...th HDMI output If the external device has DVI output this can be available with HDMI DVI cable In case of using the HDMI DVI cable connect analog audio signal to PC RGB HDMI Analog Audio Input terminal Information HDMI High Definition Multimedia Interface is next generation multimedia I O interface Only one cable is used to transmit all video audio control signals which creates easy connection Mor...

Страница 19: ...Signal List on 51 52 Ɣ Terminals on Side Since the following terminals are located on the side it is very convenient to use the extra device on a temporary basis after done the connections on the rear panel AV4 can be connected to the equipment with a composite output Headphone The audio from the speaker will be muted when connecting the headphone to this terminal Optical Out Digital Audio termina...

Страница 20: ... grounded outlet and make sure that the cord is properly grounded If you use a power source converter plug use an outlet with a ground terminal and screw down the ground line Ɣ Ensure that both ends of power cord are easily accessible Ɣ If you have to change the power cord please use the certified power cord that meets your region s safety standard Information z How to secure the power cord and ca...

Страница 21: ...ompletely turn Off the power of the unit The Indicating Lamp Status Indicating Lamp Status Power Status Power Switch Status Off Off Main power ĺ Off Red Standby mode Main power ĺ On Sub Power button ĺ Off Green On Main power ĺ On Sub Power button ĺ On Orange Power Save mode Main power ĺ On Sub Power button ĺ On NOTE Ɣ If the image does not appear on the screen at all or have any problem see TROUBL...

Страница 22: ...button you can switch the input Ⴠ To watch actual broadcast press Input Select button on the control panel the numeric buttons DTT TV button or Channel Up Down button on the remote control Ⴠ To display the image outputting from the external equipment connected to each terminal DTT TV AV1 4 HDMI and RGB select corresponding mode 1 Press Input Select buttons on the remote control Use AV button to sw...

Страница 23: ...approximately 5 seconds DTT TV 1 ABCDE ź OFF Min VIDEO AV1 Component OFF Min RGB RGB H 48 4 kHz V 60 1 Hz OFF Min 1 2 3 4 5 6 7 8 9 0 TV DTT AV TEXT P AV1 AV2 AV4 AV3 CLE 994 i OK Start time End time 06 0072 Now SD ABCDE Program name Broadcasting time Channel name C Signal Type Rating Channel number Program progress indicator Input Mode Input horizontal frequency Input vertical frequency TV positi...

Страница 24: ...lect the item press buttons The selected item will be highlighted in Yellow 3 Press button to set your selection The selected menu page will be displayed on the screen 4 Use buttons to choose the item on the MENU page Press button to set your selection 5 Use buttons to adjust the item values or choose options Press button to set your selection 6 To exit from the menu press button NOTE Ⴠ The OSD me...

Страница 25: ...d System 24 DNR 28 Color System 25 MPEG NR 28 Skip 25 Film Mode 28 Manual Tuning Anteena Att 25 3D Comb Filter 28 Fine Tuning 25 Picture Size 28 Sort 25 Picture TV AV Picture TV A V Reset 28 Setup TV Teletext Language 34 Contrast 33 Video Power Save 45 Brightness 33 Setup AV Reset ņ Color Temperature 33 Auto Adjust 32 Back Light 33 Image Position 32 Picture RGB Reset 33 Horizontal Clock 32 Audio M...

Страница 26: ...art searching Position Press channel up down buttons to input position number 1 125 or channel number C or S Search the frequency by using button when Auto Tuning Mode is set to position Frequency When Auto Tuning Mode is set to Direct this function is not available grayed out Name 1 Move the cursor to the first digit and select the letters with buttons 2 Move to the next digit with button 3 Press...

Страница 27: ...on will automatically skip unavailable channels when set to on Off Manual Tuning Anteena Att On The noise on the screen or interference could be reduced in case that the receiving field strength are too strong The selection on this item is applied to all the channels Fine Tuning 56 56 X Increase the frequency data for the main tuner W Decrease the frequency data for the main tuner Sort You can cha...

Страница 28: ... The selectable channel number and method differ depending on the modes Position or Direct of Auto tuning See 24 for the details ŏ If you have tuned channels with Position mode The position number of 0 125 of which you have tuned with Position mode can be selected by using numeric buttons on the remote control ŏ If you have tuned channels with Direct mode Input the number 001 012 displayed as C1 C...

Страница 29: ... adjusts the contrast to meet the lighting environment by using button Brightness 31 31 With this function black is adjusted to change the overall brightness by using button Color 31 31 It can adjust color density based on your preference by using button Sharpness 15 15 Preferred sharpness can be adjusted by pressing button for softer image or button for sharper image Tint 31 31 Pressing button en...

Страница 30: ...r the gap But when display is no available in Cinema size This function only works for TV Composite Component and HDMI input Reset Each item on this menu screen can be restored to the original factory settings by pressing button Information The settings of the item indicated by can be automatically stored depending on the signal mode NOTE About Film Mode Ⴠ The image might not look natural dependin...

Страница 31: ...Matrix Surround is enabled adjusting the Balance will not completely mute any one speaker Off Matrix Surround On The surround sound is mixed to left and right in order to create the illusion of virtual surround speakers Recommendation when the Matrix Surround is on ensure the Balance is set to 0 for optimum surround sound effect Off Dynamic Bass On Dynamic Bass gives you the enhanced bass sound Lo...

Страница 32: ...hich you may find useful Timer Off Timer ŻŹ Adjust Return Min Selected Items Setup hint Min 30Min 60Min 90Min Off Timer 120Min This function automatically sets the power to Standby mode when the selected time period has elapsed Information One minute before the time you set the screen will display Time off within one minute ...

Страница 33: ...und mode display appears in yellow as shown Also when receiving NICAM signals NICAM display will appear Each time I II button is pressed the display is switched in the sequence of following Green Yellow Yellow ˮ ʳ ˮ ϰ Green Yellow Yellow ˮ ʳ ˮ ϰ NICAM NICAM I Main language Primary Sound II Sub language Secondary Sound ź force mono This selects main language or primary sound Stereo broadcast With s...

Страница 34: ...ndition with this function In that case please adjust each item manually Image Position Press button and button to adjust the horizontal and vertical display positions For example When user connect PC terminal to LCD TV set PC Display card provide timing is 1024x768 60Hz that Horizontal range 100 100 and Vertical range 22 22 Horizontal Clock 31 31 Minimize the vertical stripes on the screen Clock ...

Страница 35: ...ss 31 31 With this function black is adjusted to change the overall brightness by using button Cool Normal Warm Color Temperature User You can select from 3 settings default Cool Normal Warm depending on the color condition with buttons You can adjust the setting in User item High Middle Back Light Low Adjust the brightness of the Back Light for the maximum visibility Reset Each item on this menu ...

Страница 36: ... Press button 2 Select Setup menu and press button 3 Select Teletext Language and press button Setup Auto Tuning Manual Tuning Fine Tuning Sort Teletext Language Select OK Set Return Selected Items Setup hint Teletext Language Select Teletext Language from 5 different categories West Europe East Europe Russian Arabic and Farsi According to the area West Europe Asian countries where the Teletext Is...

Страница 37: ...l To return to actual broadcast temporarily while searching for the Teletext page you request When the search is done the designated page will be displayed on the upper left of the screen Press again to return to Teletext page Cancel To access the link pages which are displayed at the bottom of the page Select the buttons corresponding to the colors of the letters on screen Color To hold the text ...

Страница 38: ...d in 4 3 mode To display fully select the other display size with button Refer to 46 TV Setup Edit channels Parental guidance Installation General settings System DTT Main Menu Menu button DTT Main Menu List Check the reference page for details Menu Function Page TV Setup This jumps to the TV main menu containing Analog TV functions such as Picture menu and Audio menu 42 Edit channels You can set ...

Страница 39: ... buttons and press button NOTE x If you are uncertain about the area please select Auto scan method or contact the local dealer in your area x Auto scan Searches every channel The message Auto scan will take more than 10 minutes Do you want to continue Select Yes and press button to precede it Restoring Channels This restores the all channel settings 1 Press button on the remote control in DTT mod...

Страница 40: ...he channel in Favorite list please refer to 39 Selecting by Number Enter the number the last 4 digits based on the list by using numeric buttons on the remote control An empty information banner shows up with the entered number Channel is switched if the number is valid If the entered number is not valid for one of the setup channels it automatically selects the closest channel Using the Electroni...

Страница 41: ...play information by changing channel Whenever a channel is switched the TV displays the banner containing the brief channel information name of channel and program etc x Display information by changing channel The TV displays not only brief information but also program description Each time button is pressed it displays information by following order Brief Channel Information Æ Current Program Des...

Страница 42: ... the EPG screen with the following remote control keys Button Select a channel program Display information Select a program from the list Ⴠ 7KH SLFWXUH RI VHOHFWHG SURJUDP LV GLVSOD HG DW ORZHU ULJKW VFUHHQ Ⴠ 7KH GHWDLOHG LQIRUPDWLRQ RI VHOHFWHG SURJUDP LV GLVSOD HG DW ORZHU OHIW VFUHHQ Select a channel Ⴠ 7KH SLFWXUH RI VHOHFWHG SURJUDP LV GLVSOD HG DW ORZHU ULJKW VFUHHQ Ⴠ 7KH GHWDLOHG LQIRUPDWLRQ...

Страница 43: ...th buttons select the audio language and press button Digital Audio Output This enables you to select the optical digital audio output between PCM and Dolbyp digital 1 Press button to display DTT main menu 2 Select General setting and press button 3 Select Audio setting and button 4 With button select either PCM or Dolby Digital and press button NOTE x In case that MPEG audio is selected by using ...

Страница 44: ...on setup Change pin Local time Subtitle setting New password Confirm new password Current time zone Greenwich mean time Adelaide Aust Brisbane Aust Canberra Aust Darwin Aust Melbourne Aust Perth Aust Sydney Aust Tasmania Aust General settings Option setup Change pin Local time Subtitle setting Audio setting Press ŻŹto select Then press OK Checking DTT System Information This can display current DT...

Страница 45: ...size and horizontally squeezed Information Aspect ratio represents horizontal vertical ratio on screen Watching High Definition Picture 720p 1080i 1080p HDMI only DTT AV1 2 HDMI Only Full mode signal output 9 16 3 16 or 21 9 4 NOTE Ⴠ The size will fix as Full mode and not change when receiving High Definition Picture 720p 1080i 1080p HDMI only Ⴠ If the images from High Difinition Picture has black...

Страница 46: ... 3 Display Area Selection Diagram Resolution Full 4 3 640x400 VGA 640x480 VGA 800x600 SVGA 1024x768 XGA 1280x768 WXGA 1280x1024 SXGA 1360x768 WXGA Picture Freezing By pressing button you can change to freeze mode easily anytime you like Press it again to return to normal picture 1 2 3 4 5 6 7 8 9 0 TV DTT AV TEXT i FREEZE button ...

Страница 47: ...e Turns On automatically Returning to operating status Ɣ Press the Input Select button of the control panel or the remote control to restart the television When the RGB input is selected When this unit is connected to a VESA DPMS computer the Power Save mode Operation mode Off can be set to be activated automatically when the computer is not being used to reduce power consumption by this unit Hori...

Страница 48: ... or No signal Database is Empty Ɣ Check aerial lead if it is disconnected damaged misaligned in DTT mode Ɣ Check with your dealer if it is out of signal area or not in DTT mode Symptom and Check List Symptoms Check list Page No picture no sound Ɣ Check the Indicating lamp status Off Red Green or Orange Ɣ Check the connection of the Power Cord and or other cables Ɣ Check if the Main Power of the un...

Страница 49: ...o picture The indicating lamp ĺ Green Ɣ Check if the signal cable is connected correctly and firmly Ɣ Adjust the level of Brightness and Contrast lower 14 18 Ɣ The top of the television and surface of the panel heat up Ɣ It may happen when you use the unit for long hours Turn off the Main Power of the unit for a while Please note that this is not all function 19 Ɣ Image cannot be displayed in the ...

Страница 50: ...PC input mode only abcdefgABCDEFGabcd abcdefgABCDEFGabcd Ɣ Try Auto Adjust Ɣ If the condition is not improved with Auto Adjust adjust Clock Phase till you get clearest image 32 Ɣ When the small patterns are displayed on the screen the entire screen is flickering PC input mode only Ɣ Try Auto Adjust Ɣ If the condition is not improved with Auto Adjust adjust Clock Phase till you get flicker free dis...

Страница 51: ...rminal RCA S video input terminal L R audio input terminal RCA AV4 composite video input terminal RCA L R audio input terminal RCA HDMI HDMI input terminal Input signals Composite video PAL SECAM NTSC3 58 NTSC4 43 PAL60 Component video 480i 576i 480p 576p 720p 50 720p 60 1080i 50 1080i 60 HDMI 480i 576i 480p 576p 720p 50 720p 60 1080i 50 1080i 60 1080p 50 1080p 60 1080p 24 Output signals OUTPUT MO...

Страница 52: ...ed N C 5 T M D S Data1 15 SCL 6 T M D S Data1 16 SDA 7 T M D S Data0 17 DDC CEC Ground 8 T M D S Data0 18 5V Power 9 T M D S Data0 19 Hot Plug Detect 10 T M D S Clock RGB terminal D sub 15 pin connector Pin Input signal 1 R 2 G 3 B 4 No connection 5 No connection 6 R GND 7 G GND 8 B GND 9 No connection 10 GND 11 No connection 12 SDA 13 H sync 14 V sync 15 SCL When different kinds of input signals ...

Страница 53: ...1280 x 720 60 00 45 00 74 25 EIA 861D With HDMI INPUT Signal mode No Signal name Resolution Vertical frequency Hz Horizontal frequency kHz Dot clock frequency MHz Remarks 1 VGA 640 x 480 59 94 31 47 25 18 EIA 861D 2 576i 720 1440 x 576 50 00 15 63 27 00 EIA 861D 3 480i 720 1440 x 480 59 94 15 73 27 00 EIA 861D 4 576p 720 x 576 50 00 31 25 27 00 EIA 861D 5 480p 720 x 480 59 94 31 47 27 00 EIA 861D ...

Страница 54: ... 7 VESA 1360 x 768 60 02 47 71 85 50 Ⴠ The type of video board or connecting cable used may not allow for correct displays adjustment of Horizontal Position Vertical Position Horizontal Clock and Clock Phase Ⴠ The unit differentiates the signal modes according to the horizontal and vertical frequencies and the horizontal and vertical sync signal polarities Note that different signals having all th...

Отзывы: