background image

48

chapter 2_Setups

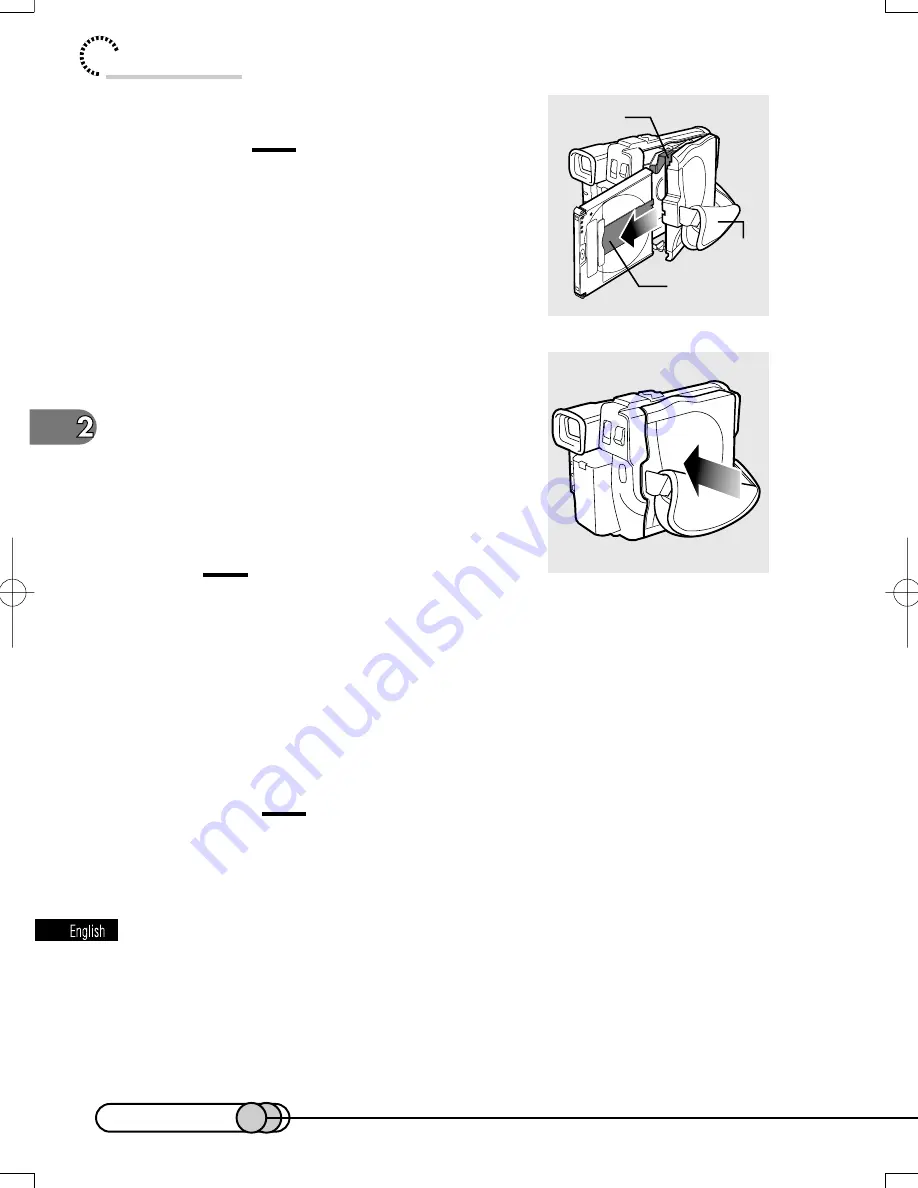
4. Remove the DVD-RAM disc.

Caution:

Be careful when removing the disc, since the
temperature at the shutter will be very high.

5. Gently push the section indicated

"PUSH" on the cover of disc insertion
block (hand strap), to close the cover.

Tip:

Even when the DVD camera/recorder is turned on, holding down the small
projection at the center of EJECT button at least 2 seconds will unlock the
disc (a click will be heard) when the DVD camera/recorder is not in record-
ing status, and the disc can be removed. (The EJECT indicator on the LCD
screen or in the viewfinder will change from white to pink at this time.)
However, it is recommended that you turn the DVD camera/recorder off
before inserting or removing disc, to prevent misoperation.

Cautions:

• Do not insert anything other than the 8 cm DVD-RAM disc into the disc

insertion block: Doing so could cause malfunctions.

• If the DVD-RAM disc cannot be removed, use the AC adapter/charger, etc.

to power the DVD camera/recorder, turn the POWER switch on/off (mak-
ing sure by the sound that the disc is unlocked), and remove the disc.

• If you push down the EJECT button, the DVD-RAM disc will not come out

until it completely stops rotating. After the lock release sound is heard, wait
for a few moments and then push down the EJECT button again.

• If you wish to remove the disc immediately after inserting it in the locked

position, close the cover once, and then open it to remove the disc.

Disc guide

Shutter

Hand

strap

 E-P37-53

01.1.29, 1:50 PM

Page 48

Adobe PageMaker 6.5J/PPC

Содержание DZMV100E

Страница 1: ...DZMV100E DVD VIDEO CAMERA RECORDER Instruction manual To obtain the best performance and ensure years of trouble free use please read this instruction manual completely ...

Страница 2: ...6 and DZ BP28 The DZ BP16 is supplied with this DVD camera recorder AC adapter charger DZ ACP1 CLASS 1 LASERPRODUCT CAUTION This product contains a laser diode of higher class than 1 To ensure con tinued safety do not remove any cov ers or attempt to gain access to the inside of the product Refer all ser vicing to qualified personnel The DVD camera recorder and AC adapter charger have the followin...

Страница 3: ...wever there is no guarantee that interference will not occur in a particular installation If this equipment does cause harmful interference to radio or television reception which can be determined by turning the equipment off and on the user is encouraged to try to correct by one or more of the following measures Reorient or relocate the receiving antenna Increase the separation between the equipm...

Страница 4: ... plug should still fail to fit contact your electrician to re place your obsolete outlet To prevent electric shock do not use this polarized plug with an extension cable receptacle or other outlet unless the blades can be fully inserted without blade exposure If you need an extension use a polarized cable 5 Power Sources This video prod uct should be operated only from the type of power source ind...

Страница 5: ...ould never be blocked by placing the video product on a bed sofa rug or other similar sur face This video product should never be placed near or over a radiator or heat register This video product should not be placed in a built in installation such as a bookcase or rack unless proper venti lation is provided or the video product manufacturer s instructions have been followed 9 Attachments Do not ...

Страница 6: ...iquid has been spilled or objects have fallen into the video product c If the video product has been ex posed to rain or water d If the video product does not oper ate normally by following the operat ing instructions Adjust only those controls that are covered by the op erating instructions Improper adjust ment of other controls may result in damage and will often require exten sive work by a qua...

Страница 7: ...7 Read This First ...

Страница 8: ...ith AC adapter charger 43 Setting up the DVD camera recorder 45 Setting date and time 50 Setting up the infrared remote control 52 Using the infrared remote control 53 Recording 55 Basic handling of DVD camera recorder 56 Recording movie 64 Useful functions during recording of movie 69 Recording stills 80 Playing Back Deleting and Editing Your Recordings 89 Playing back 90 Using Disc Navigation 96...

Страница 9: ...9 Changing display format of date and time 130 Initializing all settings to defaults 131 System reset 132 Checking remaining free space on DVD RAM disc 133 Initializing DVD RAM disc 134 Updating control information 136 Connecting DVD Camera recorder to Other Devices 137 Viewing on TV screen 138 Transferring data to PC 140 Subsidiary Information 143 Cleaning 144 Trouble messages 145 Troubleshooting...

Страница 10: ...When using a battery pack charge it or refferring to page 38 Making a Trial Recording 1 Make sure that the RECORDING MODE switch is set to movie 2 Connect the AC adapter charger to the DVD camera recorder 2 1 Attach the terminal device of provided DC power cable to the battery at tachment platform on DVD camera recorder Align the top of terminal device with the top of battery attachment plat form ...

Страница 11: ...sc insertion block hand strap will open slightly 3 2 Continue to open the cover by hand 3 3 Insert the DVD RAM disc cartridge into the disc guide so that the side of disc A or B you want to record faces the hand strap see p 28 with the cartridge shutter towards the lens The cartridge will stop once midway but firmly push it in until it stops 3 4 Push the section indicated PUSH on the cover of disc...

Страница 12: ...nder pull the viewfinder all the way out and adjust its angle as you desire Fit your eye into the Eye cup and then use the diopter control to adjust focus see p 57 Open the LCD monitor if you want to check the image on the LCD screen 5 Set the current date and time see p 50 When the DVD camera recorder is first turned on the date will be January 1 2000 It is important to correctly set the date and...

Страница 13: ...ful when you play back re corded images in full scale or wish to edit them 2 Stop playback Pressing the button will terminate playback and set the DVD camera re corder to the recording pause mode 3 Turn power off While holding button at the center of POWER switch press the switch down The red indica tor of the button will go out Wait a few seconds until the indicator turns off Do not remove the ba...

Страница 14: ...14 ...

Страница 15: ...You Begin Features of DVD camera recorder 16 Cautions when using 18 Cautions when storing 22 Suggestions and restrictions 23 About this text 23 Checking provided accessories 24 Names of parts 27 DVD RAM discs 31 ...

Страница 16: ...n the same way as with conventional camera recorders The DVD camera recorder can also record stills as with a digital still camera With the 1 160 000 pixel CCD high qual ity movies and stills can be recorded In both recordings of movie and still zooming up to 48 times is possible using the 12 times optical zoom multiplied by the 4 times digital zoom Movies and stills can be recorded on the same di...

Страница 17: ...ct this DVD camera recorder to your TV and you can enjoy the playback picture with your family and friends on the large TV screen or connect it to a video printer generally available to print the recorded image You can also transfer the recorded movies and stills to PC ...

Страница 18: ... recorder as it could cause a malfunction Liquid Crystal Display and viewfinder The Liquid Crystal Display LCD panel is made by highly precise technology More than 99 99 of its picture elements pixels are effecitive but some less than 0 01 may appear as colored bright dots This does not indicate a fault as the LCD panel stretches the limits of current technology The LCD screen and viewfinder will ...

Страница 19: ...nt directly at the sun If direct sunlight strikes the lens or viewfinder the DVD camera recorder could malfunction or burn in CCD or Viewfinder Do not leave the DVD camera recorder with the LCD screen exposed to direct sunlight This could cause malfunctions Do not use the DVD camera recorder near TV or radio This could cause noise to appear on the TV screen or interference could enter radio broadc...

Страница 20: ...laser light could damage your eyes Be careful of moisture condensation When you move the DVD camera recorder between places where the difference in temperatures is great such as entering a lodge from a ski slope or going out of a cooled room or vehicle condensation vapor in air warmed or cooled to water drop lets could occur on the lens and or inside the DVD camera recorder If condensa tion occurs...

Страница 21: ...VD RAM disc If the DVD camera recorder is turned off while the ACCESS indicator is blinking turn it on again with the disc cartridge loaded in the DVD camera recorder Do not wipe the DVD camera recorder case with benzene or thinner The coating of case could peel off or the case could deteriorate When using chemical cleaning cloth follow the instructions Also read the instructions attached with opt...

Страница 22: ...mera recorder in a place where the humidity is high or in a dusty place Dust entering the DVD camera recorder could cause malfunctions If the humidity is high the lens could become moldy and the DVD camera recorder could be un usable It is recommended that you put the DVD camera recorder with desiccant in a box when storing it in a closet etc Do not store the DVD camera recorder in a place subject...

Страница 23: ...c in your DVD camera recorder through other digital analog media or devices are protected by the copyright act and cannot be used without permission of the owner of copyright except for personal enjoy ment Note that even for personal enjoyment recording is prohibited for some demonstrations performances and exhibitions About this text Photographs used in this text Photographs taken using digital s...

Страница 24: ...ontrol model DZ RM1W Use to control the DVD camera recorder from a distance 2 AA batteries To power the remote control AV output cable Used when viewing the picture played back on the DVD camera recorder on TV screen or output video to another video device Lens cap and lens cap string Attach the lens cap when not recording to protect the lens 8 cm DVD RAM disc Stores video and audio recorded on th...

Страница 25: ...ite Cores Although the cores are not attached in the illustrations of the cables in text be sure to attach the ferrite core provided to the provided DC power cable using the following procedure the ferrite core was attached to the AV output cable at the factory Ferrite cores reduce radio interference with your radio and TV 1 Open the cover of ferrite core 2 Attach the core to the DC power cable at...

Страница 26: ... and attach it to the hand strap of DVD camera recorder 1 Use the string to attach the cap to the DVD camera recorder 2 Push the both sides of cap inward and at tach it over the lens Caution Always keep the lens cap on when not using the DVD camera recorder to protect the lens Tip When recording attach the lens cap to the hand strap by hooking the tab inside the cap onto strap for comfortable shoo...

Страница 27: ...1 Reverse search button P 90 91 93 Forward skip button P 90 92 Reverse skip button P 90 92 3 5 inch color LCD monitor P 58 Information LCD monitor P 61 142 RECORDING MODE switch P 62 64 80 PHOTO button shutter P 80 Zoom lever P 62 65 Lens hood Optical 12X zoom lens Flash P 82 Stereo microphone P 78 Infrared receiver P 53 Tally lamp P 87 AUDIO VIDEO EXT MIC DIGITAL S V I DEO Name of Parts Names of ...

Страница 28: ...G AE button P 62 70 EXPOSURE button P 62 76 FOCUS button P 62 72 87 MENU button P 23 50 62 Select dial push to enter P 50 59 62 99 Battery attachment platform P 40 Hand strap P 46 56 REC button P 62 64 POWER switch P 45 50 57 ACCESS indicator P 21 Disc eject button P 45 Eye cup P 57 Viewfinder P 40 57 Bottom PUSH ...

Страница 29: ...r button P 67 99 102 MENU button P 99 ENTER button P 67 99 103 DISC NAVIGATION button P 98 DELETE button P 99 106 107 SHIFT button P 99 102 3 5 inch color LCD monitor P 58 Speaker CANCEL button P 99 118 119 RESET button P 132 DISPLAY button P 61 95 LCD BRIGHT button P 59 SKIP SEARCH Name of Parts ...

Страница 30: ...C button P 64 PHOTO button P 80 DIGITAL ZOOM button P 66 ZOOM button P 65 DISC NAVIGATION button P 98 MENU button P 66 100 CANCEL button P 118 119 Cursor buttons P 102 VOL control buttons P 91 95 DELETE button P 106 107 ENTER button P 105 SHIFT button P 102 Playback pause button P 91 Stop button P 91 Reverse search button P 91 93 Forward search button P 93 Reverse skip button P 92 Forward skip but...

Страница 31: ...many re quests from various fields and they are proceeding with DVD standardization as the universal media of the next generation Products conforming to this standard include various discs DVD Video that is spreading remarkably DVD ROM read only for com puters DVD R write once read many DVD RAM rewritable etc The diameter of all these discs is 12 cm the same as for a CD DVD RAM Standard Most 12 cm...

Страница 32: ...es available on the market as of third quarter 2000 However some DVD players and some DVD drives to be marketed in the future will comply with playback and reading writing of discs with these stan dards Available DVD RAM Discs There are two types of DVD RAM disc for video camera and for PCs Be sure to use 8 cm DVD RAM discs 1 4 GB on one side 2 8 GB on both sides noted for video camera use for AV ...

Страница 33: ...rtridge when using it in this DVD camera recorder Do not remove the disc from the cartridge unless needed and do not open the shutter of cartridge Be sure not to touch disc surfaces Take great care so as not to scratch or stain disc Be careful not to allow the cartridge with disc to fall Be careful not to allow condensation To store disc cartridge insert it in plastic case provided Do not place th...

Страница 34: ...llowing to remove the disc provided Removing the disc 1 Release the lock pins of cartridge The two lock pins are at the bottom left corners of sides A and B Use a fine tipped pen to slide the lock pin in the direction of arrow and then turn it in the direction of arrow to release it 2 While pushing the release levers from both sides inward hold the center of disc tray and pull it out to the front ...

Страница 35: ...s Be careful not to drop the disc removed from cartridge Be sure not to bend the disc Do not leave the disc outside the cartridge Do not subject the disc to heat Do not write on disc with a ball point pen or pencil Be sure not to wipe disc surfaces with thinner water or anti static agent Use dry soft cloth to lightly wipe off dust or dirt that adheres to the disc Never use solvents to clean the di...

Страница 36: ...as been securely performed with the disc removed from cartridge Write protect tabs The DVD RAM disc cartridge has write protect tabs to prevent overwrit ing on recorded data Make sure that the write protect tab is set to the side where recording is possible Cautions Dust scratches or dirt on the disc surface may cause block noise because of the principle of disc recording This does not indicate a ...

Страница 37: ...y have to use a battery to power the DVD camera recorder First while charging the battery set up the DVD camera recorder for recording Setting up the battery 38 Using DVD camera recorder with AC adapter charger 43 Setting up the DVD camera recorder 45 Setting date and time 50 Setting up the infrared remote control 52 Using the infrared remote control 53 ...

Страница 38: ...Use the provided AC adapter charger to charge the battery Cautions Charging will not be possible if the DC power cable is left connected to the AC adapter charger Disconnect the DC power cable when charging the battery Charge the battery at ambient temperature of 10 30 C Be sure to use the ACP1 AC adapter charger to charge the battery Using a charger other than that specified could cause electric ...

Страница 39: ...table shows the time available when the DVD camera recorder is in the recording mode without using any other function after recording is started In actual recording the battery will discharge 2 3 times faster than this reference since the REC button and zoom are being operated and playback is performed Assume that the recordable time with a fully charged battery is between 40 and 60 minutes with m...

Страница 40: ...nk at one second inter vals showing that charging will not be possible Attaching Battery to DVD Camera recorder Caution Make sure that the battery is securely at tached Incomplete attachment could cause the battery to fall resulting in damage 1 Pull out the viewfinder fully and raise it 2 Align the top of battery with the top surface of battery attachment platform of DVD camera recorder 3 While fi...

Страница 41: ...ies could cause faulty DVD camera recorder operation or possi bly a fire Charge the battery immediately before using the DVD camera recorder If a charged battery is stored it will discharge on its own therefore it is recom mended that you charge the battery shortly before using the DVD camera recorder such as on the day before you plan to use it In cases other than the following when the battery i...

Страница 42: ...the battery Battery life The battery can be repeatedly charged and used but will eventually be dead The battery life varies greatly depending on the ambient environment and how often the DVD camera recorder is used If the usable time of DVD camera recorder with a fully charged battery is noticeably short the battery is probably dead Purchase a new battery Disposing of the dead battery Dispose of b...

Страница 43: ...e of provided DC power cable to the bat tery attachment platform on DVD camera recorder Align the top of terminal device with the top of battery attachment platform and while fitting it onto the DVD camera recorder slide it downward until a click is heard 2 Insert the other small plug of DC power cable into DC OUT jack of AC adapter charger 3 Insert the power cable plug into the AC input jack AC I...

Страница 44: ...ating label is located on the bottom of the AC adapter charger Caution If the POWER indicator on AC adapter charger does not light when it is plugged into AC outlet unplug the AC adapter charger from the AC outlet wait for a few moments and then plug it into the AC outlet again If the POWER indicator still does not light the AC adapter charger may be faulty Unplug it from the AC outlet and consult...

Страница 45: ... 8 cm DVD RAM disc for AV provided is already formatted When using an uninitialized DVD RAM disc it must be formatted see p 134 1 Make sure that the DVD camera re corder is turned off The red indicator at the center of POWER switch is off 2 Press down the EJECT button The cover of disc insertion block hand strap will slightly open 3 Gently open the cover by hand until it stops POWER EJECT ...

Страница 46: ...ose remove the disc and reinsert it 6 Push down the POWER switch to turn the DVD camera recorder on When the DVD camera recorder is turned on an image will appear in the viewfinder and disc recognition will start After approximately 25 sec onds the DVD camera recorder will enter the recording pause status Make sure of the remaining space on disc re ferring to indicators remaining recordable time n...

Страница 47: ... charger until the beep sound is heard twice Turn the POWER switch off Do not remove the battery to turn the DVD camera recorder off If you do this the disc cannot be removed 2 Push down the EJECT button The cover of disc insertion block hand strap will open slightly 3 Gently open the cover until it stops When the cover is fully open the disc will slightly come out from the disc guide and stop Cau...

Страница 48: ...t is recommended that you turn the DVD camera recorder off before inserting or removing disc to prevent misoperation Cautions Do not insert anything other than the 8 cm DVD RAM disc into the disc insertion block Doing so could cause malfunctions If the DVD RAM disc cannot be removed use the AC adapter charger etc to power the DVD camera recorder turn the POWER switch on off mak ing sure by the sou...

Страница 49: ...on DVD RAM disc Up to 999 stills per side when recording only stills If free space of disc remains after 999 stills are recorded recording of movie will still be possible Set the RECORDING MODE switch to movie and perform recording Thumbnails can be created for up to 999 scenes Although recording of over 999 scenes is possible new thumbnails cannot be cre ated see p 96 for scenes Setting Up the DV...

Страница 50: ...ing down the button at the center of POWER switch push the switch down When the DVD camera recorder is first turned on the date will be 0 00 1 1 2000 2 Press the MENU button in the recording pause mode to display the menu screen 3 Use the Select dial to choose DATE TIME and then DATE SET BACK is being highlighted 4 Turn the Select dial to choose SET and then press the Select dial The date and time...

Страница 51: ...t over from the beginning 7 Press the Select dial to again enter the date time and then press the MENU button The menu screen will turn off To set the time to match the time signal Set the minutes slightly ahead of the current minute and make OK blink While checking the time signal on TV or telephone press the Select dial at the moment the set time is reached Caution You can change the display for...

Страница 52: ... distance of up to approximately 5 m Caution If the batteries are dead pressing buttons on remote control will not operate the DVD camera recorder Replace the batteries 1 Push the tab on the back of remote control to open the battery compart ment lid 2 Insert two batteries according to the polarity indications in battery compart ment 3 Close the battery compartment lid ...

Страница 53: ...ght If the infrared receiver of DVD camera recorder is subjected to light stronger than the infrared light from remote control the DVD camera recorder cannot be operated by remote control If there is an obstacle between the remote control and infrared receiver of DVD camera recorder remote control may not be possible This DVD camera recorder uses the VCR2 remote control code of Hitachi VCRs If you...

Страница 54: ...54 ...

Страница 55: ...le on this DVD camera recorder movie and still Here we will explain the methods for each recording and various functions Basic handling of DVD camera recorder 56 Recording movie 64 Useful functions during recording of movie 69 Recording stills 80 ...

Страница 56: ...t the hand strap to best fit your hand Adjust the length of hand strap so that the DVD cam era recorder is stable when you press the REC but ton with your thumb Cautions Do not adjust the hand strap while holding the DVD camera recorder Doing this could cause the DVD camera recorder to fall and be damaged Do not lift the DVD camera recorder by holding the viewfinder or LCD monitor If the viewfinde...

Страница 57: ...e status Viewing Subject through Viewfinder 1 Fully extend the viewfinder 2 Adjust the angle of viewfinder as you like and fit your eye to the Eye cup Cautions If the LCD monitor is open the viewfinder will be off If the viewfinder is not fully extended subject image will not be focused If the image is blurred You can adjust the focus to suit your eyesight Ad just the diopter control under the Eye...

Страница 58: ...up to approxi mately 115 2 Tilt the LCD monitor to adjust its verti cal angle so that you can see the screen easily Caution Be sure to open the LCD monitor approxi mately 90 before changing its vertical angle LCD monitor movable range The LCD monitor can be opened up to approximately 115 If the LCD monitor is open more than approximately 90 it can be tilted down as much as 90 and can also be tilte...

Страница 59: ...he position of BRT bar scale Closing LCD Monitor 1 Before closing the LCD monitor be sure to reset it at right angles to the DVD camera recorder Replace it on the DVD camera recorder until a click is heard Cautions Be sure to return the LCD monitor at right angles to the DVD camera recorder before closing it or replacing it on the DVD camera recorder with its screen facing outside If the LCD monit...

Страница 60: ... write protected disc or disc with no remaining time is inserted The DVD camera recorder status and remaining battery level indicators do not have color with images from AV output jack Recording mode Movie Still When operating zoom When adjusting exposure Electronic image stabilizer ON When focusing manually Program AE mode SPORTS PORTRAIT SPOTLIGHT SURF SNOW When digital zoom is on Current date C...

Страница 61: ...time as a part of image However the information when recording will be recorded with image as data which can be checked during playback See Information during playback p 95 Display in Information LCD The basic information is always displayed in the information LCD monitor even if the LCD monitor is closed You can check it any time Basic Handling of DVD Camera recorder Battery remaining level RECOR...

Страница 62: ...l to adjust the exposure 5 FOCUS button To switch to manual focus After pressing FOCUS use the select dial to adjust the focus Pressing FOCUS again will restore auto focus 6 MENU button To display the menu screen for set ting camera functions Pressing MENU again will switch off the menu screen The menu screen will appear even if no disc is in the DVD camera recorder 7 Select dial To adjust program...

Страница 63: ...ns surface to infinity On W wide side approximately 1 cm from lens surface to infinity Manually focus the following objects which may not be automatically focused see p 72 1 Objects not in the center of screen 2 Objects that are far and near at the same time 3 Objects lit by neon sign spotlight etc which glares or emits strong light 4 Object behind glass with water droplets dirt on it 5 Objects mo...

Страница 64: ...camera recorder to the recording pause status Cautions Take care that power is not interrupted while the ACCESS indicator is blinking The minimum recordable time of movie is approximately 3 seconds Tip For various functions available during recording of movie see Useful Functions during Recording of Movie on page 69 3 When recording is finished turn the DVD camera recorder off Caution Hitachi cann...

Страница 65: ...imately 5 30 minutes see Setting Power Save Changing Off Time on page 129 Zooming This DVD camera recorder can zoom in on subject up to 12 times optically multi plied by 4 times digitally 1 Slide the Zoom lever to T control side and the subject image will gradu ally become telescopic Slide to W control side and the image will widen If the digital zoom is specified ON see p 66 continuously pressing...

Страница 66: ... be a little rougher so if you do not need digital zoom you can switch it off by the following procedure You can also use the DIGITAL ZOOM button on remote control to switch the digital zoom setting 1 Press the MENU button in the record ing pause status The menu screen will appear and CAMERA SETUP will be highlighted Caution Pressing MENU during recording will not display the menu screen 2 Press t...

Страница 67: ...rate the menu 3 Turn the Select dial to move the high light to D ZOOM and then press the Select dial Option will be next to D ZOOM ON is being highlighted 4 Turn the Select dial to highlight OFF and then press the Select dial The menu screen for setting camera functions will be restored and D ZOOM OFF has been speci fied SHIFT ENTER MENU DISC VIGATION DELETE CANCEL RESET DISPLAY LCDBRIGHT ...

Страница 68: ...5 You can check D ZOOM ON or OFF by reviewing the on screen informa tion The pointer of zoom indicator shows whether the DVD camera recorder is in the optical 12X zoom range or in the digital 4X zoom range D ZOOM ON or OFF setting will be stored in memory even if the DVD camera recorder is turned off When D ZOOM is OFF When D ZOOM is ON W T Digital zoom range W T ...

Страница 69: ...ording rapidly moving subjects such as in golf or tennis Portrait mode PORTRAIT This mode makes a subject such as a person or an animal stand out from a blurred background Spotlight mode SPOTLIGHT This mode prevents overexposure of subject portrait face etc when strong light strikes the subject as in a wedding or on stage Surf and snow mode SURF SNOW This mode prevents underexposure of subject por...

Страница 70: ...witch the mode as fol lows 3 Press the Select dial The selected mode will be set The set AE mode will change from characters in white background to white char acters To restore the full auto mode press the PROG AE button twice The shooting mode set as above will be stored in memory even if the DVD camera recorder is turned off Tip To restore the full auto mode from a program AE mode which has not ...

Страница 71: ...light differ ence between the actual movement and the movement on screen Gross camera shake may not be corrected even if electronic image stabi lizer is engaged Electronic image stabilizer may not operate correctly when a conversion lens is used 1 Press the MENU button in the recording pause status to display the menu screen 2 Use the Select dial to choose CAM ERA SETUP and then EIS Options will b...

Страница 72: ...is effective only when recording movies It does not operate when re cording stills Manually Focusing Subject during Movie Recording The DVD camera recorder measures the distance to a subject viewed at the center of screen and automatically focuses on it If you want to record by adding special effects or focusing on a subject image off the center of screen adjust the focus manually 1 Press the FOCU...

Страница 73: ...nd to white characters To restore auto focus from locked manual fo cus press the FOCUS button twice 5 Zoom the subject image down to the desired size and then start recording Tips Manual focus is released when the DVD camera recorder is turned off When you turn the DVD camera recorder on next time auto focus will be restored To return to auto focus from manual focus not yet locked press the FOCUS ...

Страница 74: ... the DVD camera recorder at yourself and record the image while monitoring it on the LCD screen Use the infrared remote control to operate the DVD camera recorder 1 Open the LCD monitor approximately 90 and turn it so the monitor screen faces in the same direction as the lens 2 Press the REC button on the DVD cam era recorder or remote control to start recording See the description on self timer o...

Страница 75: ... in background as in follow ing figure on left If the camera recorder is panned or tilted greatly or rapidly If subject is moving rapidly even when the camera recorder is not moving 1 Press the MENU button in the recording pause status to display the menu screen 2 Use the Select dial to choose REC SETUP and then V QUALLTY Options will be next to V QUALITY FINE is being highlighted 3 Turn the Selec...

Страница 76: ...automatically adjusts the exposure For special effects recording you can also adjust the exposure manually 1 Press the EXPOSURE button in the re cording pause status Tip Pressing EXPOSURE will alternate between manual adjustment and auto exposure With auto exposure no indication will appear on the screen The exposure indicator will appear on the screen 2 While monitoring the subject image on the s...

Страница 77: ... screen 2 Use the Select dial to choose CAM ERA SETUP and then W BALANCE Options will be next to W BALANCE AUTO is being highlighted 3 Turn the Select dial to highlight HOLD and then press the Select dial The menu screen for setting camera functions will be restored and W BALANCE HOLD has been specified 4 Press the MENU button The DVD camera recorder will return to the recording pause status Usefu...

Страница 78: ...era recorder Clearer sound can be recorded Turn on the switch on the external microphone and start recording For details on microphone see Major Specifications on page 159 Cautions Even if MIC appears on screen the microphone filter does not operate for a microphone connected to the external microphone jack With this DVD camera recorder the built in microphone will pick up and record any noise tha...

Страница 79: ...ing highlighted 3 Turn the Select dial to change the op tion to ON and then press the Select dial The menu screen for setting record mode will be restored and MIC FILTER ON has been speci fied 4 Press the MENU button to switch off the menu screen Checking microphone filter setting You can check the on setting of microphone filter by reviewing on screen information MIC will appear for ON setting an...

Страница 80: ... same as when recording a movie See Zooming on page 65 You can also switch off digital zoom see p 66 4 Press the PHOTO button shutter half way The operating sound will be heard twice The DVD camera recorder automatically focuses on the subject at the center of screen when auto focus is selected 5 Press the PHOTO button all the way in The screen will dim once DVD will blink and then the recorded st...

Страница 81: ...lly turns off see p 129 Information on Still Recording and Various Functions Recording subject away from the center of screen 1 Press the PHOTO button half way while placing the subject at the center of screen 2 While holding PHOTO button pan the DVD camera recorder until your de sired composition is obtained 3 Press the button all the way in You can also manually focus on the subject see p 87 Ima...

Страница 82: ...se electronic flash in three ways Flash automatically emits light when re cording a dark subject or a subject lit from rear flash always emits light regardless of the subject brightness flash is not used even when recording a dark subject When the subject is darker the shutter speed will automatically be slower therefore be careful of camera shake It will take approximately 6 seconds to charge the...

Страница 83: ...ing the on screen information No indication will appear when FLASH AUTO is specified Tip When the subject brightness is low with flash set to AUTO automatically emits light a flash mark will appear on the screen when the PHOTO button is pressed half or all the way in Cautions Flash automatically adjusts the amount of light to be emitted but if the distance to subject is too far or too near the lig...

Страница 84: ...e made approximately 10 seconds after the PHOTO button shutter is pressed With still recording the following functions and recordings are also available in the same manner as with movie recording Manual focus Macro recording Recording image of yourself Recording by manually adjusting exposure Recording by manually adjusting white balance Interval Recording Set the time interval for recording still...

Страница 85: ...t dial to select the re cording interval and then press the Se lect dial The menu screen for setting record mode will be restored and INT 0 40 has been specified for SELF INT 5 Press the MENU button to switch off the menu screen You can also check that interval recording has been set by reviewing the on screen information 6 Press the PHOTO button Interval recording will start Stills will be record...

Страница 86: ...t an accurate time Dark subjects may not be focused even if electronic flash is used It is recommended that you light a subject when recording in a dark place or use manual focus to previously focus the subject Self Timer Recording You can record stills of yourself alone or with your family friends etc using the self timer function as with ordinary cameras A still will be recorded approximately 10...

Страница 87: ...er mode is available while the DVD camera recorder is turned on To release it choose OFF on the menu screen or turn the DVD camera recorder off To suspend self timer press the PHOTO button again before the shutter opens or press the STOP button Manually Focusing Subject during Still Recording The DVD camera recorder automatically focuses on the subject viewed at the cen ter of screen You can also ...

Страница 88: ...o focus no indication will appear on the screen 2 While monitoring the subject image on the screen turn the Se lect dial to adjust the focus 3 When the subject is focused press the PHOTO Button With manual focus you do not need to press the PHOTO button half way Manual focus will be released when the DVD camera recorder is turned off ...

Страница 89: ...ial ef fects for stored movie and still sorting the order of scenes editing multiple scenes for continuous playback etc Playing back 90 Using Disc Navigation 96 Starting Disc Navigation 98 Buttons used for operating Disc Navigation 99 Selecting a Scene 102 Playing back selected scenes using Disc Navigation 104 Deleting scenes using menu screen 106 Playing back by skipping scenes Skip 107 Attaching...

Страница 90: ...recording pause sta tus or Disc Navigation screen 3 Forward search button Pressing during playback will acti vate fast forward Pressing during pause will advance picture frame by frame Hold down for at least one second for forword slow motion 4 Reverse search button Pressing during playback will acti vate fast back Pressing during pause will reverse picture frame by frame Hold down for at least on...

Страница 91: ...ot operate when using Disc Navigation with above playback They are effective only with playback using the Disc Navigation screen If recording of a movie scene is restarted the sound may be interrupted at the joint for approximately 0 1 second If part of the movie is deleted and video is spliced sound may also be interrupted for approximately 0 5 seconds Use Disc Navigation to play back a disc reco...

Страница 92: ...cenes If you find the desired image release the button Playback will start from that point Hold down for at least one second during playback to continuously locate the starts of previous scenes If you find the desired image release the button Playback will start from that point Hold down for at least one second during playback pause to continu ously locate the starts of following scenes If you fin...

Страница 93: ...d during special effects playback Searching for an Image You Wish to View 1 During playback of scene hold down or Scenes will be visually scanned forward or back ward 2 Release the button Playback will start at standard speed from that point Caution Pressing or releasing the skip or search button will dim the screen for approximately one second Operation mode Forward search Reverse search Forward ...

Страница 94: ... the button once Picture will advance one frame Press once Picture will go back 12 frames 2 When the image you want appears press to start playback Tips Hold down for forward slow or hold down for reverse slow Release the button when the scene you want appears and press Playback will start from that point at the standard speed 1 2 ...

Страница 95: ...ssing the button will switch the options as follows The setting of on screen information display will be held in memory even after the DVD camera recorder is turned off Recording mode Movie Still Time when recording started Date when recording started Memo of scene being played back Repeat play Slide play Playback status Playback Play pause Fast forward Fast back Forward slow Reverse slow Skipping...

Страница 96: ...ting one program Functions Available with Disc Navigation Disc Navigation makes it possible to do the following Display Thumbnails All recorded scenes can be displayed in thumbnails all programs Thumbnails can be displayed for each recording date Selecting Program p 100 Playback The following playback functions are available by displaying all programs or a spe cific program in thumbnails Select on...

Страница 97: ... can compose scenes in a different order from the original by selecting scenes at random and adding them to play list or you can insert the same scene any number of times you like A title can be attached to play list p 121 You can display the play list of thumbnails and add titles and special effects to indi vidual scenes that are different from those of original scenes You can also divide or comb...

Страница 98: ...s Activated A list of recorded scenes will appear in the order they were recorded first image of movies and still pictures 12 pictures in one list page These images refer to thumbnails Activating Disc Navigation will display thumbnails of all programs in list This thumbnail screen will not appear on DVD recorders Type of scene Movie Still Operating guide Recording date time of scene being selected...

Страница 99: ...n be used for playback using Disc Navigation see p 90 Using the or button will change pages in 12 scene units using the or button will locate the last scene or first scene respectively Using Disc Navigation Cursor buttons To select scenes or menu items SHIFT button To allow multiple scenes to be selected ENTER button To play back selected scenes or enter selected menu item DELETE button To delete ...

Страница 100: ...electing a program allows you to display the scenes recorded on a specific date 1 Press the MENU button while the thumbnail display screen is visible The Disc Navigation menu screen will appear 2 Press once to choose Program and then press The menu screen concerning that program will appear 3 Select is being highlighted Press the ENTER button The Program List menu screen will appear 4 Select the p...

Страница 101: ...s in the same way as in thumbnail display of all programs Tip The following operations are possible using the screen that shows the list of program titles in step 4 or To move in units of 5 programs or To move to the last or first program or To move in program units Scene No Scene No is not inherent in that scene but is a serial number of thumbnails being displayed Therefore the Scene No when all ...

Страница 102: ...the top row The preceding 12 thumbnails preceding page will appear Note that the previous pages cannot be displayed from the first page Tips Holding the cursor button down will continuously change the page in units of 12 thumbnails You can also press or to move pages Pressing will move to the first page to the last page Selecting Multiple Scenes Together You can select a continuous series of scene...

Страница 103: ...osi tioned to the last scene or all scenes at once This function is useful when it is both ersome to select scenes using the cursor keys since there are numerous scenes 1 Select the scene that you want to set to the beginning or end of the range any when selecting all and then press the MENU but ton to display the Disc Navigation menu screen 2 PLAY is being highlighted Press to display the menu sc...

Страница 104: ... last scene When the range for playback has been specified only the selected scenes will be played back in sequence Each still included in the specified range will be displayed for three seconds When playback finishes the last image will remain displayed Tips To temporarily stop playback press Pressing once more will start playback from that point If is pressed after playback is terminated playbac...

Страница 105: ...scene is reached by fast forward fast back forward slow reverse slow etc during playback the DVD camera recorder will enter the playback pause status Playing Back Only Stills Slide Play 1 Press the MENU button while the thumbnail display screen is vis ible to display the Disc Navigation menu screen 2 PLAY is being highlighted Press to display the menu screen for setting playback 3 Press to choose ...

Страница 106: ...enes and then press the ENTER button The screen for verifying deletion will appear 5 If you are sure that you wish to delete the scene choose Yes and then press the ENTER button The message Doing Done will appear and the selected scene will be deleted after which the thumbnail display screen will be restored To cancel deletion choose No and press the ENTER button or press the CANCEL button while t...

Страница 107: ... will be skipped 1 Select a scene and press the DELETE button Pressing DELETE will display the Skip Delete menu screen You can also specify a range of scenes to be skipped and skip all of them 2 Skip is being highlighted Press the ENTER button After the message Skip set proceeding is dis played skipping is specified for the selected scene and the thumbnail display screen will be restored A skip ma...

Страница 108: ...ene and press the MENU button to display the Disc Navigation menu screen 2 Press to choose Scene and then press to display the menu screen for editing scenes 3 Press to choose Skip Delete and then press the ENTER button The Skip Delete menu screen will appear 4 Choose Skip or Cancel skip and then press the ENTER button After the proceeding message is displayed skip will be set or released for the ...

Страница 109: ...o specify a range of scenes and attach the same title to all of them 2 Press to choose Scene and then press to display the menu screen for editing scenes 3 Title is being highlighted Press the ENTER button The screen for creating editing title will appear There are two types of menu screen for creating editing title Mode 1 To input letters and numbers Mode 2 To input symbols Using Disc Navigation ...

Страница 110: ...Mode 1 Use the cursor keys to choose T and then press the ENTER button T will appear on the left end of title input box 5 Keeping Mode 1 input O and M pressing the ENTER button after each input 6 Choose space and press the ENTER button 7 Input 2 0 0 0 pressing the ENTER button after each input 8 After entering the title choose Enter and press the ENTER button ...

Страница 111: ... will appear at the bottom right of screen Tips To delete any characters you entered by mistake choose Delete and press the ENTER button The last character will be deleted To delete all the entered characters and re input from the start choose Clear and press the ENTER button Any registered title can be changed at any time using the same procedure as above Using Disc Navigation TOM 2000 ...

Страница 112: ...Press to choose Scene and then press to display the menu screen for editing scenes 3 Press to choose Fade Wipe and then press the ENTER but ton The screen for setting special effects will appear 4 Press or to choose IN or OUT After choosing IN or OUT press to select the desired special effect and then press the EN TER button Fade Wipe B W Fades in from white screen fades out to white screen Wipes ...

Страница 113: ...n be changed at any time using the same procedure as above Special effects can also be added to on screen information displayed during playback Cautions Special effects that can operate with stills are only fade in wipe in and B W in No special effect will operate if you press when in the recording pause status If you locate the start of a scene by skipping the image at the start of the scene will...

Страница 114: ...appearing side by side Tips Search and frame advance are useful when designating division points If memo has been attached to the original scene the same title will be attached to the divided scenes If a special effect has been added to the original scene the In effect will be added to the first half of scene and the Out effect to the latter half Cautions The division point may drift before or aft...

Страница 115: ...TER button The selected movies will be combined into one and the thumbnail display screen will be restored Only the first image of the first movie before com bining will appear Tips If memo has been attached to one of the original scenes the same title will be attached to the combined scene If different memos have been at tached the title of the first scene will be chosen With special effects the ...

Страница 116: ...3 Press the to choose Detail and then press the ENTER button The detailed information on the scene will ap pear Pressing the CANCEL button will restore the thumbnail display screen Tips You can also press the DISPLAY button after selecting a scene to display the same information as above Pressing or will display the informa tion on a scene before or after the scene If multiple scenes have been sel...

Страница 117: ... display the Disc Navigation menu screen 3 Press to choose Play List and then press to display the menu screen referring to the play list 4 Edit is being highlighted Press the ENTER button The menu screen for selecting play list will ap pear 5 Add Play List is being highlighted Press the ENTER button A screen for creating a play list will appear and the thumbnail of the scenes that were displayed ...

Страница 118: ...elect and then select All Programs or a specific program Serial numbers are attached to play lists in the order of creation Before titles are attached to play lists the attached creating dates according to the date set on the DVD camera recorder will be the titles of play lists Even if you change the date and time of the created play list on this DVD camera recorder to set them back any scenes you...

Страница 119: ...mul tiple scenes press to move the cur sor to the lower row and press or to select the position where the scene is to be inserted Pressing the ENTER button will remove the scene on the right next to the position where the new scene is to be inserted from the play list 6 After specifying the insertion position press to move the cursor to the up per row use or to select the scene and then press the ...

Страница 120: ...elect and then press the ENTER button The menu screen for selecting the play list will appear 3 Select the desired play list and press the ENTER button The selected play list with thumbnails will ap pear Pressing will play back all scenes in the se lected play list Playing back play list You can select a play list and perform playback p 104 repeat play p 104 or slide play p 105 The procedure for e...

Страница 121: ...ot be lost it will simply not be included in the play list The information set to the original scenes will remain and it can also be changed on the play list Attaching Title to Play List You can attach desired titles to play lists The title of play list will appear on the Disc Navigation screen and on the menu screen it will appear in place of the created date time when the play list is selected 1...

Страница 122: ...press the MENU button to display the Disc Navigation menu 2 Choose Play List Delete List and then press the ENTER button The screen for verification will appear 3 If you are sure that you wish to delete the play list choose Yes and press the ENTER button The displayed play list will be deleted and the thumbnail display of all programs will be restored When the screen for verifying deletion appears...

Страница 123: ...y editing done on some device other than this DVD camera recorder Disc may be dirty All scenes are unloaded from the play list The number of entered scenes has reached the limit that can be entered The number of scenes en tered in play list has reached the limit that can be entered Troubleshooting Update the control informa tion see p 136 Remove the disc and wipe off fingerprints dust etc before r...

Страница 124: ...he limit that can be entered so the control information for generating thumbnails cannot be added Has the disc been initial ized on a PC Has initializing the disc on a PC been interrupted The disc may be dirty Disc error could have oc curred during editing of scenes Troubleshooting Combine the divided scenes and then unload them Combine the divided scenes and then delete them If thumbnail informat...

Страница 125: ... handy place remove the disc use the op posite side or use another disc To repair the removed disc insert the disc into the DVD camera recorder after wards and connect the AC adapter charger Cause The temperature inside the DVD camera recorder is too high and reading or writing of the data on disc may not be performed normally It is possible that the sys tem cannot normally com plete writing of fi...

Страница 126: ...and Editing Your Recordings Message Error ocurred Please change for mat disc Cause Abnormality with the disc to be repaired Troubleshooting Initialize the disc before us ing it again or use the other side of the same disc or an other disc ...

Страница 127: ... off 128 Setting power save changing off time 129 Changing display format of date and time 130 Initializing all settings to defaults 131 System reset 132 Checking remaining free space on DVD RAM disc 133 Initializing DVD RAM disc 134 Updating control information 136 ...

Страница 128: ...ect dial The menu screen for setting others will be re stored and BEEP has been specified as OFF 4 Press the MENU button to switch off the menu screen BEEP Operating sound Power switch ON Power switch OFF Eject operation is complete EJECT button can be ac cepted REC button is accepted Recording of movie is ter minated PHOTO button is pressed to half Number of sounds 1 2 2 1 1 2 2 Operating sound R...

Страница 129: ...n the recording pause status to display the menu screen 2 Use the select dial to choose OTHER SETUP and then POWER SAVE Options will be next to POWER SAVE OFF is being highlighted 3 Turn the Select dial to change OFF to ON 30 power off in approximately 30 minutes or ON 5 power off in ap proximately 5 minutes and then press the Select dial The menu screen for setting others will be re stored and PO...

Страница 130: ...lect dial to choose DATE SETUP and then DATE MODE Options will be next to DATE MODE D M Y currently selected display format is being high lighted 3 Turn the Select dial to change the dis play format and then press the Select dial The menu screen for setting date will be restored and the DATE MODE has been changed as you designated 4 Press the MENU button to switch off the menu screen Display forma...

Страница 131: ...be reset 1 Press the MENU button in the recording pause status to display the menu screen 2 Use the Select dial to choose OTHER SETUP and then RESET BACK will be highlighted 3 Turn the Select dial to choose OK and then press the Select dial The OTHER SETUP menu screen will be re stored All the setting items have now been reset to defaults 4 Press the MENU button to switch off the menu screen ...

Страница 132: ...ach the battery or AC adapter charger 2 Use a fine tipped pen to hold down the reset button for several seconds List of setting items RESET Item Settings Page for setting CAMERA SETUP FLASH AUTO ON OFF 82 W BALANCE AUTO HOLD 77 EIS ON OFF 71 D ZOOM ON OFF 65 RECSETUP V QUALITY FINE STND 75 SELF INT OFF SELF TIMER INTERVAL 0 05 5 00 84 86 MIC FILTER OFF ON 79 OTHER SETUP BEEP ON OFF 128 POWER SAVE ...

Страница 133: ... appear 3 Press to choose Disc and then Press to display the menu screen concerning disc The menu screen concerning the disc will ap pear 4 Capacity is being highlighted Press the ENTER button The remaining recording space on the side of disc will be displayed Tips With a write protected disc the remaining space will be displayed as 0 You can also review the remaining space on the information scre...

Страница 134: ...er to power the DVD camera recorder when initializing disc Initialization will not be possible when the battery used to power the DVD camera recorder is discharged Initialization with verification may not be possible for discs with severe scratches or dirt Such discs cannot be used 1 Insert the DVD RAM disc with the side you want to initialize fac ing the outside facing the hand strap and then tur...

Страница 135: ...g initialization will ap pear 6 Choose Yes and press the ENTER button When initializing one side of the disc is complete the DVD camera recorder will return to the re cording pause status When initializing the other side of disc turn the disc over and repeat the above pro cedure from step 2 Caution Before initializing the disc use the Disc Navigation screen to check the recorded contents see p 98 ...

Страница 136: ...ation if the disc has many recorded scenes Be sure to use the AC adapter charger to power the DVD camera recorder 1 Press the DISC NAVIGATION button in the recording pause status 2 Press the MENU button The Disc Navigation menu screen will appear 3 Press to choose Disc and then press to display the menu screen concerning disc 4 Press to choose Update disc and then press the ENTER button The messag...

Страница 137: ...DVD Camera recorder to Other Devices This section explains the methods for connecting to AV devices such as TV and transferring the data on DVD RAM disc to your PC Viewing on TV screen 138 Transferring data to PC 140 ...

Страница 138: ...t the DVD camera recorder to a multi TV and set the video input on the multi TV to AUTO the TV may erroneously detect the input signal from the camera recorder To prevent this set the video input on the multi TV to PAL Viewing on TV Screen 1 Turn the TV on and set the input selector to VCR whichever applicable Video input Refer to the TV instruction manual for how to switch the TV input 2 Turn the...

Страница 139: ...n also use the EXT DISPLAY button on the remote control to switch the set ting 1 Press the MENU button in the recording pause status to display the menu screen 2 Use the Select dial to choose OTHER SETUP and then E DISPLAY Options will be next to E DISPLAY LINE ON is being highlighted 3 Turn the Select dial to change the option to LINE OFF and then press the Select dial The menu screen for setting...

Страница 140: ... information on whether the PC connection software can be used with your PC refer to Conditions in which PC connection software can be used on the next page Cautions Only IBM PC AT compatible PCs with Windows 98 installed can be used with the PC connection software Read following Conditions in which PC connection software can be used carefully PCs with DVD RAM drive DVD ROM drive If PCs are provid...

Страница 141: ... available USB cable cannot be used Unplug all cables other than the DC power cable and PC connection cable when connecting DVD camera recorder to PC Do not unplug the PC connection cable when the ACCESS indicator is lit or blinking Disconnecting it could damage the data on disc And thoroughly read the instruction manual of PC connection software Connect the DVD camera recorder to PC at comfortabl...

Страница 142: ...lows Display in information LCD monitor When the DVD camera recorder is connected to PC the 3 5 LCD monitor and viewfinder will be off Close the LCD monitor and check with PC connection dis play in the information LCD monitor on the DVD camera recorder AUDIO VIDEO EXT MIC DIGITAL S V I DEO Battery remaining level Cursor display PC connection display ...

Страница 143: ...143 Subsidiary Information Cleaning 144 Trouble messages 145 Troubleshooting 147 Major specifications 155 Index 157 Introduction to optional accessories 161 ...

Страница 144: ...ect in the screen result in display unevenness or damage the LCD monitor Do not use benzene or thinner to clean DVD camera recorder case The coating of case could peel off or the case could deteriorate Wipe off dirt on the case with a moist cloth which has been completely wrung out When using chemical cleaning cloth follow instructions for use If dust adheres to viewfinder lens Use a cotton swab t...

Страница 145: ... whether the DVD RAM disc is write protected or not If this message appears be sure to initialize the disc on this DVD camera recorder before using it Reinitializing even a DVD RAM disc used on this DVD camera recorder may be necessary initializing will erase all recorded contents on disc If this message appears try to initialize the disc If the same message still appears the DVD RAM disc may be d...

Страница 146: ...VD camera recorder or DVD RAM disc is moved from a cold place to a warm place Wait until the message disappears and you can start to use the DVD camera recorder This message will be displayed for a little longer when the date changes Wiat until the message disappears and you can start to use the DVD camera recorder Insert it Condensation has occurred on the camera recorder lens or DVD RAM drive Do...

Страница 147: ... You have speci fied POWER SAVE ON 5 using the OTHER SETUP menu You can lengthen the time till power goes off or release the power save function Remove the battery or AC adapter charger In this case the disc cannot be removed To remove the disc reattach the battery or AC adapter charger and turn the camera recorder on again 38 129 Troubleshooting Check to see the following before asking for a repa...

Страница 148: ...n AC adapter charger lit or blinking during charging Unplug the PC connection cable Press the DISC NAVIGATION button The DVD camera recorder can normally be used for 40 minutes to one hour with a fully charged DZ BP16 battery but this time will be shorter at low temperatures Prepare extra batteries Replace it The battery might have been attached incorrectly to the AC adapter charger Remove the bat...

Страница 149: ...tery been unused for a long time Is the RECORD ING MODE switch set to still Is disc scratched or does dirt or fingerprint adhere to it Disconnect it Remove the battery once make sure of the orientation and then reattach it Remove the battery leave it for a while to cool down then charge it Charge the battery at 10 30 C Remove the battery and then reattach it If the battery is still not charged it ...

Страница 150: ...f you are using the viewfinder as a monitor Stop recording and adjust the brightness Use the viewfinder When using LCD monitor adjust its angle so that LCD screen is not exposed to direct sunlight Focus manually The DVD camera recorder is set to manual focus Focus the subject manually or release manual focus Adjust the diopter control 59 58 63 72 72 57 During recording During recording In cases ot...

Страница 151: ... cloth to clean it Playback of image recorded on devices other than this DVD camera recorder may be impossible on this DVD camera recorder If the scene recorded on this camera recorder is edited with applications other than Disc Naviga tion playback may not be possible on this DVD camera recorder Some TVs have multiple video input jacks Check whether the correct input was selected on TV to match t...

Страница 152: ...onnections Clean the disc Adjust TV volume control and be sure to adjust the volume on TV Detach the battery or AC adapter charger and use a fine tipped pen to hold down the reset button for several seconds Then reattach the battery orAC adapter charger and operate the DVD camera recorder Resetting the DVD camera recorder will return the date time and all setting items on the menu screen to defaul...

Страница 153: ...ed receiver on DVD camera recorder Is the infrared receiver on DVD camera recorder exposed to direct sunlight or strong fluorescent light etc The internal backup memory may be discharged Charge it Disc cannot be removed unless rotation has stopped Wait before trying to remove it again Connect the battery pack or AC adapter charger turn the POWER switch on and then off and remove the disc after the...

Страница 154: ...emote control Is the DVD camera recorder powered Is disc correctly inserted Was disc inserted until it locked Was disc inserted from wrong direction Also check the polarities of batteries The batteries could be dead Try replac ing them Turn it on Remove the disc and then reinsert it 52 57 45 Miscella neous Symptom Reference page Check to see Correction ...

Страница 155: ...dded 8 lx 0 44 inch color TFT approx 180 000 pixels 3 5 inch color TFT approx 200 000 pixels Electronic type 1 60 1 4000 second movie AUTO ON OFF Still recording only Still recording only External microphone jack 3 5 mmφ stereo mini jack Recommended microphone impedance 600 Ω 1 kΩ Movie with sound Still Movie approx 60 minutes FINE approx 120 minutes STND 1998 Movie Conforming to DVD video recordi...

Страница 156: ... cap string shoulder strap power cable 2 ferrite cores DVD RAM disc PC connection cable PC connection software CD ROM Power supply Input capacity DC output Charge output Weight External dimensions W x H x D Ambient temperature Allowable relative humidity 100 240 V AC 50 60 Hz 40 VA at 100 V 8 0 V 2 0 A 8 4 V 2 2 A approx 280 g AC adapter charger approx 65 x 50 x 105 mm 0 40 C 20 85 Specifications ...

Страница 157: ... 95 Information LCD 61 142 Interval recording 84 L Lens cap 26 Lens hood 63 Light from rear 82 LINE OFF ext out display 139 LINE ON ext out display 139 Index Number 8 cm DVD RAM disc 31 A AC adapter charger 43 156 All programs 96 Auto focus 63 B Battery pack 38 Attaching to DVD camera recorder 40 Charging 38 Disposition of dead battery 42 Life 42 Recordable time on DVD camera recorder 39 Removing ...

Страница 158: ...ction software 140 Play list Adding scenes 118 Attaching title 121 Creating 117 Deleting 122 Deleting scenes 106 Displaying with thumbnails 120 Editing 121 Playing back 120 Playing back Movie 104 Play list 120 Repeat play 104 Stills only 105 PORTRAIT program AE 69 Power save 65 129 Powering from AC outlet 43 Pressing PHOTO all the way 80 Pressing PHOTO to half 80 Program 96 Program AE 69 Provided ...

Страница 159: ...date program 100 Self timer 86 SHIFT selecting range 102 Shooting mode program AE 69 Shutter speed 82 Skip 107 108 Slide play 105 Special effects 112 Specifications 155 SPORTS program AE 69 SPOTLIGHT program AE 69 Still Manual focus 87 Playing back only stills 105 Recording 80 STND movie mode 75 Storage capacity 49 133 Suggestions and restrictions 23 SURF SNOW program AE 69 Switching recording met...

Страница 160: ...160 Introduction to Optional Accessories Power Supplies DZ BP16 battery 7 2 V 1600 mAh DZ BP28 battery 7 2 V 2800 mAh ...

Страница 161: ... ITALY Tel 39 02 487861 Tel 39 02 38073415 Servizio Clienti Fax 39 02 48786381 2 Email customerservice italy hitachi eu com HITACHI Europe AB Box 77 S 164 94 Kista SWEDEN Tel 46 0 8 562 711 00 Fax 46 0 8 562 711 13 Email csgswe hitachi eu com HITACHI EUROPE S A S Lyon Office B P 45 69671 BRON CEDEX FRANCE Tel 04 72 14 29 70 Fax 04 72 14 29 99 Email france consommateur hitachi eu com HITACHI EUROPE...

Отзывы: