background image

Q

u

ick O

p

e

ratio

n (E

ngl
ish
)

2

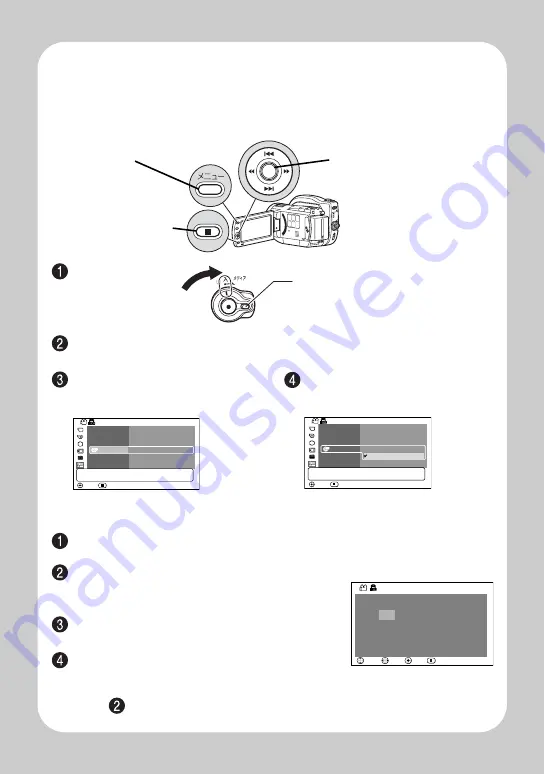
Changing the display language 

(LANGUAGE)

You can change the language used on screens and menus.
The following shows how to change from Japanese to English.

Turn on the power.

Press the menu button, then select "

初期設定

" by pressing 

f

/

e

.

Then, press 

c

 (or the confirmation button).

Setting the Date and Time

Press the menu button, then select "Date Setup" by pressing 

f

/

e

.

Then, press 

c

 to select "Date Set" and press the confirmation button.

Select each item by pressing 

d

/

c

 and set the correct value by pressing 

f

/

e

.

• Repeat this step until year, month, date, hour, 

minute, and AM/PM are correctly set.

Press the confirmation button.

The confirmation screen appears.

Press 

d

 to select "YES", then press the 

confirmation button to confirm.

• If you select “No” and press the confirmation button, the screen returns to 

step .

Confirmation button

Menu button

Cancel/Stop 
button

Press and hold the lock button, and 
turn the power switch to "

".

Select "

言語切替

" by pressing  

f

/

e

, then press 

c

 (or the 

confirmation button).

Select "English" by pressing 

e

then press the confirmation button.

ೋᦼ⸳ቯ

࿗ͥ

ࠨ೰

ᠲ૞㖸
ࡄࡢ࡯࠮࡯ࡉ
㍳↹࡜ࡦࡊ

⸒⺆ಾᦧ

࠺ࡕࡕ࡯࠼

⸳ቯ࡝࠮࠶࠻

ᣣᧄ⺆
'PINKUJ

ೋᦼ⸳ቯ

࿗ͥ

ࠨ೰

ᠲ૞㖸
ࡄࡢ࡯࠮࡯ࡉ
㍳↹࡜ࡦࡊ

⸒⺆ಾᦧ

࠺ࡕࡕ࡯࠼

⸳ቯ࡝࠮࠶࠻

ᣣᧄ⺆

ࠝࡦ

ࠝ࡯࠻

ࠝࡦ

ࠝࡈ

ŅŢŵŦġŔŦŵ

ijııĹ

İġIJıġİġġġIJġġġłŎġġIJıȇıı

ńʼnłŏňņ

ŎŐŗņ

ņŏŕņœ

œņŕŖœŏ

Содержание DZ-BD10H

Страница 1: ...Quick Operation English DZ BD10H ...

Страница 2: ...er charging is complete attach the battery pack to the camcorder If the CHARGE indicator does not light check that the connections and are firmly made CHARGE indicator Terminal at bottom Always turn the power off before disconnecting the power supply While pressing and holding the BATT switch slide the battery pack upward then remove it Be careful not to drop the battery pack while detaching it Qu...

Страница 3: ...ct value by pressing f e Repeat this step until year month date hour minute and AM PM are correctly set Press the confirmation button The confirmation screen appears Press d to select YES then press the confirmation button to confirm If you select No and press the confirmation button the screen returns to step Confirmation button Menu button Cancel Stop button Press and hold the lock button and tu...

Страница 4: ...ur hand Place the recording surface of the BD DVD face down then push down on the center of the BD DVD until it clicks into place For single sided discs the side opposite the label is the recording surface To record on the other side for double sided discs remove the disc p 4 flip it over and then reload it Notes The disc mechanism may be quite hot immediately after use Do not touch the metallic a...

Страница 5: ...Mode by pressing d c then press the confirmation button Removing the BD DVD Pressing slightly on the center hub with a finger grip the edge of the disc with your thumb and lift the disc out as shown Note Be careful that the power is not accidentally cut off while formatting otherwise the disc will become unusable Confirmation button VR Mode After recording you can perform various editing functions...

Страница 6: ...ttention to the orientation of the card The terminals should face the cover HDD BD R RAM RW VR R RW VF BD RE CARD Press and hold the lock button to turn the power switch to 入 1 To record movies slide the Movie Stills switch to To record stills slide the Movie Stills switch to 3 Turn the power switch to 入 On The HDD indicator lights and the camcorder enters recording pause mode To turn off the camc...

Страница 7: ... 1 Remaining battery level Current time Elapsed recording time hrs mins secs Remaining space on HDD BD DVD Card m n 4 Press the フォト photo button halfway down A subject will be focused When focus is locked the green m in the LCD monitor will turn purple 5 Fully press the フォト photo button The image will be recorded After a few seconds the image shot will be displayed for about three seconds You can ...

Страница 8: ...e confirmation button The chosen scene is played back To promptly return to the disc navigation screen press C or the Disc Navigation button To return to recording pause mode press C or the Disc Navigation button again Adjusting speaker volume during movie playback Confirmation Play Pause button Menu button Stop Cancel button Movie Picture also referred as scene selection button 見る Disc Navigation...

Отзывы: