background image

– 14 –

EN

2C15

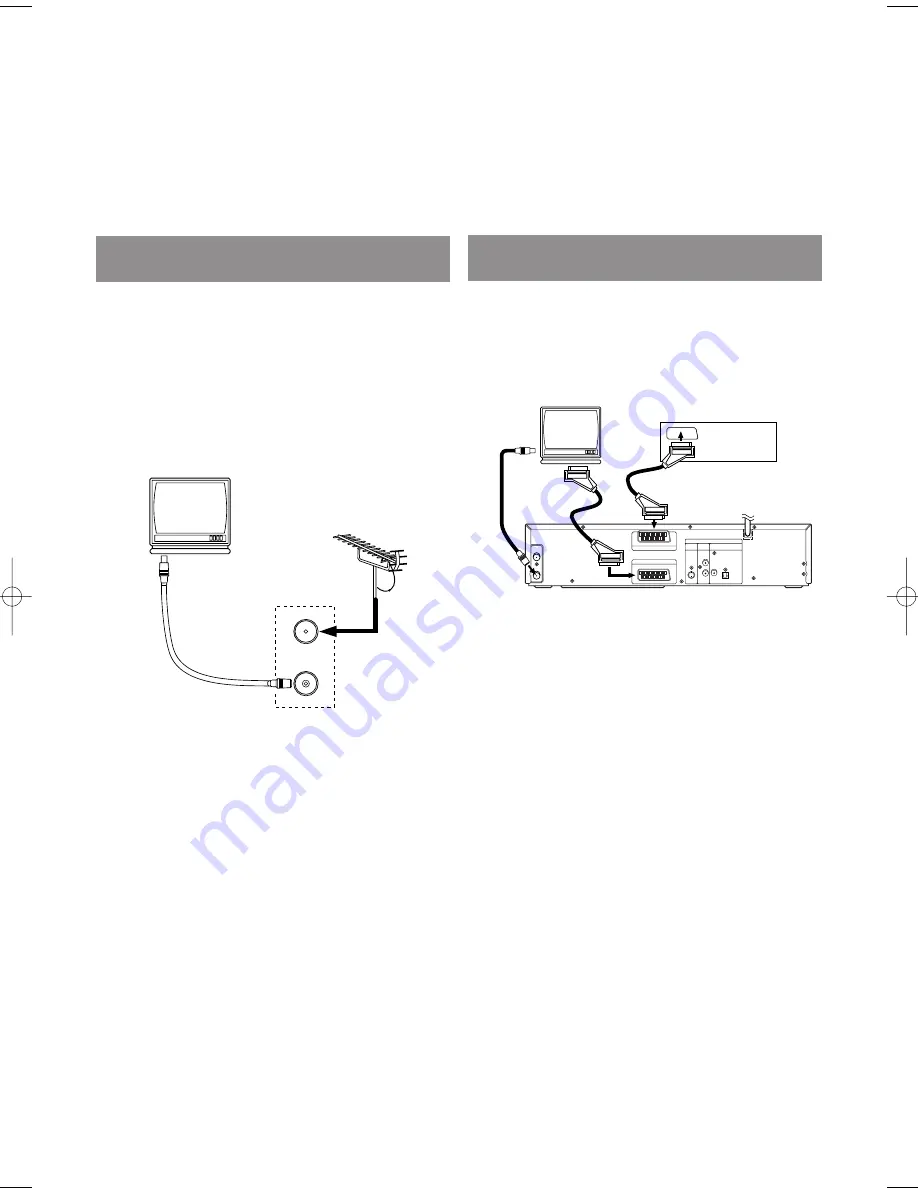
The following show examples of connections commonly used to connect the DVD/VCR to TV and other
components.

Notes

¡

Be sure to turn off the power to all components in the system before connecting another component.

¡

Refer to the Instruction Manuals for your TV, stereo system and any other components to be connected to the
DVD/VCR.

DVD/VCR TO TV CONNECTION

1. D

isconnect the TV’s power cord from the AC outlet.

2. D

isconnect the UHF  TV aerial cable from the TV.

3. C

onnect the UHF TV aerial cable to the DVD/VCR.

4. C

onnect the DVD/VCR to the TV using the aerial cable.

5. P

lug the Power cords of the DVD/VCR and TV into the

AC outlets.

RF OUT

AERIAL

to AERIAL

to RF OUT

(Back of the unit)

to aerial socket

(TV)

UHF

OTHER CONNECTIONS

AERIAL

RF OUT

AV2 (DECODER)

DVD/VCR

AV1 (TV)

DVD

DIGITAL

AUDIO OUT

L

R

COAXIAL OPTICAL

ANALOG

AUDIO OUT

S-VIDEO

OUT

VCR

to 21-Pin

to 21-Pin Scart Jack

Decoder (Not supplied)

(TV)

to RF OUT

to aerial

socket

Scart Jack

AV1 (TV)

EURO SCART (AV) SOCKETS

Your DVD/VCR is provided with two Scart sockets which
you may connect to other external devices with Scart sock-
ets. We recommend this connection to ensure a better audio
and picture quality.
NICAM stereo sound is only achieved when using a
SCART lead.

Euro Scart cables are obtainable at your dealer.

AV1 (TV) CONNECTION TO TV

If your TV has Scart sockets, you may connect your
DVD/VCR’s AV1 (TV) scart socket to the Scart socket on
the back of your TV. Please see the instruction manual for
your TV.

AV2 (DECODER) CONNECTION FOR OTHER

EXTERNAL DEVICES

The second Scart socket AV2 (DECODER) is designated
for other external devices, e.g. decoder, another VCR,
video camera and so on.

NOTE:

• 

If you want to connect a TV with Scart socket to your
DVD/VCR, the TV must be connected to the DVD/VCR
through AV1 (TV). A connection to AV2 (DECODER)
will not function correctly.

EXTERNAL INPUT MODE

To receive the signal from an external input (decoder, video
camera,

another VCR etc.),

connect to the AV2

(DECODER) socket, and press PROG 

(

o

/

p

or enter

“002” with the Number Buttons  to show “AV2” on the TV
screen. (“L2” will appear on the DVD/VCR display panel.)
If you use the AV1 (TV) socket, press PROG 

(

o

/

p

)

or

enter “001” with the Number Buttons to appear “AV1” on
the TV screen. (“L1” will appear on the DVD/VCR display
panel.)
If you use the front AUDIO/VIDEO In Jacks, press PROG

(

o

/

p

)

or enter “003” with number button to show “AV3”

on the TV screen. (“L3” will appear on the DVD/VCR
display panel.)

H9551BD.qxd  03.5.20 3:12 PM  Page 14

Содержание DVPF3EUK

Страница 1: ... of trouble free use please read this instruction manual completely MODEL DVPF3EUK PROGRAM VIDEO IN TIMER REC DVD OUTPUT VCR L mono AUDIO IN R AV 3 PAL Recordable ReWritable VIDEOPlus andPlusCodeare registeredtrademarkofGemstar Development Corporation The VIDEO Plus system is manufactured under licence from Gemstar Development Corporation ...

Страница 2: ...y to change the fuse in a non rewireable plug the fuse cover must be refitted If the fuse cover is lost or damaged the plug must not be used until a replacement available from the appliance manufacturer is obtained It is important that the colour of the replacement fuse cover corresponds with the rating marking on the base of the plug If the plug has to be changed because it is not suitable for yo...

Страница 3: ...inet and at the side or bottom are provided for ventilation To ensure reliable operation and to protect the unit from overheating these opening must not be blocked or covered Avoid enclosed spaces such as book cases unless proper ventilation is provided 3 Keep the unit away from the direct sunlight the radiator heat sources and dusty or humid places 4 Avoid locations subject to strong vibration or...

Страница 4: ...ctual property rights owned by Macrovision Corporation and other rights owners Use of this copyright protection technology must be authorized by Macrovision Corporation and is intended for home and other limited viewing uses only unless otherwise authorized by Macrovision Corporation Reverse engineering or disassembly is prohibited SYMBOLS USED IN THIS MANUAL The following symbols below appear in ...

Страница 5: ...T 21 SEARCH FUNCTIONS 22 RECORDING FUNCTION 23 NORMAL RECORDING 23 OTR One Touch Recording 23 TIMER RECORDING 23 HINTS FOR TIMER RECORDING 25 TIMER RECORDING USING THE VIDEO Plus SYSTEM 26 PDC Programme Delivery Control 27 AUTO RETURN 27 COPYING A VIDEO TAPE 28 A STATUS DISPLAY 28 TV COLOUR SYSTEM 28 AUTO REWIND 29 REAL TIME TAPE COUNTER 29 PLAYING A DISC 29 BASIC PLAYBACK 29 GENERAL FEATURES 29 D...

Страница 6: ...rround system developed by the Digital Theater System co which reproduces the origi nal sound as truthfully as possible Search Chapter search Title search Track search Time search Repeat Chapter Title Track Group All A B Zoom Marker The part designated by user can be called back DVD Disc Navigation Displays the first scenes of each chapter in a title Resume Play Virtual Surround Bit rate indicatio...

Страница 7: ... same region code The following discs cannot be played back on this DVD VCR DVD with region codes other than 2 or ALL DVD ROM DVD RAM CD ROM VSD CDV Only plays back the audio part CD G Only plays back the sound CD I SACD Photo CD Video CD Any other discs without compatibility indications PLAYABLE DISCS 2 DVD Data on a DVD is divided into sections called titles and then into subsections called chap...

Страница 8: ... Rewind Search 13 REC Button VCR page 23 Press once to start a recording Press repeatedly to start a One Touch Recording 14 REC Light page 23 Lights up during recording 15 TIMER Light page 24 This light glows when the DVD VCR is in standby mode for a timer recording or during a One Touch Recording It flashes if TIMER is pressed for a timer recording but there is no tape in the DVD VCR It flashes w...

Страница 9: ...or play back 10 Button When searching a TITLE a CHAPTER or a TRACK use this button to enter numbers 10 and above For exam ple when entering 15 press this button first then 5 28 CLEAR C RESET Button DVD mode page 31 Press to reset the setting VCR mode page 20 Press to reset the counter 29 ANGLE Button page 35 Press to change the camera angle to see the sequence being played back from a different an...

Страница 10: ...arks a segment to repeat between A and B Allows you to repeat play a Chapter or Title Allows you to repeat play a Track or Disc ZOOM Button To set surround on off Allows you to program a specific order or random playback To set surround on off To magnify part of picture x2 x4 ANGLE Button Accesses various camera angles on a disc Accesses various subtitles on a disc AUDIO Button DISPLAY Button Acce...

Страница 11: ...sor and determines its position Moves the cursor and determines its position Brings up the DVD player s Setup menu To skip Tracks To perform INDEX or TIME SEARCH Allows you to search forward backward through a disc 16 To stop playback Pause disc play Pause disc play Pause tape play or record Press to exclusively control the TV programmes Begin disc play To stop playback or record Begin tape play D...

Страница 12: ...ray closed Loading the Disc When a disc is being Play back 1 Open the battery compartment cover 2 Insert two AA batteries with each one oriented correctly 3 Close the cover Notes Do not mix alkaline and manganese batteries Do not mix old and new batteries DVD VCR VCR DVD SWITCHING Since this product comprises VCR and DVD players it is necessary to select the correct output mode Press VCR on the re...

Страница 13: ...LOG AUDIO OUT Jacks DVD only Connect the supplied audio cables here and to the Audio In jacks of a television or other audio equipment 7 DIGITAL COAXIAL AUDIO OUT Jack DVD only Connect an optional coaxial digital audio cable here and to the Coaxial Digital Audio In jack of a decoder or audio receiver 8 DIGITAL OPTICAL AUDIO OUT Jack DVD only Connect an optional optical digital audio cable here and...

Страница 14: ...his connection to ensure a better audio and picture quality NICAM stereo sound is only achieved when using a SCART lead Euro Scart cables are obtainable at your dealer AV1 TV CONNECTION TO TV If your TV has Scart sockets you may connect your DVD VCR s AV1 TV scart socket to the Scart socket on the back of your TV Please see the instruction manual for your TV AV2 DECODER CONNECTION FOR OTHER EXTERN...

Страница 15: ...r OFF for audio output in the setup mode Playing a DVD using incorrect settings may gen erate noise distortion and may also damage the speakers See page 36 The audio source on a disc in a 5 1 channel Dolby Digital surround format cannot be recorded as digital sound by an MD or DAT deck Set Dolby Digital DTS and MPEG to PCM or OFF for audio output in the setup mode for method 1 only Playing a DVD u...

Страница 16: ...ity from DVD discs will not be as good if the DVD VCR player is connected to the TV s antenna terminal through an RF Modulator During reception of bilingual broadcasts Display on the TV screen Mode MAIN SUB MAIN SUB MAIN SUB MAIN SUB Main Audio Main Audio Sub Audio Sub Audio Main Audio Sub Audio L R L R L R AUDIO OUTPUT Reception of stereo broadcasts STEREO LEFT RIGHT None Display on the TV screen...

Страница 17: ...or broadcasts between channel 22 and channel 69 in your area then press Arrow B 7 Press MENU to exit Set the TV channel to the RF OUT CHANNEL which was selected on the DVD VCR Then press PLAY B A picture from the DVD VCR will appear on the TV screen If a picture does not appear repeat steps 3 to 7 using a different channel which is not used for broadcasts VCR PRESET FOR USE VIDEO CHANNEL SETTING 8...

Страница 18: ...ng must be set before the Auto Clock is set The DVD VCR refers to the channel which was memorised into position 01 The PDC channel must therefore be set to position 01 The clock cannot be set automatically if you are not receiving a channel that carries a time signal in your area In this case set the clock manually Once the auto clock setting is performed the DVD VCR will correct the current time ...

Страница 19: ...se the remote control for this procedure 1 Turn on the TV and select the TV channel to the video channel on the TV 2 Press MENU 3 Press Arrow o p to select INITIAL then press Arrow B 4 Press Arrow o p to select CH TUNING then press Arrow B 5 Press Arrow o p to select AUTO then press Arrow B The tuner scans and memorises all the active chan nels in your area After scanning the tuner stops on the lo...

Страница 20: ...lect CH TUNING then press Arrow B 4 Press Arrow o p repeatedly to select MOVE then press Arrow B 5 Press or Arrow o p repeatedly to select the position number you want to change the channel then press Arrow B You cannot select a position number where appears next to the number This is because SKIP is set to ON for this position number When a weak signal is received in Channel Order mode you can ch...

Страница 21: ...D VCR mutes the sound during slow motion You can control the speed by pressing g or h If a noise bar appears on the TV screen you can reduce it by pressing PROG o p After the VCR has been in Still Slow mode for 5 minutes it will stop automatically to protect the tape and the video head from damage To return to playback press PLAY B AUTO REPEAT PLAYBACK This feature allows you to play a tape over a...

Страница 22: ... now search at super high speed This function will not work for a NTSC tape Press PLAY B to return to normal playback QUICK FIND This function enables you to search and confirm the contents of the recorded programme s using the index mark Use the remote control for this procedure The tape must be fully rewound 1 Press QUICK FIND to skip to the beginning of next programme 2 Press PLAY B to view at ...

Страница 23: ...nd or fast forward the tape to the point at which you want to begin recording 2 Press Number or PROG o p to select the channel to be recorded 3 Press SPEED to select the tape speed SP LP 4 Press REC to begin recording The REC Light on the display comes on To temporarily stop recording or to resume it press PAUSE STEP After the VCR has been in Pause mode for 5 minutes it will stop automatically to ...

Страница 24: ...weekly recording For once only recording Press Arrow o p repeat edly until the relevant month appears For daily recording To record a TV programme at the same time on the same channel from Monday through Friday While the month digit is flashing press Arrow o p repeatedly to select MO FR For everyday recording To record a TV programme at the same time on the same channel every day While the month d...

Страница 25: ... standby mode press TIMER The TIMER light disappears and you can operate the VCR If you want to use the DVD player during a VCR timer recording or while the TIMER light is on or flashes You can use the DVD player while the TIMER light is on or flashes or during a timer recording Press y I to turn on the DVD player Press DVD on the remote control to choose DVD mode then continue with the other DVD ...

Страница 26: ...Press VIDEO Plus If you have not set the clock yet CLOCK setting menu appears If so follow the steps outlined in the Setting the Clock section Then set the timer 2 Press Number to set the Plus Code number of the programme you want to record Press Arrow s to go back one digit from current digit while you set the PlusCode number 3 Select once daily everyday or weekly recording For once only recordin...

Страница 27: ...DC Programme Delivery Control AUTO RETURN When timer recording is finished the DVD VCR will automatically rewind the tape to the beginning where it started recording If there are any remaining pro grammes including Daily Everyday Weekly AUTO RETURN will not operate 1 Press MENU 2 Press Arrow o p repeatedly to point to SET UP then press Arrow B 3 Press Arrow o p to point to AUTO RETURN then press A...

Страница 28: ...cording press STOP C on the recording DVD VCR then stop playback of the tape in the playing VCR VCR Turn on the TV and select the video channel on the TV Notes For best results during dubbing use the DVD VCR s front panel controls whenever possible The remote control might affect the playback DVD VCR s oper ation If video or colour fades in and out you may be copy ing a copy guarded video tape TO ...

Страница 29: ...hat a prohibited operation has been encountered by the DVD VCR or the disc With DVDs that use titles for playback programme signals playback may start from the second title or it may skip these titles During the playback of a two layered disc pictures may stop for a moment This happens when the 1st layer switches to the 2nd layer This is not a mal function GENERAL FEATURES DVD may contain menus to...

Страница 30: ...rm selection DVD TITLE MENU 1 Press TOP MENU The title menu will appear 2 If the feature is not available symbol may appear on the TV screen 3 Press Arrow L K B s to select an item and ENTER to confirm selection DVD CALLING UP A MENU SCREEN DURING PLAYBACK For DVDs Press MENU to call up the DVD menu Press TOP MENU to call up the title menu Note Contents of menus and corresponding menu opera tions ...

Страница 31: ...play appears 2 Within 30 seconds select a desired track number using numerical buttons For single digits press 0 first Playback will start at the selected track Press CLEAR C RESET to erase the incorrect input CD Using SKIP H G During playback press SKIP G to move the next track Press it repeatedly to skip subsequent tracks Press SKIP H to go back to beginning of the current track Press it repeate...

Страница 32: ...during playback The display screen and Markers will appear on the TV screen 2 Press Arrow s B to select 1 2 3 4 5 6 7 8 9 or 10 and ensure that appears in the display 3 When reaches the desired point press ENTER The Title or Track and elapsed playing time will appear in the TV screen 4 To return to the Marker later press SEARCH MODE four times CD three times during playback and Arrow s B to choose...

Страница 33: ...p to 8 hierarchies can be created This player recommends the use of files recorded at the below specifications Sampling frequency 44 1kHz or 48kHz Constant bit rate 112kbps 320kbps 3 MP3 MP3 PLAYBACK PROGRAMME You may determine the order in which tracks will play 1 In stop mode press MODE The PROGRAM screen will appear 2 Press Arrow to select a track then press ENTER Press CLEAR C RESET to erase t...

Страница 34: ... and left channels are active stereo L CH only left channel is active R CH only right channel is active Note If the Virtual Surround setting is 1 or 2 the sound mode will be fixed to STEREO and can not be changed CD The DVD allows you to select a language for subtitles during DVD disc if available playback 1 Press SUBTITLE during playback 2 Press SUBTITLE repeatedly to select your desired subtitle...

Страница 35: ...wing that exceed your settings with a password or playback will stop This feature allows you to prevent discs with Adult content being played back by your children DVD RATING LEVEL Rating Level allows you to set the rating level of your DVD discs Playback will stop if the disc s ratings exceed the level you set 1 Press SETUP in STOP mode 2 Press Arrow B to select CUSTOM then press ENTER 3 Press Ar...

Страница 36: ...ction will be acti vated and sound will be down sampled at 48kHz MPEG BITSTREAM Output by MPEG sound PCM Convert the MPEG to PCM Set to BITSTREAM when the unit is connected to MPEG Decoder The default setting is PCM 5 Press SETUP to exit QUICK AUDIO DRC OFF DOLBY DIGITAL BITSTREAM DTS OFF DOWN SAMPLING ON MPEG PCM You can enjoy stereophonic Virtual Surround Effects from your existing stereo system...

Страница 37: ...STOP mode 2 Press Arrow B to select CUSTOM then press ENTER CUSTOM mode will appear 3 Press Arrow s B to select LANGUAGE then press ENTER to confirm 4 Press Arrow K L to select the below items then press ENTER If you want to return to LANGUAGE SETTING MENU press Arrow s AUDIO Sets the audio language SUBTITLE Sets the subtitle language DISC MENU Sets the language for DVD menu PLAYER MENU Sets the l...

Страница 38: ... Macedonian 5957 Malagasy 5953 Malay 5965 Malayalam 5958 Maltese 5966 Maori 5955 Marathi 5964 Moldavian 5961 Mongolian 5960 Nauru 6047 Nepali 6051 Norwegian NOR 6061 O R Occitan 6149 Oriya 6164 Oromo Afan 6159 Panjabi 6247 Pashto Pushto 6265 Persian 5247 Polish 6258 Portuguese POR 6266 Quechua 6367 Rhaeto Romance 6459 Romanian RUM 6461 Russian RUS 6467 S Samoan 6559 Sangho 6553 Sanskrit 6547 Scots...

Страница 39: ...deo tape You are experiencing copy guard protection when making a copy of a video tape Cannot remove the tape Check if the DVD VCR is in the VCR mode If not press VCR on the remote control to switch the mode No picture Connect the video cables firmly Insert a correct video disc that plays on this DVD VCR Press DVD on the remote control Check if the DVD OUTPUT Light is lit Then try other DVD featur...

Страница 40: ...ve a cas sette so you can see a clear picture Playback picture may become blurred or interrupted while the TV programme reception is clear Dirt accumulated on the video heads after long periods of use or the usage of rental or worn tapes can cause this problem If a streaky or snowy picture appears during playback the video heads in your DVD VCR may need to be cleaned 1 Please visit your local Audi...

Страница 41: ...Audio CD Video Cassette tape Converter output UHF Channel 22 69 Power source 220 240 V 10 50 Hz 0 5 Power consumption 30 W standby 9 0 W Operating temperature 41 F 5 C to 104 F40 C Dimensions W 17 1 8 435 mm H 3 7 8 99 mm D 8 9 16 218 mm Weight 8 4 lbs 3 8 kg Designs and specifications are subject to change without notice ...

Страница 42: ...way from metal objects which may cause a short circuit resulting in leakage or in extreme cases fire or even an explosion Remove dead batteries from equipment and all batteries from equipment you know you are not going to use for a long time Otherwise the batteries may leak and cause damage Never dispose of batteries in fire as this can cause them to explode Please put dead batteries in with the n...

Страница 43: ... switched on when it is unattended unless it is specifically stated that it is designed for unattended operation or has a standby mode Switch off using the switch on the equipment and make sure that your family know how to do this Special arrangements may need to be made for infirm or handicapped people DON T use equipment such as personal stereos or radios so that you are distracted from the requ...

Страница 44: ...r 3 The product serial number is not removed or altered This guarantee does not apply to products acquired second hand or for commercial or communal use This guarantee does not extend to user control adjustments battery replacement and aerial adjustment Any parts replaced under guarantee shall become the property of HITACHI EUROPE LTD Please note that evidence of the date of purchase will be requi...

Страница 45: ... ITALY Tel 39 02 487861 Tel 39 02 38073415 Servizio Clienti Fax 39 02 48786381 2 Email customerservice italy hitachi eu com HITACHI Europe AB Box 77 S 164 94 Kista SWEDEN Tel 46 0 8 562 711 00 Fax 46 0 8 562 711 13 Email csgswe hitachi eu com HITACHI EUROPE S A S Lyon Office B P 45 69671 BRON CEDEX FRANCE Tel 04 72 14 29 70 Fax 04 72 14 29 99 Email france consommateur hitachi eu com HITACHI EUROPE...

Отзывы: