background image

--- 10 ---

10. REPAIR GUIDE

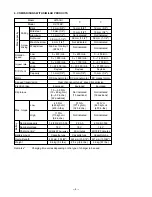
Be sure to remove the storage batteries from the main body before servicing.  Inadvertent triggering of the switch

with the storage battery connected will result in a danger of accidental turning of the motor.

10-1. Precautions in Disassembly and Reassembly

The [Bold] numbers in the description below correspond to the item numbers in the Parts List and exploded

assembly diagram for the Model DV 18DV.

10-1-1. Disassembly

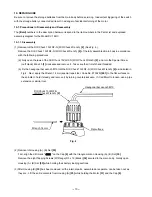
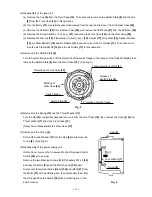
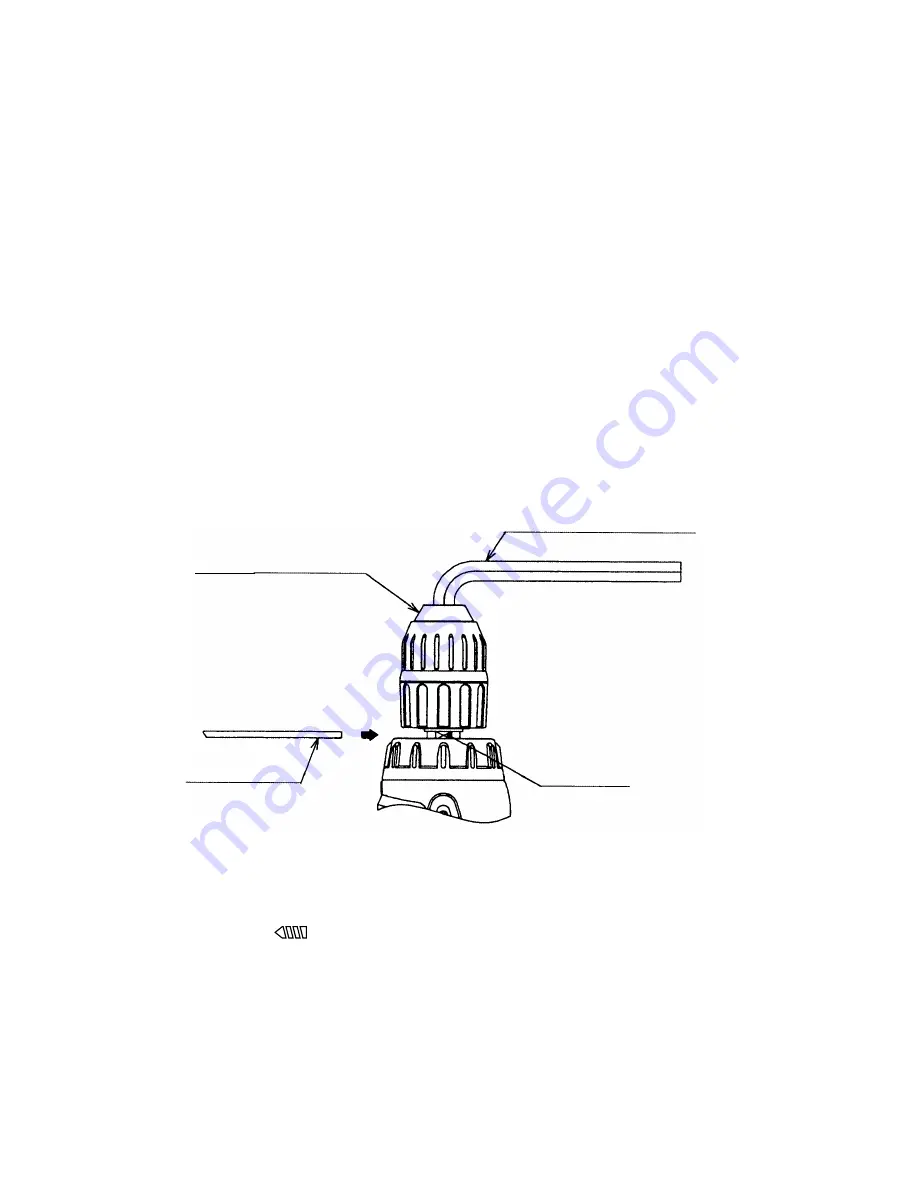
(1) Removal of the Drill Chuck 13VLRF-N (W/O Chuck Wrench) [2]  (See Fig. 4.)

Remove the Drill Chuck 13VLRF-N (W/O Chuck Wrench) [2] of the fully assembled main body in accordance

with the following procedures.

(a) Fully open the jaws of the Drill Chuck 13VLRF-N (W/O Chuck Wrench) [2], and turn the Special Screw

(Left Hand) M6 x 23 [1] clockwise and remove it.  Take care that it is left-hand threaded.

(b) Fix the hexagonal bar wrench M10 into the Drill Chuck 13VLRF-N (W/O Chuck Wrench) [2] as indicated in

Fig.4.  Next, apply the Wrench 14 mm (special repair tool, Code No. 873929) [601] to the flat surfaces on

the spindle to hold it steady, and remove it by turning counterclockwise.  If it is difficult to loosen, use a pipe

extension or similar tool.

(2) Removal of Housing (A). (B) Set [35]

First, align the drill mark "           " on the Cap [4] with the triangle mark on Housing (A). (B) Set [35].

Remove the eight Tapping Screws (W/Flange) D3 x 16 (Black) [32] secured to the main body.  Gently open

Housing (A). (B) Set [35] while holding their battery loading sections.

(3) After Housing (B) [35] has been removed, all the internal parts, assembled or separate, can be taken out as

they are.  Lift the entire contents from Housing (A) [35] while holding the Motor [31] and the Cap [4].

Hexagonal bar wrench M10

Wrench 14 mm

Drill Chuck 13VLRF-N
(W/O Chuck Wrench) [2]

Flat surface

Fig. 4

Содержание DV 18DV

Страница 1: ...POWER TOOLS TECHNICAL DATA AND SERVICE MANUAL CORDLESS IMPACT DRILL DV 18DV SPECIFICATIONS AND PARTS ARE SUBJECT TO CHANGE FOR IMPROVEMENT LIST No F854 Jul 2001 D MODEL DV 18DV ...

Страница 2: ...Notice for use Specifications and parts are subject to change for improvement Refer to Hitachi Power Tool Technical News for further information ...

Страница 3: ... AND SERVICE MANUAL a symbol s is are used in the place of company name s and model name s of our competitor s The symbol s utilized here is are as follows Symbols Utilized Competitors Company Name Model Name DEWALT DW997 P MAKITA 8443D C ...

Страница 4: ...PRECAUTIONS IN SALES PROMOTION 6 8 1 Safety Instructions 6 8 2 Inherent Drawbacks of Cordless Impact Drills Requiring Particular Attention during Sales Promotion 8 9 REFERENCE MATERIALS 9 9 1 Speed Control Mechanism 9 10 REPAIR GUIDE 10 10 1 Precautions in Disassembly and Reassembly 10 10 2 Precautions in Disassembly and Reassembly of Battery Charger 17 11 STANDARD REPAIR TIME UNIT SCHEDULES 18 As...

Страница 5: ...V 18DV The Model DV 18DV is equipped with the T type handle and the 22 step clutch for easier operation as a driver drill 3 APPLICATIONS Tightening and loosening wood screws self tapping screws and machine screws Drilling into wood materials plastic mild steel and aluminum Drilling into brick and concrete block 4 SELLING POINTS Two speed transmission with one touch speed shift knob Equipped with f...

Страница 6: ...materials such as brick and concrete block can be efficiently carried out by aligning the cap impact mark with the triangle mark on the main body See Fig 1 Fig 1 4 1 2 Durable fan cooled powerful motor The cooling fan incorporated in the motor and the air vents provided in its outer frame greatly enhance the cooling effect ensuring improved durability in continuous operation 4 1 3 13 mm 1 2 keyles...

Страница 7: ...attery Nominal voltage DC 18 V Nominal life Charging discharging Approx 500 1 000 times in case of Model UC 24YFA Nominal capacity 1 4 2 0 Ah Sealed cylindrical nickel metal hydride storage battery Nominal voltage DC 18 V Nominal life Charging discharging Approx 500 times in case of Model UC 24YFA Nominal capacity 2 2 3 0 Ah Overcharge protection system 1 Battery voltage detection 2 V system 2 Bat...

Страница 8: ...ated 16 positions Not indicated 2 0 2 6 3 0Ah 18 V 60 75 90 minutes Cassette type 267 mm 10 33 64 2 6 kg 5 7 lbs 45 N m 460 kgf cm 400 in lbs Rotation speed Low High Impact rate Type Capacity 0 6 750 min 0 21 000 min Keyless 13 mm 1 2 DC magnet motor 0 400 min 0 1 500 min 0 6 000 min 0 22 500 min Keyless 13 mm 1 2 DC magnet motor 0 600 min 0 1 800 min 0 7 150 min 0 20 350 min Maker Model Max capac...

Страница 9: ... This data should be used as a comparative guide only Type of work Maker Model Working capacity 1 Drilling speed sec pc 0 0 400 100 1000 250 800 200 200 50 600 150 High speed Low speed Low speed 3 8 3 8 4 7 5 4 5 1 5 3 0 5 0 6 0 6 120 140 95 55 60 50 950 550 530 3 3 4 4 5 3 150 150 110 T18 11 16 36 mm dia 13 32 American pine Wood boring 75 mm 3 8 mm dia 20 American pine Wood screw A 5 mm dia prepa...

Страница 10: ...ny voltage increasing equipment transformer etc between the power source and the charger If the charger is used with voltage higher than that indicated on the unit it will not function properly 4 Conduct battery charging at an ambient temperature range of 0 C 40 C 32 F 104 F Special temperature sensitive devices are employed in the charger to permit rapid charging Ensure that customers are instruc...

Страница 11: ...H or EB 1830H storage battery should be returned to the Hitachi power tool sales outlet or the authorized service center when it is no longer capable of being recharged or repaired If thrown into a fire the battery may explode or if discarded indiscriminately leakage of the cadmium compound contained in the battery may cause environmental pollution B Caution plates 1 The following cautions are lis...

Страница 12: ... improving the cooling efficiency As a fan is built into the motor a foreign object inserted through a vent hole may cause a failure Please instruct customers to never insert a foreign object into the vent hole 4 Use a thrust of 100 to 150 N 10 15 kgf 22 33 lbs It would not accelerate the drilling speed of this unit to press the tool strongly against the workpiece as is done with a usual AC impact...

Страница 13: ...r it has been used in the tool the pilot lamp red may not be turned on when the battery is connected to the charger Chargeable temperature ranges of each type of battery are specified as follows Types EB 1814 and EB 1820 from 5 C to 60 C from 23 F to 140 F Types EB 18H and EB 1830H from 0 C to 45 C from 32 F to 113 F In such a case the customer should be advised to place the battery in a shaded ar...

Страница 14: ... and remove it Take care that it is left hand threaded b Fix the hexagonal bar wrench M10 into the Drill Chuck 13VLRF N W O Chuck Wrench 2 as indicated in Fig 4 Next apply the Wrench 14 mm special repair tool Code No 873929 601 to the flat surfaces on the spindle to hold it steady and remove it by turning counterclockwise If it is difficult to loosen use a pipe extension or similar tool 2 Removal ...

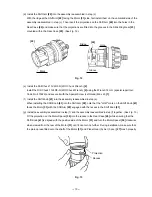
Страница 15: ...of the Switch Plate 8 then remove the Switch Plate 8 from the Front Case 12 See Fig 5 7 Removal of the O ring 6 Pull out the Lock Washer 7 from the Cap 4 and remove the O ring 6 See Fig 6 8 Disassembly of the power supply unit Note Do not remove the fin secured to the DC speed Control Switch 38 with a screw Remove the two Machine Screws W SP Washer M4 x 6 34 and take the Motor 31 and the Motor Spa...

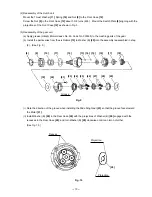
Страница 16: ...d 37 Machine Screw W SP Washer M4 x 6 34 Internal Wire Red 37 Internal Wire Black 36 Internal Wire Black 36 Ferrite Core 40 DC speed Control Switch 38 Terminal Support A 43 b Pay attention to the polarity of the Motor 31 when soldering Internal Wires Black 36 and Red 37 to the Motor 31 The red marked side of the Motor 31 is positive See Fig 8 c Apply grease Hitachi Motor Grease No 29 Code No 93003...

Страница 17: ...parts of the gear b Install the parts series from the six Rollers 13 to Washer B 29 into the assembly reassembled in step 2 See Fig 9 i Note the direction of the groove when installing the Slide Ring Gear 23 so that the groove faces toward the Motor 31 ii Install Washer B 29 in the Rear Case 20 with the projections of Washer B 29 engaged with the recesses in the Rear Case 20 and turn Washer B 29 c...

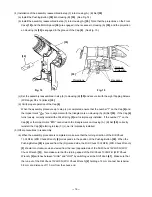
Страница 18: ...f the Rear Case 20 are positioned as shown in Fig 11 Set the narrow slit of switch flange as shown in Fig 11 Mount the Cap 4 aligning the ridge of the Click Spring 5 with the three projections of the Nut 9 Fig 11 Click Spring 5 Marking of the Rear Case 20 Holes Ridge Three projections of Nut 9 Cap 4 Wide slit of switch flange Lock Washer 7 Switch flange Narrow slit of switch flange Narrow projecti...

Страница 19: ...t with the Special Screw Left Hand M6 x 23 1 f Install the Shift Knob 41 into the assembly reassembled in step e When installing the Shift Knob 41 into the Shift Arm 22 note that the LOW mark on the Shift Knob 41 faces the Motor 31 with the Shift Arm 22 engaged with the recess in the Shift Knob 41 g Install the assembly reassembled in step 1 and the assembly reassembled in step f together See Fig ...

Страница 20: ... Cap 4 turns loosely correctly reinstall the Click Spring 5 as it is improperly installed If the number 1 on the Cap 4 or the impact mark cannot reach the triangle mark on Housing A B Set 35 correctly reinstall the Cap 4 referring to step 3 c as it is improperly installed 5 Other precautions in reassembly a When the assembly procedure is completed make sure that the turning direction of the Drill ...

Страница 21: ...crew Set M3 x 12 4 pcs 21 0 6 1 0 N m 6 10 kgf cm 5 2 8 7 in lbs Machine Screw W SP Washer M4 x 6 34 1 1 1 9 N m 11 19 kgf cm 9 5 16 5 in lbs Tapping Screw W Flange D3 x 16 Black 32 1 1 1 9 N m 11 19 kgf cm 9 5 16 5 in lbs 10 2 Precautions in Disassembly and Reassembly of Battery Charger Please refer to the Technical Data and Service Manual for precautions in disassembly and reassembly of the Batt...

Страница 22: ...DV Work Flow Housing A B Set Motor Cap DC speed Control Switch O ring Nut Shift Arm 60 50 Gear Box Ass y Front Case Ring Gear Carrier First Ring Gear Planet Gear A Set Pinion B Planet Gear B Set Pinion C Slide Ring Gear Planet Gear C Set Rear Case Spring Drill Chuck General Assembly ...

Страница 23: ...ELECTRIC TOOL PARTS LIST LIST NO CORDLESS IMPACT DRILL Model DV 18DV 2001 5 10 E1 F854 ...

Страница 24: ...24 319 749 PINION C 1 25 319 768 PLANET GEAR B SET 3 PCS 3 26 319 751 PINION B 1 27 319 767 PLANET GEAR A SET 3 PCS 3 28 319 752 FIRST RING GEAR 1 29 312 716 WASHER B 1 30 316 955 MOTOR SPACER 1 31 319 756 MOTOR 1 32 313 687 TAPPING SCREW W FLANGE D3X16 BLACK 8 33 MANE PLATE 1 34 317 333 MACHINE SCREW W SP WASHER M4X6 2 35 319 761 HOUSING A B SET 1 36 319 759 INTERNAL WIRE BLACK 100L 1 36 320 159 ...

Страница 25: ...ORIES OPTIONAL ACCESSORIES ITEM NO CODE NO DESCRIPTION REMARKS NO USED ITEM NO CODE NO DESCRIPTION REMARKS NO USED DV 18DV 501 CHARGER MODEL UC 24YFA 1 502 318 236 DRIVER BIT NO 2 55L 1 503 319 770 CASE 1 601 873 929 WRENCH 14MM 1 5 01 ...

Страница 26: ... ALTERNATIVE PARTS ITEM NO CODE NO DESCRIPTION REMARKS NO USED Printed in Japan 010510N 5 01 DV 18DV ...

Страница 27: ......

Отзывы: