


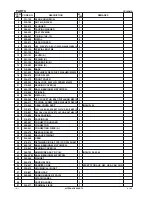
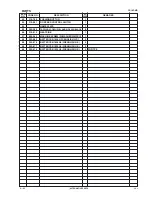


--- 16 ---
(6) Removal of the Gear
[37]
from the Gear Cover Ass'y
[27]
Remove the three Seal Lock Flat Hd. Screws M4 x 12
[20]
through the hole of the Balance Weight
[36]
.
Then the Gear
[37]
(together with the Balance Weight
[36]
, Spindle
[23]
and others) can be removed from the
Gear Cover Ass'y
[27]
.
(7) Removal of the Gear
[37]
from the Spindle
[23]
Hold at the width-across-flat portions of the Spindle
[23]
with a vise and remove the Nylock Hex. Socket Flat
Hd. Bolt M6 x 16
[29]
. Remove the Balance Weight
[36]
, Gear
[37]
, Bearing Cover (B)
[21]
and Ball Bearing
6901ZZCMPS2L
[22]
.
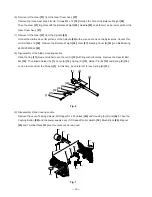
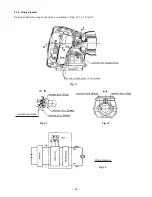
(8) Disassembly of the blade mounting section
Slide the Cap
[11]
(made of rubber) out of Lever (A)
[12]
with fingers horizontally. Remove the Special Bolt
M4
[10]
. Then Blade Holder (A)
[1]
, Lever (A)
[12]
, Spring (D)
[13]
, Holder Pin (B)
[14]
and Spring (B)
[15]
can be removed from the Plunger
[3]
. At this time, be careful not to lose Spring (B)
[15]
.
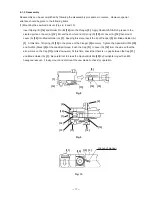
(9) Disassembly of the housing section
Remove the seven Tapping Screws (W/Flange) D4 x 20 (Black)
[55]
and Housing (A).(B) Set
[46]
. Then the
Pushing Button
[52]
and the power supply ass'y (DC-Speed Control Switch
[53]
, Brush Block
[44]
, Magnet
[43]
and Terminal Piece
[51]
are mounted) can be removed.
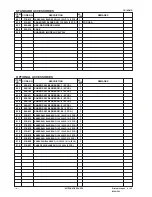
Fig. 6
[1]
[2]
[3]
[10]
[11]
[12]
[13]
[14]
[15]
Fig. 7
[43]
[44]
[45]
[47]
[48]
[46]
[49]
[50]
[51]
[52]
[53]
[54]
[55]
[56]
[57]