background image

55

Maintenance

Cleaning and replacing the air fi lter

The air fi lter has two kinds of fi lters inside. Please check and clean the air fi lter periodically. 
When the indicators or a message prompts you to clean the air fi lter, comply with it as soon 
as possible. If the fi lters are damaged or heavily soiled, replace them with the new ones. To 
prepare the new fi lters, make contact with your dealer and tell the following type number.

Type number : MU06641

 (Filter unit)

When you replace the lamp, please replace the air fi lter. An air fi lter of specifi ed type will 
come together with a replacement lamp for this projector.

1.

Turn the projector off, and unplug the power cord. 
Allow the projector to suffi ciently cool down.

2.

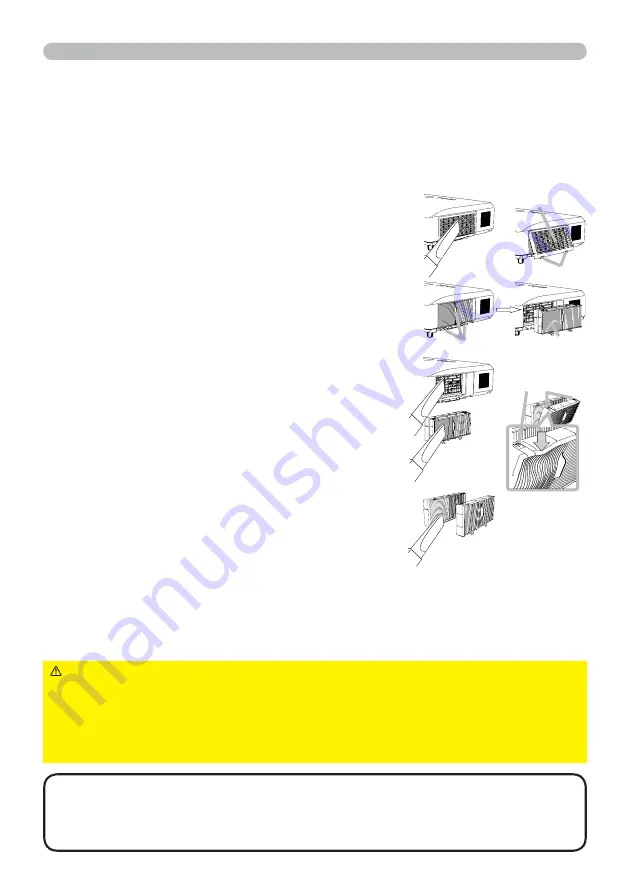
Use a vacuum cleaner on and around the fi lter cover.

3.

Pick and pull up the fi lter cover knobs to take it off.

4.

Press up slightly the bottom side knobs to unlock the 
bottom side of the fi lter unit. Pull the center knob to 
take the fi lter unit off.

5.

Use a vacuum cleaner for the fi lter vent of the 
projector and the outer side of the fi lter unit.

6.

The fi lter unit consists of two parts. Press down 
around the interlocking parts to unlock, then separate 
the two parts.

7.

Use a vacuum cleaner for the inner side of each part 
of the fi lter unit to clean them up.

If the fi lters are damaged or heavily soiled, replace them 
with the new ones.

8.

Combine the two parts to reassemble the fi lter unit.

9.

Put the fi lter unit back into the projector.

10.

Put the fi lter cover back into the place.

11.

Turn the projector on and reset the fi lter time using 
the FILTER TIME item in the EASY MENU. 

(1) Press the 

MENU

 button to display a menu. 

(2) Point at the FILTER TIME using the 

Ÿ

/

ź

 cursor buttons, then press the 

Ź

 cursor (or 

the

ENTER

 / the 

RESET

) button. A dialog will appear.

(3) Press the 

Ź

 cursor button to select the “OK” on the dialog. It performs resetting the fi lter time.

WARNING

Ź

Before taking care of the air fi lter, make sure the power cable 

is not plugged in, then allow the projector to cool suffi ciently.

Ź

Use only the air fi lter of the specifi ed type. Do not use the projector without the 

air fi lter or the fi lter cover. It could result in a fi re or malfunction to the projector.

Ź

Clean the air fi lter periodically. If the air fi lter becomes clogged by dust or the like, 

internal temperatures rise and could cause a fi re, a burn or malfunction to the projector.

NOTE

  • Please reset the fi lter time only when you have cleaned or replaced 

the air fi lter, for a suitable indication about the air fi lter.
• The projector may display the message such as the “CHECK THE AIR FLOW” 

or turn off the projector, to prevent the internal heat level rising. 

 Filter cover

Filter unit

Filter cover knobs

Filter unit knobs

Interlock parts

2.

3.

4.

5.

6.

7.

Содержание CP-X4020

Страница 1: ...us symbols are used in this manual The meanings of these symbols are described below About this manual About this manual WARNING CAUTION This symbol indicates information that if ignored could possibly result in personal injury or even death due to incorrect handling This symbol indicates information that if ignored could possibly result in personal injury or physical damage due to incorrect handl...

Страница 2: ...d from the power outlet Thank you for purchasing this projector NOTE The information in this manual is subject to change without notice The manufacturer assumes no responsibility for any errors that may appear in this manual The reproduction transmission or use of this document or contents is not permitted without express written authority WARNING Before using read these user s manuals of this pro...

Страница 3: ... place flower vases pots cups cosmetics liquids such as water etc on or around the projector Do not place metals combustibles etc on or around the projector To avoid penetration of foreign objects do not put the projector into a case or bag together with any thing except the accessories of the projector signal cables and connectors Never disassemble and modify The projector contains high voltage c...

Страница 4: ...n in households where children are present Use only the correct power cord and the correct power outlet Incorrect power supply could result in fire or electrical shock Use only the correct power outlet depending on the indication on the projector and the safety standard The enclosed power cord must be used depending on the power outlet to be used Be cautious of the power cord connection Incorrect ...

Страница 5: ...sconnecting the power cord or cables do it with your hand holding the plug or connector Do not place the cord near the heater Avoid bending the power cord sharply Do not attempt to work on the power cord Be careful in handling the battery of the remote control Incorrect handling of the battery could result in fire or personal injury The battery may explode if not handled properly Keep the battery ...

Страница 6: ... periodically If the air filter becomes clogged by dust or the like internal temperature rises and could cause malfunction The projector may display the message such as CHECK THE AIR FLOW or turn off the projector to prevent the internal heat level rising When the indicators or a message prompts you to clean the air filter clean the air filter as soon as possible If the soiling will not come off t...

Страница 7: ... detergent directly Do not use an aerosol sprays solvents volatile substances or abrasive cleaner Before using chemical wipes be sure to read and observe the instructions Do not allow long term close contact with rubber or vinyl About bright spots or dark spots Although bright spots or dark spots may appear on the screen this is a unique characteristic of liquid crystal displays and such do not co...

Страница 8: ...emote control sensors could invalidate the remote control Avoid radio interference Any interfering radiation could cause disordered image or noises Avoid radio generator such as a mobile telephone transceiver etc around the projector About displaying characteristic The display condition of the projector such as color contrast etc depends on characteristic of the screen because the projector uses a...

Страница 9: ...is product contains a mercury lamp do not put in trash Dispose of in accord with environmental laws For lamp recycling go to www lamprecycle org in USA For product disposal contact your local government agency or www eiae org in the US or www epsc ca in Canada For more information call your dealer Do not open the lamp cover while the projector is suspended from above This is dangerous since if the...

Страница 10: ...asures Reorient or relocate the receiving antenna Increase the separation between the equipment and receiver Connect the equipment into an outlet on a circuit different from that to which the receiver is connected Consult the dealer or an experienced radio TV technician for help INSTRUCTIONS TO USERS This equipment complies with the requirements of FCC Federal Communication Commission equipment pr...

Страница 11: ...TO KEYSTONE EXECUTE KEYSTONE PICTURE MODE ECO MODE MIRROR RESET FILTER TIME LANGUAGE ADVANCED MENU EXIT PICTURE menu 26 BRIGHTNESS CONTRAST GAMMA COLOR TEMP COLOR TINT SHARPNESS ACTIVE IRIS MY MEMORY IMAGE menu 29 ASPECT OVER SCAN V POSITION H POSITION H PHASE H SIZE AUTO ADJUST EXECUTE INPUT menu 31 PROGRESSIVE VIDEO NR COLOR SPACE COMPONENT VIDEO FORMAT COMPUTER IN FRAME LOCK RESOLUTION SETUP me...

Страница 12: ... even if in a small space 9 The new double layer filter system is expected to function longer and offers you less maintenance frequency 9 The built in 16W speaker can deliver sufficient sound volume in a large space like a classroom without external speakers Your projector should come with the items shown below Check that all the items are included Require of your dealer immediately if any items are...

Страница 13: ...vents during use or just after use since it is too hot ŹDo not look into the lens or vents while the lamp is on since the strong light is not good for your eyes ŹDo not handle the elevator buttons without holding the projector since the projector may drop down WARNING ŹMaintain normal ventilation to prevent the projector from heating up Do not cover block or plug up the vents Do not place anything...

Страница 14: ...IO IN2 port 3 COMPUTER IN1 port 4 COMPUTER IN2 port 5 MONITOR OUT port 6 Shutdown switch 61 7 CONTROL port 8 COMPONENT Y Cb Pb Cr Pr ports ŹUse the shutdown switch only when the projector is not turned off by normal procedure since pushing this switch stops operation of the projector without cooling it down CAUTION 9 VIDEO port 10 S VIDEO port 11 AUDIO IN3 R L ports 12 AUDIO OUT R L ports 13 REMOT...

Страница 15: ...E button 21 17 MY BUTTON 1 button 44 18 MY BUTTON 2 button 44 19 KEYSTONE button 20 20 POSITION button 19 20 23 21 MENU button 22 22 Ÿ ź Ż Ź cursor buttons 22 23 ENTER button 22 24 ESC button 22 25 RESET button 22 26 Battery cover 12 Back of the remote control 2 1 6 5 16 8 9 19 17 20 22 24 10 4 3 7 12 14 11 13 15 18 21 23 25 26 VIDEO DOC CAMERA KEYSTONE ASPECT SEARCH BLANK MUTE MY BUTTON POSITION ...

Страница 16: ...jection distance Screen height Screen height Projection distance Screen height Screen height min max min max type inch m m inch m inch cm inch cm inch m inch m inch cm inch cm inch 30 0 8 0 9 34 1 0 41 41 16 5 2 1 0 38 1 1 45 39 15 1 0 40 1 0 1 2 46 1 4 55 55 22 6 2 1 3 51 1 5 60 51 20 2 1 50 1 3 1 5 58 1 8 69 69 27 8 3 1 6 64 1 9 76 64 25 2 1 60 1 5 1 8 70 2 1 83 82 32 9 4 1 9 77 2 3 91 77 30 2 1...

Страница 17: ...jector in direct sunlight or near hot objects such as heaters Do not place anything near the projector lens or vents or on top of the projector Do not place anything that may be sucked into or stick to the vents on the bottom of the projector This projector has some intake vents also on the bottom ŹDo not place the projector anyplace where it may get wet Getting the projector wet or inserting liqu...

Страница 18: ...core only at one end connect the end with the core to the projector ŹMake sure that devices are connected to the correct ports An incorrect connection may result in malfunction or damage to the device and the projector NOTICE ŹUse the cables with straight plugs not L shaped ones as the input ports of the projector are recessed CAUTION NOTE Y CB PB CR PR COMPONENT VIDEO OUT L R AUDIO OUT VIDEO OUT ...

Страница 19: ...l of the corresponding laptop PC When the picture resolution is changed on a PC depending on an input automatic adjustment function may take some time and may not be completed In this case you may not be able to see a check box to select Yes No for the new resolution on Windows Then the resolution will go back to the original It might be recommended to use other CRT or LCD monitors to change the r...

Страница 20: ...he power cord for complete separation Never modify the power cord WARNING Using the security bar and slot AC IN Power cord A commercial anti theft chain or wire up to 10 mm in diameter can be attached to the security bar on the projector Also this product has the security slot for the Kensington lock For details see the manual of the security tool ŹDo not use the security bar and slot to prevent t...

Страница 21: ...d or pollution of the surrounding environment Be sure to use only the batteries specified Do not use batteries of different types at the same time Do not mix a new battery with used one Make sure the plus and minus terminals are correctly aligned when loading a battery Keep a battery away from children and pets Do not recharge short circuit solder or disassemble a battery Do not place a battery in ...

Страница 22: ...nd Mode 2 HIGH If the remote control does not function properly attempt to change the signal frequency In order to set the Mode please keep pressing the combination of the two buttons listed below simultaneously for about 3 seconds 1 2 1 Set to Mode 1 NORMAL the VOLUME and the RESET buttons 2 Set to Mode 2 HIGH the MAGNIFY OFF and the ESC buttons Please remember that the REMOTE FREQ in the SERVICE...

Страница 23: ...l appear on the screen for about 5 seconds Turning off the power 2 Press the STANDBY ON button again while the message appears The projector lamp will go off and the POWER indicator will begin blinking in orange Then the POWER indicator will stop blinking and light in steady orange when the lamp cooling is complete 59 3 Attach the lens cover after the POWER indicator turns in steady orange Do not ...

Страница 24: ...AUDIO SOURCE item of the AUDIO menu 36 Ɣ The C C Closed Caption is automatically activated when sound is muted and an input signal containing C C is received This function is available only when the signal is NTSC for the VIDEO or S VIDEO or 480i 60 for the COMPONENT COMPUTER IN1 or COMPUTER IN2 and when the AUTO is selected for the DISPLAY in the C C menu under the SCREEN menu 41 1 Press the INPU...

Страница 25: ... MY SOURCE AUTO MAGNIFY PAGE UP VOLUME DOWN ON OFF 㧗 FREEZE MY SOURCE DOC CAMERA button 1 Press the COMPUTER button on the remote control Each time you press the button the projector switches its input port from the current port as below COMPUTER IN 1 Æ COMPUTER IN 2 Ɣ While the ON is selected for the AUTO SEARCH item in the OPTION menu the projector will keep checking every port sequentially till...

Страница 26: ...ed before the operation Searching an input signal Ɣ While the ON is selected for the AUTO SEARCH item in the OPTION menu 42 the projector will keep checking the ports in above order repeatedly till an input signal is detected For a computer signal NORMAL Æ 4 3 Æ 16 9 Æ 16 10 For a video signal s video signal or component video signal 4 3 Æ 16 9 Æ 14 9 For no signal 4 3 fixed SEARCH button ASPECT bu...

Страница 27: ...e elevator feet Focus ring Zoom ring To loose an elevator foot push the elevator button on the same side as it To finely adjust twist the foot 4 After making sure that the elevator feet are locked put the projector down gently 5 If necessary the elevator feet can be manually twisted to make more precise adjustments Hold the projector when twisting the feet ŹDo not handle the elevator buttons withou...

Страница 28: ...ill be automatically adjusted Make sure that the application window is set to its maximum size prior to attempting to use this feature A dark picture may still be incorrectly adjusted Use a bright picture when adjusting For a video signal and s video signal The video format best suited for the respective input signal will be selected automatically This function is available only when the AUTO is s...

Страница 29: ...e MANUAL operation and press the Ź cursor or the ENTER button to perform the following 1 AUTO executes automatic vertical keystone correction 2 MANUAL displays a dialog for keystone correction Use the Ż Ź cursor buttons for adjustment To close the dialog and complete this operation press the KEYSTONE button again Even if you do not do anything the dialog will automatically disappear after a few se...

Страница 30: ...which the picture is frozen To exit the FREEZE mode and restore the screen to normal press the FREEZE button again Temporarily freezing the screen Ɣ The projector automatically exits from the FREEZE mode when some control buttons are pressed Ɣ If the projector continues projecting a still image for a long time the LCD panel might possibly be burned in Do not leave the projector in the FREEZE mode ...

Страница 31: ...g any menu the MENU button on the projector works as the cursor buttons The basic operations of these menus are as follows In the EASY MENU MENU button Cursor buttons VIDEO DOC CAMERA KEYSTONE ASPECT SEARCH BLANK MUTE MY BUTTON POSITION 1 2 ESC ENTER MENU RESET COMPUTER MY SOURCE AUTO MAGNIFY PAGE UP VOLUME DOWN ON OFF 㧗 FREEZE RESET button ENTER button MENU button Cursor buttons POSITION ESC ENTE...

Страница 32: ...ton on the remote control during the operation Note that some items ex LANGUAGE VOLUME cannot be reset Ɣ In the ADVANCED MENU when you want to return to the previous display press the Ż cursor or the ESC button on the remote control Indication in OSD On Screen Display The meanings of the general words on the OSD are as follows Indication Meaning EXIT Selecting this word finishes the OSD menu It s t...

Страница 33: ... Ź cursor buttons switches the picture mode The picture modes are combinations of the GAMMA and the COLOR TEMP settings Choose a suitable mode according to the projected source NORMAL Ù CINEMA Ù DYNAMIC Ù BOARD BLACK DAYTIME Ù WHITEBOARD Ù BOARD GREEN GAMMA COLOR TEMP NORMAL 1 DEFAULT 2 MID CINEMA 2 DEFAULT 3 LOW DYNAMIC 3 DEFAULT 1 HIGH BOARD BLACK 4 DEFAULT 4 Hi BRIGHT 1 BOARD GREEN 4 DEFAULT 5 ...

Страница 34: ...he OK using the Ź cursor button performs resetting FILTER TIME The usage time of the air filter is shown in the menu Performing this item resets the filter time which counts usage time of the air filter A dialog is displayed for confirmation Selecting the OK using the Ź cursor button performs resetting See the FILTER TIME item in the OPTION menu 43 LANGUAGE Using the Ż Ź cursor buttons changes the dis...

Страница 35: ... using the Ż Ź cursor buttons and adjust the level using the Ÿ ź cursor buttons You can display a test pattern for checking the effect of your adjustment by pressing the ENTER or the INPUT button Each time you press the ENTER or the INPUT button the pattern changes as below No pattern Ö Gray scale of 9 steps Ramp Õ Gray scale of 15 steps The eight equalizing bars correspond to eight tone levels of...

Страница 36: ...you press the ENTER or the INPUT button the pattern changes as below No pattern Ö Gray scale of 9 steps Ramp Õ Gray scale of 15 steps Lines or other noise might appear on the screen when this function is operated but it is not a malfunction COLOR Using the Ż Ź cursor buttons adjusts the strength of whole color Weak Ù Strong This item can be selected only for a video s video and component video sig...

Страница 37: ...LOAD 3 Ù LOAD 2 Ù LOAD 1 SAVE 1 SAVE 2 SAVE 3 SAVE 4 Performing a SAVE function saves the current adjustment data into the memory linked in the number included in the function s name Remember that the current data being stored of a memory will be lost by saving new data into the memory LOAD 1 LOAD 2 LOAD 3 LOAD 4 Performing a LOAD function loads the data from the memory linked in the number includ...

Страница 38: ...the vertical position Down Ù Up Over adjusting the vertical position may cause noise to appear on the screen If this occurs please reset the vertical position to the default setting Pressing the RESET button on the remote control when the V POSITION is selected will reset the V POSITION to the default setting When this function is performed on a video signal s video signal or component video signa...

Страница 39: ...o attempting to use this feature A dark picture may still be incorrectly adjusted Use a bright picture when adjusting For a video signal and s video signal The video format best suited for the respective input signal will be selected automatically This function is available only when the AUTO is selected for the VIDEO FORMAT item in the INPUT menu 32 The vertical position and horizontal position w...

Страница 40: ...buttons switches the noise reduction mode HIGH Ù MID Ù LOW This function is performed only for a video signal s video signal or component video signal of 480i 60 or 576i 50 When this function is excessive it may cause a certain degradation of the picture COLOR SPACE Using the Ÿ ź cursor buttons switches the mode for color space AUTO Ù RGB Ù SMPTE240 Ù REC709 Ù REC601 This item can be selected only...

Страница 41: ... COMPUTER IN1 Ù COMPUTER IN2 2 Use the Ż Ź cursor buttons to select the computer input signal type AUTO Ù SYNC ON G OFF Selecting the AUTO mode allows you to input a sync on G signal or component video from the port In the AUTO mode the picture may be distorted with certain input signals In such a case remove the signal connector so that no signal is received and select the SYNC ON G OFF and then ...

Страница 42: ...FXUVRU EXWWRQV WR VHOHFW WKH 86720 DQG WKH 5 62 87 21B 86720 ER ZLOO EH GLVSOD HG 6HW WKH KRUL RQWDO 25 DQG YHUWLFDO 9 57 UHVROXWLRQV XVLQJ WKH Ÿ ź Ż Ź FXUVRU EXWWRQV 7KLV IXQFWLRQ LV PD QRW VXSSRUW DOO UHVROXWLRQV 0RYH WKH FXUVRU WR WKH 2 RQ VFUHHQ DQG SUHVV WKH Ź FXUVRU RU WKH ENTER EXWWRQ 7KH PHVVDJH 5 28 685 28 6 72 1 5 62 87 21 DSSHDUV 7R VDYH WKH VHWWLQJ SUHVV WKH Ź FXUVRU EXWWRQ 7KH KRUL RQ...

Страница 43: ...djustment is set to the TELE telephoto focus this function may be excessive This function should be used when the zoom adjustment is set to the full WIDE wide angle focus whenever possible When the projector is placed on the level about 3 this function may not work When the projector is inclined to near 30 degree or over this function may not work well This function will be unavailable when the Tr...

Страница 44: ... STANDBY setting of the AUDIO SOURCE 36 is invalid and no signal is output from the AUDIO OUT ports in the standby state MONITOR OUT The combination of a picture shown on screen and output from the MONITOR OUT port can be arranged in the menu The picture coming into the port selected in the 2 is output to the MONITOR OUT port while an image from the port chosen in the 1 is on screen 1 Choose a pic...

Страница 45: ...een 1 Choose a picture input port using the Ÿ ź cursor buttons Choose the AUDIO OUT STANDBY to select the audio output to the AUDIO OUT ports in the standby state The built in speaker does not work in the standby state While the RETURN is selected pressing the Ż cursor or the ENTER button returns to the previous menu 2 Select one of the AUDIO IN ports using the Ż Ź cursor buttons AUDIO IN1 Ù AUDIO...

Страница 46: ...ANK button on the remote control MyScreen Ù ORIGINAL Ù BLUE Ù WHITE Ù BLACK MyScreen Screen can be registered by the MyScreen item 38 ORIGINAL Screen preset as the standard screen BLUE WHITE BLACK Plain screens in each color To avoid remaining as an afterimage the MyScreen or the ORIGINAL screen will change to the plain black screen after several minutes START UP Using the Ÿ ź cursor buttons switc...

Страница 47: ...s adjusts the frame position Please move the frame to the position of the image which you want to use The frame may not be able to be moved for some input signals To start registration press the ENTER or the INPUT button on the remote control To restore the screen and return to the previous dialog press the RESET or press the Ż cursor and the INPUT buttons at the same time button Registration take...

Страница 48: ...djusting NO INPUT IS DETECTED SYNC IS OUT OF RANGE INVALID SCAN FREQ NOT AVAILABLE Searching while searching for the input Detecting while an input signal is detected The indication of the input signal displayed by changing The indication of the aspect ratio displayed by changing The indication of the PICTURE MODE displayed by changing The indication of the ACTIVE IRIS displayed by changing The in...

Страница 49: ...ter or all characters will be erased The name can be a maximum of 16 characters 4 To change an already inserted character press the Ÿ cursor button to move the cursor to the first line and use the Ż Ź cursor buttons to move the cursor on the character to be changed After pressing the ENTER or the INPUT button the character is selected Then follow the same procedure as described at the item 3 above ...

Страница 50: ...ption is not displayed when the OSD menu is active The Closed Caption is the function to display the dialogue narration and or sound effects of a television program or other video sources The Closed Caption availability is depending upon broadcaster and or content MODE Select the Closed Caption MODE setting from following options using the Ÿ ź cursor buttons CAPTIONS Ù TEXT CAPTIONS Display Closed...

Страница 51: ...OFF ON Automatic keystone distortion correction will be executed whenever changing the slant of the projector OFF This function is disabled Please execute the AUTO KEYSTONE EXECUTE in the SETUP menu for automatic keystone distortion correction When the projector is suspended from the ceiling this feature will not function properly so select the OFF This function will be unavailable when the Transi...

Страница 52: ... the usage time of the lamp counted after the last resetting It is shown in the OPTION menu Pressing the Ź cursor or the ENTER the RESET button displays a dialog To reset the lamp time select the OK using the Ź cursor button CANCEL Ö OK Please reset the lamp time only when you have replaced the lamp for a suitable indication about the lamp For the lamp replacement see the section the Replacing the...

Страница 53: ... one of adjustment data stored 28 When more than one data are saved the adjustment changes every time the MY BUTTON is pressed When no data is saved in memory the dialog No saved data appears When the current adjustment is not saved to memory the dialog as shown in the right appears If you want to keep the current adjustment please press the Ź cursor button to exit Otherwise loading a data will ov...

Страница 54: ...e choose the DISABLE to disable the automatic adjustment and make adjustment manually GHOST 1 Select a color element of ghost using the Ż Ź cursor buttons 2 Adjust the selected element using the Ÿ ź cursor buttons to disappear ghost FILTER MESSAGE Use the Ÿ ź cursor button to set the timer for notifying by the message when to replace the filter unit 500h Ù 1000h Ù 2000h Ù 3000h Ù 4000h Ù 5000h Ù OF...

Страница 55: ...ither of them 13 It s not possible to disable both options at the same time INFORMATION Selecting this item displays a dialog titled INPUT_INFORMATION It shows the information about the current input The FRAME LOCK message on the dialog means the frame lock function is working The SCART RGB message means the COMPONENT port is working as a SCART RGB input port Please refer to the COMPONENT item in ...

Страница 56: ...R PASSWORD box is displayed press and hold the RESET or press the Ż cursor and the INPUT buttons at the same time button for about 3 seconds 2 The 10 digit Inquiring Code will be displayed Contact your dealer with the 10 digit Inquiring Code Your password will be sent after your user registration information is confirmed If there is no key input for about 55 seconds while the Inquiring Code is disp...

Страница 57: ...r the ENTER button will return to the MyScreen PASSWORD on off menu When a password is set for the MyScreen The MyScreen registration function and menu will be unavailable The MyScreen Lock menu will be unavailable The START UP setting will be locked on MyScreen and the menu will be unavailable Turning the MyScreen PASSWORD off will allow normal operation of these functions Please do not forget yo...

Страница 58: ...Enter PIN code box will be displayed again If an incorrect PIN Code is input 3 times the projector will turn off Afterwards the projector will turn off every time an incorrect PIN code is input The projector will also turn off if there is no key input for about 5 minutes while the Enter PIN code box is displayed This function will activate only when the projector is started after AC power is turne...

Страница 59: ...nter the same password again 1 4 Move the cursor to the right side of the NEW PASSWORD AGAIN box and press the Ź cursor or the ENTER button to display the NOTE NEW PASSWORD box for about 30 seconds please make note of the password during this time Pressing the Ź cursor or the ENTER button will return to the TRANSITION DETECTOR on off menu Please do not forget your TRANSITION DETECTOR password This...

Страница 60: ...assword again 1 4 Move the cursor to the right side of the NEW PASSWORD AGAIN box and press the Ź cursor or the ENTER button to display the NOTE NEW PASSWORD box for about 30 seconds then please make note of the password during this time Pressing the Ź cursor or the ENTER button will return to the MY TEXT PASSWORD on off menu 2 Turning off the MY TEXT PASSWORD 2 1 Follow the procedure in 1 1 to di...

Страница 61: ...ELETE or the ALL CLEAR on screen and press the ENTER or the INPUT button 1 character or all characters will be erased The MY TEXT can be input up to 24 characters on each line 3 To change an already inserted character press the Ÿ ź cursor button to move the cursor to one of the first 3 lines and use the Ż Ź cursor buttons to move the cursor on the character to be changed After pressing the ENTER or...

Страница 62: ...ighten firmly the 3 screws of the lamp that are loosened in the previous process to lock it in place 6 While putting the interlocking parts of the lamp cover and the projector together slide the lamp cover back in place Then firmly fasten the screw of the lamp cover 7 Turn the projector on and reset the lamp time using the LAMP TIME item in the OPTION menu In case of replacement by yourself follow t...

Страница 63: ...ntilate the room well and make sure not to breathe the gas that comes out of the projector vents or get it in your eyes or mouth Before replacing the lamp turn the projector off and unplug the power cord then wait at least 45 minutes for the lamp to cool sufficiently Handling the lamp while hot can cause burns as well as damaging the lamp Never unscrew except the appointed marked by an arrow screw...

Страница 64: ...lean them up If the filters are damaged or heavily soiled replace them with the new ones 8 Combine the two parts to reassemble the filter unit 9 Put the filter unit back into the projector 10 Put the filter cover back into the place 11 Turn the projector on and reset the filter time using the FILTER TIME item in the EASY MENU 1 Press the MENU button to display a menu 2 Point at the FILTER TIME using th...

Страница 65: ...e projector or inserting liquids in the projector It could result in a fire an electric shock and or malfunction to the projector Do not put anything containing water cleaners or chemicals near the projector Do not use aerosols or sprays WARNING ŹPlease take right care of the projector according to the following Incorrect care could cause not only an injury but adverse influence such as discoloratio...

Страница 66: ...m please contact your dealer or service company They will tell you what warranty condition is applied ŹNever use the projector if abnormal operations such as smoke strange odor excessive sound damaged casing or elements or cables penetration of liquids or foreign matter etc should occur In such cases immediately disconnect the power plug from the power outlet After making sure that the smoke or od...

Страница 67: ...or the signal source specs The internal temperature is rising Please turn the power off and allow the projector to cool down at least 20 minutes After having confirmed the following items please turn the power ON again Is there blockage of the air passage aperture Is the air filter dirty Does the peripheral temperature exceed 35 C If the same indication is displayed after the remedy please set FAN S...

Страница 68: ...linking and then perform the proper measure using the item descriptions below Blinking In Red or Lighting In Red Turned off Lighting In Red Turned off The lamp does not light and there is a possibility that interior portion has become heated Please turn the power off and allow the projector to cool down at least 20 minutes After the projector has sufficiently cooled down please make confirmation of ...

Страница 69: ...d Lighting In Red Turned off Turned off There is a possibility that the interior portion has become heated Please turn the power off and allow the projector to cool down at least 20 minutes After the projector has sufficiently cooled down please make confirmation of the following items and then turn the power on again Is there blockage of the air passage aperture Is the air filter dirty Does the peri...

Страница 70: ...Neither sounds nor pictures are outputted The signal cables are not correctly connected Correctly connect the connection cables 9 Signal source does not correctly work Correctly set up the signal source device by referring to the manual of the source device The input changeover settings are mismatched Select the input signal and correct the settings 15 16 The BLANK function for pictures and the MU...

Страница 71: ...nnected Correctly connect the connection cables 9 The brightness is adjusted to an extremely low level Adjust BRIGHTNESS to a higher level using the menu function 26 The computer cannot detect the projector as a plug and play monitor Make sure that the computer can detect a plug and play monitor using another plug and play monitor 10 The BLANK screen is displayed Press the BLANK button on the remo...

Страница 72: ...ear blurry Either the focus and or horizontal phase settings are not properly adjusted Adjust the focus using the focus ring and or the H PHASE using the menu function 18 30 The lens is dirty or misty Clean the lens referring to the section Caring for the lens 56 RS 232C does not work The SAVING function is working Select NORMAL for STANDBY MODE item in the SETUP menu 35 Although bright spots or d...

Страница 73: ...t port COMPUTER IN1 D sub 15 pin mini x1 COMPUTER IN2 D sub 15 pin mini x1 Computer output port MONITOR OUT D sub 15 pin mini x1 Video input port Y Cb Pb Cr Pr Component video RCA x3 S VIDEO mini DIN 4 pin x1 VIDEO RCA x1 Audio input output port AUDIO IN1 Stereo mini x1 AUDIO IN2 Stereo mini x1 AUDIO IN3 R L RCA x2 AUDIO OUT R L RCA x2 Others CONTROL D sub 9 pin x1 REMOTE CONTROL Stereo mini x1 Op...

Страница 74: ...65 Specifications continued unit mm Specificationsv ...

Страница 75: ... symbols explanation 2 Important safety instruction 2 Regulatory notices 3 About Electro Magnetic Interference 3 About Waste Electrical and Electronic Equipment 4 Contents of package 5 Preparations 5 Loading batteries into the remote control 5 Arrangement 6 Connecting your devices 7 Connecting power supply 8 Turning on the power 8 Adjusting the projector s elevator 9 Displaying the picture 10 Turn...

Страница 76: ... ŹUnplug the projector from the power outlet if the projector is not used for the time being ŹDo not open or remove any portion of the product unless the manuals direct LW RU LQWHUQDO PDLQWHQDQFH OHDYH LW WR RXU GHDOHU RU WKHLU VHUYLFH SHUVRQQHO Ź8VH RQO WKH DFFHVVRULHV VSHFL HG RU UHFRPPHQGHG E WKH PDQXIDFWXUHU ŹModify neither the projector nor accessories ŹLet neither any things nor any liquids ...

Страница 77: ...ed in accordance with the instructions may cause harmful interference to radio communications However there is no guarantee that interference will not occur in a particular installation If this equipment does cause harmful interference to radio or television reception which can be determined by turning the equipment off and on the user is encouraged to try to correct the interference by one or mor...

Страница 78: ...LSPHQW including any spent or discarded batteries or accumulators as unsorted municipal waste but use the return and collection systems available If the batteries or accumulators included with this equipment display the chemical symbol Hg Cd or Pb then it means that the battery has a heavy metal content of more than 0 0005 Mercury or more than 0 002 Cadmium or more than 0 004 Lead Regulatory notic...

Страница 79: ...ore them in a safe place 1 Holding the hook part of the battery cover remove it 2 Align and insert the two AA batteries HITACHI MAXELL Part No LR6 or R6P according to their plus and minus terminals as indicated in the remote control 3 Replace the battery cover in the direction of the arrow and snap it back into place WARNING ŹAlways handle the batteries with care and use them only as directed Impr...

Страница 80: ...height Screen height Projection distance Screen height Screen height min max min max type inch m m inch m inch cm inch cm inch m inch m inch cm inch cm inch 30 0 8 0 9 34 1 0 41 41 16 5 2 1 0 38 1 1 45 39 15 1 0 40 1 0 1 2 46 1 4 55 55 22 6 2 1 3 51 1 5 60 51 20 2 1 50 1 3 1 5 58 1 8 69 69 27 8 3 1 6 64 1 9 76 64 25 2 1 60 1 5 1 8 70 2 1 83 82 32 9 4 1 9 77 2 3 91 77 30 2 1 70 1 8 2 1 82 2 5 97 96...

Страница 81: ...amage to the device and the projector ŹUse appropriate accessory or designated cables Ask your dealer about non accessory FDEOHV ZKLFK PD EH UHTXLUHG D VSHFL F OHQJWK RU D IHUULWH FRUH E WKH UHJXODWLRQV RU cables with a core only at one end connect the end with the core to the projector Ź0DNH VXUH WKDW GHYLFHV DUH FRQQHFWHG WR WKH FRUUHFW SRUWV Q LQFRUUHFW connection may result in malfunction or d...

Страница 82: ... indicator will light up in steady orange 3OHDVH UHPHPEHU WKDW ZKHQ WKH 5 7 21 IXQFWLRQ activated the connection of the power supply make the projector turn on WARNING ŹPlease use extra caution when connecting the power cord as LQFRUUHFW RU IDXOW FRQQHFWLRQV PD UHVXOW LQ UH DQG RU HOHFWULFDO VKRFN 2QO XVH WKH SRZHU FRUG WKDW FDPH ZLWK WKH SURMHFWRU I LW LV GDPDJHG FRQVXOW your dealer to get a new ...

Страница 83: ... side of the projector to the desired height 3 Release the elevator buttons in order to lock the elevator feet 4 After making sure that the elevator feet are locked put the projector down gently 5 If necessary the elevator feet can be manually twisted to make more precise adjustments Hold the projector when twisting the feet To loose an elevator foot push the elevator button on the same side as it...

Страница 84: ...ess the VIDEO button for selecting an input signal from the COMPONENT Y Cb Pb Cr 3U S VIDEO or VIDEO port or the COMPUTER button for selecting an input signal from the COMPUTER IN1 or the COMPUTER IN2 port 4 Press the ASPECT button on the remote control Each time you press the button the projector switches the mode for aspect ratio in turn 5 2SHQ WKH RRP IRFXV ULQJ FRYHU 6 Use the zoom ring to adj...

Страница 85: ...or on again too soon could shorten the lifetime of some consumable parts of the projector VIDEO DOC CAMERA KEYSTONE ASPECT SEARCH BLANK MUTE MY BUTTON POSITION 1 2 ESC ENTER MENU RESET COMPUTER MY SOURCE AUTO MAGNIFY PAGE UP VOLUME DOWN ON OFF 㧗 FREEZE SECURITY POWER TEMP LAMP MENU INPUT STANDBY ON WARNING Ź R QRW WRXFK DURXQG WKH ODPS FRYHU DQG WKH H KDXVW YHQWV during use or just after use since...

Страница 86: ...handles Never loosen any other screws 5 QVHUW WKH QHZ ODPS DQG UHWLJKWHQ UPO WKH 3 screws of the lamp that are loosened in the previous process to lock it in place 6 While putting the interlocking parts of the lamp cover and the projector together slide the lamp FRYHU EDFN LQ SODFH 7KHQ UPO IDVWHQ WKH VFUHZ RI the lamp cover 7 Turn the projector on and reset the lamp time XVLQJ WKH 03 7 0 LWHP LQ ...

Страница 87: ...to breathe the gas that comes out of the projector vents or get it in your eyes or mouth HIRUH UHSODFLQJ WKH ODPS WXUQ WKH SURMHFWRU RII DQG XQSOXJ WKH SRZHU cord then wait at least 45 minutes for the lamp to cool sufficiently Handling the lamp while hot can cause burns as well as damaging the lamp 1HYHU XQVFUHZ H FHSW WKH DSSRLQWHG PDUNHG E DQ DUURZ VFUHZV R QRW RSHQ WKH ODPS FRYHU ZKLOH WKH SURM...

Страница 88: ...UH GDPDJHG RU KHDYLO VRLOHG UHSODFH WKHP with the new ones 8 RPELQH WKH WZR SDUWV WR UHDVVHPEOH WKH OWHU XQLW 9 3XW WKH OWHU XQLW EDFN LQWR WKH SURMHFWRU 10 3XW WKH OWHU FRYHU EDFN LQWR WKH SODFH 11 7XUQ WKH SURMHFWRU RQ DQG UHVHW WKH OWHU WLPH XVLQJ WKH 7 5 7 0 LWHP LQ WKH 6 0 18 1 Press the MENU button to display a menu 3RLQW DW WKH 7 5 7 0 XVLQJ WKH Ÿ ź FXUVRU EXWWRQV WKHQ SUHVV WKH Ź FXUVRU RU...

Страница 89: ...on the Projectors icon appeared on the desktop screen 2 When main html file is clicked Web browser will start and Initial window will appear 2 Click the model name of your projector first and then click language you want from the displayed list The User s manual detailed will open CAUTION Ź2QO XVH WKH 520 LQ D FRPSXWHU GULYH 7KH 520 LV GHVLJQHG IRU 3 XVH RQO 1 9 5 16 57 7 520 172 121 20387 5 3 5 Q...

Страница 90: ...s Computer input port 20387 5 1 D sub 15 pin mini x1 20387 5 1 D sub 15 pin mini x1 Computer output port 021 725 287 D sub 15 pin mini x1 Video input port Y Cb Pb Cr Pr Component video RCA x3 6 9 2 mini DIN 4 pin x1 9 2 RCA x1 Audio input output port 8 2 1 Stereo mini x1 8 2 1 Stereo mini x1 8 2 1 5 RCA x2 8 2 287 5 RCA x2 Others 21752 D sub 9 pin x1 5 027 21752 Stereo mini x1 2SWLRQDO SDUWV Lamp ...

Страница 91: ...a or http www hitachidigitalmedia com Trademark acknowledgment 0DF Macintosh DQG 0DF 26 are registered trademarks of Apple Inc 3HQWLXP is a registered trademark of Intel Corp GREH and Acrobat Reader are registered trademarks of Adobe Systems Incorporated 0LFURVRIW and Internet explorer Windows Windows NT Windows Vista are registered trademarks of Microsoft Corporation 3RZHU3 LV D UHJLVWHUHG WUDGHP...

Страница 92: ...1280 x 960 60Hz 1280 x 1024 64 0 60 0 VESA SXGA 60Hz 1280 x 1024 80 0 75 0 VESA SXGA 75Hz 1280 x 1024 91 1 85 0 VESA SXGA 85Hz 1400 x 1050 65 2 60 0 VESA SXGA 60Hz 1600 x 1200 75 0 60 0 VESA UXGA 60Hz NOTE H VXUH WR FKHFN MDFN W SH VLJQDO OHYHO WLPLQJ DQG UHVROXWLRQ EHIRUH FRQQHFWLQJ WKLV SURMHFWRU WR D 3 6RPH 3 V PD KDYH PXOWLSOH GLVSOD VFUHHQ PRGHV 8VH RI VRPH RI WKHVH PRGHV ZLOO QRW EH SRVVLEOH...

Страница 93: ...VGA 75Hz 1 6 3 2 16 2 0 3 3 21 600 1 800 x 600 SVGA 85Hz 1 1 2 7 14 2 0 6 3 27 600 1 832 x 624 Mac 16 mode 1 1 3 9 14 5 0 6 3 39 624 1 1024 x 768 XGA 60Hz 2 1 2 5 15 8 0 4 6 29 768 3 1024 x 768 XGA 70Hz 1 8 1 9 13 7 0 3 6 29 768 3 1024 x 768 XGA 75Hz 1 2 2 2 13 0 0 2 3 28 768 1 1024 x 768 XGA 85Hz 1 0 2 2 10 8 0 5 3 36 768 1 1152 x 864 75Hz 1 2 2 4 10 7 0 6 3 32 864 1 1280 x 768 W XGA 60Hz 1 7 2 5...

Страница 94: ... 7 Ground Green 15 A 6 FORFN B C 1R FRQQHFWLRQ 8 URXQG OXH 9 1R FRQQHFWLRQ Connection to the ports RQQHFWLRQ WR WKH SRUWV A B C NOTICE Ź8VH WKH FDEOHV ZLWK VWUDLJKW SOXJV QRW VKDSHG RQHV DV WKH LQSXW SRUWV RI WKH SURMHFWRU DUH UHFHVVHG 2 for Component signal RPSRQHQW YLGHR ZLWK FRPSRVLWH V QF 9S S WHUPLQDWRU U 3U RPSRQHQW YLGHR U 3U 9S S WHUPLQDWRU E 3E RPSRQHQW YLGHR E 3E 9S S WHUPLQDWRU 3LQ Sign...

Страница 95: ...FRPSRQHQW YLGHR VLJQDO WR WKH COMPUTER IN1 or IN2 SRUW RI WKH SURMHFWRU XVH D 5 WR VXE FDEOH RU DGDSWHU RU DERXW WKH SLQ GHVFULSWLRQ RI WKH UHTXLUHG FDEOH RU DGDSWHU UHIHU WR WKH GHVFULSWLRQV DERXW COMPUTER IN1 and IN2 SRUW 3 Y CB PB CR PR COMPONENT VIDEO OUT 9 5 9 SOD HU 5 FRQQHFWRUV 5 SOXJV VXE SOXJ ...

Страница 96: ...WHUPLQDWRU 3 Ground 4 Ground Connection to the ports continued 4 3 2 1 H VIDEO 5 MDFN 6 VWHP 176 3 6 0 3 0 3 1 176 3 9S S ȍ WHUPLQDWRU COMPONENT D Y E Cb Pb F Cr Pr 5 MDFN 6 VWHP L S L S L S 3RUW Signal RPSRQHQW YLGHR ZLWK FRPSRVLWH V QF 9S S ȍ WHUPLQDWRU E 3E RPSRQHQW YLGHR E 3E 9S S ȍ WHUPLQDWRU U 3U RPSRQHQW YLGHR U 3U 9S S ȍ WHUPLQDWRU E G H F D ...

Страница 97: ...DFN P9UPV N WHUPLQDWRU AUDIO OUT M R N L 5 MDFN P9UPV N RXWSXW LPSHGDQFH To input SCART RGB signal H 7R LQSXW 6 57 5 VLJQDO WR WKH SURMHFWRU XVH D 6 57 WR 5 FDEOH RQQHFW WKH SOXJV UHIHU WR DERYH H RU PRUH UHIHUHQFH SOHDVH FRQVXOW RXU GHDOHU 6 57 FRQQHFWRU MDFN 6 57 FDEOH SOXJ 5 SOXJV I J M L N K Video XGLR Audio R R G ...

Страница 98: ...QHFWHG ZLWK WKH UHPRWH FRQWURO RSWLRQDO O CONTROL VXE SLQ SOXJ ERXW WKH GHWDLOV RI 56 FRPPXQLFDWLRQ SOHDVH UHIHU WR WKH IROORZLQJ SDJH 3LQ Signal 3LQ Signal 3LQ Signal 1 1R FRQQHFWLRQ 4 1R FRQQHFWLRQ 7 RTS 2 5 5 Ground 8 76 3 7 6 1R FRQQHFWLRQ 9 1R FRQQHFWLRQ P O 6 5 4 3 2 1 9 8 7 ...

Страница 99: ...U WR 56 RPPXQLFDWLRQ FRPPDQG table 9 Connection 1 7XUQ RII WKH SURMHFWRU DQG WKH FRPSXWHU 2 RQQHFW WKH SURMHFWRU V CONTROL SRUW DQG WKH FRPSXWHU V 56 SRUW ZLWK D 56 FDEOH FURVV 8VH WKH FDEOH WKDW IXO OOV WKH VSHFL FDWLRQ VKRZQ LQ JXUH 3 7XUQ WKH FRPSXWHU RQ DQG DIWHU WKH FRPSXWHU KDV VWDUWHG XS WXUQ WKH SURMHFWRU on CONTROL SRUW RI WKH SURMHFWRU 56 SRUW RI WKH FRPSXWHU 9 5 4 3 2 1 6 7 8 1 2 4 3 8 ...

Страница 100: ...HFWRU LQWHUQDO VHWXS YDOXH E E D aH K K E bH K K 1 5 0 17 QFUHPHQW VHWXS YDOXH E E E D aH K K E bH K K 5 0 17 HFUHPHQW VHWXS YDOXH E E E D aH K K E bH K K 87 5XQ D FRPPDQG E E D aH K K E bH K K Header code Packet Data size 6HW K K K K K WR E WH QXPEHU 4 5 ÀDJ For byte number refer to 56 RPPXQLFDWLRQ FRPPDQG WDEOH 11 Action 6HW IXQFWLRQDO FRGH WR E WH QXPEHU SET K K GET K K 1 5 0 17 K K 5 0 17 K K ...

Страница 101: ... QFUHPHQW HFUHPHQW RU HFXWH FRPPDQG FRUUHFWO WKH SURMHFWRU FKDQJHV WKH VHWWLQJ GDWD IRU WKH VSHFL HG LWHP E 7 SH DQG LW UHWXUQV WKH FRGH 2 NAK reply 15h KHQ WKH SURMHFWRU FDQQRW XQGHUVWDQG WKH UHFHLYHG FRPPDQG WKH SURMHFWRU UHWXUQV WKH HUURU FRGH Q VXFK D FDVH FKHFN WKH VHQGLQJ FRGH DQG VHQG WKH VDPH FRPPDQG DJDLQ 3 Error reply 1Ch 0000h KHQ WKH SURMHFWRU FDQQRW H HFXWH WKH UHFHLYHG FRPPDQG IRU DQ...

Страница 102: ...2 01 00 02 30 00 00 FREEZE BE EF 03 06 00 13 D3 01 00 02 30 01 00 Get BE EF 03 06 00 B0 D2 02 00 02 30 00 00 BRIGHTNESS Get BE EF 03 06 00 89 D2 02 00 03 20 00 00 Increment BE EF 03 06 00 EF D2 04 00 03 20 00 00 Decrement BE EF 03 06 00 3E D3 05 00 03 20 00 00 BRIGHTNESS Reset Execute BE EF 03 06 00 58 D3 06 00 00 70 00 00 CONTRAST Get BE EF 03 06 00 FD D3 02 00 04 20 00 00 Increment BE EF 03 06 0...

Страница 103: ...E EF 03 06 00 F4 FF 02 00 91 30 00 00 Increment BE EF 03 06 00 92 FF 04 00 91 30 00 00 Decrement BE EF 03 06 00 43 FE 05 00 91 30 00 00 User Gamma Point 2 Reset Execute BE EF 03 06 00 A4 C3 06 00 51 70 00 00 User Gamma Point 3 Get BE EF 03 06 00 B0 FF 02 00 92 30 00 00 Increment BE EF 03 06 00 D6 FF 04 00 92 30 00 00 Decrement BE EF 03 06 00 07 FE 05 00 92 30 00 00 User Gamma Point 3 Reset Execute...

Страница 104: ...00 COLOR TEMP GAIN R Reset Execute BE EF 03 06 00 10 C6 06 00 46 70 00 00 COLOR TEMP GAIN G Get BE EF 03 06 00 70 F4 02 00 B2 30 00 00 Increment BE EF 03 06 00 16 F4 04 00 B2 30 00 00 Decrement BE EF 03 06 00 C7 F5 05 00 B2 30 00 00 COLOR TEMP GAIN G Reset Execute BE EF 03 06 00 EC C7 06 00 47 70 00 00 COLOR TEMP GAIN B Get BE EF 03 06 00 8C F5 02 00 B3 30 00 00 Increment BE EF 03 06 00 EA F5 04 0...

Страница 105: ... BE EF 03 06 00 F2 D6 01 00 15 20 00 00 2 BE EF 03 06 00 62 D7 01 00 15 20 01 00 3 BE EF 03 06 00 92 D7 01 00 15 20 02 00 4 BE EF 03 06 00 02 D6 01 00 15 20 03 00 ASPECT Set 4 3 BE EF 03 06 00 9E D0 01 00 08 20 00 00 16 9 BE EF 03 06 00 0E D1 01 00 08 20 01 00 14 9 BE EF 03 06 00 CE D6 01 00 08 20 09 00 16 10 BE EF 03 06 00 3E D6 01 00 08 20 0A 00 NORMAL BE EF 03 06 00 5E DD 01 00 08 20 10 00 Get ...

Страница 106: ... 01 00 17 20 00 00 SCART RGB BE EF 03 06 00 DA D6 01 00 17 20 01 00 Get BE EF 03 06 00 79 D7 02 00 17 20 00 00 S VIDEO FORMAT Set AUTO BE EF 03 06 00 E6 70 01 00 12 22 0A 00 NTSC BE EF 03 06 00 86 74 01 00 12 22 04 00 PAL BE EF 03 06 00 16 75 01 00 12 22 05 00 SECAM BE EF 03 06 00 16 70 01 00 12 22 09 00 NTSC4 43 BE EF 03 06 00 26 77 01 00 12 22 02 00 M PAL BE EF 03 06 00 86 71 01 00 12 22 08 00 N...

Страница 107: ... 46 D3 01 00 01 60 01 00 Get BE EF 03 06 00 E5 D2 02 00 01 60 00 00 MONITOR OUT COMPUTER IN1 Set COMPUTER IN1 BE EF 03 06 00 3E F4 01 00 B0 20 00 00 OFF BE EF 03 06 00 CE B5 01 00 B0 20 FF 00 Get BE EF 03 06 00 0D F4 02 00 B0 20 00 00 MONITOR OUT COMPUTER IN2 Set COMPUTER IN2 BE EF 03 06 00 CE F7 01 00 B4 20 04 00 OFF BE EF 03 06 00 FE B4 01 00 B4 20 FF 00 Get BE EF 03 06 00 3D F5 02 00 B4 20 00 0...

Страница 108: ...00 1C 20 00 00 Get BE EF 03 06 00 5D D5 02 00 1C 20 00 00 AUDIO SOURCE COMPUTER IN1 Set AUDIO IN1 BE EF 03 06 00 6E DC 01 00 30 20 01 00 AUDIO IN2 BE EF 03 06 00 9E DC 01 00 30 20 02 00 AUDIO IN3 BE EF 03 06 00 0E DD 01 00 30 20 03 00 OFF BE EF 03 06 00 FE DD 01 00 30 20 00 00 Get BE EF 03 06 00 CD DD 02 00 30 20 00 00 AUDIO SOURCE COMPUTER IN2 Set AUDIO IN1 BE EF 03 06 00 5E DD 01 00 34 20 01 00 ...

Страница 109: ...KI BE EF 03 06 00 97 D7 01 00 05 30 0E 00 TÜRKÇE BE EF 03 06 00 07 D6 01 00 05 30 0F 00 DANSK BE EF 03 06 00 A7 DF 01 00 05 30 11 00 ý 6 BE EF 03 06 00 57 DF 01 00 05 30 12 00 MAGYAR BE EF 03 06 00 C7 DE 01 00 05 30 13 00 520Æ1Ă BE EF 03 06 00 F7 DC 01 00 05 30 14 00 SLOVENSKI BE EF 03 06 00 67 DD 01 00 05 30 15 00 HRVATSKI BE EF 03 06 00 97 DD 01 00 05 30 16 00 ǼȁȁǾȃǿȀǹ BE EF 03 06 00 07 DC 01 00...

Страница 110: ...01 00 22 30 01 00 DOT LINE2 BE EF 03 06 00 23 D8 01 00 22 30 02 00 DOT LINE3 BE EF 03 06 00 B3 D9 01 00 22 30 03 00 DOT LINE4 BE EF 03 06 00 83 DB 01 00 22 30 04 00 Get BE EF 03 06 00 70 D9 02 00 22 30 00 00 TEMPLATE On Off Set OFF BE EF 03 06 00 BF D8 01 00 23 30 00 00 ON BE EF 03 06 00 2F D9 01 00 23 30 01 00 Get BE EF 03 06 00 8C D8 02 00 23 30 00 00 C C DISPLAY Set OFF BE EF 03 06 00 FA 62 01 ...

Страница 111: ... 36 1B 00 Get BE EF 03 06 00 09 33 02 00 00 36 00 00 MY BUTTON 2 Set COMPUTER IN1 BE EF 03 06 00 C6 32 01 00 01 36 00 00 COMPUTER IN2 BE EF 03 06 00 06 30 01 00 01 36 04 00 COMPONENT BE EF 03 06 00 96 31 01 00 01 36 05 00 S VIDEO BE EF 03 06 00 A6 33 01 00 01 36 02 00 VIDEO BE EF 03 06 00 56 33 01 00 01 36 01 00 INFORMATION BE EF 03 06 00 06 3F 01 00 01 36 10 00 AUTO KEYSTONE V BE EF 03 06 00 96 3...

Страница 112: ...kirchen bei Muenchen GERMANY Tel 49 89 991 80 0 SWITZERLAND Fax 49 89 991 80 224 Hitachi Europe S A 364 Kifissias 1 Delfon Str 152 33 Chalandri GREECE Tel 30 1 6837200 Fax 30 1 6835694 Hitachi Europe S r l Via T Gulli 39 20147 Milano ITALY Tel 39 02 487861 Fax 39 02 48786381 Hitachi Europe AB Atlas Spedisjon C O Hitachi Europe AB Smalvollveien 52 N 0667 Oslo NORWAY Tel 44 1628 585000 Fax 47 3 339 ...

Отзывы: