background image

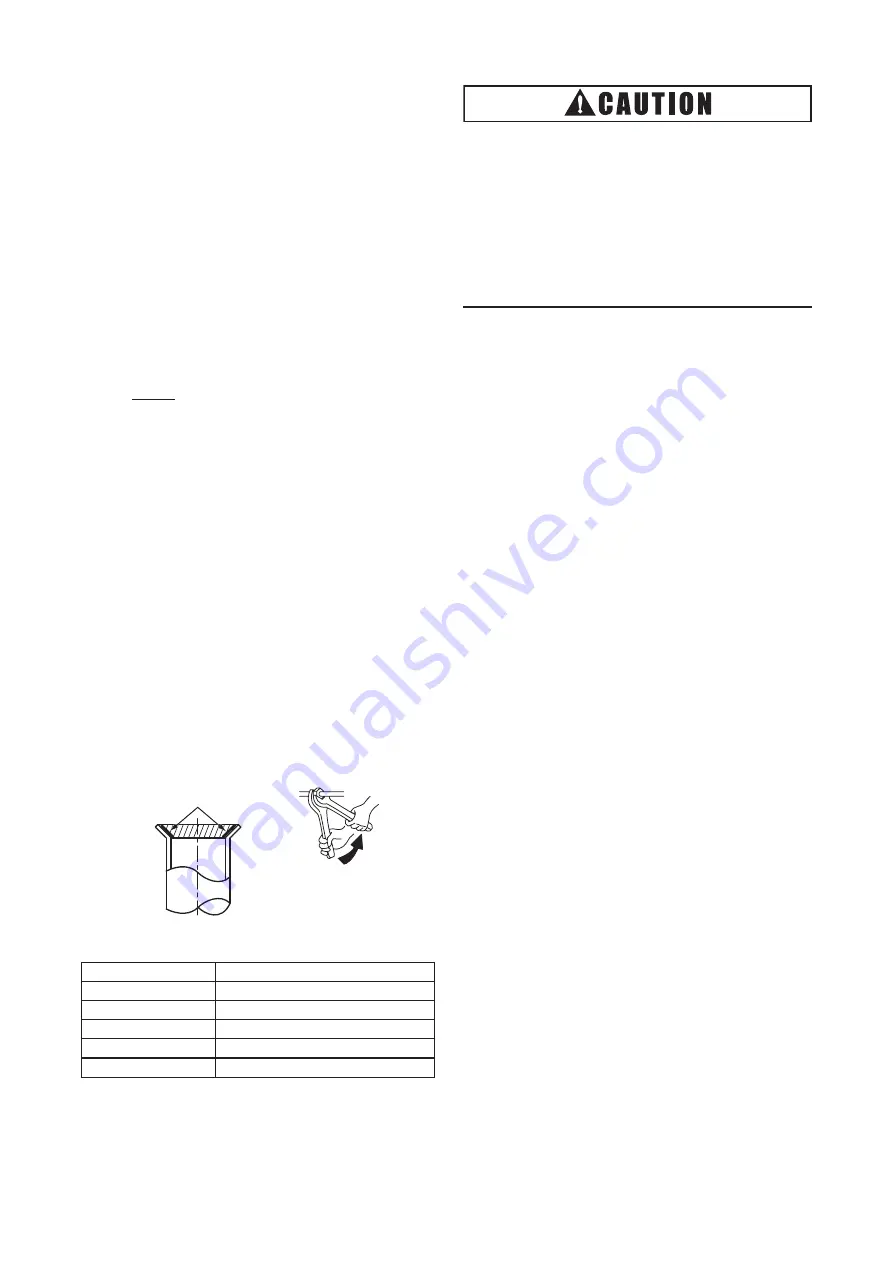
Two wrenches required to prevent 

damaging the copper piping.

Apply Refrigerant Oil.

12 

P5417025-rev.1

●  Cautions for Piping Connection Work

(a)  Connect the indoor/outdoor connecting 

pipes.  Secure the pipes and do not touch 

other objects, such as ceilings for example. 

(Otherwise, abnormal sound may be heard 

due to the vibration of the piping.)

(b)  Apply refrigerant oil slightly on the sheet 

surface of the pipe and flare nut before the 

flaring work.  Then tighten the flare nut with 

the specified tightening torque using two 

wrenches.  Always use a back-up wrench to 

prevent twisting of the copper piping within 

the unit assembly.  Perform the flaring work 

on the liquid piping side before the gas 

piping side.  Check the gas leakage after the 

flaring work. 


NOTE:


Refrigerant oil is field-supplied.


[Ethereal Oil FVC50K, FVC68D (Idemitsu 

Kousan Co. Ltd.)]

(c)  When temperature and humidity inside the 

ceiling exceed 27

o

C(80

o

F) /RH, relative 

humidity, 80%, apply additional insulation 

approximately 20mm (13/16 inch) thickness 

to the accessory insulation.  It prevents 

condensation on the surface of the insulation 

(refrigerant pipe only) and possible damage 

to electronic components. 

(d)  Perform the air-tight leakage test 4.15MPa 

(601 psi) for the test pressure.  Refer to the 

Technical Manual for the Outdoor Unit for 

more details. 

(e)  Perform cold insulation work by insulating 

and taping the flare connection and reducer 

connection.  Also insulate all the refrigerant 

pipes.

● 

Do not apply excessive force to the flare 

nut when tightening.  Excessive force can 

result in the flare nut cracking and refrigerant 

leakage may occur.  Use the specified 

tightening torque. 

● 

For more details of the refrigerant piping 

work, vacuum pumping and refrigerant 

charge, refer to the Technical Manual for the 

Outdoor Unit. 

Required Tightening Torque

Pipe Size

Tightening Torque

6.35mm (ɸ1/4 inch)

14 to 18 N

m (10.3 to 13.3 ft

.

lbs)

9.52mm (ɸ3/8 inch)

34 to 42 N

m (25.1 to 31.0 ft

.

lbs)

12.7mm (ɸ1/2 inch)

49 to 61 N

m (36.1 to 45.0 ft

.

lbs)

15.88mm (ɸ5/8 inch)

68 to 82 N

m (50.2 to 60.5 ft

.

lbs)

19.05mm (ɸ3/4 inch) 100 to 120 N

m (73.8 to 88.5 ft

.

lbs)

Содержание CH-AP04MSSX

Страница 1: ...CH AP12MSSX CH AP16MSSX JCH AP04MSSX JCH AP08MSSX JCH AP12MSSX JCH AP16MSSX Installation Manual for Cooling Heating Change Over Box CH Box IMPORTANT READ AND UNDERSTAND THIS MANUAL CAREFULLY BEFORE INSTALLING THIS CH BOX KEEP THIS MANUAL FOR FUTURE REFERENCE ...

Страница 2: ......

Страница 3: ... When the New CH Box is connected to current VRF outdoor unit the unit will not operate and the wired controller will display the alarm code C4 4 Available Not Available Current and new CH Boxes can not be used in the same system together Production of current CH unit shall be discontinued However it will be supplied for servicing and maintenance until further notice Contact us if there are order ...

Страница 4: ...laces with an atmosphere of high nuisance dust Places with organic solvent atmospheres such as painting and cleaning locations Do not install a unit in the place where condensate water can leak onto the unit or electrical device failures may occur Pay attention to the following points when the unit is installed in a hospital or other facility where electromagnetic waves generate from medical equip...

Страница 5: ...cal connections Connections must be clean and tight at the terminals Claims for damage either apparent or concealed should be filed immediately with the shipping company NOTE Rough handling may dislocate internal components Check the model number electrical characteristics power supply voltage and frequency and accessories to determine if they are correct with the ordering and shipping information...

Страница 6: ...country s requirements with regard to refrigerant use and should be obtained from distributors Use of unapproved refrigerant substitutes will void the warranties and can cause injury or death Do not pour water into the indoor or outdoor unit These units are equipped with electrical parts Exposure to water may cause a serious electrical shock Do not open the service cover or access panel for the in...

Страница 7: ...this system Carefully refer to the wiring diagram and these instructions when wiring Improper connections and inadequate grounding can cause serious injury or death Perform all electrical work in strict accordance with this installation and maintenance manual and all relevant regulatory standards Use specified cables between units Be sure to install circuit breakers ground fault interrupter isolat...

Страница 8: ...or to operation of the system for preheating of the compressor oil NOTE It is recommended that the room is ventilated every three to four hours The heating capacity of the heat pump unit is decreased according to the outdoor air temperature Therefore it is recommended that auxiliary heating equipment be used in the field when the unit is installed in a low temperature region Do not step on the uni...

Страница 9: ...stallation 7 4 1 Factory Supplied Accessories 7 4 2 Initial Check 8 4 3 Suspension Bolts 9 4 4 Installation 10 4 4 1 Marking of the Positions of the Suspension Bolts and Wiring Connections 10 4 4 2 Mounting and Hanging the CH Box 10 5 Refrigerant Piping Work 11 5 1 Refrigerant Piping 11 5 2 Refrigerant Piping Work 13 6 Electrical Wiring 21 6 1 General Check 21 6 2 Electrical Wiring Connection 22 6...

Страница 10: ...viii P5417025 rev 1 ...

Страница 11: ...P5417025 rev 1 1 1 Safety Summary Do not perform installation work refrigerant piping work or electrical wiring connection without referring to our installation manual Check that the ground wire is securely connected Connect a fuse of specified capacity Figure 2 1 Dimensions of CH Box 2 Structure 2 1 Dimensions CH AP04MSSX JCH AP04MSSX Unit mm Specifications Model CH AP04MSSX JCH AP04MSSX Power Su...

Страница 12: ...ring Connection 3 x ɸ26 Refrigerant Liquid Pipe Connections 12 x ɸ9 52 Flare Nuts Refrigerant Gas Pipe Connection 12 x ɸ15 88 Flare Nuts Power Supply Wiring Connection ɸ26 Ground Terminal M5 in Electrical Box 60 x 11 660 Refrigerant Gas High Low Pressure Pipe Connection I D ɸ25 6 Suspension Bracket 4 12 x 32 Slotted Hole For Suspension Bolt Refrigerant Gas Low Pressure Pipe Connection I D ɸ28 75 R...

Страница 13: ...upply Wiring Connection ɸ26 Ground Terminal M5 in Electrical Box Refrigerant Gas High Low Pressure Pipe Connection I D ɸ28 75 Suspension Bracket 4 12 x 32 Slotted Hole For Suspension Bolt Refrigerant Gas Low Pressure Pipe Connection I D ɸ32 Refrigerant Liquid Pipe Connection I D ɸ19 3 P View from P Specifications Model CH AP16MSSX JCH AP16MSSX Power Supply 1 N 220 240V 50Hz 1 N 220V 60Hz 1 N 230V ...

Страница 14: ...X CH AP12MSSX JCH AP12MSSX CH AP08MSSX JCH AP08MSSX To Outdoor Unit Side S S S Unit L Unit K Unit J Unit I Unit H Unit G Unit F Unit E Unit D Unit C Unit B Unit A S S S S S S S S S S S G High Low Pressure G Low Pressure L L G MVS1 MVD1 MVS2 MVD2 MVS3 MVD3 MVS4 MVD4 MVS1 MVD1 MVS2 MVD2 MVS3 MVD3 MVS4 MVD4 MVS1 MVD1 MVS2 MVD2 MVS3 MVD3 MVS4 MVD4 L G L G L G L G L G L G L G L G L G L G L G 2 1 2 1 1 ...

Страница 15: ...ld Refrigerant Piping Flare Connection Brazing Connection CH Box G L P5417025 rev 1 5 2 3 Necessary Tools and Instrument List for Installation No Tool No Tool 1 Handsaw 11 Wrench 2 Phillips Screwdriver 12 Charging Cylinder 3 Vacuum Pump 13 Manifold Gauge 4 Refrigerant Gas Hose 14 Wire Cutter 5 Megohmmeter 15 Gas Leak Detector 6 Copper Pipe Bender 16 Level 7 Manual Water Pump 17 Crimper for Solderl...

Страница 16: ... Capacity of All Connected Indoor Units shown in above table Make sure to increase the pipe connection size by using the appropriate accessory pipe Model CH AP04MSSX JCH AP04MSSX CH AP08MSSX JCH AP08MSSX CH AP12MSSX JCH AP12MSSX CH AP16MSSX JCH AP16MSSX Number of Branches for Indoor Unit 4 8 12 16 Single Unit Per Branch Maximum Total Capacity of All Connected Indoor Units 16 0HP or less Max 44 8kW...

Страница 17: ...n place and functioning properly prior to putting the equipment into operation Never by pass or jump out any safety device or switch If any of these accessories are not packed with the unit please contact your distributor Unit mm inch No Accessory CH AP04MSSX JCH AP04MSSX Q ty CH AP08MSSX JCH AP08MSSX Q ty CH AP12MSSX JCH AP12MSSX Q ty CH AP16MSSX JCH AP16MSSX Q ty 1 Accessory Pipe ID f12 7 1 2 Fl...

Страница 18: ...sound A Install the CH Box inside the ceiling As for the ceiling material select a material like a plasterboard at least 9mm 1 inch which minimizes operation sound B Do not install the CH Box in a place near bedrooms or hospital rooms When the operation is changed to cooling heating mode a change in the typical refrigerant flow sounds may be heard or perceived from the CH Box Therefore install the...

Страница 19: ...60mm 5 7 8 to 6 5 16 inch Part A Part B Unit Body Use a hole saw to make a hole Use a hole saw to make a hole Fixing Bolt Fixing Use a suspension bolt with 30 to 45o sloping edge Use the resin capsule within the warranty period Resin capsules deteriorate over time and should be used within six mounths of the manufacturing date 20o C 15o C 10o C 5o C 0o C 68o F 59o F 50o F 41o F 32o F Min 30min Min...

Страница 20: ...Hang the CH Box by putting hands on the bottom of the cabinet b Insert the suspension bolt into the groove part of the suspension bracket as shown in Figure 4 5 Ensure that the washers are correctly affixed to the suspension bracket c After the hanging work the piping and wiring connection work is required inside the ceiling in the gap between the roof and ceiling so it is not visible Therefore de...

Страница 21: ...ing work with 1 2H material In this case use an accessory pipe with a flare 5 1 Refrigerant Piping Cautions for Refrigerant Pipe Work Example 1 Prepare locally supplied copper pipes 2 Select clean copper tubes making sure there is no dust or moisture inside the tubes Before connecting pipes blow the inside of the tubes with nitrogen or dry air to remove any dust or foreign materials 3 Select the p...

Страница 22: ...dditional insulation approximately 20mm 13 16 inch thickness to the accessory insulation It prevents condensation on the surface of the insulation refrigerant pipe only and possible damage to electronic components d Perform the air tight leakage test 4 15MPa 601 psi for the test pressure Refer to the Technical Manual for the Outdoor Unit for more details e Perform cold insulation work by insulatin...

Страница 23: ... C B A E F G H I J K L ࠉ E F G H C D B A D C B A E F G H I J K L M N O P a View of Indoor Unit Connecting Side CH AP04MSSX JCH AP04MSSX CH AP08MSSX JCH AP08MSSX CH AP12MSSX JCH AP12MSSX 4 x φ15 8 5 8 Flare Nut Refrigerant Liquid Pipe Connection for Indoor Unit 4 x φ9 52 3 8 Flare Nut Refrigerant Gas Pipe Connection for Indoor Unit 8 x φ15 8 5 8 Flare Nut Refrigerant Gas Pipe Connection for Indoor ...

Страница 24: ... 3 4 f15 88 5 8 f9 52 3 8 25 0 Q 33 5 f22 2 7 8 f19 05 3 4 f9 52 3 8 33 5 Q 45 0 f25 4 1 f22 2 7 8 f12 7 1 2 45 0 Q 50 0 f28 58 1 1 8 f22 2 7 8 f12 7 1 2 50 0 Q 61 5 f28 58 1 1 8 f22 2 7 8 f15 88 5 8 61 5 Q 73 0 f28 58 1 1 8 f25 4 1 f15 88 5 8 73 0 Q 85 0 f31 75 1 1 4 f28 58 1 1 8 f19 05 3 4 NOTE Refer to Position of Piping Connection for the details of the piping connection for the CH Box Use fie...

Страница 25: ...ed Pipe Size Field Supplied Remarks Low Pressure Gas Pipe A ɸ28 58 1 1 8 f19 05 3 4 OD28 58 1 1 8 ID19 05 3 4 Apply Field Supplied Reducer 3 Size Down ɸ22 2 7 8 OD28 58 1 1 8 ID22 2 7 8 Apply Field Supplied Reducer 2 Size Down ɸ25 4 1 OD28 58 1 1 8 ID25 4 1 Apply Field Supplied Reducer ɸ28 58 1 1 8 f34 93 1 3 8 OD28 58 1 1 8 ID34 93 1 3 8 Apply Field Supplied Reducer High Low Pressure Gas Pipe B ɸ...

Страница 26: ...d Reducer f15 88 5 8 f19 05 3 4 OD15 88 5 8 ID19 05 3 4 Apply Field Supplied Reducer CH AP16MSSX JCH AP16MSSX Unit mm inch Piping Connection Size for CH Box Required Pipe Size Field Supplied Remarks Low Pressure Gas Pipe A ɸ31 75 1 1 4 ɸ22 2 7 8 OD31 75 1 1 4 ID22 2 7 8 Apply Field Supplied Reducer 3 Size Down ɸ25 4 1 OD31 75 1 1 4 ID25 4 1 Apply Field Supplied Reducer 2 Size Down ɸ28 58 1 1 8 OD3...

Страница 27: ...88 5 8 1 f9 52 3 8 1 Q 22 4 f19 05 3 4 f9 52 3 8 1 Use accessory pipe 3 on gas pipe side to increase the pipe size Q 28 0 f22 2 7 8 f9 52 3 8 1 Use accessory pipe 4 on gas pipe side to increase the pipe size 1 Field flaring work is required Refer to Section 5 1 for the flaring work NOTES 1 When connecting the Gas Pipe D and Liquid Pipe E reuse the flare nut attached to the CH Box 2 When the connec...

Страница 28: ...above Any piping connections can be left over 4 In case there is plan for additional indoor units in the future Do not plan the piping size for additional indoor units Ensure to select the piping again in the future Additional indoor units can be connected only after the refrigerant is recovered Item Tightening Torque Gas Pipe Flare Nut 75 7 N m 55 3 5 ft lbs Liquid Pipe Flare Nut 38 4 N m 28 0 3 ...

Страница 29: ...CH Box Side Insulation Field Supplied Insulation Field Supplied Insulation Field Supplied Insulation Work for Gas High Low Pressure and Low Pressure Pipe of Outdoor Unit Side Insulation Work for Liquid Pipe of Outdoor Unit Side Insulation Work for Gas Pipe of Indoor Unit Side Insulation Work for Liquid Pipe of Indoor Unit Side CH Box Side CH Box Side P5417025 rev 1 19 d In case there are unused pi...

Страница 30: ...re is no effect of ground wiring when a hard vinyl pipe is used Lightning conductor The ground electric potential abnormally increases when a lightning conductor is used 6 1 General Check 1 Make sure that the field selected electrical components main switches fuses ELB Earth Leakage Breaker wires conduit connectors and wire terminals are properly selected according to the electrical data indicated...

Страница 31: ...ed by Hitachi Cable Ltd Japan 4 Use a shielded cable for the transmitting circuit and connect it to ground 5 In the case that power cables are connected in series add each unit maximum current and select wires below Selection According to EN60 335 1 Selection According to MLFC at Cable Temperature of 90o C Current i A Wire Size mm2 Current i A Wire Size mm2 i 6 0 75 i 15 0 5 3 In the case that 6 i...

Страница 32: ...use Power Supply R L1 S L2 TB3 TB4 PCB4 Indoor 4 6 5 3 7 8 9 10 M N O P Indoor CH AP16MSSX 5 3 3 2 1 4 1 208 230V 50Hz 1 220V 60Hz 22 P5417025 rev 1 Example of Electrical Wiring The following figure shows an example of electrical wiring around the CH Boxes NOTES 1 Do not apply excessive voltage to the communication cable DC5V non polarity between the outdoor unit and the CH Box between the CH Box ...

Страница 33: ...1 Electrical Wiring Connection 6 3 Electrical Wiring The electrical wiring connection for the CH Box is shown in Figure 6 1 1 Turn OFF the main power switch and take off the electrical box cover of CH Box 2 Connect the power supply wiring to L1 and L2 on the terminal block TB1 and connect ground wiring to the terminals in the electrical box 3 Connect the communication cable between the outdoor uni...

Страница 34: ...tting is required When the connection port is not used turn ON the applicable pin shown in the table 6 2 Example When connection port D is not used turn ON DSW2 No 4 pin on PCB1 2 1 ON 1 ON 2 DSW4 for TB2 1 2 ON ON 1 2 DSW5 8 for TB3 and TB4 2 1 ON DSW3 No setting is required 2 6 1 ON 5 4 3 DSW1 No setting is required DSW4 8 In the case of applying high voltage to terminals of TB2 TB3 or TB4 the 0...

Страница 35: ...on may occur NOTICE Perform a test run according to the Installation and Maintenance Manual of the outdoor unit Special Attention Regarding Refrigerant Gas Leakage The refrigerant R410A is non toxic and inflammable in its original state However in consideration of a state where the refrigerant leaks into the room measures against refrigerant leaks must be taken in small rooms where the tolerable l...

Страница 36: ...1 CH Box Incorrect CH Box Connection 2 or More CH Boxes are Connected between Outdoor Unit and Indoor Unit C2 Incorrect Indoor Unit Connection Number 9 or More Indoor Units Connected to Single Branch Type CH Box 7 or More Indoor Units Connected per a Branch of Multiple Branch Type CH Box C3 Incorrect Indoor Unit Refrigerant Number Setting Indoor Units of Different Refrigerant Cycle Number are Conn...

Страница 37: ...P5417025 rev 1 27 ...

Страница 38: ...28 P5417025 rev 1 ...

Страница 39: ...P5417025 rev 1 29 ...

Страница 40: ...P5417025 rev 1 2017 Printed in China 2017 Johnson Controls Hitachi Air Conditioning Technology Hong Kong Ltd ...

Отзывы: