


10
4. When you hear the engine want to start, return choke lever to
RUN position (open) (B). Then pull recoil starter briskly again.
NOTE
If engine does not start, repeat procedures from 2 to 5.
5. Then allow the engine about 2–3 minutes to warm up before
subjecting it to any load.
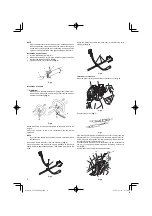
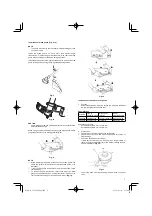
Cutting
(
Fig.
25,
26,
27
)
○
When cutting, operate engine at over 6500 rpm. Extended time
of use at low rpm may wear out the clutch prematurely.
○
Cut grass from right to left.
○
Cut grass from left to right (only curve shaft model).
○
Blade thrust may occur when the spinning blade contacts a
solid object in the critical area.
A dangerous reaction may occur causing the entire unit and
operator to be thrust violently. This reaction is called blade
thrust. As a result, the operator may lose control of the unit
which may cause serious or fatal injury. Blade thrust is more
likely to occur in areas where it is di
ffi
cult to see the material to
be cut.
○
Wear the harness as shown in the
fi
gure (if so equipped). The
blade turns counter-clockwise, therefore, be advised to operate
the unit from right to left for e
ffi
cient cutting. Keep onlookers out
of working area at least 15 m.
Fig.
25
Fig.
26
15 m
Fig.
27
WARNING
If cutting attachment should strike against stones or other
debris, stop the engine and make sure that the attachment and
related parts are undamaged. When grass or vines wrap around
attachment, stop engine and attachment and remove them.
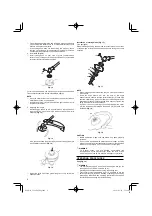
Stopping
(
Fig.
28,
29
)
Decrease engine speed and run at an idle for a few minutes, then
turn o
ff
ignition switch (24).
For models with an engine ignition switch, keep the ignition switch
pressed until the engine comes to a complete stop.
26
24
Fig.
28
24
Fig.
29
WARNING
A cutting attachment can injure while it continues to spin after
the engine is stopped or power control is released. When the
unit is turned o
ff
, make sure the cutting attachment has stopped
before the unit is set down.
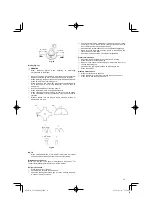
Semi-auto
cutting
head
○
When cutting, operate engine at over 6500 rpm. Extended time
of use at low rpm may wear out the clutch prematurely.
○
Cut grass from right to left.
○
Cut grass from left to right (only curve shaft model).
WARNING
A cutting attachment can injure while it continues to spin after
the engine is stopped or power control is released. When the
unit is turned o
ff
, make sure the cutting attachment has stopped
before the unit is set down.
Automatically feeds more nylon cutting line when it is tapped at low
rpm (not greater than 4500 rpm).
MAINTENANCE
MAINTENANCE, REPLACEMENT OR REPAIR OF THE EMISSION
CONTROL DEVICES AND SYSTEMS MAY BE PERFORMED
BY ANY NON-ROAD ENGINE REPAIR ESTABLISHMENT OR
INDIVIDUAL.
000Book̲CG22EAS̲Eng.indb 10
000Book̲CG22EAS̲Eng.indb 10
2010/01/18 17:16:09
2010/01/18 17:16:09
Содержание CG 22EAB(L)
Страница 14: ...14 CG22EAS 000Book CG22EAS Eng indb 14 000Book CG22EAS Eng indb 14 2010 01 18 17 16 09 2010 01 18 17 16 09 ...
Страница 16: ...16 CG22EAD 000Book CG22EAS Eng indb 16 000Book CG22EAS Eng indb 16 2010 01 18 17 16 11 2010 01 18 17 16 11 ...
Страница 17: ...17 CG22EAB 000Book CG22EAS Eng indb 17 000Book CG22EAS Eng indb 17 2010 01 18 17 16 12 2010 01 18 17 16 12 ...
Страница 18: ...18 CG22EAB 000Book CG22EAS Eng indb 18 000Book CG22EAS Eng indb 18 2010 01 18 17 16 13 2010 01 18 17 16 13 ...
Страница 19: ...19 000Book CG22EAS Eng indb 19 000Book CG22EAS Eng indb 19 2010 01 18 17 16 14 2010 01 18 17 16 14 ...