– 14 –
English
ADJUSTING THE BLADE VERTICAL TO THE TUBE
IN THE FRONT OF THE TABLE (FIG. Q)
This adjustment must be correct, or kickback could
result and accurate cuts cannot be made.
1. Raise the blade to its highest position and set it to
0°.
2. Place the rip fence and mitre gauge in the right
hand tube on the table top. Set the rip fence & mitre
gauge to 90° and push the lever to the right to lock it
in that position.
3. If the saw blade is not parallel with fence adjust six
screws (1) and carefully grasp the saw blade. Make
necessary correction until measurements taken at
the saw blade and fence are parallel. Tighten the six
screws (1).
Fig. Q
NOTE:
This tool is accurately adjusted before shipping
from the factory. Check the following accuracy and
readjust them if necessary in order to obtain the best
results in operation.
ADJUST THE RIVING KNIFE (FIG. P)
The adjustment was made at the factory, but it should
be rechecked and adjusted if necessary.
The riving knife is in a thickness of 2.5 mm. Make
sure the blade and riving knife are aligned on the
same line. If not, adjust the riving knife by loosening
the nut. It should be kept a distance from the blade
less than 5 mm at all positions.
1. Remove the blade guard.
2. Loosen the screws on the table insert and remove
the table insert.
3. Raise the blade to its highest position by turning the
handwheel (1). Loosen the nut (2) and adjust the
riving knife to the proper distance less than 5mm to
the blade. Tighten the nut (2).
4. Replace the table insert and tighten the screw.
5. Replace the blade guard.
Fig. P
IN THE FRONT OF THE TABLE (FIG. Q)
WARNING
1
1
WARNING
1
2
Содержание C12RA
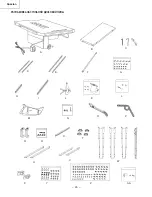
Страница 8: ... 8 English UNPACKING YOUR TABLE SAW A D J K L E C M N G F H I B P O Q R S T U V W X Y Z AA ...
Страница 26: ... 26 Russian РАСПАКОВКА НАСТОЛЬНОЙ ДИСКОВОЙ ПИЛЫ A D J K L E C M N G F H I B P O Q R S T U V W X Y Z AA ...
Страница 40: ... 40 English 12 315mm JOBSITE TABLE SAW MODEL NO C12RA ...


