background image

English

24

Avoid any unreasonably forced pressure to the motor during cutting operation by
twisting or pressing the circular saw forcibly;

Avoid any use of dull saw blade.

3. Cutting procedures

CAUTION:

Recheck that the saw blade is se-
curely clamped.

Confirm that the clamp lever for ad-
justing the slot depth, the wing-bolt
(A) for adjusting the angle of inclina-
tion.

(1) Place the saw body (base) on the lumber, and as in Fig. 18 align the intended line of cut

with the saw blade, using the notch at the front of the base. This relationship of base to
lumber should remain unchanged regardless of the inclination of the base.

(2) Ensure that the switch is turned to the ON position before the saw blade comes in contact

with the lumber. The switch is turned ON when the trigger is squeezed; and OFF when
the trigger is released.

(3) Moving the saw straight at a constant speed will produce optimum cutting.

CAUTION:

Before starting to saw, ensure that the saw blade has reached full speed revolution.

Should the saw blade be stopped or made an abnormal noise during operation, turn
off the switch immediately.

When finished with a job, pull out the battery from the main body.

Twisting and forcibly pressing the saw during cutting can result in unreasonable
pressure on the motor, so try to go straight quietly.

In the situation where the circular saw is continuously operated while replacing the
battery with stocked spare batteries one after another, the motor tends to overheat.
Therefore, whenever the housing becomes hot, give the saw a break for a while.

Avoid cutting operation in a state where the base bottom is afloat from the material
being cut.  Otherwise, the motor can get locked.

When not
inclined

When inclined 45°

Fig. 18

Содержание C 7D

Страница 1: ...AND INSTRUCTION MANUAL WARNING IMPROPER OR UNSAFE use of this power tool can result in death or serious bodily injury This manual contains important information about product safety Please read and understand this manual BEFORE operating the power tool Please keep this manual available for other users and owners before they use the power tool This manual should be stored in safe place INSTRUCCIONE...

Страница 2: ...R SAW 11 IMPORTANT SAFETY INSTRUCTIONS FOR BATTERY CHARGER 12 IMPORTANT SAFETY INSTRUCTIONS FOR USE OF THE BATTERY AND BATTERY CHARGER 13 FUNCTIONAL DESCRIPTION 15 MODEL 15 NAME OF PARTS 15 SPECIFICATIONS 16 Page ASSEMBLY AND OPERATION 17 APPLICATIONS 17 REMOVAL AND INSTALLATION METHOD OF BATTERY 17 CHARGING METHOD 17 BEFORE USE 20 ADJUSTING THE SAW PRIOR TO USE 21 OPERATION 22 MOUNTING AND DISMOU...

Страница 3: ...ecautions are outlined in the SAFETY section of this Instruction Manual and in the sections which contain the operation and maintenance instructions Hazards that must be avoided to prevent bodily injury or machine damage are identified by WARNINGS on the power tool and in this Instruction Manual NEVER use this power tool in a manner that has not been specifically recommended by HITACHI MEANINGS OF...

Страница 4: ...ck Use of any other batteries may create a risk of fire 3 Personal Safety 1 Stay alert watch what you are doing and use common sense when operating a power tool Do not use tool while tired or under the influence of drugs alcohol or medication A moment of inattention while operating power tools may result in serious personal injury 2 Dress properly Do not wear loose clothing or jewelry Contain long...

Страница 5: ... or binding of moving parts breakage of parts and any other condition that may affect the tool s operation If damaged have the tool serviced by a HITACHI authorized service center before using Many accidents are caused by poorly maintained tools 9 Use only accessories that are recommended by the manufacturer for your model Accessories that may be suitable for one tool may become hazardous when use...

Страница 6: ...o walk backwards cutting whatever is in its path Be aware of the time it takes for the blade to stop after switch is released 6 NEVER hold piece being cut in your hands or across your leg It is important to support the work properly to minimize body exposure blade binding or loss of control 7 Hold tool by insulated gripping surfaces when performing an operation where the cutting tool may contact h...

Страница 7: ...ag under their own weight Supports must be placed under the panel on both sides near the line of cut and near the edge of the panel as shown in Fig 1 To minimize the risk of blade pinching and kickback When cutting operation requires the resting of the saw on the work piece the saw shall be rested on the larger portion and the smaller piece cut off To avoid kickback do support board Don t support ...

Страница 8: ...ILLUSTRATION OF PROPER HAND SUPPORT AND WORK PIECE SUPPORT Fig 4 13 Place the wider portion of the saw base on that part of the work piece which is solidly supported not on the section that will fall off when the cut is made As examples Fig 5 illustrates the RIGHT way to cut off the end of board and Fig 6 the WRONG way If the work piece is short or small clamp is down DON T TRY TO HOLD SHORT PLACE...

Страница 9: ...ndle tool correctly Operate the tool according to the instructions provided herein Do not drop or throw the tool Never allow the tool to be operated by children individuals unfamiliar with its operation or unauthorized personnel 20 Definitions for symbols V volts direct current no no load speed min revolutions or reciprocation per minute 21 Keep all screws bolts and covers tightly in place Keep al...

Страница 10: ...ly it may be deformed cracked or damaged 26 Do not wipe plastic parts with solvent Solvents such as gasoline thinner benzine carbon tetrachloride and alcohol may damage and crack plastic parts Do not wipe them with such solvents Wipe plastic parts with a soft cloth lightly dampened with soapy water and dried thoroughly ...

Страница 11: ...the saw blade during operation Hold the circular saw by its handle only 5 Because the cordless circular saw operates by battery power be aware of the fact that it can begin to operate at any time 6 Wear eye and ear protection at all times 7 When working at elevated locations clear the area of other people and aware of conditions below you 8 It is important to support the work properly and to hold ...

Страница 12: ...ng battery charger 7 Make sure cord is located so that it will not be stepped on tripped over or otherwise subjected to damage or stress 8 An extension cord should not be used unless absolutely necessary Use of improper extension cord could result in a risk of fire and electric shock If extension cord must be used make sure a That blades of extension cord are the same number size and shape as thos...

Страница 13: ...ND CAUSE INJURY Follow these instructions to avoid the risk of injury WARNING Improper use of the battery or battery charger can lead to serious injury To avoid these injuries 1 NEVER disassemble the battery 2 NEVER incinerate the battery even if it is damaged or is completely worn out The battery can explode in a fire 3 NEVER short circuit the battery 4 NEVER insert any objects into the battery c...

Страница 14: ...English 14 SAVE THESE INSTRUCTIONS AND MAKE THEM AVAILABLE TO OTHER USERS AND OWNERS OF THIS TOOL ...

Страница 15: ...ool NEVER operate or attempt any maintenance on the tool unless you have first read and understood all safety instructions contained in this manual Some illustrations in this Instruction Manual may show details or attachments that differ from those on your own power tool Switch Lock Switch Trigger Battery Nameplate Wing Bolt A Saw Blade Light Base Hexagonal Flange Bolt Safety Cover Lower Guard Lev...

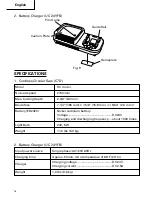
Страница 16: ...harger UC 24YFB 2 Battery Charger UC 24YFB SPECIFICATIONS 1 Cordless Circular Saw C7D Motor DC motor No load speed 2700 min Max Cutting Depth 2 3 8 60 mm Blade Size 7 1 4 185 mm D 5 8 15 9 mm H 5 64 2 0 mm T Battery EB2420 Nickel cadmium battery Voltage DC24V Charging and discharging frequency about 1000 times Light Bulb 24V 5W Weight 11 0 lbs 5 0 kg Fig 9 Pilot Lamp Guide Rail Caution Plate Namep...

Страница 17: ...tches on both sides of the battery Fig 4 CHARGING METHOD NOTE Before plugging into the receptacle make sure the following points 䡬 The power source voltage is stated on the nameplate 䡬 The cord is not damaged WARNING Do not charge at voltage higher than indicated on the nameplate If charged at voltage higher than indicated on the nameplate the charger will burn out 1 Insert the plug of battery cha...

Страница 18: ...unted 䡬 When the battery is fully charged the pilot lamp will bilink in red slowly At 1 second intervals See Table 2 Table 2 Indications of the pilot lamp Lights for 0 5 seconds Does not light for 0 5 seconds off for 0 5 seconds Lights continuously Lights for 0 5 seconds Does not light for 0 5 seconds off for 0 5 seconds Lights for 0 1 seconds Does not light for 0 1 seconds off for 0 1 seconds Lig...

Страница 19: ...ry charger by hand pull out the battery from the battery charger Regarding electric discharge in case of new batteries etc Astheinternalchemicalsubstanceofnewbatteriesandbatteriesthathavenotbeenused for an extended period is not activated the electric discharge might be low when using them the first and second time This is a temporary phenomenon and normal time required for recharging will be rest...

Страница 20: ... immediate use when it is assembled at the factory be sure to check it out again for caution s sake A bolt can be tightened when it is turned clockwise Use the provided box wrench to check it out For further details refer to the item of MOUNTING AND DISMOUNTING THE SAW BLADE on Page 20 3 Check if clamp lever is tightened If the clamp lever to adjust cutting depth Fig 13 is loose injury can result ...

Страница 21: ... surface of the lumber place the lumber on a work bench when cutting If a square block is utilized as a work bench selectlevelgroundtoensureitisproperly stabilized An unstable work bench will result in hazardous operation CAUTION Toavoidpossibleaccident alwaysensure that the portion of lumber remaining after cutting is securely anchored or held in position ADJUSTING THE SAW PRIOR TO USE 1 Adjustin...

Страница 22: ...nce Fig 16 Optional Accessory The cutting position can be regulated by moving the guide to the left or right after loosening its wing bolt The guide may be mounted on either the right or left side of the tool OPERATION WARNING Never touch the moving parts Never operate the circular saw with the saw blade turned upward or to the side Do not fix and secure the switch lock Besides keep your finger of...

Страница 23: ...he switch lock the saw blade continues running and the light continues being turned ON as long as you keep on pulling the switch trigger 3 If you release the switch trigger you can turn OFF the switch and the switch lock returns to the original position automatically and the light turns OFF too NOTE If the saw is set aside with the battery still installed then depending on the orientation of the s...

Страница 24: ...hen the trigger is squeezed and OFF when the trigger is released 3 Moving the saw straight at a constant speed will produce optimum cutting CAUTION Before starting to saw ensure that the saw blade has reached full speed revolution Should the saw blade be stopped or made an abnormal noise during operation turn off the switch immediately When finished with a job pull out the battery from the main bo...

Страница 25: ...d insufficient tightening may take place resulting in injury 䡬 Take procedures here that are contrary to the detaching procedures NOTE 䢇 Thoroughly remove any sawdust which has accumulated on the spindle bolt and washers 䢇 To assure proper rotation direction of the saw blade the arrow direction on the saw blade must coincide with the arrow direction on the saw cover 䢇 Using the fingers tighten the...

Страница 26: ...art of the housing and then pull out the light cover in the arrow marked direction as shown in Fig 22 2 Push the back of the socket and remove the socket and the light bulb together from the housing Fig 23 3 Remove the light bulb from the socket Fig 24 2 Attaching light bulb Take procedures here that are contrary to the detaching procedures NOTE 䢇 When attaching the light bulb to the socket insert...

Страница 27: ...t repair in case of any malfunction 4 Inspecting the carbon brushes Fig 25 Themotoremployscarbonbrusheswhich are consumable parts Since and excessivelyworncarbonbrushcanresult inmotortrouble replacethecarbonbrush with new ones when it becomes worn to or near the wear limit In addition always keep carbon brushes clean and ensure that they slide freely within the brush holders NOTE When replacing th...

Страница 28: ...crew with a slotted head screwdriver shift the positionofthebasetoproducethedesired right angle 7 Check for dust Dust may be removed with a clean rag or a cloth dampened with soapy water Do not use bleach chlorine gasoline or thinner for they may damage the plas tics 8 Disposal of the exhausted battery WARNING Do not dispose of the exhausted battery The battery must explode if it is incinerated Th...

Страница 29: ...dren 10 Service and repairs All quality power tools will eventually require servicing or replacement of parts because of wear from normal use To assure that only genuine replacement parts must be used all service and repairs must be performed by a HITACHI AUTHORIZED SERVICE CENTER ONLY ...

Страница 30: ...30 ...

Страница 31: ...31 ...

Страница 32: ...dence dans la section SECURITE de ce mode d emploi et dans les sections qui contiennent les instructions de fonctionnement et d entretien Les dangers qui doivent être évités pour prévenir des blessures corporelles ou un endommagement de la machine sont identifiés par AVERTISSEMENTS sur l outil motorisé et dans ce mode d emploi NE JAMAIS utiliser cet outil motorisé d une manière qui n est pas spéci...

Страница 33: ...il est utilisé avec une autre batterie 2 Utiliser l outil motorisé à batterie exclusivement avec la batterie spécialement conçue L utilisation de toute autre batterie peut présenter un risque de feu 3 Sécurité personnelle 1 Rester sur ses gardes regarder ce que l on fait et utiliser son sens commun lors de l utilisation d un outil motorisé Ne pas utiliser un outil en état de fatigue ou sous l infl...

Страница 34: ...imentées Les outils sont dangereux dans les mains de personnes inexpérimentées 6 Lorsqu on ne se sert pas de la batterie l éloigner des objets métalliques par exemple trombones pièces de monnaie clous vis ou petits objets métalliques qui peuvent créer une connexion entre deux bornes Le fait de court circuiter les bornes entre elles peut provoquer des étincelles des brulûres ou un feu 7 Conserver l...

Страница 35: ...mme les coupes de poche et les coupes composées Relever la protectioninférieureaveclapoignéederétraction Dèsquelalameentreencontactavec le matériau relâcher la protection inférieure Pour toutes les autres opérations de coupe laisser la protection inférieure fonctionner automatiquement 5 Toujours s assurer que la protection inférieure recouvre la lame avant de poser la scie sur un établi ou sur le ...

Страница 36: ...a lame remonte du plateau de découpe et qu elle saute vers l arrière c est à dire vers l opérateur Le retour de lame est le résultat d une mauvaise utilisation et ou d une procédure ou d une opération de coupe incorrectes on pourra l éviter en prenant les précautions suivantes 䡬 Tenir la scie fermement et placer le corps et le bras de façon à pouvoir résister aux forces du RETOUR DE LAME S il pren...

Страница 37: ...és à fond avant la coupe Si le réglage de la lame change pendant la coupe cela provoquera un voilage de lame et un RETOUR DE LAME 䡬 Faire particulièrement attention lors d une coupedepoche dansunmurexistantoutout autre endroit aveugle La lame pourrait couper des objets ce qui risque de provoquer un RETOUR DE LAME NEJAMAISpasserlamainoulesdoigtsderrière la scie S il se produit un retour de lame la ...

Страница 38: ...ès la coupe A titre d exemple la Fig 5 montre la façon CORRECTE de couper l extrémité de la planche et la Fig 6 montre la façon INCORRECTE Si la pièce est courte ou petite la serrer NE PAS ESSAYER DE TENIR LES SECTIONS COURTES À LA MAIN Fig 5 Fig 6 14 Ne jamais tenter de scier avec la scie circulaire dirigée vers le bas dans un étau Ceci serait extrêmement dangereux et pourrait entraîner de graves...

Страница 39: ... symboles V volts courant continu no vitesse à vide min rotations ou mouvements de va et vient par minute 21 Maintenir toutes les vis tous les boulons et les couvercles fermement en place Maintenir toutes les vis tous les boulons et les couvercles fermement montés Vérifier leurs conditions périodiquement 22 Ne pas utiliser les outils motorisés si le revêtement de plastique ou la poignée est fendu ...

Страница 40: ...e autre partie du corps de la lame de scie pendant le fonctionnement Tenir la scie circulaire uniquement par sa poignée 5 La scie circulaire fonctionnant sur batterie bien savoir qu elle peut se déclencher à tout moment 6 Toujours porter des lunettes de protection et des protection anti bruit 7 Lors d un travail en hauteur évacuer tout le monde de l aire de travail et vérifier ce qu il y a en dess...

Страница 41: ...r le cordon du chargeur en tirant sur la fiche 7 Vérifier que le cordon est placé de façon que personne ne puisse marcher dessus se prendre les pieds dedans ni l endommager ou le soumettre à des contraintes 8 Nepasutiliserdecordonderallongesicelan estpasabsolumentnécessaire L utilisation d un cordon de rallonge incorrect pourrait entraîner un feu ou une décharge électrique Si l on doit utiliser un...

Страница 42: ...odèle UC 24YF bien lire attentivement toutes les consignes et les avertissements signalés sur le chargeur sur la batterie ou dans ce manuel BIEN NOTER UTILISER EXCLUSIVEMENT DES BATTERIES HITACHI DE EB2420 LES AUTRESTYPESDEBATTERIEPOURRAIENTEXPLOSEROUPROVOQUERDESBLESSURES Pour éviter tout risque de blessure observer les consignes suivantes AVERTISSEMENT Une utilisation incorrecte de la batterie ou...

Страница 43: ...URS alimenter le chargeur sur une prise secteur domestique standard 120 volts L utilisation du chargeur à une autre tension peut entraîner une surchauffe et endommager le chargeur 13 TOUJOURS attendre au moins 15 minutes entre deux recharges pour éviter toute surchauffe du chargeur 14 TOUJOURS débrancher le cordon d alimentation de la prise secteur lorsqu on ne se sert pas du chargeur CONSERVER CE...

Страница 44: ...i entreprendre une révision de l outil sans avoir d abord lu et compris toutes les instructions de sécurité contenues dans ce manuel Certaines illustrations dans ce mode d emploi peuvent montrer des détails ou des accessoires différents de ceux de l outil motorisé utilisé Plaque signalétique Taquet Orifice de prise Verrouillage d interrupteur Batterie Plaque signalétique Boulon à bride hexagonale ...

Страница 45: ...ron 1000 Ampoule 24V 5W Poids 11 0 lbs 5 0 kg 2 Chargeur de batterie UC 24YFB Fig 9 2 Chargeur de batterie UC 24YFB SPECIFICATIONS 1 Scie Circulaire à batterie C7D Source d alimentation d entrée Monophasée CA 120 V 60 Hz Durée de recharge Environ 50 min à une température de 68 F 20 C Chargeur Tension de charge CC 24 V Courant de charge CC 2 5 A Poids avec batterie 1 3 lbs 0 6 kg Lampe témoin Plaqu...

Страница 46: ...ôté de la batterie Fig 10 MÉTHODE DE RECHARGE REMARQUE Avant de brancher le chargeur dans la prise vérifier les points suivants 䡬 La tension de la source d alimentation est indiquée sur la plaque signalétique 䡬 Le cordon n est pas endommagé AVERTISSEMENT Ne pas effectuer de recharge à une tension supérieure à la tension indiquée sur la plaque signalétique Cela brûlerait le chargeur 1 Brancher la f...

Страница 47: ...tterie rechargeable La température admissible des batteries rechargeables est indiquée dans le tableau ci dessous et les batteries qui ont chauffé devront être laissées à refroidir pendant quelque temps avant de pouvoir être rechargées Tableau 2 Indications de la lampe témoin Avant la recharge Pendant la recharge Recharge terminée Recharge impossible Recharge impossible Clignote ROUGE S allume ROU...

Страница 48: ...ue d être très faible lors des première et deuxième utilisations Ce phénomène est temporaire et le temps de recharge normal sera rétabli quand les batteries auront été rechargées 2 ou 3 fois Comment prolonger la durée de vie des batteries 䡬 Recharger les batteries avant qu elles ne soient complètement épuisées Quand la puissance de l outil utilisé faiblit l éteindre et recharger la batterie Si l o...

Страница 49: ...tre Vérifier qu il est bien serré avec la clé à douille fournie Pour les détails voir la section MONTAGE ET DÉMONTAGE DE LA LAME DE SCIE page 54 3 Vérifier si le levier de serrage est bien vissé Si le levier de serrage qui permet de régler la profondeur de coupe Fig 13 est mal vissé il y a risque de blessure Bien vérifier qu il est vissé à fond 4 Vérifier le bon fonctionnement du carter de sécurit...

Страница 50: ...tériau sur un établi en bois pour effectuer la coupe Si l on utilise un bloc carrécommeétablidetravail sélectionner un sol de niveau pour bien stabiliser le travail Un établi de travail instable risque de rendre le travail dangereux ATTENTION Pour éviter tout risque d accident toujours s assurer que la section du matériau qui reste après la coupe est solidement ancrée ou maintenue en place RÉGLAGE...

Страница 51: ...déplaçantleguideverslagauche ou vers la droite après avoir desserré son boulon à oreilles Le guide peut être placé sur la droite ou sur la gauche de l outil UTILISATION AVERTISSEMENT Ne jamais toucher les pièces mobiles Ne jamais faire fonctionner la scie circulaire avec la lame de scie orientée vers le haut ou sur le côté Ne pas fixer ni attacher le verrouillage de l interrupteur Par ailleurs ret...

Страница 52: ... et la lampe reste allumée même si l on retire la main du verrouillage d interrupteur tant que l on continue à tirer sur la gâchette 3 Si l on relâche la gâchette l interrupteur se coupe et le verrouillage d interrupteur revient automatiquement à sa position d origine et la lampe s éteint REMARQUE Lorsque la scie est posée alors qu elle est pourvue de la batterie il se peut selon l orientation de ...

Страница 53: ... n entre en contact avec le bois L interrupteur se déclenche ON quand on appuie sur la gâchette et il se coupe quand on relâche la gâchette 3 Déplacer la scie en ligne droite et à vitesse constante pour obtenir le meilleur rendement de coupe possible ATTENTION Avant de mettre la scie en marche bien s assurer que la lame de scie a atteint sa vitesse de régime Si la lame de scie s arrête ou qu elle ...

Страница 54: ...nie on risque d obtenir un serrage excessif ou insuffisant ce qui pourrait provoquer des blessures 䡬 Procéder dans l ordre inverse de la méthode de montage REMARQUE 䢇 Bien retirer toute la sciure qui s est accumulée sur l arbre le boulon et les rondelles 䢇 Pour garantir un sens de rotation correct de la lame de scie le sens de la flèche de la lame de scie doit correspondre à celui du carter de la ...

Страница 55: ... de la section concave du logement puis sortir le couvercle de lampe en tirant dessus dans le sens de la flèche comme indiqué à la Fig 22 2 Appuyez sur le dos de la douille et retirer la douille et l ampoule en même temps du logement Fig 23 3 Retirer l ampoule de la douille Fig 24 2 Fixation de l ampoule Procéder dans l ordre inverse de la méthode de montage REMARQUE 䢇 Pour fixer l ampoule dans la...

Страница 56: ...ances et entretien du carter de protection Maintenirlecarterdeprotectionenbonétatpourgarantirconstammentdesperformances régulières Faire immédiatement réparer l outil en cas de mauvais fonctionnement 4 Contrôle des balais en carbone Fig 25 Le moteur utilise des balais en carbone qui sont des pièces qui s usent Comme un balai en carbone trop usé peut détériorer le moteur remplacer les balais en car...

Страница 57: ...ame de scie en vue de la perpendicularité L angle formé par le socle et la lame de scie a été réglé en usine sur 90 si cette perpendicularitésetrouveperturbéepour une raison ou pour une autre la régler en procédant comme suit 1 Retourner le socle Fig 29 et desserrer le boulon à oreilles A 2 Placer une équerre entre le socle et la lame de scie et déplacer la position du socleentournantlavisdefixati...

Страница 58: ...énagères Vérifier auprès de son service de ramassage d ordures les options de recyclage et la procédure correcte de mise au rebut 9 Rangement Ranger dans un lieu dont la température est inférieure à 104 F 40 C et hors de portée des enfants 10 Entretien et réparation Tous les outils motorisés de qualité auront éventuellement besoin d une réparation ou du remplacement d une pièce à cause de l usure ...

Страница 59: ...59 ...

Страница 60: ...60 ...

Страница 61: ...ásicas de seguridad se describen en la sección SEGURIDAD de este Manual de instrucciones y en las secciones que contienen las instrucciones de operación y mantenimiento Para evitar lesiones o el daño de la herramienta eléctrica los riesgos están identificados con ADVERTENCIAS en dicha herramienta y en este Manual de instrucciones No utilice NUNCA esta herramienta eléctrica de ninguna forma que no ...

Страница 62: ...e con la batería específicamente diseñada para ella La utilización de otras baterías podría crear el riesgo de incendios 3 Seguridad personal 1 Esté siempre alerta y utilice el sentido común cuando utilice la herramienta eléctrica No utilice la herramienta cuando esté cansado o bajo la influencia de medicamentos ni de alcohol Un descuido al utilizar la herramienta eléctrica puede resultar en una l...

Страница 63: ...uando no vaya a utilizar la batería guárdela alejada de objetos metálicos sujetapapeles monedas llaves puntas y demás objetos metálicos pequeños que puedan cortocircuitar los terminales El cortocircuito de los terminales podría crear el riesgo de incendios 7 Realiceelmantenimientocuidadosodelasherramientas Mantengalasherramientas afiladas y limpias Las herramientas adecuadamente mantenidas con los...

Страница 64: ... inferior antes de cada uso Si el protector inferior no se mueve con libertad o no se cierra instantáneamente no utilice la sierra No fije ni sujete nunca el protector inferior en la posición de abierto Si la sierra se cayese accidentalmente el protector inferior podría doblarse Levante el protector inferior con el asa retráctil y cerciórese de que se mueva libremente y no toque la cuchilla ni otr...

Страница 65: ...es el resultado de la mala utilización y o de los procedimientos de operación incorrectos o las malas condiciones y puede evitarse si el operador tiene en cuentas las precauciones siguientes 䡬 Sujete firmemente la sierra y coloque su cuerpo y brazos de forma que pueda resistir la fuerza del CONTRAGOLPE El operador podrá resistir la fuerza del CONTRAGOLPE si toma las precauciones apropiadas 䡬 Cuand...

Страница 66: ...desplazase durante el corte podría producirse el agarrotamiento y el CONTRAGOLPE 䡬 Presteespecialatencióncuandorealice Cortes de cavidades en paredes existentes o en otros lugaresciegos Lacuchillapodríacortarobjetos que podrían producir el CONTRAGOLPE No coloque nunca su mano o dedos detrás de la sierra Si se produce el contragolpe la sierra podría saltar hacia atrás sobre su mano y producir lesio...

Страница 67: ...e nunca sus manos dedos ni demás partes del cuerpo cerca de las piezas móviles de la herramienta 16 No utilice nunca la herramienta sin los protectores colocados en su lugar No utilice nunca esta herramienta sin los protectores de seguridad correctamente instalados Si el trabajo de mantenimiento o de reparación requiere el desmontaje de un protector de seguridad cerciórese de volver a instalarlo a...

Страница 68: ... Silaherramientaparecequefuncionaanormalmente produciendoruidosextraños etc deje inmediatamente de utilizarla y solicite su arreglo a un centro de reparaciones autorizado por Hitachi 25 Maneje con cuidado las herramientas eléctricas Siunaherramientaeléctricasehacaídoohachocadoinadvertidamentecontramateriales duros es posible que se haya deformado rajado o dañado 26 No limpie las partes de plástico...

Страница 69: ...las condiciones del lugar situado debajo de usted 8 Para evitar la pérdida de control lo que podría causar lesiones es muy importante inmovilizar adecuadamente la pieza de trabajo y sujetar firmemente la sierra 9 Protéjasecontraelcontragolpe Elcontragolpeocurrecuandolasierrasepararápidamente y retrocede hacia el operador Si la hoja de sierra se atasca o la sierra se para suelte inmediatamente el g...

Страница 70: ...dios en descargas eléctricas o en lesiones 6 Para reducir el riesgo de dañar el cable y el enchufe para desconectar el cable del cargador de baterías tire del enchufe 7 Cerciórese de que el cable quede situado donde no pueda pisarse donde nadie pueda tropezar con él y donde no pueda recibir daños 8 A menos que sea absolutamente necesario no deberá utilizarse un cable prolongador La utilización de ...

Страница 71: ...EGURIDAD PARA LA BATERÍA Y EL CARGADOR DE BATERÍAS Usted deberá cargar la batería antes de utilizar el atornilladores de percusion inalámbrico Antes de utilizar el cargador de baterías modelo UC 24YF cerciórese de leer todas las instrucciones y precauciones del mismo de la batería y de este manual RECUERDE UTILICE SOLAMENTE BATERÍAS HITACHI DEL TIPO DE EB2420 LOS DEMÁS TIPOS DE BATERÍAS PODRÍAN EX...

Страница 72: ...RE utilice el cargador con un tomacorriente 120 voltios La utilización de un cargador con cualquier otra tensión podría hacer que éste se recalentase y dañase 13 SIEMPRE espere 15 minutos por lo menos entre las cargas para evitar que el cargador se recaliente 14 SIEMPRE desconecte el cable de alimentación del tomacorriente cuando no vaya a utilizar el cargador GUARDE ESTAS INSTRUCCIONES Y PÓNGALAS...

Страница 73: ...este manual Algunas ilustraciones de este Manual de Instrucciones pueden mostrar detalles o accesorios diferentes a los de la propia herramienta eléctrica MODELO C7D BFK con cargador y caja NOMENCLATURA 1 Sierra circular a batería C7D 䡬 Batería EB2420 Fig 8 Seguro del interruptor Batería Place de características Base Hoja de sierra Perno de cabeza hexagonal Cubierta protectora Protector inferior P...

Страница 74: ...C24V Frecuencia de carga y descarga aprox 1000 Lámpara 24V 5W Peso 11 0 lbs 5 0 kg Fuente de alimentación de entrada Monofásica 120 V CA 60 Hz Tiempo de carga Aprox 50 min A una temperatura de 68 F 20 C Cargador Tensión de carga 24 V CC Corriente de carga 2 5 A CC Peso 1 3 libras 0 6 kg ESPECIFICACIONES 1 Sierra circular a batería C7D 2 Cargador de baterías UC 24YFB Lámpara piloto Place de caracte...

Страница 75: ...OTA Antes de enchufar el cargador en un tomacorriente tenga en cuenta los puntos siguientes 䡬 La tensión de la fuente de alimentación está indicada en la placa de características 䡬 El cable no deberá estar dañado ADVERTENCIA No cargue con una tensión superior a la indicada en la placa de características Si cargase con una tensión superior a la indicada en la placa de características el cargador se...

Страница 76: ...ya cargado completamente la lámpara parpadeará lentamente en rojo A intervalos de 1 segundo Consulte la Tabla 2 Tabla 2 Indicaciones de la lámpara piloto Se encenderá durante 0 5 segundos No se encenderá durante 0 5 segundos Apagada durante 0 5 segundos Iluminación permanente Se encenderá durante 0 5 segundos No se encenderá durante 0 5 segundos Apagada durante 0 5 segundos Se encenderá durante 0 ...

Страница 77: ...a eléctrica en caso de baterías nuevas etc Comolasubstanciaquímicainternadelasbateríasnuevasolasquenosehayanutilizado durante mucho tiempo no está activada la descarga eléctrica puede ser inferior cuando se utilicen por primera y segunda vez Este fenómeno es temporal y el tiempo normal requerido para la recarga se restablecerá recargando las baterías 2 3 veces Forma de hacer que las baterías duren...

Страница 78: ...ad para utilizarse inmediatamente al ensamblarse en la fábrica por motivos de seguridad compruébela Los pernos con arandela podrán apretarse girándolos hacia la derecha Para la comprobación utilice la llave de cubo suministrada Para más detalles consulte MONTAJE Y DESMONTAJE DE LA HOJA DE SIERRA de la página 83 3 Compruebe que la palanca de fijación esté apretada Si la palanca de fijación de ajust...

Страница 79: ...deradetrabajo coloque ésta sobre un banco de trabajo para cortarla Si como banco de trabajo utiliza un madero cuadrangular tenga en cuenta el nivel del suelo para asegurar que quede adecuadamente estabilizado Un banco de trabajo inestable resultaría en una operación peligrosa PRECAUCIÓN Paraevitaraccidentes asegúresesiempre dequelapartedemaderaquededespués del corte esté firmemente fijada AJUSTE D...

Страница 80: ...ierra con un transportador etc 3 Regulación de la guía Guía de corte Fig 16 Accesorio opcional La posición de corte podrá regularse moviendo la guía hacia la izquierda o la derecha después de haber aflojado el perno de mariposa La guía podrá montarse en la parte derecha o izquierda de la herramienta OPERACIÓN ADVERTENCIA No toque nunca las partes móviles No utilice nunca la sierra circular con la ...

Страница 81: ... tira del interruptor de bloqueo en estado de bloqueo se encenderá la lámpara de iluminación 2 Después de haber bloqueado el interruptor aunque suelte el dedo del mismo la hoja de sierra continuará funcionando y la lámpara seguirá encendida mientras mantenga presionado el gatillo interruptor 3 Si libera el gatillo interruptor el interruptor se desconectará OFF y el seguro del interruptor volverá a...

Страница 82: ...to con la madera El interruptor se cerrará ON cuando apriete el gatillo interruptor y se abrirá OFF cuando lo suelte 3 Si mueve la sierra recta a velocidad constante podrá realizar el corte óptimo PRECAUCIÓN Antes de comenzar a serrar cerciórese de que la hoja de sierra haya alcanzado las revoluciones de la velocidad máxima Si la hoja de sierra se para o produce algún ruido anormal durante la oper...

Страница 83: ...as utilizando herramientas que no sean la llavedecubosuministrada éstospodrían quedar demasiado apretados o flojos lo que resultaría en lesiones 䡬 Realice los procedimientos contrarios a los de desmontaje NOTA Limpie perfectamente el serrín etc que se haya acumulado en el eje los pernos y las arandelas Para asegurar el sentido apropiado de giro de la hoja de sierra el sentido de la flecha de dicha...

Страница 84: ...5 W y móntela correctamente De lo contrario la lámpara podría desprender y o recalentarse 1 Extracción de la lámpara 1 Extraiga la parte convexa de la cubierta de la lámpara de la parte cóncava de la carcasa ydespuéstiredelacubiertadela lámpara en el sentido indicado por la flecha como se muestra en la Fig 22 2 Presione la parte posterior del casquillo y extraiga juntos éste y la lámpara de la car...

Страница 85: ...ando fije el casquillo a la carcasa alinéelo con el orificio de ésta observando la parte posterior del casquillo como se muestra en la Fig 23 e inserte el casquillo hasta que choque ligeramente contra dicha carcasa ...

Страница 86: ... Comprobación del funcionamiento y mantenimiento de la cubierta protectora Mantenga la cubierta protectora en buenas condiciones para que funcione bien en todo momento En caso de mal funcionamiento repárela inmediatamente 4 Inspeccióndelasescobillasdecarbón Fig 25 El motor emplea escobillas de carbón que son piezas consumibles Como una escobilla excesivamente desgastada podría dar problemas al mot...

Страница 87: ...ja de sierra para mantener la perpendicularidad El ángulo entre la base y la hoja de sierra ha sido ajustado a 90 Sin embargo si esta perpendicularidad se pierde por cualquier razón ajústela de la forma siguiente 1 Gire la cara de la base hacia arriba Fig 29 y afloje el perno de orejetas A 2 Aplique una escuadra a la base y la hoja de sierra y girando el tornillo de sujeción ranurado con un destor...

Страница 88: ...de reciclado o de la forma de deshacerse apropiadamente de la batería 9 Almacenamiento Guarde la herramienta en un lugar con menos de 104 F 40 C y fuera del alcance de niños 10 Mantenimiento y reparación Todas las herramientas eléctricas de calidad requieren de vez en cuando el servicio de mantenimiento o el reemplazo de piezas debido al desgaste producido durante la utilización normal Para asegur...

Страница 89: ...89 ...

Страница 90: ...90 ...

Страница 91: ...Español 91 ...

Страница 92: ...atuit ou UN SERVICE APRES VENTE D OUTILS ELECTRIQUE AGREE PAR HITACHI Con respecto a la RECOLECCIÓN de baterías póngase en contacto con HITACHI KOKI U S A LTD número 1 800 59 TOOLS llamada gratis o con HITACHI AUTORIZED POWER TOOL SERVICE CENTER Issued by Shinagawa Intercity Tower A 15 1 Konan 2 chome Minato ku Tokyo 108 6020 Japan Distributed by 3950 Steve Reynolds Blvd Norcross GA 30093 Hitachi ...

Отзывы: