background image

Содержание AJ-CE series

Страница 1: ...CE AJH CE Series Operation Manual A3 Zoo os IMPORTANT To ensure safe and proper use of the balance please read this manual carefully After reading this manual store it in a safe place near the balance so you can review it as needed V VlBRA SHINKO DENSHI CO LTD ...

Страница 2: ...ay provides excellent visibility and the instrument s high speed and stability intrinsic to a tuning fork design help boost operational efficiency Moreover balances with a built in calibration weight AJH CE Series can be calibrated by simply turning the calibration knob Before using the balance please check that the following items have been included in the package Should you find any missing part...

Страница 3: ...ilway or road with heavy traffic should also be avoided as much as practicable Avoid choosing a location subject to a direct draft of airflow from an air conditioning unit or exposed to direct sunlight which may cause abrupt fluctuations in temperature Also avoid a room subject to a heavy flow of people since fluctuations in drafts and temperature are likely to occur in such a location The gravity...

Страница 4: ...enance The balance is supplied with a transparent dust cover The dust cover may be statically charged immediately after removal from the packing box or under low humidity conditions Unstable indications by the balance may be due to statically charged dust cover In such case wipe the dust cover with a damp cloth or use a commercial antistatic agent Otherwise simply operate the balance with the dust...

Страница 5: ... 8 1 Limit Function Setup cont 23 8 2 Setup of Limit Values by Actual Quantity Loads 24 8 3 Setting up Limit Values by Inputting Values 25 8 3 Setting up Limit Values by Inputting Values cont 26 9 Calibrating the Balance 27 9 1 Calibration of AJ CE Series 27 9 2 Calibration of AJH CE Series 29 9 3 GLP compliant print 31 10 Input output functions 32 10 1 Terminal Numbers and Functions 32 10 2 Conne...

Страница 6: ...This term indicates steps that the user should take to ensure the quality and reliability of the balance Meanings of Symbols Each symbol is accompanied by an instruction o Mandatory Symbol s Prohibitive Symbol Indicates a mandatory action that should be executed without fail Indicates a prohibited action that must not be executed O Check Level 0 Do not Use CAUTION Do Not Disassemble Do not disasse...

Страница 7: ...ic shock Keep Dry Do not use the balance in a location were it may be subjected to excess moisture Electric shock or short circuiting could occur The balance may be corroded with resultant malfunction Do Not Leave Afloat Do not use the balance with its adjusters lifted The balance will become unstable preventing accurate measurement V Avoid Dust Do not use the balance in a location where it may be...

Страница 8: ... increase in the balance may lead to inaccurate measurement Unplug Adapter If the balance is to be unused for an extended period of time unplug the adapter This conserves power and prevents deterioration 0 Do Not Use Do not use volatile solvents for cleaning The body may be distorted To clean the unit of stains use a piece of dry cloth or cloth soaked in a small quantity of neutral detergent 0 Do ...

Страница 9: ...the balance Turn the adjusters until the bubble rests in the center of the red circle Liquid crystal display LCD See page 6 Front View round pan type Operation keys See page 7 Measurement pan Adjusters Round pan type Total of two one on either side of the unit s front Square pan type Total of four one on either side at front and rear RS232C connector AC adapter connector Calibration knob AJH 220CE...

Страница 10: ...LO when the limit function is active Momme Display of setvalues from memory If a value is flashing it is being saved Stays on andflashes while span adjustment is in progress Auxiliary scale interval Lights up only when the auxiliary scale interval is displayed Bar graph Ct ctj carat O2 oz ounce ib lib pound O2 t ozt troy ounce GII v t dwt penny weight Upper right grain fc J tl tael Hong Kong t Upp...

Страница 11: ...mit function Function key Brief press Brief press Brief press Continuous press Longer continuous press toggle switches the units to be displayed in succession g Pcs etc moves the flashing digit in the setup of a limit value when using the value input method selects an item when setting the function invokes various functions invokes span adjustment Zero Tare key Brief press Brief press Brief press ...

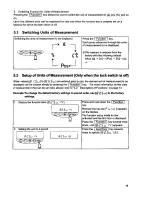
Страница 12: ...til the bubble rests in the center of the red circle on the level Round pan type total of two adjusters one on either side at front Square pan type total of four adjusters one on either side at front and rear Caution Use caution when operating the adjusters on the square pan type to prevent them from lifting up 3 Connecting the AC adapter Connect the AC adapter to the balance as illustrated at lef...

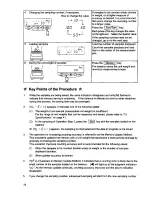
Страница 13: ...lit parts A few seconds after startup the indication is reset to zero 3 Switching the measurement mode 0 0 0Qg 0 00 C 3 Press the Function key Each time the key is pressed the unit of measurement changes as indicated balance is shipped from the factory with the following switching sequence g ct Pcs M a Pcs 4 Verifying changes in the read out indicator Press the measurement pan lightly and make sur...

Страница 14: ... now indicate only the weight of the sample loaded in the tare fr Weighing only the weight of an added sample 4 Resetting the indication to zero T 0 I I F Press the Zero Tare key The total weight of the sample loaded on the measurement pan is indicated as zero 5 Adding samples to be measured O T o I I r The balance indicates only the weight of an added sample When the weight of a sample currently ...

Страница 15: ... being affected by wind or other vibrations Use the windshield or vibration dampers to protect against such adverse effects I I F 0 I I F Unstable Stable 4 When the read out indicator is reset to zero or the tare is subtracted the balance indicates zero this way 0 If the tare is subtracted the indicator reads as follows T T is effective only when the lock switch is off 0 I I I F If the indication ...

Страница 16: ... Selecting the next item B 5EL 0 Press the Function key The indication changes to the next item 5 E L 0 Limit function 3 Selecting an item Pressing the Function key 3 Rl advances the function items at the rate of one item per press 4 Changing the content of an item Select the item to be changed with the I Function key Each press of the Zero Tare key changes the digit on the right end Select the de...

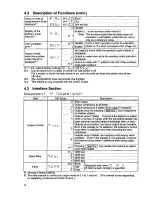
Страница 17: ...graduation is judged ranges 5 graduation or below including negative ranges are not judged The entire range is judged the entire range including the negative is judged One point setup Qudges between OK and LO Upper limit and lower limit values are set up Qudges among HI OK and LO Disable Enable This function automatically sets the zero point exactly to zero to prevent slight deviations Disable bal...

Страница 18: ...ion This setting is only available with the AJH E Series 4 3 Interface Section Displayed when i E 3 is set to or c Item Output Control Baud Rate Parity Set Value 1 O C 13 b L r l3 PR n u i i a 3 S s s a 3 1 3 Description Stop output Output continuous at all times Output continuous if stable stop output if unstable Outputs of wheth once by pressing I Memory key irrespective er stable Outputs once i...

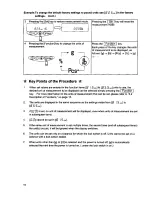
Страница 19: ...nly when the lock switch is off When values 8 1 5 u to 8 5 5 u are entered prior to use the desired unit of measurement to be displayed can be chosen simply by pressing the Function key For more information on the units of measurement that can be set here please refer to 4 2 Description of Functions on page 13 Example To change the default factory settings to pound units use BE S u in the factory ...

Страница 20: ...on key For more information on the units of measurement that can be set please refer to 4 2 Description of Functions on page 13 2 The units are displayed in the same sequence as the settings made from 8 1 5 u to 8S 5 U 3 If 0u is set no unit of measurement will be displayed even when units of measurement are set in subsequent items 4 0 0 cannot be set in 8 l 5 u 5 If the same unit of measurement i...

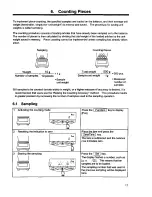
Страница 21: ...eight _ 500 g Sample unit weight 1g Sample unit weight 500 pcs Measured number of samples JKIf samples to be counted deviate widely in weight or a higher measure of accuracy is desired it is recommended that users use the Raising the Counting Accuracy method This procedure results in greater precision by increasing the number of samples used in the sampling operation 6 1 Sampling 1 Activating the ...

Страница 22: ... the following states 1 The weight of one sample measurable unit weight is insufficient For the range of unit weights that can be measured and saved please refer to 13 Specifications on page 41 2 In the sampling of Operation Step 3 press the Set key with the samples loaded on the balance S If L Err appears the sampling is interrupted and the data in progress is not saved 3 The operation for increa...

Страница 23: ...ng samples O I D Add approximately an equal number of samples as the number currently displayed Add them gradually in groups of approximately the same number until the number of samples is approximately double The additional samples need not be counted 4 Saving the samples 20 pieces saved Press the Set key After the unit weight of the samples has been saved the display begins to flash indicating t...

Страница 24: ...ode Press the Function key to disaplay 2 Setting the reference value I I i P 5 Eh i i i 1 Press the Set key The display begins flashing P 5 E t The balance is now ready for reference value setup D 3 Loading the sample Load the reference sample P SEh i 4 Saving the reference value i r n t i I I o i u u u u I Press the Memory key The balance indexes the weight value of the reference sample as 100 an...

Страница 25: ... 1 The weight of the reference sample is insufficient For the limit weight that can be saved limit weight please refer to 13 Specifications on page41 2 While setting up the reference value in Step 2 the Set key has been pressed while the samples were loaded on the balance Klf _ E r r appears sampling has been interrupted and the sample value being processed will not be saved 3 The minimum interval...

Страница 26: ...lue 2 Numeric value setup method The limit value is entered with a key stroke SKThe limit values entered are held in memory even when the balance is powered down The respective limit values for weight mode counting mode and percentage mode are set up independently Indication of judgement result The M mark lights up as either HI OK or LO on the left side of the display indicating the result of judg...

Страница 27: ... select the desired condition Judged at all times Judged when stable 5 Setting the judgement range aa L aa L u Judge entire range Press the Function key The display changes to Judgement Range Press the I Zero Tare l key to select the desired choice Judge beyond 5 6 Setting the number of judgement points Press the Function key The display changes to Judgement Points Press the Zero Tare key to selec...

Страница 28: ...e Memory key After the lower limit value has been saved the balance displays it briefly and proceeds to the following setup i lf One point setup was chosen the setup is complete 4 The upper limit value setup H SEt M anoo The display now changes to K SEt indicating that the upper limit value can be set The currently set upper limit value flashes 5 Loading the sample of the upper limit value I n n n...

Страница 29: ...he Function key The flashing moves to the digit on the immediate left Each time the key is pressed the flashing digit moves one position left When the leftmost digit is selected the flashing advances to the rightmost digit position 5 Repeat Steps 3 and 4 I Enter the lower limit value by selecting a value with the Zero Tare key and moving the digits with the Function key as needed 1 6 Saving the lo...

Страница 30: ... Continuous pressing J x I Upper limit value displayed 1000s Lower limit value displayed Measurement mode restored 2 If you make a mistake press the Function key during the setup of actual quantities or the 1 Set 1key during the setup of values If you press the Memory key while a value is flashing an actual quantity will be set based on the weight currently loaded on the balance Pressing the j Zer...

Страница 31: ...n the lock switch is off Span adjustment should be performed with the balance installed perfectly level and without any load on the measurement pan 1 Activating the span adjustment function F u n c CRL Key released Pressed continuously Press and hold down the Function key Release the key when the display changes from F a n c to L FtL 2 Starting the span adjustment Press the Function key while hold...

Страница 32: ...capacity of the balance To implement a calibration as precisely as possible use a weight close to the capacity of the balance Calibration weights can be ordered from Shinko For ordering information please contact Shinko 3 If problems arise during span adjustments one or more of the following error messages will appear 1 o E r r The calibration weight exceeds the capacity of the balance 2 i E r r T...

Страница 33: ...t the same time Press the Function key while holding down the Zero Tare key then release both fingers simultaneously Display will change to a flashing C R L u and the zero point will be calibrated automatically 3 Zero point calibration CRL CAL I N Once zero point calibration is completed display switches to C R L o n Calibration now proceeds to that of the weighing capacity point _ n _ GAL 4 Calib...

Страница 34: ...ill be displayed when power is turned on with the knob in the Calibration position or when set to the Calibration position during measurement Wind or vibration affecting the balance may result in the process not proceeding beyond the flashing display of 0 FtL D Always use windscreen and stable vibration free bench 5 Should the balance display 3 E r r at the end of zero point adjustment in Step 2 t...

Страница 35: ...Functions Page 13 9 2 Calibration of AJH CE Series Page 29 GLP Compliant Print Form CALIBRATION MODEL S N ID DATE TIME CAL END NAME Title Model of balance Serial No of balance ID No Date of calibration Time of calibration End of calibration Signature ofperson in charge JKWhen theCSP 16 0 is connected forprinting setthedipswitch No 3 ON control by scale and No 7 OFF manual printingoff For more info...

Страница 36: ...CP 0556 01 0201 Hoshiden supplied with balance 1 RS232C connector DIN 5 pin Rear panel STare subtraction zero adjustment is possible by connecting an external tare subtraction input and a signal ground through contacts or a transistor switch When following this procedure secure a connection time of at least 400 milliseconds When the switch is off the voltage maximum is 15 V when the switch is on t...

Страница 37: ... with an IBM PC AT compatible RXD TXD GND IBM PC AT compatible D SUB9P TXD RXD GND DCD RTS CTS DSR DTR 3 2 5 1 7 8 6 4 4 Balance DIN5P 3 4 5 Sample connection with PC9801 TXD RXD GND DCD RTS CTS DSR DTR PC9801 D SUB25P 2 3 7 8 4 5 6 20 4 d Balance DIN5P 3 4 5 RXD TXD GND 33 ...

Страница 38: ...zation 1200 2400 4800 9600 bps ASCII codes 8 bit Compliant with EIA RS 232C HIGH level Data logic 0 5 to 15 V LOW level Data logic 1 5 to 15 V 5 One character bit configuration Start bit 1 bit Data bit 8 bits Parity bit 0 1 bits Stop bit 2 bits 6 Parity bit none odd even Logic 1 Logic 0 LSB MSB 1 Data bit 1 Start bit Stop bit Parity bit may be omitted 34 ...

Страница 39: ... 14 CR 15 LF 3 Six digit numeric format for model provided with an auxiliary scale interval Composed of 15 characters including the terminators CR 0DH LF 0AH with 7 added to the left of the auxiliary scale interval place 1 P1 2 D1 3 D2 4 D3 5 D4 6 D5 7 D6 8 D7 9 D8 10 U1 11 U2 12 S1 13 S2 14 CR 15 LF 4 Seven digit numeric format for model provided with an auxiliary scale interval Composed of 16 ch...

Страница 40: ...and replaced with a blank space SP in the lowest order place Space zero of leading portion of value leading zero suppress Delimiter to be inserted to the left of the auxiliary scale interval place 10 4 4 Units U1 U2 two characters S All the codes are ASCII codes U1 SP c 0 l_ 0 D G T T T M t SP P U2 G T Z B T W R L _ L 0 o C Code 20H 43H 4FH 4CH 47H 54H 5AH 42H 4FH 54H 44H 47H 54H 54H 54H 4DH 74H 2...

Страница 41: ...ystem commands can be transmitted regardless of their data transmission timing 2 When the balance has executed the received command it activates a normal end response or transmits the requested data via the transmitting command If the balance was unable to execute the command or received an erroneous command it transmits an error end response If the balance is working properly it usually returns a...

Страница 42: ...xt time including the zero indication Outputs once if stable and outputs continuously when unstable Even if the sample is not replaced output of the balance stops when it stabilizes after being output once Pressing Memory key causes the balance to output once when stable Output once immediately Output once after stabilization output controls executed with commands OO 07 work the same as the output...

Страница 43: ...t when the power is switched on Overcharging will also decrease battery life 2 When the balance is used for the first time after purchase the operating time may be shorter than when using a fully charged battery This is due to natural discharge of the battery Although the balance can be used while OS is flashing it should be recharged as soon as possible 3 When the battery displays no indication o...

Страница 44: ...eeded the capacity of the balance weight range container weight of sample A section of the mechanism is damaged A foreign object is caught between the measuring pan pan base and the balance A section of the mechanism is damaged The balance is exposed to static electricity or noise The electrical system of the balance is malfunctioning A weight heavier than the capacity was used The reference weigh...

Страница 45: ...01 0 001 0 1 With AJH 420CE 420 0 01 0 001 0 001 0 1 AJH 620CE 620 0 01 0 001 0 001 0 1 built in weight j 118 mm Compliant with RS232C Provided Not provided Provided Battery drive 13 2 Common Specifications 1 Tare subtraction range Total capacity 2 Liquid crystal display LCD Seven segments two segments in leading part Maximum digits indication seven digits Segment height 16 5 mm 3 Calibration span...

Страница 46: ...70 0 01 0 001 6400 1 0 1 11 0 001 0 0001 11 0 001 o oob i 11 0 001 0 0001 110 0 01 0 001 36 0 001 0 0001 AJ 620CE AJH 620CE 620 0 01 0 001 3100 0 1 0 01 21 0 001 0 0001 1 3 0 0001 0 00001 19 0 001 0 0001 390 0 01 b 06i 9500 i 0 1 16 0 001 0 0001 16 0 001 0 0001 16 0 001 0 0001 160 0 01 0 001 53 0 001 0 0001 AJ 820CE 820 0 01 4100 0 05 28 0 0005 1 8 0 00005 26 0 0005 520 0 01 12000 b 2 21 0 0005 21...

Страница 47: ... 37500 penny weight 0 64301 0 12860 18 22917 291 66667 20 1 0 04167 24 06741 24 30556 24 11306 2 41131 7 5 unit 1g 1ct 1oz 11b 1ozt 1dwt 1GN 1tl HK 1tl SGRMal 1tl Taiwan 1mom 1to grain 15 43236 3 08647 437 5 7000 480 24 1 577 61774 583 33333 578 71344 57 87134 180 tael Hong Kong 0 02672 0 00534 0 75742 12 11874 0 83100 0 04155 0 00173 1 1 00990 1 00190 0 10019 0 31162 tael Singapore Malaysia 0 026...

Отзывы: