background image

- 18 -

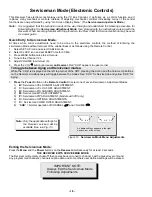
Serviceman Mode (Electronic Controls)

This Receiver has electronic technology using the I²C Bus Concept. It performs as a control function and it
replaces many mechanical controls. Instead of adjusting mechanical controls individually, many of the control
functions are now performed by using “On Screen Display Menu”. (The Serviceman Adjustment Mode.)

Note:  It is suggested that the technician reads all the way through and understand the following procedure for

Entering/Exiting the Serviceman Adjustment Mode; then proceed with the instructions working with the
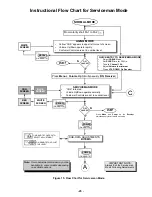
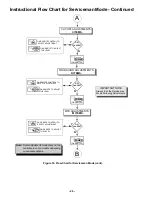
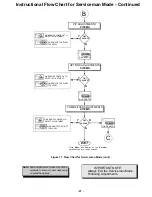
Receiver. When becoming familiar with the procedure, the Flow Chart for Serviceman Mode may be used
as a quick guide.

Quick Entry to Serviceman Mode:

At times when minor adjustments need to be done to the electronic controls, the method of Entering the
serviceman Mode without removal of the cabinet back is as follows using the Remote Control:
1.

Select SET-UP icon and select CABLE mode.

2.

Select CLOCK icon and set SLEEP time for 30 Min.

3.

Press MENU button twice to exit menus.

4.

Tune to the Channel 124.

5.

Adjust VOLUME to minimum (0).

6.

Press the VOL 

button (decrease) on Receiver. Red “CHK” appears in upper corner.

7.

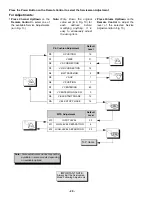
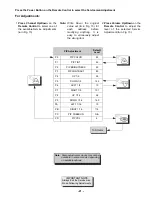
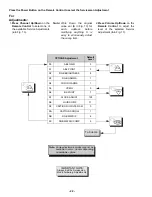
Press the Power Button on the Remote Control to select one of seven Serviceman Adjustment Modes.

       1)    B= Serviceman VCJ SUB-DATA ADJUSTEMENT.
       2)    C= Serviceman VCJ CUT-OFF ADJUSTMENT.
       3)    D= Serviceman PIN CUSHION ADJUSTMENT.
       4)    M= Serviceman MTS ADJUSTMENTS.
       5)    P= Serviceman PIP ADJUSTMENT. 

(Models with PIP only)

       6)    S= Serviceman OPTIONS ADJUSTMENTS.
       7)    X = Serviceman COMB FILTER ADJUSTMENT.
       8)    “CHK” = Normal operation of CHANNEL 

 and VOLUME 

.

Exiting the Serviceman Mode:

Press the Menu and the Power buttons on the Receiver simultaneously for at least 2 seconds.
                                        THE RECEIVER EXITS SERVICEMAN MODE.
The Receiver momentarily shuts off; then comes back on tuned to channel 3 with a preset level of sound.
Any programmed channels, channels caption data and some others user defined settings will be erased.

To toggle between Aging and Serviceman modes:

While the “CHK” is displayed on the left top corner of the CRT, pressing the Action and the Volume Up buttons
on the Receiver simultaneously will toggle between the modes. Red “CHK” for Serviceman and yellow “CHK” for
Aging.

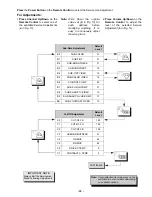
An address Menu appears in the right
hand corner of the screen

32   B   0

2    215   C   0

b

a

b

a

Note: Only the applicable settings for

the Receiver serviced will be
available (See 

a

 in Fig. 13).

Figure 13.  Serviceman Mode Menu Adjustments.

IMPORTANT NOTE:

      Always Exit the Serviceman Mode
      Following Adjustments.

Содержание 27GX01B-501

Страница 1: ...ID STATE COLOR TELEVISION SPECIFICATIONS AND PARTS ARE SUBJECT TO CHANGE FOR IMPROVEMENT JUNE 2000 HHEA MANUFACTURING DIVISION SAFETY PRECAUTIONS 2 PRODUCT SAFETY NOTICE 4 POWER SOURCE 4 SERVICE NOTES 5 SPECIFICATIONS 6 OPERATION 7 SERVICE 13 CIRCUITS AND BLOCK DIAGRAMS 32 PARTS IDENTIFICATION 36 PARTS LIST 39 This television will display television Closed Captioning or in accordance with paragrap...

Страница 2: ...ON Using an insulation tester DC500V connect one lead to the jumpered AC plug and touch the other lead to each exposed metal part antennas screwheads metal overlays control shafts etc particularly any exposed metal part having a return path to the chassis should have a minimum resistor reading of 0 24MΩ and a maximum resistor reading of 12MΩ Any resistance value below or above this range indicates...

Страница 3: ...ceman Mode 18 Toggle between Modes 18 Exiting the Serviceman Mode 18 Sub Data Adjustment 19 Cut Off Adjustment 19 Pin Cushion Adjustment 20 MTS Adjustment 20 PIP Adjustment 21 Options Adjustment 22 Comb Filter Adustment 23 To Check Purity 24 Helpful Hints 24 Instructional Flow Chart for Serviceman Mode 25 Service Adjustments Electronic Control 28 Sub Brightness 28 Sub Contrast 28 Tint Color Adjust...

Страница 4: ... Do not operate the chassis longer than is necessary to locate the cause of excessive voltage This Service Manual is intended for qualified service technicians it is not meant for the casual do it yourselfer Qualified technicians have the necessary test equipment and tools and have been trained to properly and safely repair complex products such as those covered by this manual Improperly performed...

Страница 5: ...rotect against excessive high voltage and beam current If for any reason the high voltage and beam current exceed a predetermined level this protective circuit activates and detunes the horizontal oscillator that limits the high voltage The over voltage protection circuit is not adjustable However if components indicated by the symbol on the schematic in either the horizontal sweep system or the o...

Страница 6: ...me Correction X Built in audio power 5Wx2 10 of speakers 2 A V in rear front 3 2 1 Dimensions mm HxWxD in 594 8x665 2x544 5 23 4x26 1x21 4 Weight kg lbs 38 83 6 Power source V Hz 120 60 Anode voltage 28 30kV 1 25kV Video input jack 1Vp p 75Ω phono jack Audio input jack 500mV RMS 47kΩ A Board TNP2AH017 AD C Board TNP2AA047 AP Table 1 Receiver Features Specifications are subject to change without no...

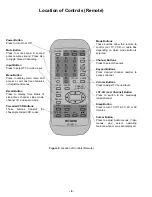
Страница 7: ... Level or to adjust Audio Menus Video Menus and select operating features when menus are displayed Channel Buttons Press to select programmed channels Press to highlight desired features when menus are displayed Menu Button Press to display Main Menu and access On Screen feature and Adjustment Menus Input Button Press to select TV or one of two Video Inputs Front AV In Jacks Front audio video and ...

Страница 8: ...enus Recall Button Press to display Time status of sleep timer channel video mode channel I D and audio mode Precoded VCR Buttons These buttons transmit the chosen precoded VCR codes REMOTE CONTROL Mode Buttons These buttons allow the remote to control your TV VCR or cable box depending on which mode button is selected Channel Buttons Press to select channels Keypad Buttons Press desired channel n...

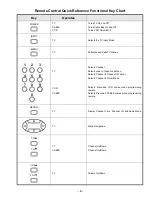
Страница 9: ...ts TV Menus TV VCR CABLE Selects Channel Selects code in Video Lock Menu Selects Channel in Channel I D Menu Selects Channel in Timer Menu Selects Precoded VCR codes when programming remote Selects Precoded CABLE codes when programming remote RECALL TV Display Channel Time Channel I D and Audio Mode TV Menu Navigation CH CH TV CABLE Channel Up Down Channel Up Down VOL p VOL q TV Volume Up Down 0 9...

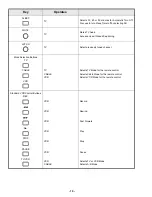
Страница 10: ...Select previously tuned channel Mode Selection Buttons TV CABLE VCR TV CABLE VCR Selects TV Mode for the remote control Selects Cable Mode for the remote control Selects VCR Mode for the remote control Standard VCR Control Buttons REC STOP PAUSE TV VCR VCR VCR VCR VCR VCR VCR VCR CABLE Record Rewind Fast Forward Play Stop Pause Selects TV or VCR Mode Selects A B Mode Key Operates ...

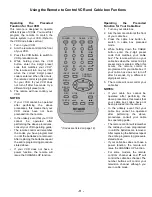
Страница 11: ...ing the Precoded Function for Your Cable Box 1 Turn on your cable box 2 Aim the remote control at the front of your cable box 3 Press the cable box button to switch to cable box precoded mode 4 While holding down the CABLE button enter the 2 digit preset code that matches your cable box The remote will turn on your cable box when the correct 2 digit preset code is entered When this occurs the remo...

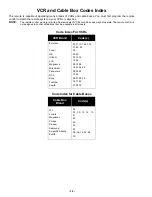
Страница 12: ...remote control is not designed to control all features that are available in all models Code Index For VCRs Code Index for Cable Boxes VCR Brand Code s Emerson Funai GE Hitachi JVC Magnavox Mitsubishi Panasonic RCA Sony Toshiba Zenith 00 01 10 16 23 33 37 40 43 00 09 22 00 14 15 14 26 09 12 28 16 23 26 45 09 35 46 15 22 06 07 08 09 16 17 42 07 08 12 Cable Box Brand Code s G I Jerrold Magnavox Phil...

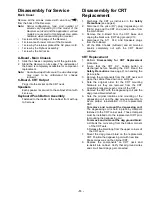
Страница 13: ...e CRT dag ground C10 4 Disconnect the A11 A12 and Speakers plugs from the A Board 5 Lift the Main Chassis A Board and all mounted boards completely out with the CRT Board attached CRT Replacement 1 Perform Disassembly for CRT Replacement procedure 2 Insure that the CRT H V Anode button is discharged before handling the CRT Read the Safety Precautions see page 2 on handling the picture tube 3 Remov...

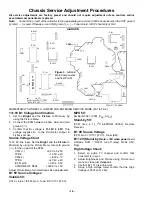
Страница 14: ... C572 5 0V 0 25V TPD9 13 0V 2V C552 8 0V 1V TPD8 27 4V 2V IC551 pin3 9 0V 0 5V CATHODE OF D554 220 0V 15V Adjust Picture Menu for normalized video adjustments B 5V Source Voltages Volatile 5V C572 side IC552 pin 3 Tuner BP IC101 IF 5V MPU 5V Emitter Q002 IC001 VDD AVDD Stand by 5V IC001 key in 1 I2 C EEPROM IC002 Remote Receiver B 9V Source Voltage IC551 pin 3 IC101 IF 9V Tuner BM B 12V Stand by N...

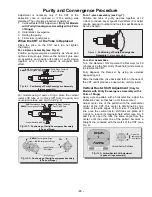
Страница 15: ...lection yoke back and forth on the neck of the CRT until it produces a near white uniform raster Vertical Raster Shift Adjustment Only for Models with Purity Convergence Assembly with 4 Pairs of Rings Apply a green pattern with a horizontal line adjust the Deflection Yoke so that has no tilt then secure it Adjust center line of the pattern with the mechanical center of the CRT this center is deter...

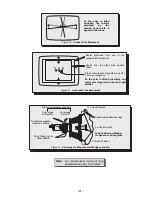
Страница 16: ...again until Purity check white screen appears Observe the screen for uniform white If purity has not been achieved repeat the above procedure Final Convergence Procedure see Fig 10 through Fig 12 Note Vertical size and focus adjustments must be completed prior to performing the convergence adjustment Connect a dot pattern generator to the Receiver The Brightness level should not be higher than nec...

Страница 17: ...s the yoke is tilted horizontally one raster gets larger while the other gets smaller Figure 11 Horizontal Yoke Movement 11 o clock Position Double sided adhesive tape 3 o clock Position 7 o clock Position Converges R B with G Converges R with B Purity Convergence Assembly Clamp Purity Rings Adj on Green Raster Static Convergence Magnets Yoke Positioning Wedges for Dynamic Convergence Figure 12 Co...

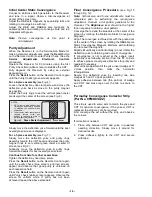
Страница 18: ...rs in upper corner 7 Press the Power Button on the Remote Control to select one of seven Serviceman Adjustment Modes 1 B Serviceman VCJ SUB DATA ADJUSTEMENT 2 C Serviceman VCJ CUT OFF ADJUSTMENT 3 D Serviceman PIN CUSHION ADJUSTMENT 4 M Serviceman MTS ADJUSTMENTS 5 P Serviceman PIP ADJUSTMENT Models with PIP only 6 S Serviceman OPTIONS ADJUSTMENTS 7 X Serviceman COMB FILTER ADJUSTMENT 8 CHK Normal...

Страница 19: ...128 C3 USER BRIGHTNESS 31 C4 G DRIVE 64 C5 B DRIVE 64 C6 DRIVE C TEMP 8 C7 CONTRAST C TEMP 5 1 Press Channel Up Down on the Remote Control to select one of the available Service Adjustments a in Fig 13 Note Write Down the original value set b in Fig 13 for each address before modifying anything It is easy to erroneously adjust the wrong item 2 Press Volume Up Down on the Remote Control to adjust t...

Страница 20: ...LEVEL SEPARATION 6 M2 HIGH LEVEL SEPARATION 25 1 Press Channel Up Down on the Remote Control to select one of the available Service Adjustments a in Fig 13 Note Write Down the original value set b in Fig 13 for each address before modifying anything It is easy to erroneously adjust the wrong item 2 Press Volume Up Down on the Remote Control to adjust the level of the selected Service Adjustment b ...

Страница 21: ...YDL 4 1 Press Channel Up Down on the Remote Control to select one of the available Service Adjustments a in Fig 13 Note Write Down the original value set b in Fig 13 for each address before modifying anything It is easy to erroneously adjust the wrong item 2 Press Volume Up Down on the Remote Control to adjust the level of the selected Service Adjustment b in Fig 13 CH CH CH Note Some adjustments ...

Страница 22: ...Press Volume Up Down on the Remote Control to adjust the level of the selected Service Adjustment b in Fig 13 OPTIONS Adjustment Default Level S0 ABL GAIN 3 S1 ABL POINT 3 S2 RGB BRIGHTNESS 8 S3 RGB GAMMA 1 S4 COLOR GAMMA 1 S5 VSM G 0 S6 BS POINT 7 S7 CLOCK ADJUST 128 S8 LOUD COMP 31 S9 CAPTION DIG FILTER SW 0 SA CAPTION SCROLL 1 SB RGB MATRIX 6 SC RGB MATRIX COMP 5 IMPORTANT NOTE Always Exit the ...

Страница 23: ...E 0 X10 SUB H LOCK 70 X11 SUB H SEP1 313 X12 SUB H SEP2 266 1 Press Channel Up Down on the Remote Control to select one of the available Service Adjustments a in Fig 13 Note Write Down the original value set b in Fig 13 for each address before modifying anything It is easy to erroneously adjust the wrong item 2 Press Volume Up Down on the Remote Control to adjust the level of the selected Service ...

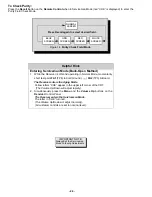
Страница 24: ...eceiver is ON and operating in Normal Mode momentarily short test point FA1 TP8 to Cold Ground FA2 TP3 A Board The Receiver enters the Aging Mode Yellow letters CHK appear in the upper left corner of the CRT The Volume Up Down will adjust rapidly 2 Simultaneously press the Menu and the Volume Up buttons on the Receiver Control Panel The Receiver enters the Serviceman Mode The letter in CHK turn re...

Страница 25: ...normally Costumer Controls are set to nominal level SUB DATA ADJUSTMENTS B ITEMS QUICK ENTRY TO SERVICEMAN MODE Select CABLE Mode Set SLEEP time for 30 Min Tune to Channel 124 Adjust Volume to minimum Press VOL DOWN On Receiver EXIT EXIT Figure 15 Flow Chart for Serviceman Mode N Y N Y C ON REMOTE RECALL Press Menu and Power on the Receiver simultaneously for at least 2 seconds ON REMOTE CONTROL T...

Страница 26: ...OTE CONTROL TO SELECT ADJUSTMENT ON REMOTE TO ADJUST THE LEVEL CH VOL VOL ON REMOTE CONTROL TO SELECT ADJUSTMENT ON REMOTE TO ADJUST THE LEVEL CH VOL VOL ON REMOTE CONTROL TO SELECT ADJUSTMENT ON REMOTE TO ADJUST THE LEVEL CH VOL VOL B IMPORTANT NOTE Always Exit the Serviceman Mode Following Adjustments Figure 16 Flow Chart for Serviceman Mode cont Note Some adjustments modes may not be available ...

Страница 27: ...STMENTS P ITEMS Adj needed Y N POWER ON REMOTE Note Some adjustments modes may not be available in some models depending on available options ON REMOTE CONTROL TO SELECT ADJUSTMENT ON REMOTE TO ADJUST THE LEVEL CH VOL VOL ON REMOTE CONTROL TO SELECT ADJUSTMENT ON REMOTE TO ADJUST THE LEVEL CH VOL VOL OPTIONS ADJUSTMENTS S ITEMS Adj needed Y N POWER ON REMOTE ON REMOTE CONTROL TO SELECT ADJUSTMENT ...

Страница 28: ... used 2 Preset the following controls Brightness Center Color Min Contrast Max Sharpness Center 3 Connect the oscilloscope to TP47R Set the scope time base to 20µs horizontal 4 Connect a jumper from TPD2 to ground Procedure 1 In the Serviceman Mode select DAC Sub Brightness Adjustment B2 and adjust for 1 5 1 9Vp p between blanking and 7 5 IRE level See video waveforms detail Fig 18 2 In the Servic...

Страница 29: ...e and adjust the Serviceman Mode DAC C0 level until a scanning period of 195V above DC ground is measured as indicated in Fig 22 9 Connect the scope to the GRN Cathode KG 10 In Serviceman Mode for making electronic adjustments select the GRN CUTOFF DAC C1 11 Press the LST CH key on the Remote 12 View the scope trace and adjust the Serviceman Mode DAC C1 for the scanning period to be 195V above DC ...

Страница 30: ...ulation monaural 70 5dB 75Ω OPEN P S 10dB 2 Adjust the MTS Input Level Adjustment M0 until the voltage measured is 106 6 0mV rms Stereo Separation Adjustment M1 M2 Preparation 1 Connect an RF signal generator to the RF antenna input 2 Connect a scope to TPE10 Procedure 1 Select Stereo Mode in Audio menu 2 Apply the following signal from the RF signal generator Video 100 IRE flat field 30 modulatio...

Страница 31: ...ollowing formula Note Pin 13 measurement will not change regardless of the value stored in S7 Vertical Size D1 1 Adjust the VERTICAL SIZE DAC control D1 until the top and the bottom edges of the raster are visible 2 Adjust the VERTICAL SIZE control D1 until the top and the bottom of the raster touch the bezel edge Then advance SIZE control to obtain an approximately 10 overscan Linearity adjustmen...

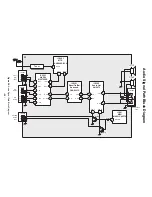
Страница 32: ...L R 15 RAV3 3 L AV1 5 R AV1 8 L AV2 R AV2 A V Input 1 A V Input 2 JK3001 L R V2 L2 R2 10 35 33 LRF1 RRF1 IC2351 Bass Tre Bal Surround CXA2021S 30 22 L1 Out L In 28 R1 Out 1 R In 14 9 L Out R Out IC2302 Audio Out AN5272 5 L In 2 R In 7 12 L Out R Out L OUT R OUT Headphone Jack 4 1 VAO L VAO R IC001 MPU MN101C46FTA 17 S Defeat D2343 Q2409 Q2410 Variable Audio Out JK3004 L R JK3002 7 6 2 3 4 5 1 ...

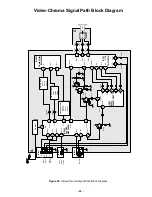
Страница 33: ...a Out Filter Q6501 Q6514 Q6519 Q6505 JK3003 S Video Y C IC101 VCJ TA1310BN 45 Chroma In 27 Y1 Out 38 Sync In Q201 5V Q303 5V IC001 MPU MN101C46FTA 25 CVBS0 26 V2 Out CVBS1 24 Q302 5V C314 53 R Y In 52 33 29 6 3 4 5 YM YS G R B R In YM YS In G In B In 13 14 15 R Out G Out B Out C Q351 Q352 Q353 A11 1 C1 1 A11 2 C1 2 A11 3 C1 3 B Y In C6529 C3019 C315 D014 D015 C225 C226 CRT Luma In Filter Q6504 Q65...

Страница 34: ...t Hold Down V Reg SCL 29 I2 C SCL Input SDA 30 GND 31 Ground HD Out 32 NC VD Out 33 RGB Mute R Out FBP In 34 Flyback Pulse H Out 35 Sync Out 36 NC DEF VCC 37 9V Y Sync In 38 Video Sync V Sep 39 Vertical Separation AFC1 40 AFC1 detection 32 fh VCO 41 Horizontal Oscillation Bend Correction 42 Horizontal Correction 43 DL Out Delayed Y Signal Ground 44 GND Chroma Input Chroma In 45 APC Filter APC 46 N...

Страница 35: ...Speaker On Off Sound Defeat TV Video RFAGC Volume 3 3V YUV SW FA1 Version S VHS Action Key Scan 1 AFC2 Remote signal in SDA1 AFC1 SCL1 Closed Caption System Clock Out CLH 22 VREF1 23 CVBS1 24 CVBS0 25 VREFH0 26 HSYNC 27 FLASH 28 YS 29 BOUT 30 GOUT 31 ROUT 32 YM 33 NRST 34 VSYNC 35 36 P40 37 P41 P42 38 VDD VPP 39 OSC2 40 OSC1 41 VSS 42 Closed Caption Closed Caption 1 Closed Caption 1 Closed Caption...

Страница 36: ...3 screws at the top edge of the receiver 1 screw by the A V jacks 1 screw by the flyback assembly 1 screw at the lower edge of the receiver 1 screw at the lower edge of the receiver 1 screw on the retainer plate for the AC power cord 1 screw by audio out jacks ...

Страница 37: ...T secured to cabinet by 4 screws on corners of CRT DAG ground Anode high voltage C board Tuner A V jacks Flyback T551 Note After servicing the receiver remember to dress the cables as shown Yoke Speaker 4 screws Speaker 4 screws Degaussing coil VAO Out ...

Страница 38: ...01 MPU 8 FRONT AV IN 13 Q501 H DRIVE 15 T551 FLYBACK 2 IC 002 EEPROM 9 FRONT KEYPAD 14 Q551 H OUT 16 FUSE 3 IC 101 VCJ 10 REAR AV IN 17 TUNER 4 IC 2302 AUDIO 11 S VIDEO IN 5 IC 2351 BASS TRE BAL 12 VAO OUT 6 IC 3001 A V SWITCH 7 IC 6501 COMB FILTER 12 2 8 16 15 17 13 1 5 6 7 9 3 11 4 14 10 MTS processor IC2201 is located on the other side of the board ...

Страница 39: ...AP C 1UF Z 50V C330 ECA1AM101 CAP E 100UF 10V C331 ECJ2VF1H103Z CAP C 01UF Z 50V C337 ECA1HM2R2 CAP E 2 2UF 50V C342 ECA1HM010 CAP E 1 0UF 50V C351 TACCW331T50V CAP C 330PF 50V C352 TACCW331T50V CAP C 330PF 50V C353 TACCW331T50V CAP C 330PF 50V C354 ECKD3D102KB CAP C 001UF K 2KV C357 EEANA1E1R0B CAP E 1 0UF 25V C401 ECJ2VB1C104K CAP C 1UF I 16V C403 ECA1HM010 CAP E 1 0UF 50V C404 ECA1HM010 CAP E 1...

Страница 40: ...UF 35V C2302 ECA1HM010 CAP E 1 0UF 50V C2305 ECA1HM010 CAP E 1 0UF 50V C2306 ECJ2VF1H103Z CAP C 01UF Z 50V C2307 ECA1CM102 CAP E 1000UF 16V C2309 ECQB1H473JM CAP P 047UF J 50V C2311 ECA1HM3R3 CAP E 3 3UF 50V C2313 ECA1EM101 CAP E 100UF 25V REF NO PART NO DESCRIPTION C2314 ECQB1H473JM CAP P 047UF J 50V C2315 ECA1EM100 CAP E 10UF 25V C2321 ECA1EM100 CAP E 10UF 25V C2324 ECA1EM100 CAP E 10UF 25V C232...

Страница 41: ... DIODE D531 AS01 DIODE D532 MA4091M DIODE ZENER D533 MA4091M DIODE ZENER D551 TVSRU2N DIODE D554 BYD33G 163 DIODE D555 MA165 DIODE D556 MA4360H DIODE ZENER D557 TVSRU2N DIODE D558 RS3FS DIODE D559 BYD33G 113 DIODE D561 BYD33G 163 DIODE D801 GP15KL 042 DIODE D802 GP15KL 042 DIODE REF NO PART NO DESCRIPTION D805 TAP111M003 DIODE D806 MA4047M DIODE ZENER D807 MA165 DIODE D809 RU3YX M DIODE D820 EU02V...

Страница 42: ...TX TRANSISTOR Q002 2SC1685QRS TRANSISTOR Q003 2SD601ARTX TRANSISTOR Q004 2SC1685QRS TRANSISTOR Q005 2SD601ARTX TRANSISTOR Q201 2SD601ARTX TRANSISTOR Q302 2SD601ARTX TRANSISTOR Q303 2SD601ARTX TRANSISTOR REF NO PART NO DESCRIPTION Q351 2SC3063 TRANSISTOR Q352 2SC3063 TRANSISTOR Q353 2SC3063 TRANSISTOR Q401 2SD601ARTX TRANSISTOR Q402 2SD601ARTX TRANSISTOR Q501 2SC4212H TRANSISTOR Q509 2SD601ARTX TRA...

Страница 43: ...GEYJ103 RES M 10K J 1 10 R309 ERJ6GEYJ332 RES M 3 3K J 1 10 R310 ERJ6GEYJ332 RES M 3 3K J 1 10 R312 ERJ6GEYJ393 RES M 39K J 1 10 R328 ERJ6GEYJ105 RES M 1 0MEG J 1 10 R341 ERJ6GEYJ474 RES M 470K J 1 10 R351 ERG2FJ123H RES M 12K J 2W REF NO PART NO DESCRIPTION R352 ERG2FJ123H RES M 12K J 2W R353 ERG2FJ123H RES M 12K J 2W R354 ERDS1TJ272 RES C 2 7K J 1 2 R355 ERDS1TJ272 RES C 2 7K J 1 2 R356 ERDS1TJ2...

Страница 44: ... RES M 100 J 1 10 R2301 ERQ2CJP1R0 RES F 1 0 J 2W R2305 ERD25FJ180 RES C 18 J 1 4 R2306 ERD25FJ180 RES C 18 J 1 4 R2307 ERJ6GEYJ221 RES M 220 J 1 10 REF NO PART NO DESCRIPTION R2308 ERJ6GEYJ221 RES M 220 J 1 10 R2311 ERJ6GEYJ562 RES M 5 6K J 1 10 R2312 ERJ6GEYJ752 RES M 7 5K J 1 10 R2313 ERJ6GEYJ332 RES M 3 3K J 1 10 R2318 ERJ6GEYJ682 RES M 6 8K J 1 10 R2319 ERJ6GEYJ223 RES M 22K J 1 10 R2321 ERDS...

Страница 45: ...10 R6558 ERJ6GEYJ103 RES M 10K J 1 10 R6559 ERJ6GEYJ272 RES M 2 7K J 1 10 R6560 ERJ6GEYJ124 RES M 120K J 1 10 R6565 ERJ6GEYJ102 RES M 1K J 1 10 R6566 ERJ6GEYJ681 RES M 680 J 1 10 R6567 ERJ6GEYJ222 RES M 2 2K J 1 10 R6568 ERJ6GEYJ471 RES M 470 J 1 10 SWITCHES S001 TSE2AD001 SWITCH S002 TSE2AD001 SWITCH REF NO PART NO DESCRIPTION S003 TSE2AD001 SWITCH S004 TSE2AD001 SWITCH S005 TSE2AD001 SWITCH S008...

Страница 46: ...4 CAP P 068UF K 50V RESISTOR TYPE TOLERANCE C Carbon F 1 F Fuse J 5 M Metal Oxide K 10 S Solid M 20 W Wire Wound G 2 CAPACITOR TYPE TOLERANCE C Ceramic C 0 25pF E Electrolytic D 0 5pF P Polyester F 1pF S Styrol J 5 T Tantalum K 10 L 15 M 20 P 10 0 Z 80 20 ...

Страница 47: ... 47 NOTES ...

Страница 48: ...Printed in USA V00062000ME0609 7 ...

Страница 49: ...io adjustments are set to Normalize TV ANT CABLE Set Up Menu in TV ANT Mode Volume Min TV Video SW TV position Audio Mode Stereo Voltage readings are nominal and may vary 10 on active devices Some voltage reading will vary with signal strength and picture content Supply voltages are nominal 2 Ground symbol indicates ground lead connection of meter Incorrect ground connection will result in erroneo...

Страница 50: ...D NOTE All other component symbols are used for engineering design purposes Voltage Measurements 1 Voltage measurement AC input to the Receiver is 120V NTSC HD 1125i 525P when applicable signal generator is connected to the antenna of the Receiver Color bar pattern of 100 IRE white and 7 5 IRE black All Picture and Audio adjustments are set to Normalize TV ANT CABLE Set Up Menu in TV ANT Mode Volu...

Страница 51: ...nal generator is connected to the antenna of the Receiver Color bar pattern of 100 IRE white and 7 5 IRE black All Picture and Audio adjustments are set to Normalize TV ANT CABLE Set Up Menu in TV ANT Mode Volume Min TV Video SW TV position Audio Mode Stereo Voltage readings are nominal and may vary 10 on active devices Some voltage reading will vary with signal strength and picture content Supply...

Отзывы: