background image

30

ENGLISH

POWER

INPUT

1

2

3

4

5

6

7

8

9

0

GUIDE

SLEEP

FAV ADD/ERASE

MUTE

MENU

EXIT

OK

SUBPAGE

S

RETURN

P

CH LIST

i

?

i

AD

1

Coloured

buttons

TEXT

SUBTITLE

S

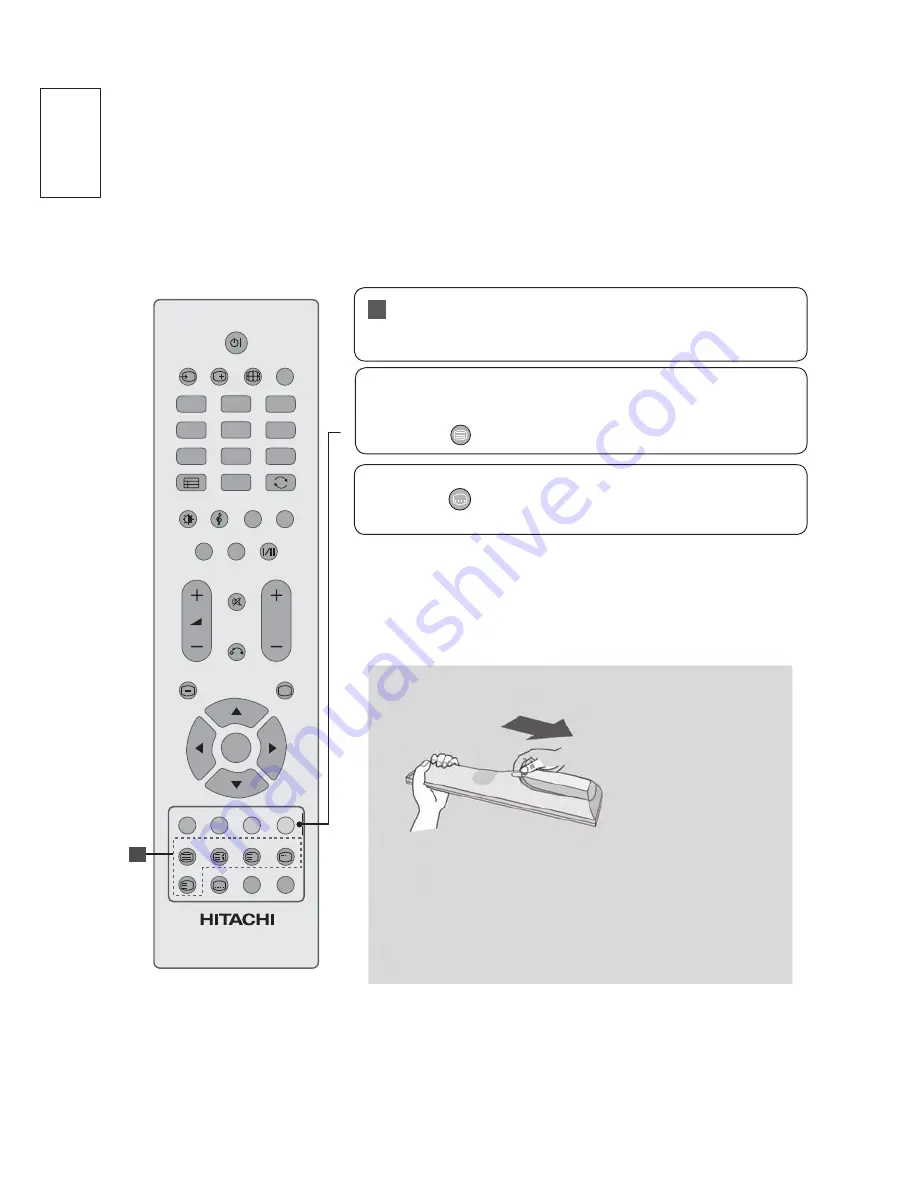
These buttons are used for teletext (on 

TELETEXT

models only).

Show the 

TELETEXT

 screen..

Recalls your preferred Teletext subtitle page or 
display the channel subtitle.

Installing Batteries

Ŷ

Open the battery compartment cover on the back and 

LQVWDOOWKHEDWWHULHVPDWFKLQJFRUUHFWSRODULW\ZLWK
ZLWK

Ŷ

Install two 1.5V AAA batteries. Do not mix old or used 
batteries with new ones.

Ŷ

Close cover.

TELETEXT

BUTTONS

These buttons are used for teletext.

For further details, see the ‘Teletext’ section.

1

Содержание 19LD4550C

Страница 1: ... This serial number is located on the rear of the television Colour LCD Television Model Name 19LD4550C 19LD4550U 22LD4550C 22LD4550U 26LD4550C 26LD4550U 32LD4550C 32LD4550U USER S MANUAL MANUEL UTILISATEUR BEDIENUNGSANLEITUNG MANUAL DEL USUARIO MANUALE D USO BRUKSANVISNING BRUKERHÅNDBOK BRUGERVEJLEDNING KÄYTTÖOPAS ǼīȋǼǿȇǿǻǿȅ ȋȇǾȈȉǾ GEBRUIKSAANWIJZING Ver 1 ...

Страница 2: ...on Please read this user s manual carefully before operating this product To ensure proper operation please read and follow ALL the instructions especially the IMPORTANT SAFETY INSTRUCTIONS and SAFETY PRECAUTIONS Please keep this user s manual for future reference ...

Страница 3: ...ERVIEW 8 SUPPLIED ACCESSORIES 8 PREPARATION 9 Front Panel Controls 9 Back Panel Information 10 Stand Installation 11 Detaching Stand Only 26 32 12 Wall Mounting 13 EXTERNAL EQUIPMENT SETUP 14 HD Receiver Setup 14 Digital Audio Out Setup 16 DVD Setup 17 VCR or DVD Setup 20 Connecting with a Euro Scart cable 21 Connecting with a S Video cable 21 Other A V Source Setup 22 Insertion Of CI Module 22 PC...

Страница 4: ...38 Assigning Programme Fine Tune In Analog Mode 39 Selecting The Channel List 40 Input List 41 PICTURE CONTROL 42 Picture Size Aspect Ratio Control 42 Preset Picture Settings 44 Picture Mode Preset 44 Colour Temperature Normal Warm Cool 45 Manual Picture Adjustment 46 Picture Mode User option 46 Picture Improvement Technology 47 Picture Mode 48 SOUND CONTROL 49 Sound Setting Adjustment User Mode 4...

Страница 5: ... Diagnostics 61 Common Interface CI 62 PARENTAL CONTROL RATINGS 63 Set Password Lock System 63 Block Programme 64 Parental Control Program Block 65 Key Lock 66 TELETEXT 67 Switch On Off 67 Simple Text 67 Top Text 67 Special Teletext Functions 68 APPENDIX 69 Initializing Reset to original factory settings 69 Troubleshooting 70 WARRANTY 72 ...

Страница 6: ...FWV OOHG ZLWK OLTXLGV VXFK DV vases shall be placed on the apparatus Ɣ 7KH ODVV DSSDUDWXV VKDOO EH FRQQHFWHG WR D PDLQV VRFNHW RXWOHW ZLWK D SURWHFWLYH HDUWKLQJ connection Ɣ 7KH PDLQV SOXJ RU DSSOLDQFH FRXSOHU LV XVHG DV WKH GLVFRQQHFW GHYLFH WKH GLVFRQQHFW GHYLFH VKDOO remain readily operable Ɣ 7KH 79 0RQLWRU LV IRU HQWHUWDLQPHQW XVH RQO DQG YLVXDO LVSOD WDVNV DUH H FOXGHG Ɣ FHVVLYH VRXQG SUHVVXU...

Страница 7: ...other products and company names used in this manual are trademarks or registered trademarks of their respective owners Trademark Credits Ɣ 0 WKH 0 ORJR DQG LJK H QLWLRQ 0XOWLPHGLD QWHUIDFH DUH WUDGHPDUNV RU UHJLVWHUHG trademarks of HDMI Licensing LLC Ɣ 9 LV D UHJLVWHUHG WUDGHPDUN RI WKH 9 3URMHFW 7KLV ORJR LQGLFDWHV WKDW WKH SURGXFW LV FRPSOLDQW with European Digital Broadcasting Ɣ 5 9 DQG WKH 5 ...

Страница 8: ...KLQJ RU REMHFWV ÀOOHG ZLWK liquids such as vases to be placed on the equipment DON T SODFH KRW REMHFWV RU QDNHG ÁDPH VRXUFHV VXFK DV OLJKWHG FDQGOHV RU QLJKW OLJKWV RQ RU FORVH WR HTXLSPHQW LJK WHPSHUDWXUHV FDQ PHOW SODVWLF DQG OHDG WR ÀUHV DON T XVH PDNHVKLIW VWDQGV DQG 1 9 5 À OHJV ZLWK ZRRG VFUHZV WR HQVXUH FRPSOHWH VDIHW DOZD V ÀW WKH PDQXIDFWXUHU V DSSURYHG VWDQG RU OHJV ZLWK WKH À LQJV SURYL...

Страница 9: ...nnected to the terminal marked with the letter L or coloured BROWN or RED About the Symbols The following are the symbols used in this manual and affixed on the unit itself Please fully understand the meanings of the symbols before reading the instructions in this section Information for Users Applicable in European Union Countries 7KLV V PERO RQ WKH SURGXFW RU RQ LWV SDFNDJLQJ PHDQV WKDW RXU HOHF...

Страница 10: ...er rooms close to windows or outside where rain snow or other inclement conditions could occur should be avoided Please also avoid installing the unit in a position where fumes from a Hot Spring could come into contact with it Ŷ Unplug this unit during lightning storm Ɣ 7R UHGXFH WKH ULVN RI HOHFWULFDO VKRFN GR QRW WRXFK WKH SURGXFW ZKHQ VWDUWV OLJKWQLQJ Disconnect the plug from the power outlet Ŷ...

Страница 11: ...LRQ RI WKH PHGLFDO GHYLFHV GR QRW XVH WKLV SURGXFW DQG PHGLFDO GHYLFHV LQ WKH VDPH URRP Ŷ Do not place a CRT based television near the speakers of the Colour LCD Television Ɣ W FRXOG FDXVH WKH SDUWLDO GLVFRORXUDWLRQ RU EOXUULQJ RI WKH LPDJH RQ D 57 EDVHG WHOHYLVLRQ 3OHDVH LQVWDOO LW DZD from the speakers of the unit Ŷ Disconnect all of the external connection cables and detach the anti tumble meas...

Страница 12: ...t radio interference However the unit may generate noise in the radio Ɣ I WKH QRLVH LV KHDUG RQ UDGLR SOHDVH WU WKH IROORZLQJ DFWLRQV ƒ Adjust the direction of the radio antenna in order not to receive the interference from the unit ƒ HHS WKH UDGLR DZD IURP WKH XQLW ƒ 8VH FRD LDO FDEOH IRU WKH DQWHQQD Ŷ About infrared communication devices Ɣ 7KH LQIUDUHG FRPPXQLFDWLRQ GHYLFHV VXFK DV FRUGOHVV PLFU...

Страница 13: ...io Out installed Easy to use On Screen Display system operating with Remote control Low power consumption with Power Saving feature Motorized Power Swivel feature Provided 2000 pages for Teletext SUPPLIED ACCESSORIES Check the supplied accessories before installation In case of missing or damaged please contact the dealer immediately User s Manual Remote Control AAA size battery X2 Power Cord UK o...

Страница 14: ...he selection left and right Program Use these two buttons to select channels In OSD menu use these two buttons to switch the selection up and down OK This button accepts your selection or display the current mode MENU Press this button to display the on screen display OSD menu POWER Press this button to switch the TV on off POWER LED IR Remote Receiver The blue light indicates the TV power is on T...

Страница 15: ... 1RWH Q VWDQGE PRGH WKHVH ports do not work Euro Scart Socket AV1 AV2 Connect scart socket input or output from an external device to these jacks HDMI Input Connect a HDMI signal to HDMI IN or DVI VIDEO signal to HDMI DVI port with DVI to HDMI cable RGB Input Connect the output from a PC RS 232C IN SERVICE ONLY PORT Component Input Connect a component video audio device to these jacks Aerial Input...

Страница 16: ...sion of the tightening part of the bolt Only 26 32 n Carefully place the TV screen side down on a cushioned surface to protect the screen from scratches and damages o Assemble the Base with the Stand as shown p Fix the bolts securely at the bottom of the Base 3 bolts for 26 TV and 4 bolts for 32 TV Only 19 22 n Carefully place the TV screen side down on a cushioned surface to protect the screen fr...

Страница 17: ...t the screen from scratches and damages o Loosen the bolts from the bottom of the Base 3 bolts for 26 TV and 4 bolts for 32 TV p Separate the Base from the Stand as shown Only 19 22 n Carefully place the TV screen side down on a cushioned surface to protect the screen from scratches and damages o Pull out the Base while pressing the button on the Stand as shown ...

Страница 18: ...wn p Secure the wall mount bracket to the back of the TV Refer to the instructions for the wall mount bracket Only 19 22 n Remove the 3 bolts from the back of the Base o Remove the Stand Base as shown p Secure the wall mount bracket to the back of the TV Refer to the instructions for the wall mount bracket NOTE f For 19 22 26 Secure the wall mount bracket to the back of the TV using four M4 screws...

Страница 19: ...of the digital set top box to the COMPONENT IN VIDEO jacks on the TV Connect the audio output of the digital set top box to the COMPONENT IN AUDIO jacks on the TV Turn on the digital set top box Refer to the user manual for the digital set top box Select Component input source using the INPUT button on the remote control Signal Component HDMI 480i Yes Yes 576i Yes Yes 480p 576p Yes Yes 720p 1080i ...

Страница 20: ... input source using the INPUT button on the remote control Connecting with a HDMI to DVI cable n o p q Connect the digital set top box to HDMI IN 1 DVI jack on the TV Connect the audio output of the digital set top box to the AUDIO IN RGB DVI jack on the TV Turn on the digital set top box Refer to the owner s manual for the digital set top box Select HDMI1 input source using the INPUT button on th...

Страница 21: ...al audio optical input RQ WKH DXGLR HTXLSPHQW Set the TV Speaker option Off in the AUDIO PHQX Ź S 5HIHU WR WKH H WHUQDO DXGLR HTXLSPHQW LQVWUXFWLRQ manual for operation CAUTION f Do not look into the optical output port Looking at the laser beam may damage your vision RGB IN PC AV 1 RS 232C IN SERVICE ONLY AUDIO IN RGB DVI DMI IN 1 DVI COMPONENT IN Pb Pr RGB IN PC AV 1 RS 232C IN SERVICE ONLY AUDI...

Страница 22: ...T IN AUDIO jacks on the TV q Turn on the DVD player insert a DVD r Select Component input source using the INPUT button on the remote control s Refer to the DVD player s manual for operating instructions Component Input ports 7R DFKLHYH EHWWHU SLFWXUH TXDOLW FRQQHFW D 9 SOD HU WR WKH component input ports as shown below Component ports on the TV Y Pb Pr Video output ports on DVD player Y Pb Pr Y B...

Страница 23: ...al for operating instructions NOTE f Any Euro scart cable used must be signal shielded Connecting with a S Video cable n Connect the S VIDEO output of the DVD to the S VIDEO input on the TV o Connect the audio outputs of the DVD to the AUDIO input jacks on the TV p Turn on the DVD player insert a DVD q Select AV3 S Video input source using the INPUT button on the remote control r Refer to the DVD ...

Страница 24: ...ect HDMI1 or HDMI2 input source using the INPUT button on the remote control p Refer to the DVD player s manual for operating instructions NOTE f The TV can receive video and audio signals simultaneously when using a HDMI cable f If the DVD does not support Auto HDMI you must set the output resolution appropriately HDMI IN 1 DVI ...

Страница 25: ...HQGHG SHULRG WKH HG LPDJHV RQ WKH sides of the screen may remain visible Connecting with a RF cable n Connect the ANT OUT socket of the VCR to the ANT IN socket on the TV o Connect the aerial cable to the ANT IN socket of the VCR p Press the PLAY button on the VCR and match the appropriate channel between the TV and VCR for viewing Antenna Wall Jack ...

Страница 26: ...Any Euro scart cable used must be signal shielded Connecting with a S Video cable n o p q Connect the S VIDEO output of the VCR to the S VIDEO input on the TV The picture TXDOLW LV LPSURYHG FRPSDUHG WR QRUPDO composite RCA cable input Connect the audio outputs of the VCR to the AUDIO input jacks on the TV Insert a video tape into the VCR and press PLAY on the VCR Refer to the VCR owner s manual Se...

Страница 27: ... the corresponding external HTXLSPHQW 5HIHU WR H WHUQDO HTXLSPHQW operating guide Insertion Of CI Module To view the encrypted pay services in digital TV mode This feature is not available in all countries n Insert the CI Card to the CI Common Interface CARD SLOT of the TV as shown For further information see p 60 AV IN 3 H P S VIDEO COMMON INTERFACE HDMI IN 2 COMMON INTERFACE L R AUDIO VIDEO Camc...

Страница 28: ...e TV s settings Connecting with a D sub 15 pin cable n o p q RQQHFW WKH 5 RXWSXW RI WKH 3 WR the RGB IN PC jack on the TV Connect the PC audio output to the AUDIO IN RGB DVI jack on the TV Turn on the PC and the TV Select RGB input source using the INPUT button on the remote control RGB IN PC AUDIO IN RGB DVI ...

Страница 29: ...L RQWDO DQG 9HUWLFDO IUHTXHQFLHV DUH separate f Connect the signal cable from the monitor RXWSXW SRUW RI WKH 3 WR WKH 5 3 SRUW of the TV or the signal cable from the HDMI output port of the PC to the HDMI IN or HDMI DVI IN port on the TV f Connect the audio cable from the PC to the Audio input on the TV Audio cables are not included with the TV f If using a sound card adjust PC sound as UHTXLUHG f...

Страница 30: ...0 1366x768 47 56 59 60 1440x900 55 935 57 887 1680x1050 65 16 59 94 1920x1080 66 647 59 988 0 79 PRGH Resolution Horizontal UHTXHQF N Vertical UHTXHQF 720x480 31 469 31 5 59 94 60 720x480 15 734 15 6 60 720x576 31 25 50 720x576 15 625 50 1280x720 37 500 50 44 96 45 59 94 60 1920x1080 33 72 33 75 59 94 60 28 125 50 00 26 97 27 23 97 24 33 716 33 75 26 976 30 00 56 250 50 67 43 67 5 59 94 60 NOTE f ...

Страница 31: ... LQ SURJUHVV OK OPTION Menu Language Input List Screen Factory Reset RETURN OK Move OK Screen Auto Config H Position V Position Phase Size 61 49 16 127 Resolution RETURN OK Move Select OPTION Select Screen Select XWR RQ J Make Appropriate Adjustments 1 2 or or 3 4 MENU or OK OK OK 3UHVV WKH MENU or EXIT button to return to normal TV viewing 3UHVV WKH RETURN button to move to the previous menu scre...

Страница 32: ... OK OPTION Menu Language Input List Screen Factory Reset RETURN OK Move OK Screen Auto Config H Position V Position Phase Size 61 49 16 127 Resolution RETURN OK Move Select OPTION Select Screen Select H Position V Position Phase Size or Resolution Make Appropriate Adjustments 1 2 3 4 MENU OK OK OK or or or 3UHVV WKH MENU or EXIT button to return to normal TV viewing 3UHVV WKH RETURN button to move...

Страница 33: ... Auto Config H Position V Position Phase Size 61 49 16 127 Resolution RETURN OK Move OK Resolution 1 2 3 1024 X 768 1280 X 768 1360 X 768 RETURN OK Move Select OPTION Select Screen Select Resolution Select desired resolution 1 2 3 4 MENU OK OK OK or or or 3UHVV WKH MENU or EXIT button to return to normal TV viewing 3UHVV WKH RETURN button to move to the previous menu screen ...

Страница 34: ...eep Timer Selects a programme Show the programme guide with information Return to the previous programme Select and set the Picture Mode Select and set the Sound Mode Switch the Audio Description on off Display the programme List Display the selected favorite programme Add Erase programme to your Favorite List Select the Mono Stereo sound MUTE RETURN MENU EXIT THUMBSTICK Up Down Left Right OK Swit...

Страница 35: ...the TELETEXT screen Recalls your preferred Teletext subtitle page or display the channel subtitle Installing Batteries Ŷ Open the battery compartment cover on the back and LQVWDOO WKH EDWWHULHV PDWFKLQJ FRUUHFW SRODULW ZLWK ZLWK Ŷ Install two 1 5V AAA batteries Do not mix old or used batteries with new ones Ŷ Close cover TELETEXT BUTTONS These buttons are used for teletext For further details see ...

Страница 36: ...displayed on the screen after turning on the TV you can select the Language Mode Country Time Zone Auto tuning Note a Press the RETURN button to change the current OSD to the previous OSD E RU WKRVH FRXQWULHV ZLWKRXW FRQ UPHG 79 EURDGFDVWLQJ VWDQGDUGV VRPH 79 IHDWXUHV PLJKW QRW ZRUN GHSHQGLQJ RQ WKH 79 EURDGFDVWLQJ HQYLURQPHQW Programme Selection n Press the P or NUMBER buttons to select a program...

Страница 37: ...Select the Country Next Previous HQPDUN Bulgaria Belgium Austria Finland Czech Croatia OK COMPLETED Congratulations Completed lnitial Setup Please press OK to exit Next OK Auto Tuning Before starting be sure that TV antenna is connected Press OK to continue Next Previous 0 OK Mode Selecting the environment Choose the setting mode you want Next Previous In Store Home 1 2 3 OK OK 4 OK OK 5 OK 6 OK P...

Страница 38: ...light User Advanced Control Colour Temperature Normal OK OK Move EXIT AUDIO Sound Mode Standard On Off PCM Equalizer 120Hz Equalizer 500Hz Equalizer 1 5KHz Equalizer 5KHz Equalizer 10KHz 3 3 3 3 Balance 3 0 Virtual Surround Auto Volume Digital Audio Out OK OK Move EXIT OPTION Menu Language Input List Time Subtitle Teletext Language Diagnostics Common Interface Factory Reset OK OK Move EXIT LOCK Pa...

Страница 39: ...t Audio Language 2nd Audio Language Auto Tuning Manual Tuning Programme Skip Programme Swap Programme Fine Tune OK Move EXIT OK SETUP Country 1st Audio Language 2nd Audio Language Auto Tuning Manual Tuning Programme Skip Programme Swap Programme Fine Tune RETURN OK Move 1 2 3 MENU OK OK or or Select SETUP Select Auto Tuning Start Tuning 3UHVV WKH MENU or EXIT button to return to normal TV viewing ...

Страница 40: ... category OK SETUP Country 1st Audio Language 2nd Audio Language Auto Tuning Manual Tuning Programme Skip Programme Swap Programme Fine Tune OK Move RETURN OK 1st Audio Language 1 2 3 4 6 7 8 9 Bulgarian Croatian Czech Danish Dutch French Finnish English German 10 Greek 5 RETURN OK Move 1 2 3 4 MENU OK OK OK or or or Select SETUP Select 1st Audio Language or 2nd Audio Language Select your Desired ...

Страница 41: ...Programme Skip Programme Swap Programme Fine Tune RETURN OK Move OK DTV OK Move RETURN Transmitter Crystal Palace Service Number 11 Service Name BBC NEWS 24 VHF UHF Channel 21 60 Signal Strength 1 2 3 4 MENU OK OK OK or or or Select SETUP Select Manual Tuning Select DTV Start Tuning 3UHVV WKH MENU or EXIT button to return to normal TV viewing 3UHVV WKH RETURN button to move to the previous menu sc...

Страница 42: ...amme Fine Tune RETURN OK Move OK TV Programme Number Programme Name Frequency Colour System Auto 45 00 B G Sound System Search Up Search Down RETURN OK Move 1 2 3 4 MENU OK OK OK or or or Select SETUP Select Manual Tuning Select TV Select OK 3UHVV WKH MENU or EXIT button to return to normal TV viewing 3UHVV WKH RETURN button to move to the previous menu screen L SECAM L L France BG 3 6 0 XURSH DVW...

Страница 43: ...kip Programme Swap Programme Fine Tune RETURN OK Move OK Programme Skip OK Move RETURN 1 2 3 4 6 7 8 9 10 Digital Digital Digital Digital Digital Digital Digital Digital Digital Digital BBCi NRJ12 TF1 BBC Knowledge Eurosport France LCI BBC ONE BBC TWO BBC CHOICE BBC NEWS 24 5 1 2 3 4 MENU OK OK OK or or or Select SETUP Select Programme Skip Select Programme Select OK 3UHVV WKH MENU or EXIT button ...

Страница 44: ... Fine Tune OK Move RETURN OK Programme Fine Tune OK Move RETURN 900 BBC1 901 902 903 905 906 907 908 909 904 175 3 MHz 55 8 MHz 209 25 MHz 223 25 MHz 590 3 MHz 623 25 MHz 687 25 MHz 759 25 MHz 847 25 MHz 572 3 MHz 1 2 3 4 MENU OK OK OK or or or Select SETUP Select Programme Fine Tune Select Programme Select OK 3UHVV WKH MENU or EXIT button to return to normal TV viewing 3UHVV WKH RETURN button to ...

Страница 45: ...aying Channel List 1CH LIST Display the Channel List Ŷ Selecting a Programme in the Channel List 1 2 OK or Select a Programme Switch to the chosen programme number Ŷ Displaying the Favourite List 1 FAV Display the Favourite List 6RPH SURJUDPPHV ZLWK WKH channel number shown in the Channel List indicate there is no station name assigned ...

Страница 46: ... RETURN OK Move OK Input List 1 2 3 4 6 7 8 9 Antenna AV1 AV2 AV3 CVBS AV3 S Video HDMI 1 RGB PC Component HDMI 2 5 RETURN OK Move 1 2 3 4 MENU OK OK OK or or or Select OPTION Select Input List Select the Input Select OK 3UHVV WKH MENU or EXIT button to return to normal TV viewing 3UHVV WKH RETURN button to move to the previous menu screen INPUT RU WKH TXLFN LQSXW OLVW ...

Страница 47: ...nced Control Colour Temperature Normal Move RETURN PICTURE Aspect Ratio Zoom 1 Picture Mode Brightness Contrast Colour Sharpness 50 90 60 60 80 Backlight User Advanced Control Colour Temperature Normal Move RETURN Select the desired picture format 16 9 The following selection will allow you to adjust the picture horizontally LQ OLQHDU SURSRUWLRQ WR OO WKH HQWLUH screen useful for viewing 4 3 forma...

Страница 48: ...m1 The following selection will allow you to view the picture without DQ DOWHUDWLRQ ZKLOH OOLQJ WKH entire screen However the top and bottom of the picture will be cropped Zoom2 Choose Zoom 2 when you wish the picture to be altered both horizontally extended and vertically cropped The picture adopting a compromise between alteration and screen coverage NOTE Ź RX FDQ RQO VHOHFW LGH LQ RPSRQHQW DQG ...

Страница 49: ... Control Colour Temperature Normal Move RETURN 1 2 3 or MENU OK Select PICTURE Select Picture Mode Select desired Picture Mode 3UHVV WKH MENU or EXIT button to return to normal TV viewing 3UHVV WKH RETURN button to move to the previous menu screen 3LFWXUH PRGH DGMXVWV WKH TV for the best picture appearance Select the preset value in the picture mode menu based on the programme category 3LFWXUH PRG...

Страница 50: ...ontrol Colour Temperature Warm Move RETURN PICTURE Aspect Ratio Zoom 1 Picture Mode Brightness Contrast Colour Sharpness 50 90 60 70 100 Backlight User Advanced Control Colour Temperature Cool Move RETURN 1 2 3 or MENU OK Select PICTURE Select Colour Temperature Select either Normal Warm or Cool 3UHVV WKH MENU or EXIT button to return to normal TV viewing 3UHVV WKH RETURN button to move to the pre...

Страница 51: ... Cool Move RETURN PICTURE Aspect Ratio Zoom 1 Picture Mode Brightness Contrast Colour Sharpness 50 90 60 70 100 Backlight User Advanced Control Colour Temperature Cool Move RETURN 1 2 3 4 or MENU OK OK Select PICTURE Select Picture Mode on User Select Temperature Backlight and Advanced Control Make Appropriate Adjustments 3UHVV WKH MENU or EXIT button to return to normal TV viewing 3UHVV WKH RETUR...

Страница 52: ... Control Flesh Tone On Adaptive Luma Control Noise Reduction DCR On Medium On Move RETURN 1 2 3 4 or or MENU OK OK Select PICTURE Select Advanced Control Select Flesh Tone Adaptive Luma Control Noise Reduction or DCR Select your desired source 3UHVV WKH MENU or EXIT button to return to normal TV viewing 3UHVV WKH RETURN button to move to the previous menu screen NOTE Ź RX FDQ RQO VHOHFW OHVK 7RQH ...

Страница 53: ...al input User Dynamic Nature Cinema Sport Game 1 Select and set the picture Mode I RX VHOHFW LQHPD LQ 9 PRGH LQHPD PRGH will be selected both for Picture Mode and Sound Mode in PICTURE menu and AUDIO menu respectively I RX VHOHFW 8VHU LQ 9 PRGH WKH SLFWXUH DQG image which you initially set will be selected ...

Страница 54: ...tal Audio Out Move RETURN OK AUDIO Sound Mode User On Off PCM Equalizer 120Hz Equalizer 500Hz Equalizer 1 5KHz Equalizer 5KHz Equalizer 10KHz 0 0 0 0 Balance 0 0 Virtual Surround Auto Volume Digital Audio Out RETURN OK Move 1 2 3 4 or MENU OK OK Select AUDIO Select Sound Mode on User Select a Frequency band Set the Desired Sound Level 3UHVV WKH MENU or EXIT button to return to normal TV viewing 3U...

Страница 55: ...alizer 120Hz Equalizer 500Hz Equalizer 1 5KHz Equalizer 5KHz Equalizer 10KHz 4 1 0 5 Balance 4 0 Virtual Surround Auto Volume Digital Audio Out Move RETURN AUDIO Sound Mode Standard On Off PCM Equalizer 120Hz Equalizer 500Hz Equalizer 1 5KHz Equalizer 5KHz Equalizer 10KHz 3 3 3 3 Balance 3 0 Virtual Surround Auto Volume Digital Audio Out Move RETURN 1 2 3 or MENU OK Select AUDIO Select Sound Mode ...

Страница 56: ...z Equalizer 500Hz Equalizer 1 5KHz Equalizer 5KHz Equalizer 10KHz 0 0 0 0 Balance 0 0 Virtual Surround Auto Volume Digital Audio Out RETURN OK Move 1 2 3 or MENU OK OK Select AUDIO Select Balance Make Desired Adjustment 3UHVV WKH MENU or EXIT button to return to normal TV viewing 3UHVV WKH RETURN button to move to the previous menu screen ...

Страница 57: ...ualizer 120Hz Equalizer 500Hz Equalizer 1 5KHz Equalizer 5KHz Equalizer 10KHz 0 0 0 0 Balance 0 0 Virtual Surround Auto Volume Digital Audio Out Move RETURN 1 2 3 or MENU OK Select AUDIO Select Auto Volume Select On or Off 3UHVV WKH MENU or EXIT button to return to normal TV viewing 3UHVV WKH RETURN button to move to the previous menu screen ...

Страница 58: ...120Hz Equalizer 500Hz Equalizer 1 5KHz Equalizer 5KHz Equalizer 10KHz 0 0 0 0 Balance 0 0 Virtual Surround Auto Volume Digital Audio Out Move RETURN AUDIO Sound Mode User On On Dolby Digital Equalizer 120Hz Equalizer 500Hz Equalizer 1 5KHz Equalizer 5KHz Equalizer 10KHz 0 0 0 0 Balance 0 0 Virtual Surround Auto Volume Digital Audio Out Move RETURN 1 2 3 or MENU OK Select AUDIO Select Digital Audio...

Страница 59: ...Fi system turn off the TV internal speakers AUDIO TV Speaker On Type Audio Description Audio Description Volume Level Move RETURN Select AUDIO Select TV Speaker Select On or Off 1 2 3 or MENU OK 3UHVV WKH MENU or EXIT button to return to normal TV viewing 3UHVV WKH RETURN button to move to the previous menu screen ...

Страница 60: ...Speaker On Type Audio Description Audio Description Volume Level RETURN OK Move OK Audio Description Volum TV Speaker 20 RETURN OK Move Select AUDIO Select Type Select Audio Description Select Audio Description Volume Level Adjust the Volume 1 2 3 or MENU OK or OK 4 5 3UHVV WKH MENU or EXIT button to return to normal TV viewing 3UHVV WKH RETURN button to move to the previous menu screen ...

Страница 61: ...PTION Select Menu Language Select your Desired Language Select On or Off 3UHVV WKH MENU or EXIT button to return to normal TV viewing 3UHVV WKH RETURN button to move to the previous menu screen NOTE Ź I RX VHOHFW WKH ZURQJ ORFDO FRXQWU WHOHWH W PD QRW DSSHDU FRUUHFWO RQ the screen and some problems may occur during teletext operation Ź 7KH RPPRQ QWHUIDFH IXQFWLRQ PD QRW EH DSSOLHG EDVHG RQ FRXQWU ...

Страница 62: ... Time Zone Clock Sleep Timer Off RETURN OK Move OK Time Zone 1 2 3 4 6 7 8 9 Canary GMT Lisbon GMT London GMT Amsterdam GMT 1 Beograd GMT 1 Brussels GMT 1 Bern GMT 1 Berlin GMT 1 Budapast GMT 1 10 Copenhagen GMT 1 5 RETURN OK Move 1 2 3 4 MENU OK OK OK or or or 5 OK Select OPTION Select Time Select Time Zone Select your viewing area Time Zone RQ UP LW 3UHVV WKH MENU or EXIT button to return to nor...

Страница 63: ...OK Time Time Zone Clock Sleep Timer Off RETURN OK Move Clock Auto Synchronization On 2002 01 03 17 10 28 Date Time Timer Off 0 On Timer On Volume On Programme Off Timer 00 00 00 00 00 00 Move RETURN 1 2 3 or MENU OK 4 5 or OK or OK Select OPTION Select Time Select Clock Select Timer Slelct On Off 3UHVV WKH MENU or EXIT button to return to normal TV viewing 3UHVV WKH RETURN button to move to the pr...

Страница 64: ...s to be turned on and set at the real time before you set the Auto Timer The Auto On Off Timer only operates on real clock time is set and the TV is in standby mode Clock Auto Synchronization On 2002 01 03 17 10 28 Date Time Timer On 0 On Timer On Volume On Programme Off Timer 00 00 00 00 00 00 Move RETURN 7R FDQFHO On Off Timer function select Off 1 2 3 5 4 or MENU OK or OK Select OPTION Select T...

Страница 65: ...ime Zone Clock Sleep Timer 10 Minutes Move RETURN 1 2 3 4 or or MENU OK OK Select OPTION Select Time Select Sleep Timer Select Off 10 20 30 40 50 60 90 or 120 Min SLEEP Set the Sleep Timer 3UHVV WKH MENU or EXIT button to return to normal TV viewing 3UHVV WKH RETURN button to move to the previous menu screen KHQ RX VZLWFK WKH 79 RII WKH SUHVHW VOHHS WLPH LV FDQFHOOHG RX FDQ DOVR DGMXVW 6OHHS 7LPHU...

Страница 66: ...Common Interface Factory Reset RETURN OK Move Diagnostics Manufacturer Model Type HITACHI Ltd H000001 XXXXXX_XXX_X XXXX_XXXXXX_X_XXX_XX App Verison Software Version RETURN 1 2 3 or MENU or OK OK Select OPTION Select Diagnostics Display Model Name Serial Number and Software Version 3UHVV WKH MENU or EXIT button to return to normal TV viewing 3UHVV WKH RETURN button to move to the previous menu scre...

Страница 67: ...on after inserting a CI Module you may not have any sound output This may be incompatible with the CI module and smart card CI Common Interface functions may not be possible depending upon the country broadcasting circumstances OK OPTION Menu Language Input List Time Subtitle Teletext Language Diagnostics Common Interface Factory Reset RETURN OK Move Common Interface No CI card presented RETURN 1 ...

Страница 68: ... LOCK Password RETURN 1 2 3 1 2 3 4 5 6 7 8 0 9 1 2 3 4 5 6 7 8 0 9 MENU or OK 4 or OK Select LOCK Input a 4 digit password Select Set Password Input a 4 digit password Be sure to remember this QXPEHU 5H HQWHU QHZ SDVVZRUG IRU FRQ UP 3UHVV WKH MENU or EXIT button to return to normal TV viewing 3UHVV WKH RETURN button to move to the previous menu screen ...

Страница 69: ... Key Lock On RETURN OK Move OK Block Programme Analog Analog Analog Analog Analog Analog Analog Analog Analog Analog 901 902 903 904 906 907 908 909 910 905 RETURN OK Move 1 2 3 1 2 3 4 5 6 7 8 0 9 4 5 MENU OK or OK or OK Select LOCK Input a 4 digit password Select Block Programme Select a Channel to be Locked Save 3UHVV WKH MENU or EXIT button to return to normal TV viewing 3UHVV WKH RETURN butto...

Страница 70: ...ven if you switch the TV off Prevents children from watching certain adult s TV programmes according to the ratings limit set OK LOCK Block Programme Parental Guidence Set Password Key Lock On RETURN OK Move Parental Guidence Age Rating None Move RETURN 1 2 3 4 1 2 3 4 5 6 7 8 0 9 MENU OK or OK or Select LOCK Input a 4 digit password 6HOHFW 3DUHQWDO XLGHQFH Please Input Age rating 4 18 or Off 3UHV...

Страница 71: ...ssword Select Key Lock Select Yes or No 3UHVV WKH MENU or EXIT button to return to normal TV viewing 3UHVV WKH RETURN button to move to the previous menu screen Q H RFN 2Q LI 79 LV WXUQHG RII SUHVV WKH I INPUT P buttons on the TV or POWER INPUT P buttons on the remote control to turn on the TV LWK WKH Key Lock On the display Key Lock On appears on the screen if any button on the front panel is pre...

Страница 72: ...vious mode reappears Simple Text Ŷ Page selection n Enter the desired page number as a three digit number with the NUMBER buttons If during selection you press a wrong number you must complete the three digit number and then re enter the correct page number o The P button can be used to select the preceding or following page Top Text 7KH XVHU JXLGH GLVSOD V IRXU HOGV UHG JUHHQ HOORZ DQG EOXH DW WK...

Страница 73: ...HOLD Stops the automatic page change which will occur if a teletext page consists of 2 or more sub pages The number of sub pages and the sub page displayed is usually shown on the screen below the time When this menu is selected the stop symbol is displayed at the top left hand corner of the screen and the automatic page change is inactive ...

Страница 74: ...put List Time Subtitle Teletext Language Diagnostics Common Interface Factory Reset OK Move EXIT Factory Reset Password RETURN Select OPTION Select Factory Reset Input Password Reset 1 2 3 4 1 2 3 4 5 6 7 8 0 9 or or MENU OK OK OK 3UHVV WKH MENU or EXIT button to return to normal TV viewing 3UHVV WKH RETURN button to move to the previous menu screen ...

Страница 75: ...this station Ŷ Check whether the TV is switched on Ŷ Try another channel The problem may be with the broadcast Ŷ Is the power cord inserted correctly into the mains Ŷ Check your antenna direction and or location Ŷ Test the mains outlet by plugging another TV into the same outlet Ŷ This is normal the image is muted during the TV startup process Please contact your service centre if the picture has ...

Страница 76: ...r Ŷ Press the button Ŷ Sound muted Press MUTE button Ŷ Try another channel The problem may be with the broadcast Ŷ Are the audio cables installed properly Ŷ Adjust Balance in menu option Ŷ A change in ambient humidity or temperature may result in an unusual noise when the TV is switched on or off and does not indicate a fault with the TV Ŷ GMXVW UHVROXWLRQ KRUL RQWDO IUHTXHQF RU YHUWLFDO IUHTXHQF ...

Страница 77: ...7KLV JXDUDQWHH GRHV QRW FRYHU WKH UHSODFHPHQW RI H KDXVWHG EDWWHULHV WKH adjustment of user controls or aerial alignment Q SDUWV UHSODFHG XQGHU WKLV JXDUDQWHH VKDOO EHFRPH WKH SURSHUW RI LWDFKL Europe Ltd 3OHDVH QRWH WKDW HYLGHQFH RI WKH GDWH RI SXUFKDVH ZLOO EH UHTXLUHG EHIRUH DQ service under this guarantee is carried out Use the boxes provided below to record your TV s Model and Serial Number t...

Страница 78: ... the TV whilst in operation Never place the TV onto a carpet during normal operation this could obstruct ventilation slots on the base of the TV Always place the TV on a flat surface or if supplied the stand accessory Main Power switch located on the front panel Insert the batteries into your handset Switch your TV on ready to start autotune procedure Connect the TV plug to the mains socket IMPORT...

Страница 79: ... highlighted selection menu Use this button to display the main menu OK Use this button to set a highlighted selection OK Use this button to set a highlighted selection This button is used to move the menu selection box left right or change a highlighted selection cursor left right cursor up down This button is used to move the menu selection box up down or change a highlighted selection This butt...

Страница 80: ...Department UNITED KINGDOM Tel 0870 405 4405 Email FRQVXPHU PDLO KLWDFKL HX FRP HITACHI EUROPE GmbH Munich Office GERMANY Te l 089 991 80 0 Fax 089 991 80 224 Hotline 0180 551 25 51 12ct min Email GPJ PXQ VHUYLFH KLWDFKL HX FRP HITACHI EUROPE S r l ITALY Te l 02 487861 Fax 02 48786381 Servizio Clienti Te l 02 38073415 Email FXVWRPHUVHUYLFH LWDO KLWDFKL HX FRP HITACHI EUROPE S A S Lyon Office FRANCE...

Отзывы: