background image

English   

- 29 -

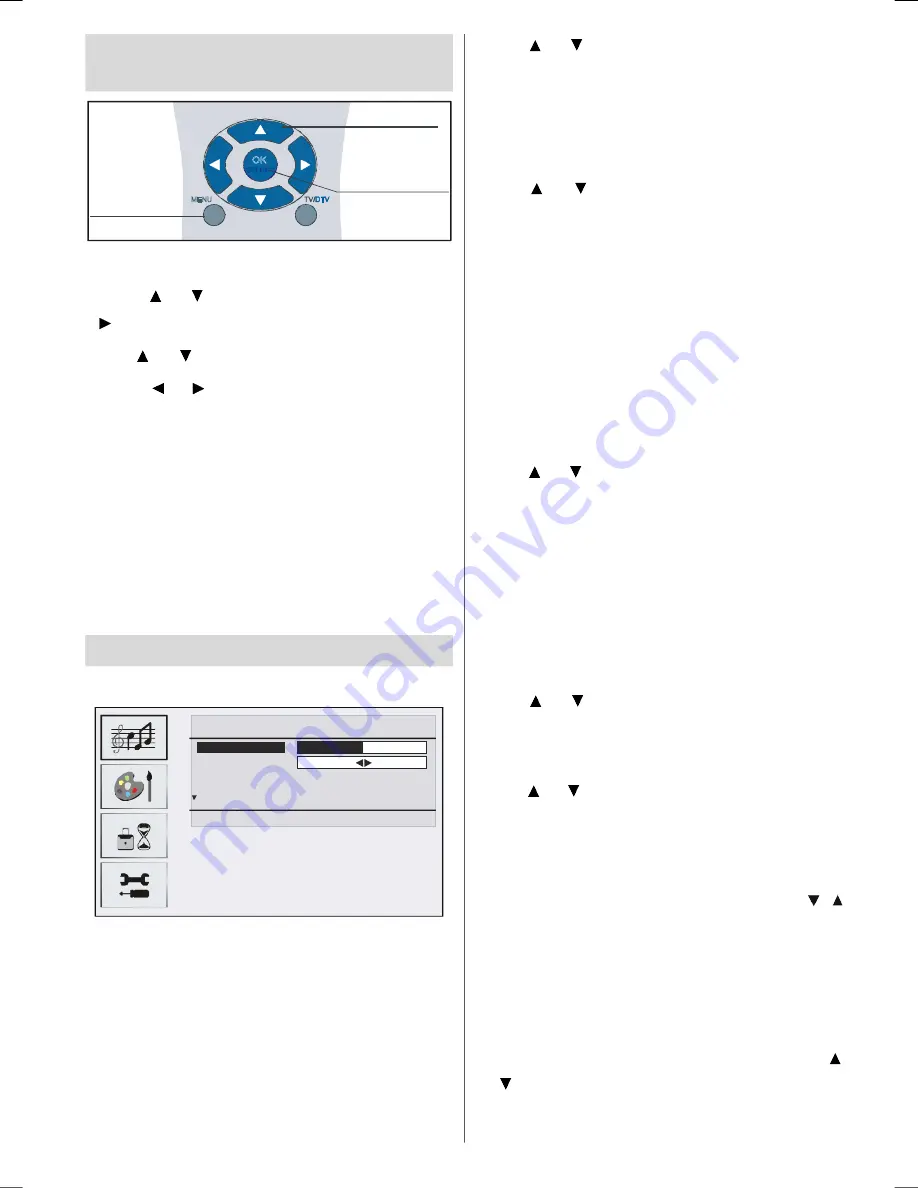
Navigating the Analogue TV
Menu System

TV/DTV

OK

MENU 

For displaying 

menu options

For navigation

To confirm choices

• 

Press 

MENU

to display the main menu.

• 

Press   or   button to select an icon. Press

 or 

OK 

button for more options.

• 

Use   or   button to highlight.

• 

Press    or   buttons to change the settings.

Press 

OK

 to set as default.

• 

To  exit  the  menu  or  return  from  sub-menu

screen, press 

MENU

.

Note

:  These  explanations  are  valid  for  the

navigation  of  the  whole menu system.
To select options that are explained in
the following parts, refer to “Navigating
the Analogue TV Menu System”.

Analogue TV Menu System

Sound Menu

SOUND

Volume

Balance

0

Sound Mode

Stereo

AVL

On

Effect

Off

Back : Menu

Exit : TV

Volume

When you enter the sound menu, Volume will
be the first selected option. Press 

 / 

 button

to change the level of the Volume.

Balance

This  setting  is  used for  emphasizing  the  left
or  right speaker balance.

Press   or   button to select 

Balance

. Press

 / 

 button to change the level of the balance.

Balance  level  can  be  adjusted  between 

-32

and 

+ 32

.

Sound Mode

Press   or   button to select 

Sound Mode

.

Using 

  / 

  button,  you  can  select 

Mono

,

Stereo

Dual  I

  or 

Dual  II

  mode,  only  if  the

selected  channel  supports  that  mode.

AVL

Automatic Volume Limiting (AVL) function adjusts
the  sound  to  obtain  fixed  output level  between
programmes  (For  instance,  volume  level  of
advertisement s  tends  to  be  louder  than
programmes).

Press   or   button to select 

AVL

VL

. Press 

 / 

button  to set the AVL as On or Off.

Effect

If  you  are  watching  a  mono  broadcast,  set

Effect 

on to obtain a better sound effect which

will be more  stereo-like.  If the current  sound
system is stereo, switching this effect on will
give a more spatial effect.

Press   or   button to select 

Effect

. Press 

 button  to set 

Effect

 as On or Off.

Equalizer

Press   or   button to select 

Equalizer

. Press

 / 

 button  to change the Equalizer setting. In

equalizer menu, the mode can be changed to

Flat,  Speech,  Music,  Personal 

and

  Jazz.

Select the desired frequency by pressing   / 
button and increase or decrease the frequency
gain by pressing 

 / 

 button.

Note: 

Equalizer menu settings can be changed only

when the mode is in Personal.

HP  Volume

To  adjust  headphone  volume  level,  press 
or   button to select 

HP Volume

. Press 

 / 

button to change the level of the HP Volume.

ENG-1994W-1055 UK-17MB24H UK IDTV-(BACK LINE OUT-YPbPr-WO SVHS)-10052630-50116999.p65

16.10.2007, 14:49

29

Содержание 19LD2550BB

Страница 1: ...19LD2550BB GB Instructions for use Digital LCD olo r Television C u ...

Страница 2: ...15 Programme Selection Previous or Next Programme 16 Programme Selection Direct Access 16 Initial Settings 16 General Operation 17 Information Banner 17 Electronic Programme Guide EPG 17 Displaying the Subtitles 18 Digital Teletext 18 Over Air Download 19 Widescreen 19 IDTV Menu System 20 Channel List 20 Navigating the Entire Channel List 20 Deleting the Channels in the Channel List 20 Renaming Ch...

Страница 3: ...r System 33 Program Table 33 Name 33 Move 33 Delete 33 APS Auto Programming System 33 Favourite Mode 33 Program Lock 33 EnterPIN 34 ChangePIN 34 Displaying TV Information 34 Mute Function 34 Personal Preference 34 Zoom Modes 34 Auto 34 4 3 35 16 9 35 Cinema 35 Subtitle 35 Teletext 35 Tips 36 Screen Care 36 No Power 36 Poor Picture 36 Input Sources 36 CI Module 36 Specifications 37 Pin Specificatio...

Страница 4: ...matic Programming System All programmes can be named Forward or backward automatic tuning Sleep timer Child lock Automatic sound mute when no transmission NTSC playback It has an HDMI connector for digital video and audio This connection is also designed to accept high definition signals AVL automatic volume limiting When no valid signal is detected after 5 minutes the TV switches itself automatic...

Страница 5: ...te safety approved extension lead or consult your dealer Observe the manufacturers instructions when connecting extension leads to theTV Check the fuse rating on the new plug this should be fitted with a 5Amp fuse which conformsto eitherASTA or BSI BS1 362 approvals these are easily identifiable by either the or symbols If you are in any doubt about the installation of an extension lead please con...

Страница 6: ...washing machine Do not expose this device to rain or water as this may be dangerous and do not place objects filled with liquids such as flower vases on top Avoid from dripping or splashing If any solid object or liquid falls into the cabinet unplug the TV and have it checked by qualified personnel before operating it any further Cleaning Before cleaning unplug the TV set from the wall outlet Do n...

Страница 7: ...lection systems for recycling in the EU For more information please contact the local authority or your retailer where you purchased the product Disconnecting the Device The mains plug is used to disconnect TV set from the mains and therefore it must remain readily operable Headphone Volume Excessive sound pressure from earphones and headphones can cause hearing loss Installation To prevent injury...

Страница 8: ...x No function Image size Expand Previous Programme Personal Preference PP Reveal Index page Electronic Programme Guide EPG Update No function Hold No function BLUE Fast Text button Install Menu YELLOW Fast Text button Feature Menu TV Digital TV Mode Mono stereo Dual I II Volume Volume Double digit No function in DTV Mute only functional in analogue mode ABC DEF GHI JKL MNO PQR STU VWX YZ 1 2 3 4 5...

Страница 9: ...English 8 LCD TV and Operating Buttons Standby LED Built in Speakers Fixed Table Top Stand IR Sensor TV AV MENU P CH VOLUME P CH MENU TV AV VOLUME STAND BY Headphone Front View Side and Top Views ...

Страница 10: ...own in the illustration below HDMI Inputs are for connecting a device that has an HDMI socket Your LCD Television is capable of displaying High Definition pictures from devices such as a High Definition Satellite Receiver or DVD Player These devices must be connected via the HDMI sockets or Component Socket These sockets can accept either 720p or 1080i signals No sound connection is needed for an ...

Страница 11: ...output Connect the component video cables between the COMPONENT VIDEO INPUTS on on the TV and the component video outputs of your device While connecting be sure that the letters on your TV Y Pb Pr correspond with your device s connectors Use an appropriate RCA cable to connect the set to a subwoofer unit SCART 1 inputs or outputs for external devices CI Slot CI Slot is used for inserting a CI car...

Страница 12: ...low the TV set to reach the ambient room temperature before you connect the set to the mains Plug the power cable to the mains socket outlet Aerial Connection Connect the aerial or cable TV plug to the AERIAL INPUT socket located at the rear of the TV Aerial Input VHF UHF Antenna 75 Ohm RF Cable 75 Ohm REAR VIEW ...

Страница 13: ...HDMI source See Input selection section Most DVD players are connected through COMPONENT SOCKETS Use a component video cable to connect video input For enabling audio use a component audio cable as illustrated below When done switch to YPbPr source See Input selection section You may also connect through the SCART 1 Use a SCART cable as shown below When connections are complete you can switch to E...

Страница 14: ...hat cables shown in the illustration are not supplied Power off both the TV and the devices before making any connections For more information refer to your device s own instruction book When connections are complete you can switch to EXT1 source by pressing the AV Source button on the RC see page 15 VCR DVD Recorder Decoder scart sockets SCART cable SCART cable SCART cable REAR VIEW ...

Страница 15: ...oing to be used for an extended period of time To avoid possible failure read the following instructions and handle the remote control properly Do not drop or cause impact to the remote control Do not spill water or any liquid on the remote control Do not place the remote control on a wet object Do not place the remote control under the direct sunlight or near sources of excessive heat NOTE Remove...

Страница 16: ...a short while Source TV EXT1 YPBPR HDMI DTV Basic Operations You can operate your TV using both the remote control and buttons on the set Operation with the Buttons on the TV Volume Setting Press button to decrease volume or button to increase volume so a volume level scale slider will be displayed on the screen Programme Selection Press P CH button to select the next programme or P CH button to s...

Страница 17: ... To start installation process select Yes to cancel select No To select the Yes or No option highlight the item by using or buttons and press the OK button The IDTV will automatically tune to the UHF transmision channels 21 to 68 searching for digital terrestrial TV broadcasts and displaying the names of channels found This process will take about five minutes To cancel searching you can press the...

Страница 18: ...o Information Available will be displayed in the information banner Icons are also displayed in the information banner and if this channel is a favourite channel favourite channel icon will also be displayed If the selected channel is locked you must enter the correct four numeric code to view the channel Enter Lock Key will be displayed on the screen in such a case Enter Lock Key Electronic Progr...

Страница 19: ...xt event is highlighted a reminder is set for the highlighted programme and a clock appears on the screen Programme reminders can be set to signal that a programme is about to start when you are watching another channel If you set reminder to a programme then you will be asked for switching to that channel when the reminder time is due Newsround 16 55 17 00 30 CBBC Channel 15 00 Even Stevens 40 BB...

Страница 20: ...eletext broadcasting is the same as the aspect ratio of the picture watched previously When you press the Text button again the digital teletext screen will be displayed Over Air Download To ensure that your IDTV always has the most up to date information please ensure that after use it is set to standby mode At 3 A M each day the IDTV automatically searches for any new information which may be br...

Страница 21: ... for selecting the previous or next channel You can press RED or GREEN button to move page up or page down To watch a specific channel highlight it using or button and then press OK button while the Select item on Channel List menu is highlighted by using or button Then the name and number of the selected channel will be displayed in the top left and top right of the channel display at the top rig...

Страница 22: ...ock a channel you should know the parental lock password default value is set to 0000 in the factory and can only be changed from the Configuration menu Select the channel to be locked by highlighting it and select the Lock option by pressing or button When the OK button is pressed a dialog OSD asking for the password will be displayed SELECT i SELECT CHANNEL LIST 1 BBC ONE 1 BBC ONE 2 BBC TWO 3 I...

Страница 23: ...ressing the OK button in the auto search pop up menu All the services will be searched and a channel table will be created automatically All channels found are stored in a sorted form with respect to their channel numbers Some services may not appear with the correct channel number If the broadcaster has no channel information this may happen due to missing info Manual Search In manual search the ...

Страница 24: ... button to highlight Txt Region Select a region by using or button When finished press OK button to continue To cancel press the TV DTV button The following menu will be displayed during the APS process Auto Programming System Automatic tuning runs at 78 State Fine scanning Exit TV After APS is finalized the programme table will appear on the screen In the programme table you will see the programm...

Страница 25: ...de If the Favourite Mode is on while in normal operating mode pressing P and P buttons will only navigate through the channels that were previously defined as favourites in the channel list EPG Preference Digital terrestrial television channels can broadcast simultaneous Next Now and 7 Day electronic programme Highlight the EPG Preference line in the Configuration menu and use the or button to sel...

Страница 26: ...Parental Settings menu A dialog box asking for the lock key is displayed Enter Lock Key There is only one key which is set to 0000 initially Enter lock key If wrong lock key is entered the following message is displayed and the TV then returns to the previous menu Wrong Lock Key If it is correct the Parental Settings menu will be displayed including the following items Menu Lock Installation Set L...

Страница 27: ...ting using the or buttons The channel name is set using the or button to display the channel which broadcasts the programme The start time end time and date are each set with the numeric buttons on the remote control in 24 hour format The frequency mode determines how often the receiver operates this event and is set with the or button to be either Once Daily or Weekly If an invalid number for the...

Страница 28: ...ubscribing to a pay channel company then insert those to the TV using the following procedure Switch off the TV and unplug from the mains Insert the CAM then viewing card to the slot that is located in the terminal cover at the left hand side of the TV from front view The CAM should be correctly inserted it is impossible to insert fully if reversed The CAM or the TV terminal may be damaged if the ...

Страница 29: ...ack Menu Exit TV Favorite mode On SOUND MENU PICTURE MENU FEATURES MENU INSTALL MENU Volume Balance Sound Mode AVL Effect Equalizer Mode HP Volume Store Picture Mode Brightness Contrast Colour Sharpness Colour Temp Room Lightning Picture zoom Store Sleep Timer Language Childlock Menu Colour Favorite Mode Programming Programme Band Channel Standard Colour System Search VCR Mode Decoder Store APS Au...

Страница 30: ...32 and 32 Sound Mode Press or button to select Sound Mode Using button you can select Mono Stereo Dual I or Dual II mode only if the selected channel supports that mode AVL Automatic Volume Limiting AVL function adjusts the sound to obtain fixed output level between programmes For instance volume level of advertisements tends to be louder than programmes Press or button to select AVL VL Press butt...

Страница 31: ...ng Select Room Lighting by pressing the button Press button to set Room Lighting as Normal Bright or Movie Picture Zoom Picture Zoom setting enables you to select the aspect ratio of the broadcast Select Picture Zoom by pressing button Use buttons to change Picture Zoom to Auto 4 3 16 9 Cinema or Subtitle Store Select Store by pressing button Press or OK button to store the settings Stored will be...

Страница 32: ...hen press button to display Programming menu PROGRAMMING Programme 4 Band S Channel 30 Standard BG Colour System PAL Back Menu Exit TV Programme Select Programme by pressing button Press button to select the programme number You can also enter a number via the numeric buttons on the remote control There are 100 programme storage between 0 and 99 Band Band can be selected either C or S Press button...

Страница 33: ...screen A P S Select A P S by pressing button Press button to enter the A P S submenu Auto Programming System Country U K Warning All prestored programs will be deleted Start Ok Back Menu Exit TV A P S Country Press button to set your country If you want to exit from A P S function press the TV DTV button For going back press MENU When you press OK button for starting APS all stored programs will b...

Страница 34: ... to select the other letters By pressing the YELLOW button you can store the name Move Select the programme that you want to insert by using the navigation buttons Press the GREEN button Using navigation buttons move the selected programme to the decided programme space and press the GREEN button again Delete To delete a programme press the RED button Pressing the RED button again erases the selec...

Страница 35: ...ew PIN Hint If you forget your Program Lock password you can deactivate the Program Lock by using the code 7910 and be able to set new password for future use Thus do keep this code in a safe place for future reference Displaying TV Information Programme Number Programme Name Sound Indicator and Zoom Mode information are displayed on the screen when a new programme is entered Mute Function Press b...

Страница 36: ...ressed once Pressing this button again will split the screen into two windows one displaying the teletext and the other displaying the current channel Pressing again will quit the teletext mode Index Selects the teletext index page Mix Places the teletext screen over the programme Expand Press once to enlarge top half of the page press again to enlarge the bottom half of the page Press again to re...

Страница 37: ...ou can improve the picture quality by changing the direction of the aerial Is the picture or teletext unrecognisable Check if you have entered the correct frequency The picture quality may degrade when two peripherals are connected to the TV at the same time In such a case disconnect one of the peripherals No Picture Is the aerial connected properly Are the plugs connected tightly to the aerial so...

Страница 38: ... 148KHz Formats Auto 4 3 16 9 Cinema or Subtitle AUDIO German Nicam Stereo INPUT CONNECTIONS Video TV Tuner IEC 75 Ohm Input Resistance SCART CVBS RGB YPbPr 3 x RCA HDMI x 1 Audio YPbPR Phono L R OUTPUT CONNECTIONS Audio Line Out 3 5mm Jack L R Headphones 3 5mm Jack L R Audio Speaker Output 2 x 3W RMS 10 THD OPERATOR CONTROL KEYS TV AV MENU P CH P CH VOL VOL STANDBY OPERATING CONDITIONS Temperatur...

Страница 39: ... 14 GND 4 AUDIO GND 15 RGB R S VHS CHROMINANCE IN 5 RGB B GND 16 BLANKING SIGNAL 6 AUDIO IN LEFT MONO 17 COMPOSITE VIDEO GND 7 RGB B IN 18 BLANKING SIGNAL GND 8 AUDIO RGB SWITCH 16 9 19 COMPOSITE VIDEO OUT 9 RGB G GND 20 COMPOSITE VIDEO S VHS LUMINANCE IN 10 Not used 21 GND SHIELD CHASSIS 11 RGB G IN Pin Specifications AV Signal Compatibility Source Available O O X X O O 480i 60Hz O 576i 50Hz O 48...

Страница 40: ...proceed as follows The wire which is coloured green and yellow must be connected to the terminal which is marked with the letter E or by the earth symbol or coloured green or green and yellow The wire which is coloured blue or black must be connected to the terminal which is marked with the letter N or coloured Black The wire which is coloured brown or red must be connected to the terminal which i...

Страница 41: ... connect the aerial through a VCR Aerial RF Socket Aerial RF Socket wall socket wall socket Aerial RF Lead Aerial RF Lead Optional Scart Lead TV to VCR Aerial RF Socket VCR RF connector lead VCR to TV It is recommended that a scart lead should be fitted between your TV and VCR to enhance your picture and sound quality Scart leads are essential if you have a stereo TV and VCR and wish to obtain ste...

Страница 42: ...ctor lead Device to TV wall socket Aerial RF Lead Aerial RF Socket High Definition Your LCD Television is capable of displaying High Definition pictures from devices such as a High Definition Satellite Receiver or DVD Device These devices must be connected via the HDMI socket or Component Socket These sockets can accept either 720p or 1080i signals Switch to these sources from the Source Menu Also...

Страница 43: ...n Off button NB When the set is first switched on the set will be in standby Press the channel up down P and the indicator on the front of the set will illuminate red P or numeric buttons 1 2 3 to operate insert plug European plug and switch on insert plug UK plug Front View Programme Up Volume Up Volume Down Programme Down To select a programme number To enter the main menu For navigation of the ...

Страница 44: ... on the screen To continue Auto Program first set the language country and Txt region by using button and then press the OK Select button For details please refer to the Install Menu section of the instruction book 50109282 When the TV is turned on for the first time it is in the digital mode Because this is the first time the TV is used there are no channels stored in the memory and the following...

Страница 45: ...Keep this important information about how to re tune your TV during the digital TV switchover Keep this leaflet and your instruction manual safe you ll need them ...

Страница 46: ...V equipment Your new TV has a digital tuner built in which means it is ready to receive the Freeview signal by simply plugging it into your aerial socket check if you can get digital TV through your aerial now or whether you ll have to wait until switchover at www digitaluk co uk When the TV switchover happens in your area there are at least two occasions when you will need to re tune your TV in o...

Страница 47: ...isit www digitaluk co uk 1 With your TV in digital TV mode press Menu on your remote control 2 From the menu options on screen select Installation Select First Time Installation to re tune your digital TV not Add New Channels 3 If you do not re tune your channels when advised to do so by Digital UK you may lose some or all of your channels until you do re tune You should re tune your Freeview ever...

Страница 48: ... non BT lines Visit us at digitaluk co uk_call us on 08456 50 50 50 The exact date you switch depends on the transmitter you are served by To check when you switch go to Digital UK s postcode checker on www digitaluk co uk Check your ITV news service or look at Teletext page 106 to see what TV region you re in Copeland switches on October 17 2007 ...

Страница 49: ......

Отзывы: