background image

Connector


1. CameraLink connector 
      D.OUT 1 (Connector 1) 

Pin No.  Signal 

Pin No.

Signal 

+12V (PoCL) 

14 

GND 

GND (non-PoCL) 

TXOUT 0 (-) 

15 

TXOUT 0 (+) 

TXOUT 1 (-) 

16 

TXOUT 1 (+) 

TXOUT 2 (-) 

17 

TXOUT 2 (+) 

TXCLKOUT (-) 

18 

TXCLKOUT (+) 

TXOUT 3 (-) 

19 

TXOUT 3 (+) 

RX (+) [ SERTC (+) ] 

20 

RX (-) [ SERTC (-) ] 

TX (-) [ SERTFG (-) ] 

21 

TX (+) [ SERTFG (+) ] 

TRIG/VD (-) [ CC1 (-) ] 

22 

TRIG/VD (+) [ CC1 (+) ] 

10 

N.U. [ CC2 (+) ] 

23 

N.U. [ CC2 (-) ] 

11 

N.U. [ CC3 (-) ] 

24 

N.U. [ CC3 (+) ] 

12 

N.U. [ CC4 (+) ] 

25 

N.U. [ CC4 (-) ] 

13 

GND 

26 

+12V (PoCL) 
GND (non-PoCL) 

      D.OUT 2 (Connector 2: used for Medium configuration) 

Pin No.  Signal 

Pin No.

Signal 

+12V (PoCL) 

14 

GND 

GND (non-PoCL) 

TYOUT 0 (-) 

15 

TYOUT 0 (+) 

TYOUT 1 (-) 

16 

TYOUT 1 (+) 

TYOUT 2 (-) 

17 

TYOUT 2 (+) 

TYCLKOUT (-) 

18 

TYCLKOUT (+) 

TYOUT 3 (-) 

19 

TYOUT 3 (+) 

N.U. 

20 

N.U. 

N.U. 

21 

N.U. 

N.U. 

22 

N.U. 

10 

N.U. 

23 

N.U. 

11 

N.U. 

24 

N.U. 

12 

N.U. 

25 

N.U. 

13 

GND 

26 

+12V (PoCL) 
GND (non-PoCL) 

        SDR connector (3M) or equivalent   


N.U.: Not used 

- The digital out cable should be comprised of a twisted pair of wires having 100Ω  characteristic impedance and an outer   

sheath shield type conductor. 

- Connect the shield (ground) of the digital out cable to the ground terminal of the video equipment, frame grabber, etc. 
- TX: Transmit data from camera to machine 
- RX: Transmit data from machine to camera 
(Note) Please do not unplug and insert cable (digital out cable) with a power supplied to a camera. 
            Install clamp filter (ZCAT2035-0930A: TDK) at both ends (camera and video processor ends) in the CE marking legion. 

 
2. DCIN/SYNC connector 

PIN NO. 

Signal 

PIN NO.

Signal 

GND 

Trigger IN /VD IN 

N.U. (PoCL) 

GND 

+12V (non-PoCL) 

GND 

N.U. 

N.U. 

10 

FLASH OUT / VD OUT 

GND 

11 

N.U. 

N.U. 

12 

GND 

N.U.: Not used 

        Plug (matching cable plug : HR10A-10P-12S(01) HIROSE    or equivalent 

(Note) Please do not unplug and insert cable (camera cable) with a power supplied to a camera. 

Содержание KP-FD510WCL

Страница 1: ...ompliant These products comply with the requirement of the RoHS Restriction of the use of Certain Hazardous Substances in Electrical and electronic Equipment Directive 2002 95 EC Thank you for purchase this fine Hitachi Kokusai Electric CCD camera Before using the camera please read this operation manual carefully ...

Страница 2: ...ould be routed to that they are not likely to be walked on or pinched by items placed upon or against them paying particular attention to cords at plug convenience receptacles and the point where they exit from the product 14 Lightning For added protection for this product during a lightning storm or when it is left unattended and unused for long periods of time unplug it from the wall outlet This...

Страница 3: ...lichst nicht darauf getreten wird und daß sie nicht eingeklemmt werden mit besonderer Beachtung der kabel an Stackern Verlängerungskabeln und dem Austritt des Kabels aus dem Erzeugnis 14 Blitzschlag Für zusätzlichen Schutz des Erzeugnisses während eines Gewitters oder bei Nichtverwendung für lange Zeit den Stecker aus der Steckdose ziehen Dies verhütet Beschädigung durch Blitzschlag und Netzspannu...

Страница 4: ... Acheminer les cordons d alimentation de facon qu on ne risque pas de marcher dessus ou de les coincer sous un objet placé dessus ou contre eux Faire particuliérement attention aux fiches des cordons á la proximité des prises et á l endroit oú ils ressortent de l appareil 14 Foudre Pour renforcer la protection de l appareil pendant un orage ou si l on s en éloigne ou qu on reste longtemps sans l u...

Страница 5: ...5 of the FCC Rules These limits are designed to provide reasonable protection against harmful interference when the equipment is operated in a commercial environment This equipment generates uses and can radiate radio frequency energy and if not installed and used in accordance with the instruction manual may cause harmful interference to radio communications Operation of this product in a residen...

Страница 6: ...E ...

Страница 7: ...vent the camera shows any abnormality switch off the camera and disconnect the power cord Contract a Hitachi Denshi service representative 2 Handling Do not attempt to remove cover When installing or removing a lens be sure to use care that water or dust dose not enter the inside of the camera 3 Installing and storage Avoid installing or storing the camera in the following environments Environment...

Страница 8: ... functions 2 6 Camera mounting 2 7 Lens 2 8 Optical filter 3 9 Connector 4 10 Functions and operations 5 11 Remote control 9 12 Command list 16 13 CameraLink output timing chart 20 14 Trigger operation and timing chart 24 15 Input Output signal 27 16 Spectral response 28 17 Specifications 29 18 Dimensions 30 ...

Страница 9: ... from the DCIN SYNC connector is also possible it is possible to make the camera work by using usual frame grabber board The power supply from the DCIN SYNC connector is given to priority when the power supply is supplied from both System example KP FD510WCL connect to frame grabber board using CameraLink cable KP FD510WCL PoCL KP FD510WCL non PoCL AC adaptor Power over type CameraLink frame grabb...

Страница 10: ... connector Use for DC 12V power or external trigger VD signal input Camera Tripod adaptor mounting screw holes CAUTION Observe the dimensions of the lens mounting selection as illustrated at the right If the dimensions are not observed do not use such a lens because the lens and the camera will be damaged Lens flange Lens optics Max 9mm Screw type U1 4 20 Length L 4 to 5 5mm Screws longer than 5 5...

Страница 11: ...ff 2 Remove the IR cut filter from filter frame 3 Then reinstall and secure filter holder with two screws Note Prior to removing the optical filter be sure to turn off the power Since garbage etc invades into image reception surface camera please work under the clean air such as a CREAN ROOM 1 2 3 4 ...

Страница 12: ...SDR connector 3M or equivalent N U Not used The digital out cable should be comprised of a twisted pair of wires having 100Ω characteristic impedance and an outer sheath shield type conductor Connect the shield ground of the digital out cable to the ground terminal of the video equipment frame grabber etc TX Transmit data from camera to machine RX Transmit data from machine to camera Note Please d...

Страница 13: ...put trigger signal from 7 pin of 12 pin DCIN SYNC connector See Trigger operation and timing chart page 23 to 27 2 OUTPUT SIGNAL Setting of output signal from 10 pin of 12 pin DCIN connector OFF Factory setting No output FLASH OUT Output flash pulse strobe out VD OUT Output camera VD 3 SHUTTER Setting of electronic shutter OFF Factory setting Shutter operation set to OFF normal shutter 1 12 1 60 1...

Страница 14: ...HD Output HD LVAL Factory setting Output LVAL 7 GAIN LEVEL Setting of electrical sensitivity LEVEL Adjust MANUAL gain level 0 Factory setting Set MANUAL gain when AGC is OFF to 12dB From 0 to 12dB in 337 steps 8 GAMMA Setting of gamma correction MODE Select of mode OFF Factory setting Not perform gamma correction ON Adjust the detail gamma according to setting value LEVEL Adjust gamma correction 0...

Страница 15: ...Blue gain is reduced at 0 side and raised at 255 side Factory setting is 128 14 MASKING Setting of 6 vector independent making primary color R G B and complementary color Ye Cy Mg saturation and hue can be separately varied MODE Select of mode OFF Factory setting Not use masking functions ON Use masking functions R SATURATION Adjust red saturation 0 Factory setting to 255 Adjust red saturation in ...

Страница 16: ...ting Scan is performed number of line set up in 1 to 2050 is scanned Note When WIDHT is 16 or less AGC and AES may not operate 17 TEST PATTERN Setting for the test pattern OFF Factory setting Test pattern is OFF H LAMP Output the horizontal lamp image V LAMP Output the vertical lamp image HV LAMP Output the horizontal and vertical lamp image 18 BALANCE ADJUST Setting for the balance of the right a...

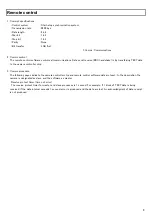
Страница 17: ...ansferring TEXT data to the camera controller chip 3 Comms procedure The following pages indicate the camera controller chip and remote control software data protocol In the description the camera is designated as slave and the software as master Receive protect timer time out error The receive protect timer for master and slave processes is 1 second For example if 1 block of TEXT data is being re...

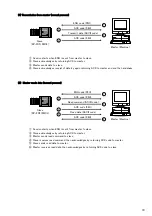
Страница 18: ...r to slave Slave acknowledges by returning ACK to master Master sends read command to slave Slave receives read command then acknowledges by returning ACK code to master Slave sends read data to master Master receives read data then acknowledges by returning ACK code to slave Slave KP FD510WCL HITACHI Master Machine 1 2 3 4 ENQ code 05H ACK code 06H Transmit data ASCII code ACK code 06H HITACHI Ma...

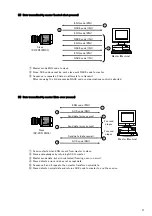
Страница 19: ...urning ACK to master Master sends data but error detected framing over run error Slave detects error and does not accept data Sequence 3 and 4 repeats then master transfers normal data Slave detects normal data and returns ACK code to master to end the session HITACHI Master Machine 1 2 3 ENQ code 05H NACK code 15H ENQ code 05H NACK code 15H ENQ code 05H NACK code 15H ENQ code 05H NACK code 15H Sl...

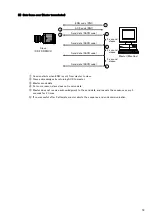
Страница 20: ... Master does not receive acknowledgment to the send data and repeats the sequence every 3 seconds for 3 times If unsuccessful after 3 attempts master aborts the sequence and ends communication HITACHI Master Machine 1 2 3 ENQ code 05H ACK code 06H Send data ASCII code Send data ASCII code Send data ASCII code 4 5 Send data ASCII code 6 3 second elapse 3 second elapse 3 second elapse Slave KP FD510...

Страница 21: ...ason master fails to receive read data Slave fails to receive acknowledgment of read data and attempts to resend every 3 seconds for 3 times After the third failure slave aborts the sequence and ends communication HITACHI Master Machine 1 2 6 ENQ code 05H ACK code 06H Read data ASCII code Read data ASCII code Read data ASCII code 7 Read data ASCII code 8 3 4 Read command ASCII code ACK code 06H 5 ...

Страница 22: ...and ETX 2 byte ASCII code d Text data format details transmission sequence Status Transmission data status 2 byte ASCII code Used for EEPROM write 0 write absent 1 write present ID No Camera peculiar ID KP FD510WCL has FFH 2 byte ASCII code Area address Classification of Send data 01H and Read command 81H 2 byte ASCII code Relative No Sets number 0 to 255 for each adjustment item 2 byte ASCII code...

Страница 23: ... 0x01 Send data 0x81 Read command 1 Data 0x00 0x00 Common data 2 Upper Lower 0x00 3 Upper Mid Lower 5 Calculation method of checksum Example STX 1 2 3 4 5 6 7 ETX SUM STATUS ID NO AREA ADDRESS RELATIVE NO DATA 02 01 FF 01 04 00 00 00 03 28 i STAUTUS to DATA are transformed into hexadecimal number on the basis of the ASCII code 0 30 16 1 31 16 4 34 16 F 46 16 STX 02 16 ETX 03 16 ii STX to ETX are a...

Страница 24: ... 01 15 00 00 00 03 26 FVAL 02 01 FF 01 15 01 00 00 03 25 HD LVAL HD 02 01 FF 01 16 00 00 00 03 25 LVAL 02 01 FF 01 16 01 00 00 03 24 GAIN 2Byte 4 MIN 0 02 01 FF 01 0C 00 00 00 03 19 MAX 336 02 01 FF 01 0C 01 50 00 03 13 GAMMA MODE OFF 02 01 FF 01 23 00 00 00 03 27 ON 02 01 FF 01 23 01 00 00 03 26 LEVEL MIN 0 02 01 FF 01 24 00 00 00 03 26 MAX 255 02 01 FF 01 24 FF 00 00 03 FA SHARPNESS MODE OFF 02 ...

Страница 25: ...0 00 03 F5 Mg HUE MIN 0 02 01 FF 01 39 00 00 00 03 20 MAX 255 02 01 FF 01 39 FF 00 00 03 F4 B SATURATION MIN 0 02 01 FF 01 3A 00 00 00 03 18 MAX 255 02 01 FF 01 3A FF 00 00 03 EC B HUE MIN 0 02 01 FF 01 3B 00 00 00 03 17 MAX 255 02 01 FF 01 3B FF 00 00 03 EB Ye SATURATION MIN 0 02 01 FF 01 3C 00 00 00 03 16 MAX 255 02 01 FF 01 3C FF 00 00 03 EA Ye HUE MIN 0 02 01 FF 01 3D 00 00 00 03 15 MAX 255 02...

Страница 26: ... 48 20 00 00 03 1E MAX 1 1456dB 02 01 FF 01 48 40 00 00 03 1C RIGHT BLACK 9 MIN 128 2048 02 01 FF 01 4A 00 00 00 03 17 0 2048 02 01 FF 01 4A 80 00 00 03 0F MAX 127 2048 02 01 FF 01 4A FF 00 00 03 EB TEST PATTERN OFF 02 01 FF 01 50 00 00 00 03 27 H 02 01 FF 01 50 01 00 00 03 26 V 02 01 FF 01 50 02 00 00 03 25 HV 02 01 FF 01 50 03 00 00 03 24 FACTORY SETTING SET 02 01 FF 01 45 01 00 00 03 22 9 RIGHT...

Страница 27: ...1 2A 00 00 00 03 12 B GAIN 02 00 FF 81 2B 00 00 00 03 11 MASKING MODE 02 00 FF 81 31 00 00 00 03 21 R SATURATION 02 00 FF 81 32 00 00 00 03 20 R HUE 02 00 FF 81 33 00 00 00 03 1F Cy SATURATION 02 00 FF 81 34 00 00 00 03 1E Cy HUE 02 00 FF 81 35 00 00 00 03 1D G SATURATION 02 00 FF 81 36 00 00 00 03 1C G HUE 02 00 FF 81 37 00 00 00 03 1B Mg SATURATION 02 00 FF 81 38 00 00 00 03 1A Mg HUE 02 00 FF 8...

Страница 28: ...rizontal timing 2 Vertical timing CameraLink output timing chart VIDEO Active Picture LVAL 2568 clk 2448 clk 8clk 100clk HD 12clk 1clk 15 625ns Active Picture VIDEO FVAL 2079 H 2050 H 10H 3H VD 16H 1H 40 125μs ...

Страница 29: ...nfiguration please be sure to connect CameraLink cable to D OUT 1 If the cable is connected to D OUT 2 machine may break down Previous Cycle TCLK 15 625ns 64 0000MHz R7 1 R6 1 N U B7 B6 G7 G6 R7 R6 B3 1 B2 1 N U FVAL LVAL B5 B4 B3 B2 G2 1 G1 1 B1 B0 G5 G4 G3 G2 G1 R1 1 R0 1 G0 R5 R4 R3 R2 R1 R0 X3 X2 X1 X0 CLKX Next Cycle VD HD ...

Страница 30: ...AL B5 B4 B3 B2 N U R9 1 B1 B0 B9 B8 N U N U R9 R1 1 R0 1 R8 R5 R4 R3 R2 R1 R0 X3 X2 X1 X0 CLKX Next Cycle VD HD TCLK 15 625ns 64 0000MHz Previous Cycle N U N U N U N U N U G7 G6 N U N U N U N U N U FVAL LVAL N U N U N U N U G2 1 G1 1 G9 G8 G5 G4 G3 G2 G1 N U N U G0 N U N U N U N U N U N U Y3 Y2 Y1 Y0 CLKY Next Cycle VD HD TCLK 15 625ns 64 0000MHz ...

Страница 31: ...R10 1 R9 1 B1 B0 B9 B8 R11 R10 R9 R1 1 R0 1 R8 R5 R4 R3 R2 R1 R0 X3 X2 X1 X0 CLKX Next Cycle VD HD TCLK 15 625ns 64 0000MHz Previous Cycle N U N U N U N U N U G7 G6 N U N U G11 1 G10 1 N U FVAL LVAL N U N U G11 G10 G2 1 G1 1 G9 G8 G5 G4 G3 G2 G1 N U N U G0 N U N U N U N U N U N U Y3 Y2 Y1 Y0 CLKY Next Cycle VD HD TCLK 15 625ns 64 0000MHz ...

Страница 32: ...te and number of total line can be calculated from following equation using width of picture grabbing Total line 20 Width 2071 Width 4 omit the figures after the decimal fractions Frame rate 64000000 2568 Total line Trigger operation and timing chart 0 5 10 15 20 25 30 35 40 45 50 0 500 1000 1500 2000 Width of picture grabbing H Frame rate fps Shutter time Shutter time Camera setting value Data ou...

Страница 33: ...xed exposure The strobe signal start end can be set to shutter time When normal mode 1 T 2079H 2 16H 3 2050H When partial scan mode 1 T 20 Width 2071 Width 4 H 2 16 Start 4 H 3 Width H Note1 Please use the partial scan in following condition Width Start 2051 Note2 Please use FVAL in the partial scan 3 Trigger input POS High Low Shutter time Shutter time Camera setting value Data output More than 1...

Страница 34: ...trigger signal width equals the exposure time When normal mode 1 T 2079H 2 16H 3 2050H When partial scan mode 1 T 20 Width 2071 Width 4 H 2 16 Start 4 H 3 Width H Note1 Please use the partial scan in following condition Width Start 2051 Note2 Please use FVAL in the partial scan Trigger input POS High Low Shutter time Shutter time Integration time Data output More than T 1 Flash output VD 3H FVAL 2...

Страница 35: ... If the external VD of cycle which does not match the camera operation mode is input shutter time has an error 1 Input signal The level of the trigger signal input to KP FD510WCL is as follows 1 Input from CameraLink cable LVDS level 2 Input from DCIN 12 pin connector High level 2 5 to 5 0 V Low level 0 to 0 3 V 2 Output signal The level of the trigger signal output from KP FD510WCL is as follows ...

Страница 36: ...28 KP FD510WCL Spectral response Relative Response R G B IR cut filter ...

Страница 37: ... 1 100 1 250 1 1000 1 2000 1 10000秒 and 1 50000 second Variable 10 to 1 100000 second 16 Frame on demand Mode OFF Normal mode Fixed shutter mode ONE trigger mode VD reset mode Trigger input From CameraLink CC1 or DCIN SYNC 12pin connector 17 Partial scan Selectable start position and width of picture grabbing in 1H step 18 Remote control Control system Start stop synchronization system Control ite...

Страница 38: ... P E R C E V O I R M A N U E L D OUT 2 D OUT 1 2 M2 DEPTH 3 2 M3 DEPTH 3 2 M2 DEPTH 3 21 1 COLOR BLACK 47 1 5 6 34 1 28 0 5 44 0 5 25 0 5 44 0 5 28 0 5 26 1 U1 25 3 2 M3 DEPTH 3 4 M3 DEPTH 6 R o H S SER NO 10 1 2 5 0 5 DC IN SYNC MASS APPROX 110 g UHIT mm SCALE NTS MASS APPROX 110g UNIT mm SCALE NTS ...

Страница 39: ...th Sales Service 1 256 774 3777 Parts Center phone 1 516 682 4435 Fax 1 516 921 0993 Latin Sales phone 1 519 682 4420 Fax 1 516 496 3718 URL http www hitachikokusai us Hitachi Kokusai Electric Canada Ltd Head Office 1 Select Avenue Unit 12 Scarborough Ontario M1V 5J3 Canada Phone 1 416 299 5900 Fax 1 416 299 0450 Eastern Office 5795 Chemin St Francois St Laurent Quebec H4S 1B6 Canada Phone 1 514 3...

Отзывы: