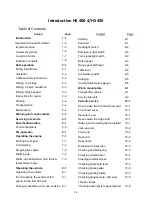
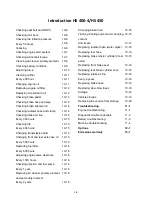
background image

Safe Operation 


2-5


8.  equipment by professionals. 
9.  Keeping specified tire pressure can help to 

ensure driving safety. 

10. Elevate the vehicle and place a suitable 

stand under the frame when removing the 
wheels, Be sure to tighten the wheel nuts to 
specified torque. 


Содержание HS 400-4

Страница 1: ...of the instructions herein will provide the knowledge needed to have safe and enjoyable UTV operation For questions regarding this UTV please call 972 446 0760 IMPORTANT SAFETY MESSAGES READ THIS MANU...

Страница 2: ...anual by the following notations The Safety Alert Symbol means ATTENTION YOUR SAFETY IS INVOLVED Failure to follow WARNING instructions could result in severe injury or death to the machine operator b...

Страница 3: ...erature is below 4 F 20 C park the UTV in a place where the temperature is higher than 4 F 20 C Start the UTV after the UTV has warmed up Please see page 7 3 on the warming up process Follow the prope...

Страница 4: ...below with an indication of their meaning Safety Alert Symbol Lift Cylinder Retract Diesel Fuel Lift Cylinder Extend Engine coolant Temperature Lift Cylinder Float Parking Brake Hazard Warning Lights...

Страница 5: ...w vehicle 8 1 Do not operate the vehicle at full speed for the first 50 hours 8 1 Changing lubricating oil for new vehicles 8 1 Subject Page Starting 8 1 Seat belt 8 1 Head light switch 8 2 Emergency...

Страница 6: ...axle case oil 10 15 Every 500 hours 10 16 Replacing fuel filter 10 16 Every 600 hours 10 16 Adjusting engine valve clearance 10 16 Every 1500 hours 10 16 Checking injection and fuel pump 10 16 Every 1...

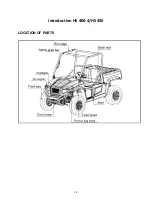
Страница 7: ...Introduction HS 400 4 HS 450 1 7 LOCATION OF PARTS...

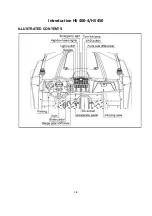
Страница 8: ...Introduction HS 400 4 HS 450 1 8 ILLUSTRATED CONTENTS...

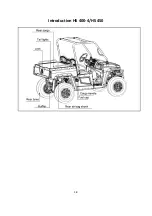
Страница 9: ...Introduction HS 400 4 HS 450 1 9...

Страница 10: ...eration as these can be drawn into moving parts on the vehicle and could cause a severe injury to occur You should wear protective devices such as helmet boots eye protection earmuff gloves and etc 5...

Страница 11: ...rn at different speed Otherwise the vehicle may turnover 10 Never drive over terrain such as a ditch a hole dams excessive mud or the vehicle can get stuck because of the vehicles weight 11 Always pay...

Страница 12: ...tion 5 Driving in harsh conditions 1 Vehicle can be operated during the day or under good light conditions 2 Operate the vehicle in open smooth pavement 3 Under all conditions both operator and passen...

Страница 13: ...position stop the engine and remove the key 1 When working next to the engine exhaust or radiator work only after it has cooled down 2 Wait for the engine to stop running and cool down before checking...

Страница 14: ...by professionals 9 Keeping specified tire pressure can help to ensure driving safety 10 Elevate the vehicle and place a suitable stand under the frame when removing the wheels Be sure to tighten the...

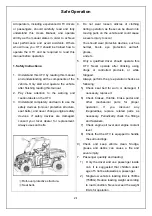
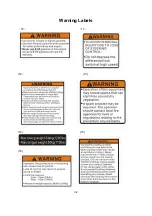
Страница 15: ...Warning Labels 3 1 Warning and caution labels 1 2 3 4 5 6 7 8 9...

Страница 16: ...Warning Labels 3 2 10 11 12 13 14 15 16...

Страница 17: ...Warning Labels 3 3 17...

Страница 18: ...owever when in need of parts or major service be sure to see your dealer For service contact the dealership from which you purchased your vehicle or your local dealer When in need of parts be prepared...

Страница 19: ...ntrol switch Gear selection F N R for HS400UTV 4 H L range forward N R for HS450UTV Brakes Front Rear Wet disk brake Parking brake Axis brake pedal braking Steering Mechanical Suspension Front Indepen...

Страница 20: ...6 min 27 9 14 14 7 max 6PR Rear 25 10 12 12 8 min 27 11 14 14 9 max 6PR Body color Red Black White Blue Yellow Orange Camo NOTE The values in Ground clearance and Weight are those of the machine equip...

Страница 21: ...t in vehicle malfunction or failures with a possibility of the vehicle damage to other property and injury to the operator or others Any malfunctions or failures of the vehicle resulting from use with...

Страница 22: ...y inspect the exterior of the vehicle Check engine oil level Check transmission oil level Check brake fluid level Check coolant level Clean radiator screen When used in a dusty place Check brake and p...

Страница 23: ...a rule to set gear shift lever to NEUTRAL position before starting the engine IMPORTANT Do not use starting fluid or ether To protect the battery and the starter make sure that the starter is not con...

Страница 24: ...nly Always conduct daily checks carefully by referring to DAILY CHECK in PERIODIC SERVICE section 5 Turn the key to START position and release when the engine starts IMPORTANT Because of safety device...

Страница 25: ...ing warm up For 5 minutes after engine start up allow the engine to warm up without applying any load This is to allow oil to reach every engine part If load applied to the engine without warming up e...

Страница 26: ...aster than prescribed On rough roads slow down to suitable speeds Do not operate the vehicle at fast speed The above precautions are not limited to new vehicles However they should be especially obser...

Страница 27: ...dometer 5 Front left and right position lights Emergency Light Switch if equipped Press the top half of the emergency light switch the light flash along with the indicator on the instrument panel Pres...

Страница 28: ...he brake pedal is the left pedal on the foot board Depress the pedal to slow or stop the vehicle Brake pedal 4 Selecting the travel speed Range Gear Shift Lever CAUTION To avoid personal injury Avoid...

Страница 29: ...ge do not force the lever Depress the brake pedal fully then shift the lever Damage may occur with wrong shifting operation 4WD Lever CAUTION To avoid personal injury when traveling at road speed Use...

Страница 30: ...suddenly become very white While driving check the following items to see if all parts are functioning normally Fuel gauge Coolant Temperature Gauge CAUTION To avoid personal injury Do not remove radi...

Страница 31: ...cle 8 6 Coolant temperature gauge The hourmeter indicates in five digits the hours the vehicle has been used the last digit indicates 1 10 of an hour Hourmeter The speedometer indicates the traveling...

Страница 32: ...in the winch owner s manual before attempting to install or use a winch Winch mount plate Transporting Vehicle Pay attention to the following points when transporting the vehicle 1 Use a suitable truc...

Страница 33: ...local dealer for this service 5 When the battery is used for less than 100 hours per year check the battery condition by reading the indicator annually The items listed below with a mark are registere...

Страница 34: ...tor hose and clamp Check Every 200 hrs Replace Every 2 years 18 Intake air line Check Every 200 hrs Replace Every 1 years 19 Brake hose pipe Check Every 200 hrs Check Every 4years 20 Tire wear Check E...

Страница 35: ...rs 32 Fuel system Bleed Service as required 33 Fuse Replace 34 Light bulb Replace NOTE Engine Oil 10W 40SL Oil used in the engine should have an American Petroleum Institute API service classification...

Страница 36: ...he latches Turn switch Front hood cover Operator s Seat To open the seat raise the seat to the forward position Operator s seat HOW TO RAISE THE CARGO BED CAUTION To avoid personal injury When servici...

Страница 37: ...or suitable blocking Front End Jack up at the front frame tube only Jack Front frame tube Rear End Jack the rear only after placing a wooden block under the right and left frame tubes for securing th...

Страница 38: ...eling 1 Turn the key switch to ON check the amount of fuel by the fuel gauge 2 Fill fuel tank when fuel gauge shows1 4 or less fuel in tank Fuel tank cap Fuel tank capacity 28L 7 4 0 1U S GALS IMPORTA...

Страница 39: ...full level In case of leakage add anti freeze and water in the specified mixing ratio up to the full level see flush cooling system and changing coolant in EVERY 2 YEARS in PERIODIC SERVICE section R...

Страница 40: ...uickly ruins synthetic resin or rubber hoses 1 Check to see that the brake fluid level is up to the LOWER mark 2 If it is below the LOWER mark add brake fluid OIL CUP LOWER Checking brake pedal CAUTIO...

Страница 41: ...ged or not 2 If the boots are cut crashed or show signs of deterioration consult your local dealer Joint boot Drive shaft Checking tire inflation pressure Though the tire pressure is factory set to th...

Страница 42: ...brake and stop the engine Test gear shift range lever safety switch 1 Sit on the operator s seat 2 Shift the range gear shift lever to F N or REVERSE position 3 Turn the key to START position 4 The en...

Страница 43: ...olvent 4 Squeeze the excess solvent out of the sponge material and let it dry 5 Inspect the sponge material and replace it if damaged 6 Thoroughly apply foam air filter oil or other quality liquid foa...

Страница 44: ...nd clamps are found to be damaged or deteriorated replace them 4 Check fuel filter if it is clogged by debris or contaminated with water replace it IMPORTANT When the fuel line is disconnected for mai...

Страница 45: ...ssible 3 When exchanging an old battery for a new one use battery of equal specification shown in table 1 Battery type Volts 12V32Ah 12 Direction for storage 1 When storing the vehicle for a long peri...

Страница 46: ...the screen assembly and lightly clean the screen with wire brush Soak in solvent and again clean with wire brush if necessary 4 If any breaks in the screen or welds are discovered the assembly must b...

Страница 47: ...icle on a flat surface remove the seat and open the adjust hatch cover 2 Remove the oil filter 3 Put a film of clean engine oil on the rubber seal of the new filter 4 Tighten the filter quickly until...

Страница 48: ...Dipstick Checking Brake Pedal CAUTION Stop the engine and chock the wheels before checking brake pedal If movement is outside of the specifications contact your local dealer for adjusting the brake Ch...

Страница 49: ...hoses and tighten hose clamps 3 securely if radiator hoses are swollen hardened or cracked Replace hoses and hose clamps every 2 years or earlier if checked and found that hoses are swollen hardened...

Страница 50: ...surface raise the cargo bed mount the safety support 2 To drain the used oil remove the drain plug at the bottom of the transmission case and drain the oil completely into the oil pan 3 After draining...

Страница 51: ...r local Dealer for this service See Checking Brake Fluid Level in DAILY CHECK in PERIODIC SERVICE section Flushing Cooling System and Changing Coolant CAUTION To avoid personal injury Do not remove th...

Страница 52: ...eeze The mixture can produce chemical reaction causing harmful substances Antifreeze is extremely flammable and explosive under certain conditions Keep fire and children away from antifreeze When drai...

Страница 53: ...ly affecting the engine parts 7 The vehicle s genuine long life coolant has a service life of 2 years Be sure to change the coolant every 2 years NOTE The above data represent industry standards that...

Страница 54: ...e poisoning do not operate the engine in a closed building without proper ventilation When storing remove the key from the key switch to avoid unauthorized persons from operating the vehicle and getti...

Страница 55: ...hicle after the muffler and the engine have cooled down REMOVING THE VEHICLE FROM STORAGE 1 Check the tire air pressure and inflate the tires if they are low 2 Install battery before installing the ba...

Страница 56: ...ery from the vehicle charge and store it indoors install it on the vehicle only when the vehicle is going to be used Engine power is insufficient Insufficient fuel The injector is clogged Crankshaft p...

Страница 57: ...t Low Voltage P0132 O2A Circuit High Voltage P0031 O2A Heater Circuit High Voltage P0032 O2A Heater Circuit Low Voltage P0201 Injector 1 Circuit Malfunction P0202 Injector 2 Circuit Malfunction P0230...

Страница 58: ...tes look whitish Refillable type battery only Battery was used with an insufficient amount of electrolyte Add distilled water and charge the battery Regularly check the electrolyte level Battery was u...

Страница 59: ...ance for the inner and outside gears of transmission shaft Replace the gears Big clearance of transmission gears Replace the gears Non good connection of gear end face Replace the gears Less vehicle p...

Страница 60: ...OPTIONS 12 1 Consult your local dealer for further details 1 Roof 2 Windshield 3 Windlass 4 Motor Scan KF90121 5 Rear Trailer Hitch Pin 2...

Страница 61: ...STEM WARRANTY NOTICE Use of this vehicle in any type of competitive event completely and absolutely voids this and all other warranties offered by HISUN OWNER S WARRANTY RESPONSIBILITIES As the vehicl...

Страница 62: ...replacements improperly installed unless performed by a HISUN authorized dealer 4 use of improper replacement parts or accessories not conforming to specifications set forth by HISUN which adversely a...

Страница 63: ...s you specific legal rights and you may also have other rights which vary from state to state V This warranty is in addition to the limited vehicle warranty VI ADDITIONAL INFORMATION Any replacement p...

Отзывы: