background image

Replacing the LED light

CAUTION! 

Only after the door seals are  

completely dry should the 

appliance be powered on.

WARNING! 

The LED light must be replaced by 

a competent person. If the LED  

light is damaged, follow the steps 

below:

1. Unplug your appliance.

2. Remove the light cover by

lifting up and pulling out.

3. Hold the LED light with one hand

and pull it while pressing the

connector latch with the other

hand.

4. Replace the LED light and snap

it correctly in place and replace

the light cover.

Door


seal


cleaning

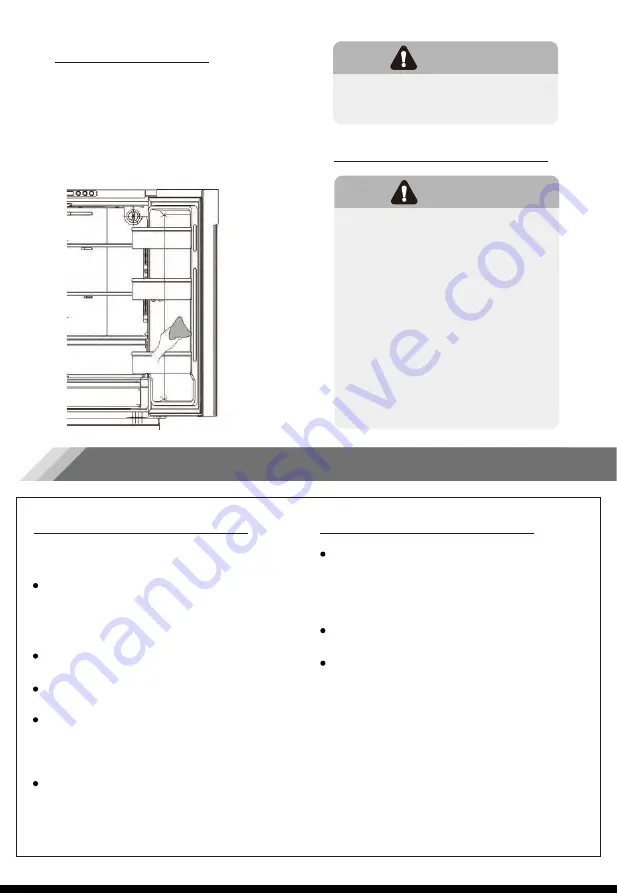
Take


care


to


kee

p


the


door


seals


clean.


Sticky


food


and


drinks


can


cause


seals


to


stick


to


the


cabinet


and


tear


when


you


open


the


door.


Wash


seal


with


a


mild


detergent


and


warm


water.


Rinse


and


dry


it


thoroughly


after


cleaning.

Helpful Hints and Tips

Energy Saving Tips

We recommend that you follow the tips 

below to save energy.

Don’t set the temperature colder than 

necessary.
Don’t store warm food or evaporating 

liquid in the appliance.

If the diagram shows the correct 

combination for the drawers, crisper and 

shelves, do not adjust the combination as 

this is designed to be the most energy 

efficient configuration.

Avoid


keeping


the


door


open


for


long


periods


in


order


to


conserve


energy.


Ensure


the


appliance


is


away


from


any


sources


of


heat


(direct


sunlight,


electric


oven


or


cooker


etc.)

Place


the


appliance


in


a


well


ventilated,


h

umidity


freeroom.


Please


refer


to


the


I

nstalling


your


New


Appliance


c

hapter.

Hints for fresh food refrigeration

Do not place hot food directly into the 

refrigerator or freezer, the internal 

temperature will increase resulting in the 

compressor having to work harder and 

consume more energy.
Do cover or wrap the food, particularly if it 

has a strong flavor.
Place food properly so that air can 

circulate freely around it.

15

Содержание RQ22N6ASD

Страница 1: ...For questions about features operation performance parts or service call 1 855 344 7367 Refrigerator Use Care Guide Model RQ22N6ASD ...

Страница 2: ... including children with reduced physical sensory or mental capabilities or lack of experience and knowledge unless they have supervision or been given instruction concerning use of the appliance Children should be supervised to ensure that they do not play with the appliance Do not store explosive substances such as aerosol cans with a flammable propellant in this appliance Kitchen areas in shops...

Страница 3: ... items on top of the appliance as this could cause injury should they fall off Never allow children to play with the appliance by hanging or standing over or on the doors racks shelves and drawers etc Electrical Safety To avoid the risks that are always present when using an electric appliance we recommend that you pay attention to the instructions about electricity belo w We recommend that you wa...

Страница 4: ...e unless they are approved by the manufacturer To avoid eye injury do not look directly into the LED light located in the refrigerator compartment If it is not functioning correctly consult a qualified registered electrician or replace it in accordance with the Cleaning and Care chapter The refrigerant isobutane R600a is contained within the refrigerant circuit of the appliance During transportati...

Страница 5: ...son sufficient clear space should be available around the refrigerator Ventilation of appliance This appliance performs well within the climate class from N to T shown in the table below It may not work properly if left at a temperature above or below the indicated range for a long period Stand your appliance in a dry place to avoid high moisture Keep the appliance out of direct sunlight rain or f...

Страница 6: ... a suitably sized Snap Ring between the Door and the Hinge as shown Contains Small Parts Keep the Snap Rings Away From Babies and Children WARNING IMPORTANT 1 Insert only one Snap Ring If you insert two or more Snap Rings they may slip out or cause a rubbing noise 2 Do not raise the door too much The door may contact and damage the top cover 3 Save rermaining Snap Rings for possible future use Sna...

Страница 7: ... the appliance doors proceed to Installing Water Lines on page 8 If you need to remove the doors continue below Door Removal Adjustable bottom feet Front roller Rear roller 0 4 0 6 Adjustable bottom feet Allen Wrench 5 32 4mm Philips Screwdriver Wrench 5 16 8mm Tools you will need Not provided 1 With the door closed remove the 3 screws holding the top cover A with Philips screw driver and then rem...

Страница 8: ...sate for the low pressure The water connection must be made by a qualified plumber Operation outside the water pressure range may cause malfunction or severe and damaging water leaks What you need to have before you begin 4 You may need to purchase several items to complete this connection You may find these items sold as a kit at a local hardware store Connecting to the water supply line 1 2 3 Fi...

Страница 9: ...n improper water flow through the line and will affect the functionality of the fridge Clip Water line Water line Coupler 5 Connect the extension tubing line with the line on the back of the fridge via the coupler Fully insert the extension tubing into the coupler and then insert the clip onto the coupler to lock in the tubing Do the same with the other end After both clips are inserted check the ...

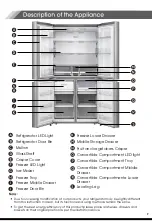
Страница 10: ... and baskets on their original position as per the illustration above Mullion Crisper Cover Fruit and vegetabers Crisper Refrigerator LED Light Refrigerator Door Bin Glass Shelf Freezer LED Light Ice Maker Freezer Tray Freezer Middle Drawer Freezer Door Bin Freezer Lower Drawer Middle Storage Drawer Convertible Compartment LED light Convertible Compartment Tray Convertible Compartment Middle Drawe...

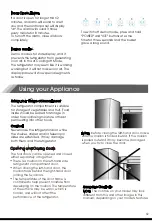
Страница 11: ...ss of the button decrease the setting by one degree 3 Release the TEMP button control when the desired temperature setting appears the setting by one degree NOTE Each press of the button decrease the My Fresh Choice icon appears 1 Press ZONE button repeatedly until 5 C to 4 F 20 C avaiable temperature settings from 41 F button repeatedly to cycle through the is illuminated and then press TEMP 2 Wh...

Страница 12: ...emperature setting will revert back to the previous setting NOTE When you selecting the Super Freeze function ensure there are no bottled or canned drinks especially carbonated drinks in the freezer compartment Bottles and cans may explode The ice maker is located inside the freezer compartment near the top of the compartment When the ice maker makes ice the ice is stored in ice storage box inside...

Страница 13: ...ned and closed either separately or together There is a mullion on the left hand side refrigerator compartment door When closing the left hand door the mullion folds behind the right hand door joining the two doors The temperature of the door frame is controlled to help prevent moisture from developing on the mullion The temperature of the surface may be warm which is normal and will not affect th...

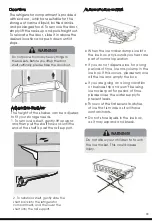
Страница 14: ...down until it stops Do not place too many heavy things in the baskets Before you liftup the door shelf vertically please take the dood out WARNING Automatic Ice maker When the ice maker dumps ice into the ice box any sounds you hear are part of normal operation lf you do not dispense ice for a long periods of time ice may clump in the ice box lf this occurs please remove all the ice and empty the ...

Страница 15: ...ty and proceed as follows Remove existing food and accessory baskets unplug the appliance from the main power and leave the doors open Ventilate the room thoroughly to accelerate the process When defrosting is completed clean your freezer as described above 1 2 For hygienic reasons the appliance including exterior and interior accessories should be cleaned at least once every two months Spray wate...

Страница 16: ...We recommend that you follow the tips below to save energy Don t set the temperature colder than necessary Don t store warm food or evaporating liquid in the appliance If the diagram shows the correct combination for the drawers crisper and shelves do not adjust the combination as this is designed to be the most energy efficient configuration Avoid keeping the door open for long periods in order t...

Страница 17: ... aluminum foil or cling wraps which are airtight Do not allow unfrozen food to touch the food which is already frozen to avoid temperature rise of the latter Hints for freezing Hints for the storage of frozen food It is recommended to label and date each frozen package in order to keep track of the storage time Once defrosted food will deteriorate rapidly and should not be re frozen Do not exceed ...

Страница 18: ... operating during the defrost cycle or for a short time after the appliance is switched on to protect the compressor The cabinet is not level The back of appliance is touching the wall Bottles or containers have fallen or are rolling The sounds below are quite normal Compressor running noises Air movement noise from the small fan motor in the freezer compartment or other compartments Gurgling soun...

Страница 19: ... It will need to run more in the following circumstances The temperature is set colder than necessary A large quantity of warm food has recently been stored within the appliance The temperature outside the appliance is high Doors are kept open too long or too often After first installing the appliance or if it has been switched off for a long time Check that the air outlets are not blocked by food...

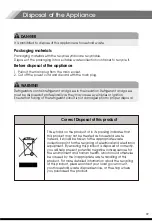
Страница 20: ...It is prohibited to dispose of this appliance as household waste Packaging materials Before disposal of the appliance This symbol on the product or in its packing indicates that this product may not be treated as household waste Instead it should be taken to the appropriate waste collection point for the recycling of electrical and electronic equipment By ensuring this product is disposed of corre...

Страница 21: ...eproduce transmit or distribute materials may be made to one of the following addresses USA CANADA MEXICO Hisense and any and all other Hisense product names logo s slogans or marks are registered trademarks of Hisense Company Ltd and its subsidiaries All other trademarks are the property of their respective holders Hisense USA Corporation 7310 McGinnis Ferry Road Suwanee GA 30024 Hisense Canada C...

Страница 22: ......
Отзывы: