


Using the TV features
1) Press the [Menu] button to enter the main Menu.
2) Press the
button to select the item CHANNEL, and press the
to enter CHANNEL Menu.
3) Press the
button to select AUTO-SEARCH.
4) Press the
button to start auto-searching.
[CH+/CH-]
[ Vol+ ]
[CH+/CH-]
[ Vol+/Vol- ]
AUTO-SEARCH
1) Press the [Menu] button to enter the main Menu.
2) Press the
button to select the item CHANNEL, and press the
to enter CHANNEL Menu.
3) Press the
button to select SKIP.
4) Press the
button to skip or unskip the present channel.
NOTE: The 'skipped' channels cannot be accessed by
, but you can access them by digit (direct select) button.
[CH+/CH-]
[ Vol+ ]
[CH+/CH-]
[ Vol+/Vol- ]
[CH+/CH-]
SKIP
1) Press the [Menu] button to enter the main Menu.
2) Press the
button to select the item CHANNEL,
and press the
to enter CHANNEL Menu.
3) Press the
button to select PROGRAM.
4) Press the
button to select the present channel.
[CH+/CH-]
[ Vol+ ]
[CH+/CH-]
[ Vol+/Vol- ]
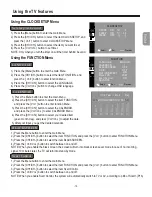
Using the CHANNEL Menu
PROGRAM
PROGRAM
AUTO SEARCH
SEARCH
FINE TUNE
CHANNEL
Select
Set
Previous
OFF
SKIP
FINE TUNE
CHANNEL EDIT
1) Press the [Menu] button to enter the main Menu.
2) Press the
button to select the item CHANNEL, and press the
to enter CHANNEL Menu.
3) Press the
button to select SEARCH.
4) Press the
button to start manual searching.
[CH+/CH-]
[ Vol+ ]
[CH+/CH-]
[ Vol+/Vol- ]
SEARCH
1) Press the [Menu] button to enter the main Menu.
2) Press the
button to select the item CHANNEL, and press the
to enter CHANNEL Menu.
3) Press the
button to select FINE TUNE.
4) Press the
button to fine-tune.
[CH+/CH-]
[ Vol+ ]
[CH+/CH-]
[ Vol+/Vol- ]
FINE TUNE
TV SYSTEM
B/G
TV SYSTEM
1) Press the [Menu] button to enter the main Menu.
2) Press the
button to select the item
, and press the
to enter
Menu.
3) Press the
button to select TV system.
4) Press the
button to switch from among
B/G ,
.
[CH+/CH-]
CHANNEL
[ Vol+ ]
CHANNEL
[CH+/CH-]
[ Vol+/Vol- ]
D/K,
I, L/L
,
-10-
Содержание PDP4211
Страница 1: ...Part No IES050148...
Страница 18: ...Scart connector Appendix SeeSignalSourceSelectiononpage8for selecting SCARTinput 16...
Страница 19: ...Appendix 17...
Страница 23: ...21 Appendix...


